Table of Contents >> Show >> Hide
- Quick Jump
- Gladiolus 101: Bulb Energy, Corm Reality
- When to Plant Gladiolus
- Where to Plant Gladiolus for Tall, Straight Spikes
- How to Plant Gladiolus (Step-by-Step)
- Gladiolus Care: Watering, Feeding, Staking, and Deadheading
- Common Gladiolus Problems (and How to Fix Them)
- How to Harvest Gladiolus for Cut Flowers (So They Last)
- Digging and Storing Gladiolus Corms for Winter
- How to Multiply Gladiolus (Cormels, Division, and Patience)
- Real-World Experiences: What Gardeners Learn After Growing Gladiolus
- 1) Deep planting is the closest thing to a magic trick
- 2) Succession planting turns “a week of glory” into “a season of bouquets”
- 3) Labels are not optional if you like knowing things
- 4) Wind and watering routines matter more than you think
- 5) Storing corms is easier when you treat it like “winter laundry,” not “winter science”
- 6) Cut-flower harvesting gets better with tiny adjustments
- Conclusion
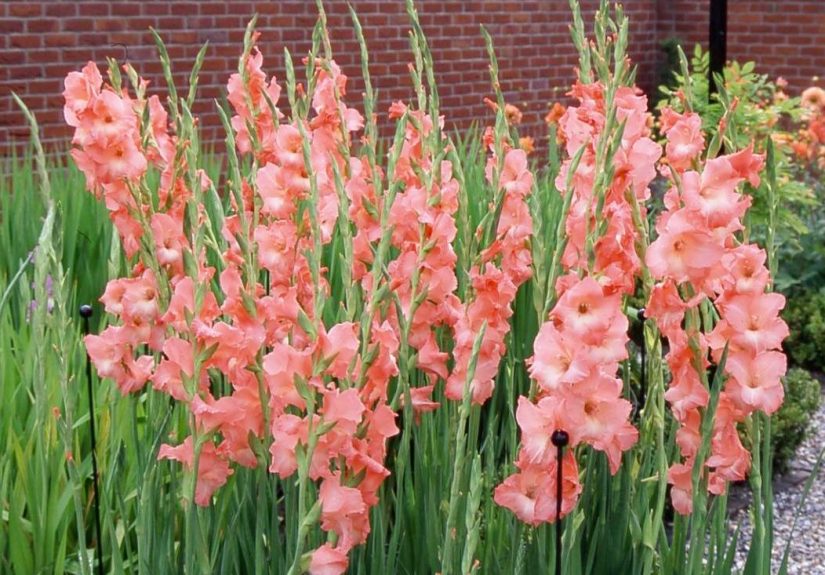
Gladiolus (aka “glads,” aka “the flowers that look like they’re auditioning for a Broadway finale”) are one of the
fastest ways to turn a basic garden bed into a bouquet factory. Their tall spikes, candy-shop colors, and cut-flower
stamina make them a favorite for home gardeners and flower lovers who want big impact without needing a botany PhD.
This guide will walk you through how to plant and grow gladiolus the right waywhen to plant, how deep,
how far apart, how to keep them standing tall, and how to store the corms for next year (because yes, they’re corms,
not bulbs… but they’re “bulb-ish,” so you’re forgiven).
Gladiolus 101: Bulb Energy, Corm Reality
Gladiolus grow from corms, which are swollen underground stems that store energy. Functionally, they behave
a lot like bulbs: you plant them, they sprout, they bloom, and they store energy for next season. The key difference is
that corms tend to form a “new” corm on top of the old one each year, plus small baby corms (often called cormels) around
the base.
Translation: if you treat gladiolus like a summer-flowering bulb, you’ll do greatand if you call them bulbs at a garden
center, nobody is going to arrest you.
When to Plant Gladiolus
Gladiolus are typically planted in spring once the risk of hard frost is fading. In many regions, you can plant
corms a few weeks before the average last frost date, especially if your soil isn’t icy and waterlogged. If you want
blooms all summer instead of one dramatic week of floral fireworks, use succession plantingplant a small batch
every 1–2 weeks.
Easy timing rules (no calendar gymnastics)
- Cooler climates: Start planting after your soil is workable and trending warmer; keep planting in batches into early summer.
- Warmer climates: You can often start earlier, and some types (like certain species glads) may be fall-planted depending on variety and region.
- Stop date idea: Give corms enough time to grow and mature before your first fall frost. Many glads bloom roughly 70–90 days after planting, depending on variety and weather.
Example: a simple succession plan
If your last frost is around mid-April, plant a first round in early April (if conditions allow), then again mid-April,
late April, mid-May, and early June. That staggered schedule often creates waves of blooms instead of a single
“blink-and-you-miss-it” moment.
Where to Plant Gladiolus for Tall, Straight Spikes
Sunlight
Gladiolus want full sun for the best flower spikesthink 6+ hours of direct light. They’ll tolerate some
shade, but fewer sun hours usually means fewer blooms and floppier stems (glads can be dramatic enough without adding
fainting spells).
Soil
The big requirement is well-draining soil. Gladiolus hate sitting in soggy groundwet soil can invite rot and
weak roots. If your soil is heavy clay, improve drainage with compost, and consider planting in raised beds or mounded rows.
Wind
Gladiolus are basically nature’s floral skyscrapers, so wind matters. A spot with some protection (near a fence, shrub line,
or building) helps reduce leaning and snappingespecially once the flower spikes get heavy.
How to Plant Gladiolus (Step-by-Step)
Step 1: Choose healthy corms
Pick firm corms with intact “skins” and no soft spots. Bigger corms generally produce bigger flower spikes. If you’re
buying mixed sizes, save the smallest ones for a nursery areathey can still grow, but often take time to reach
peak performance.
Step 2: Prep the bed (fast but effective)
Loosen soil 8–12 inches deep if you can, remove weeds, and mix in compost. Gladiolus aren’t divas about fertilizer,
but they do appreciate decent soil and a clean start.
Step 3: Plant at the right depth
Planting depth depends on corm size, but a common sweet spot is about 4–6 inches deep for larger corms.
Deeper planting can help reduce staking needs because the stem is anchored more firmly.
Step 4: Space for airflow and stronger stems
For a home garden, spacing often lands around 4–6 inches apart. If you’re growing in rows for cut flowers,
you can plant closer in-row and give yourself wider paths between rows for harvesting and maintenance.
Step 5: Pointy end up, water in
Set each corm with the pointed side facing up. Cover with soil, press gently, and water thoroughly after planting.
If you’re planting multiple batches, label them (future-you will thank present-you).
Two planting styles that work
- Cluster planting: Great for showy garden bedsplant in groups for a fuller look.
- Trench planting: Dig one long trench and line corms up. This is efficient, tidy, and popular for cut-flower rows.
Gladiolus Care: Watering, Feeding, Staking, and Deadheading
Watering
Gladiolus like consistent moisture, especially while establishing roots and during spike formation. Aim for evenly moist
soilthink “wrung-out sponge,” not “swamp.” Mulch can help hold moisture and reduce weeds, but keep it from piling directly
against stems.
Fertilizing
If your soil is reasonably fertile, you can keep feeding simple. A balanced fertilizer or bulb-friendly fertilizer can
be applied when shoots are a few inches tall and again as spikes begin to form. Avoid overdoing nitrogentoo much can mean
lush leaves and fewer flowers (great hair, no personality).
Staking (because gravity is undefeated)
Many modern gladiolus varieties grow tall enough that staking is helpful, especially in windy spots or rich soil that produces
extra height. Options:
- Individual stakes: Best for a few plantstie loosely with soft garden twine.
- Corralling method: Place stakes around a group and run string in a circle, supporting them as they grow.
- Deep planting: Planting 4–6 inches deep can reduce flopping by anchoring stems better.
Weeding and airflow
Keep weeds down early so young glads don’t compete for water and nutrients. Good airflow helps reduce disease risk, so avoid
overcrowding if your summers are humid.
After bloom: deadhead vs. leave leaves
If you’re not harvesting as cut flowers, you can remove spent blooms for a cleaner look. But leave the foliage in place
until it yellows naturallythose leaves recharge the corm for next season.
Common Gladiolus Problems (and How to Fix Them)
1) Thrips: the tiny villains behind streaky blooms
Thrips can cause distorted flowers, silvery streaks on leaves, and generally ruin your glad’s big debut. Managing thrips
often involves monitoring, removing heavily infested material, and focusing on clean storage practices. Cool, dry storage
temperatures can also reduce thrips survival on stored corms.
2) Rot and fungal diseases
Poor drainage and injured corms are a recipe for rot. The best defense is cultural: well-draining soil, careful digging,
discarding damaged corms, and rotating planting locations. If a plant looks sickly or rotted at the base, remove it to
reduce spread.
3) Flopping stems
Usually caused by shallow planting, rich soil growth spurts, wind exposure, or overcrowding. Fix it with deeper planting,
group support, and/or staking. Also, make sure they’re getting enough sunshade-grown glads can get leggy and tip over.
How to Harvest Gladiolus for Cut Flowers (So They Last)
Gladiolus are cut-flower champions, especially when harvested at the right stage. For local use, cut when the lower buds
are showing color and a floret or two is beginning to open. For longer transport or longer vase life, cut a little earlier
when the lowest buds show color.
Cutting tips that actually help
- Cut in the cool part of the day (morning/evening).
- Use a sharp, clean knife or pruners.
- Leave a few leaves on the plant so the corm can keep storing energy.
- Re-cut stems at an angle and place in clean water right away.
- Change vase water regularly for longer life.
Digging and Storing Gladiolus Corms for Winter
In many parts of the U.S., gladiolus are treated as tender perennials: they won’t survive freezing soil, so gardeners dig
the corms in fall and store them for replanting in spring. In warmer zones, some gardeners leave them in the ground with mulch,
but it depends on winter conditions, soil drainage, and the type of gladiolus.
When to dig
A common approach is to dig corms after foliage is damaged by frost or after the plant has had time to recharge post-bloom.
You want mature corms, but you don’t want the ground to freeze around them.
How to dig and cure (the “don’t bruise your future flowers” method)
- Loosen soil around the plant with a fork or spade; lift carefully.
- Shake off excess soil; cut stems down to about 1–2 inches above the corm.
- Dry (cure) corms in a warm, dry, well-ventilated space for about 2–3 weeks.
- Once dry, remove the old “mother” corm attached underneath and discard it if shriveled.
- Separate cormels (tiny baby corms) if you want to propagate more plants.
Storage conditions
Store cured corms in mesh bags, paper bags, or ventilated containers in a cool, dry place. Many recommendations land around
the 35–45°F range with good airflowcool enough to discourage pests and disease, but not freezing. Check them
monthly and toss any that soften or mold.
How to Multiply Gladiolus (Cormels, Division, and Patience)
Want more gladiolus without buying more? Your plants have plans. Gladiolus naturally produce cormels around the base.
These little guys can be grown, but they usually take a couple of seasons to reach flowering size.
Cormels (baby corms)
Save cormels when you clean corms in fall. Store them dry over winter, then plant them in spring a bit shallower than full-sized
corms. Give them their own “nursery row” so you don’t confuse them with your bloom-ready plants.
Dividing large corms
Some mature corms develop multiple growing points. In certain cases, they can be cut so each piece has a budthough this can increase
disease risk if tools aren’t clean and the cut surfaces aren’t properly cured/dried. If you’re new to glads, cormels are the simpler route.
Real-World Experiences: What Gardeners Learn After Growing Gladiolus
The internet will tell you gladiolus are “easy,” and that’s mostly truebut the garden is where theory meets windstorms, squirrels,
and the fact that you forgot where you planted that “last batch” (surprise! it’s under the sprinkler head). Here are the kinds of
lived-in lessons gardeners commonly pick up after a season or two of growing glads.
1) Deep planting is the closest thing to a magic trick
Many gardeners start with the classic mistake: planting too shallow because it feels safer. Then summer arrives, the spikes shoot up,
and the whole planting leans like it’s trying to read your neighbor’s text messages. Planting the corms deeperwithin the recommended range
for their sizeoften makes a noticeable difference in stability. It’s not that staking disappears forever, but you’ll spend less time tying
plants to sticks and more time enjoying actual flowers.
2) Succession planting turns “a week of glory” into “a season of bouquets”
The first year, it’s tempting to plant all your gladiolus corms on the same Saturday, because you’re motivated, the weather is nice, and
you bought a cute garden hat. The result is usually one big bloom wave, followed by silence. Gardeners who try succession planting almost
never go back. Small batches every week or two can stagger bloom time so you have spikes ready for vases, parties, or casual “oh these?
I just had them growing” moments throughout summer.
3) Labels are not optional if you like knowing things
Gladiolus varieties can look wildly different on the packagethen surprisingly similar when they’re just green leaves. Many gardeners
learn to label rows or groups at planting time, especially if they’re testing colors for a wedding palette or building a cut flower garden.
Waterproof markers, a simple map in your notes app, or even a quick photo of the bed with labels visible can save you from mystery-glad chaos.
4) Wind and watering routines matter more than you think
In real gardens, glads don’t fail because someone forgot a secret fertilizer. They fail because the soil stayed soggy after heavy rain, or
because a hot week arrived and watering got inconsistent during spike formation. Gardeners often notice that steady moistureespecially in
sandy soilmakes spikes fuller and blooms more reliable. Meanwhile, smart wind placement (near a fence or among supportive neighboring plants)
can dramatically reduce broken stems. If your yard is breezy, planning for support early feels like overkilluntil the first summer storm.
5) Storing corms is easier when you treat it like “winter laundry,” not “winter science”
The idea of digging and storing corms can sound intimidating, but experienced growers usually reduce it to a routine:
dig carefully, dry thoroughly, store cool and ventilated, check occasionally. The big “aha” moment is that the drying step is not negotiable.
Corms stored too damp are much more likely to mold or rot. Gardeners who succeed long-term often use mesh bags, paper bags, or old stockings
so corms can breathe, and they keep them in a consistently cool spot. And yesmost people learn the hard way that “cool” is different from
“freezing,” because frozen corms rarely bounce back.
6) Cut-flower harvesting gets better with tiny adjustments
Gardeners who grow gladiolus for vases often experiment with harvest stage. Cut too late and the spike may be gorgeous but shorter-lived;
cut a bit earlier (when lower buds show color) and the vase life improves, with florets continuing to open indoors. Many people also learn
to change vase water more often than they think they should. Gladiolus are showy, but they also drink water like they’re training for a marathon.
Clean water and a fresh stem cut can add days of beauty.
Bottom line: growing gladiolus is straightforward, but growing great gladiolus is mostly about small habitsplant depth, timing batches,
steady moisture, and storage discipline. Once those become automatic, glads start feeling less like a “project” and more like your garden’s
most reliable summer headline.
Conclusion
If you want towering summer color with cut-flower perks, gladiolus are hard to beat. Start with healthy corms, plant them in full sun and
well-draining soil, and aim for that sweet spot of proper depth and spacing. Use succession planting for longer bloom seasons, keep water steady
while spikes develop, and support stems early if wind is a factor. Then, if you live where winters freeze the ground, dig and store corms after
the season so you can do it all againbigger and betternext year.