Table of Contents >> Show >> Hide
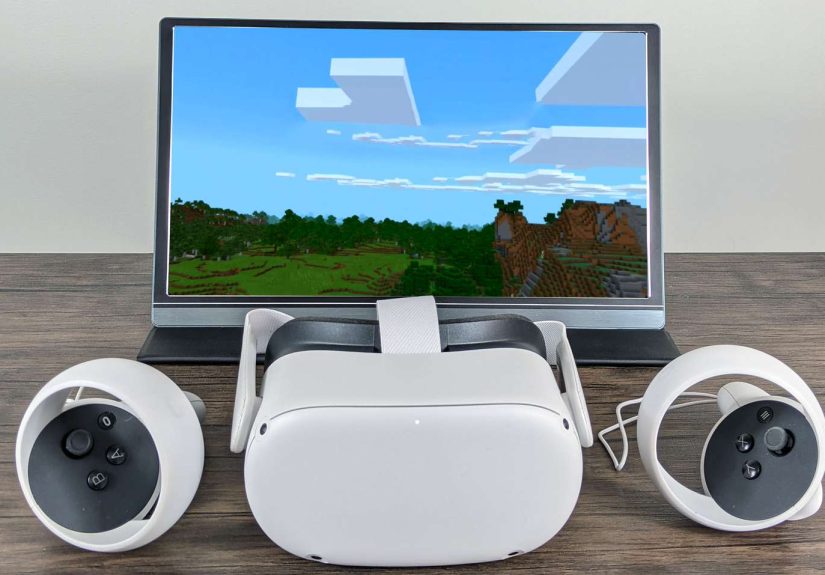
If you’re a fan of both Minecraft and virtual reality, you’re in luck. Playing Minecraft on the Meta Quest and Quest 2 offers a unique experience that combines the creative freedom of Minecraft with the immersive world of VR. In this guide, we’ll walk you through how to get Minecraft up and running on both of Meta’s VR headsets and explore some tips to optimize your gaming experience.
Getting Minecraft on Meta Quest and Quest 2
Before we dive into the setup, let’s clarify the two main ways you can play Minecraft on your Meta Quest or Quest 2: through the native app (Minecraft for Gear VR) and through side-loading the Java Edition or Windows 10 version of Minecraft using tools like Virtual Desktop or Air Link. Let’s break down these methods so you can decide which is best for you.
1. Minecraft for Gear VR
Originally designed for Samsung’s Gear VR, Minecraft VR is available in the Meta Quest Store and can be played on both the Meta Quest and Quest 2 without any additional steps. While it may not have all the features of the desktop versions, it is still an immersive experience that lets you enjoy Minecraft in 3D with VR controls.
- Step 1: Open the Meta Quest Store on your headset.
- Step 2: Search for “Minecraft Gear VR” in the store and purchase the game.
- Step 3: Download and install the game on your Quest or Quest 2.
- Step 4: Put on your headset, launch Minecraft, and start playing in virtual reality.
It’s a simple process, but there are limitations in terms of graphics and world size, compared to the Java or Windows 10 editions of Minecraft. Still, it’s perfect for casual VR gamers who want to experience Minecraft without needing to do much setup.
2. Side-loading Minecraft Java or Windows 10 Edition
If you’re looking for a more feature-rich Minecraft experience in VR, you’ll need to side-load the Java or Windows 10 edition using tools like Virtual Desktop or Air Link. This method gives you access to the full Minecraft experience, including mods, custom skins, and much more. However, it does require a PC capable of running the game and some additional setup. Here’s how to do it:
Virtual Desktop Method
Virtual Desktop allows you to stream your PC’s screen to your Meta Quest, making it possible to play the full PC version of Minecraft in VR. Here’s how you can set it up:
- Step 1: Download and install Virtual Desktop on your PC.
- Step 2: Install the Virtual Desktop app from the Meta Quest Store on your headset.
- Step 3: Connect your Meta Quest to your PC using the same Wi-Fi network.
- Step 4: Launch Virtual Desktop on your Quest and connect to your PC.
- Step 5: Open Minecraft on your PC, and the game will now appear on your VR headset screen.
While this method is highly flexible and offers better graphics, it does require a stable Wi-Fi connection and a powerful PC to ensure a smooth experience.
Air Link Method
Another great option for playing Minecraft in VR is Air Link, which allows you to wirelessly connect your Meta Quest to your PC. Air Link provides lower latency than Virtual Desktop and works similarly to the Oculus Link cable, but without the physical connection. Here’s how you can use Air Link:
- Step 1: Make sure your PC is running the latest version of the Oculus app.
- Step 2: Enable Air Link in the settings of your Meta Quest under “Settings” > “Experimental Features.”
- Step 3: Pair your Quest with your PC via Air Link.
- Step 4: Launch Minecraft on your PC and start playing in VR.
Air Link is perfect for a wireless, high-quality VR experience, as long as your Wi-Fi is up to the task.
Optimizing Your Minecraft VR Experience
Now that you know how to get Minecraft running on your Meta Quest and Quest 2, let’s talk about optimizing the experience for a smooth and immersive time. Here are some tips to help you get the most out of your VR gameplay:
1. Use Comfort Settings
Minecraft in VR can sometimes be intense, especially for new players. To make the experience more comfortable, adjust the comfort settings in Minecraft. Reduce motion sickness by enabling “Teleport” movement, which allows you to point and jump to locations instead of walking, and experiment with the field of view settings to avoid feeling disoriented.
2. Optimize Your PC Setup
If you’re using Virtual Desktop or Air Link, make sure your PC is optimized for VR gaming. Check that you have a good Wi-Fi setup (preferably 5GHz Wi-Fi for low latency) and make sure your PC meets the recommended requirements for running Minecraft smoothly in VR. This includes having a decent GPU (like an NVIDIA GTX 1060 or better) and enough RAM (16GB or more).
3. Set Up Mods and Customizations
One of the best things about playing the Java or Windows 10 version of Minecraft is the ability to use mods and texture packs. If you’re using Virtual Desktop or Air Link to play the full version, you can add mods like OptiFine, which improves graphics and performance in VR. You can also download custom skins and worlds for a more personalized experience.
4. Adjust VR Settings for Comfort
VR can be physically demanding, so make sure to take regular breaks. Adjust your headset to fit comfortably on your head, and take advantage of the adjustable straps to avoid unnecessary pressure on your face. Additionally, lower the brightness on your Quest or Quest 2 if you find it too intense after long sessions.
Experiencing Minecraft in VR: The Virtual World Awaits
For many Minecraft fans, the idea of playing the beloved block-based game in VR is a dream come true. The experience of exploring your creations in full 3D, standing inside massive castles or exploring deep caves, is nothing short of magical. But how does it really feel to step into Minecraft on the Meta Quest or Quest 2? Here’s what you can expect:
The Joy of Exploration
The first thing you’ll notice when you put on your headset is the sense of scale. Minecraft, in its standard format, doesn’t give you a true sense of the size of your creations. But in VR, you’re literally inside the world. You can look up and around to appreciate the height of your creations or marvel at the endless expanse of a Minecraft landscape stretching out before you. It’s an entirely new level of immersion.
Building in VR
Building in Minecraft VR is surprisingly intuitive. While your arms might get a little tired after extended play, the act of placing blocks, crafting, and exploring all feel more tactile and real when you’re physically moving your hands. The VR controllers make the experience feel more like you’re actually manipulating the world around you. For avid builders, this could be a game-changer.
Combat and Survival Mode
If you’re into survival mode, Minecraft VR brings combat to life. You’ll need to physically swing your arm to attack enemies, which adds a whole new layer of immersion. Dodging creepers or battling mobs feels like you’re really there, which can be a blast (and sometimes terrifying!). But it’s also physically demanding, so make sure you’re prepared for some action-packed sessions.
Multiplayer Minecraft in VR
One of the most exciting aspects of Minecraft VR is the ability to experience multiplayer with friends. Whether you’re exploring together or building epic structures, the ability to play alongside others in the same virtual world feels truly unique. Team up with friends using VR chat features, and it’s like you’re all inside the game, working together in real time.
Conclusion
Whether you’re enjoying the simpler version through Gear VR or diving into the full Minecraft experience with Virtual Desktop or Air Link, playing Minecraft on Meta Quest and Quest 2 is a thrilling adventure. The world of Minecraft has never felt more immersive, and with a bit of setup and optimization, you can dive into an endless world of blocks in full virtual reality.