Table of Contents >> Show >> Hide
- What you can (and can’t) do from a computer
- Method 1: Post directly on Instagram.com (the simplest option)
- Method 2: Use the Instagram app on Windows (when you want an “app” feel)
- Method 3: Schedule posts with Meta Business Suite (best for brands and planners)
- What about Stories and Reels from a computer?
- How to make your desktop posts look better than your mobile posts (yes, really)
- Troubleshooting: Common problems (and fast fixes)
- Security tips: Post smart, not sorry
- Conclusion: Your best option depends on how you post
- Experiences: What it’s really like posting to Instagram from your computer
Instagram used to be that friend who only answered texts and never picked up the phone. “Desktop upload?” Instagram would say.
“New phone, who dis?” But these days, posting from your computer is not only possibleit’s actually pretty smooth once you know
where to click and what to expect.
In this guide, you’ll learn the best official ways to post pictures to Instagram from a computer (Windows or Mac),
how to schedule posts if you manage a brand, what’s different from posting on your phone, and how to avoid the classic
“Why is my photo cropped into a tragic square?” moment.
What you can (and can’t) do from a computer
From a computer, you can typically upload photos to your Feed, write captions, tag people, add a location, and publish.
Many accounts can also upload videos through the same “Create” flow, and carousel posts (multiple images) are supported.
Some features still work better on mobileespecially Stories editing tools, music stickers, and certain creative effects.
Quick checklist before you upload
- Use a clean file format: JPG (photos) and MP4 (video) are your safest bets.
- Know your aspect ratios: 1:1 (square), 4:5 (portrait), 1.91:1 (landscape) are common for Feed.
- Keep text away from edges: Cropping happens. Protect your important stuff.
- Plan your caption: Write it in a notes app first if you’re prone to accidental tab-closing.
Method 1: Post directly on Instagram.com (the simplest option)
If you want the “no extra tools, no weird hoops, no questionable browser extensions” method, this is it:
log in to Instagram on the web and use the built-in Create button.
Step-by-step: Upload a photo from your computer to Instagram
- Open Instagram in your browser and sign in.
- Click “Create” (usually a plus icon) in the left navigation.
- Select “Post” (if prompted), then choose your photo(s) from your computer.
- Adjust the crop (square/portrait/landscape). If your photo looks “too zoomed,” switch aspect ratio.
- Apply light edits (filters/brightness/contrast if available). Keep it subtle unless your brand is “neon chaos.”
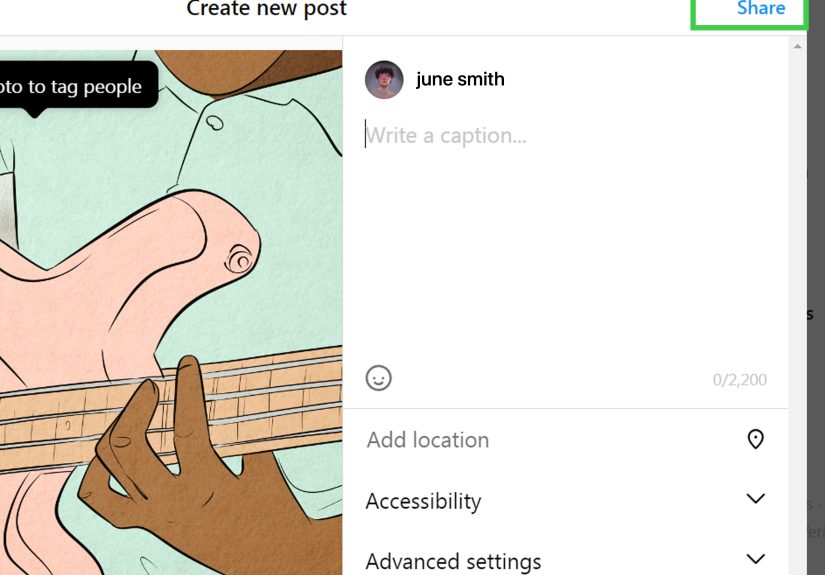
- Add details: caption, hashtags, tags, location, and any other settings you see.
- Click “Share” to publish.
Posting multiple pictures (carousel posts) from your computer
Want that “photo dump but curated” vibe? You can upload multiple photos at once and post them as a carousel.
Instagram Feed carousels allow up to 10 photos and/or videos in a single post.
Pro tip: When you upload multiple images, Instagram usually applies one crop style across the set.
If image #3 is a different shape, you may need to pad it with a border in an editor (Canva/Photoshop) so everything looks consistent.
Example: The easiest workflow for high-quality photos
Let’s say you’re a photographer or you edit product photos on your laptop. Here’s a clean workflow:
- Edit your images in Lightroom/Photoshop (or any editor you like).
- Export at a web-friendly size (for Feed, a portrait 4:5 format is often a strong choice).
- Name files clearly (e.g., “spring-launch-01.jpg”) so you don’t upload the wrong version.
- Upload via Instagram.com → Create → Post, then add a caption that matches your brand voice.
Method 2: Use the Instagram app on Windows (when you want an “app” feel)
If you’re on Windows, the Instagram app from the Microsoft Store may allow posting photos and videos to your feed from the app.
This can feel faster than the browser if you’re already living in app-world all day.
When the Windows app is worth it
- You post frequently from your PC and want a dedicated window (no “which tab is Instagram?” scavenger hunt).
- You manage DMs and comments on desktop and want everything in one place.
- You prefer the app interface over the browser layout.
Heads-up: Desktop apps can change features over time. If an option disappears, switch back to Instagram.com
(the web version is usually the most consistently supported desktop route).
Method 3: Schedule posts with Meta Business Suite (best for brands and planners)
If your life includes phrases like “content calendar,” “campaign,” or “we need this posted at 8:07 AM for reasons,”
Meta Business Suite is your friend. It’s designed for managing Instagram and Facebook content from a desktop dashboard,
including scheduling posts ahead of time.
Who should use Meta Business Suite?
- Businesses: You want consistent posting without living on your phone.
- Creators: You batch-create content and schedule it to keep momentum.
- Teams: You need approvals, drafts, and less “who posted this?” confusion.
Step-by-step: Schedule an Instagram photo post from your computer
- Open Meta Business Suite on desktop and log in.
- Go to Planner or Content (wording varies, but it’s usually obvious).
- Click Create and choose Instagram as the destination.
- Upload your image(s), write your caption, add tags and location if needed.
- Choose Schedule and pick your date/time.
- Save/confirm the scheduled post and double-check it appears on your calendar.
Important: Scheduling generally works best with Professional accounts (Business/Creator). If you can’t see Instagram as an option in Business Suite,
check your account type and connection settings inside Meta’s tools.
What about Stories and Reels from a computer?
Here’s the truth: computers are great for uploading polished content, but mobile is still Instagram’s “favorite child”
for certain creative tools. That said, you have optionsjust set your expectations correctly.
Reels: Often possible, but editing tools may be limited
Many users can upload videos from the desktop Create flow the same way they upload photos. The trade-off is that desktop
creation may offer fewer editing features than the mobile app (think: fewer stickers, music, and on-screen text tools).
The best move is to edit your Reel in a video editor first (CapCut, Premiere, or whatever you like), then upload the finished file.
Stories: Sometimes limited on desktop
Some accounts can post Stories through certain desktop experiences, but it’s not always available as a simple “click and upload” on the web.
You’ll often get the most reliable Story features on mobile.
Workaround note (use with care): Some people switch their browser into a mobile-style view using developer tools to access Story upload options.
If you try it, keep it simple: upload only your media, and don’t rely on advanced sticker/music tools.
If anything feels glitchy, don’t fight your computer like it owes you moneyuse the official mobile app instead.
How to make your desktop posts look better than your mobile posts (yes, really)
1) Use the big screen to catch mistakes
Desktop posting is amazing for proofreading. On a phone, “New collection dropping now!!” and “New colection dropping now!!”
look basically the same until your followers start politely bullying you in the comments.
2) Build a repeatable caption formula
- Hook: One strong first line that earns the “more…” click.
- Value: A tip, a story, a mini-guide, or a reason to care.
- Call to action: Ask a question or invite a comment (“Which one is your favorite?”).
- Hashtags: Use a handful of relevant tagsskip the 30-tag confetti cannon unless it truly fits.
3) Add alt text for accessibility (and clarity)
Alt text helps describe your image for people using screen readers, and it can also keep your content clearer for broader audiences.
If you’re posting a product photo, describing what’s in the image is both helpful and practical.
Example alt text: “A white ceramic mug on a wooden desk next to a laptop and a small green plant.”
Troubleshooting: Common problems (and fast fixes)
“I don’t see the Create button.”
- Make sure you’re logged in (sounds obvious, but so is forgetting where you put your keys).
- Try refreshing, switching browsers, or updating your browser.
- Disable extensions that modify web pages (ad blockers sometimes break buttons).
- If you’re using a work computer with restrictions, try a different network/device.
“My photo looks cropped weird.”
- Use the crop/aspect ratio selector during upload.
- Pre-crop in an editor so Instagram doesn’t decide for you.
- For mixed-size carousels, add borders to match proportions.
“Upload failed.”
- Check file size and format (JPG for photos is usually safest).
- Rename the file (special characters in filenames can occasionally cause issues).
- Try a different browser or clear cache.
- Check your internet connection stability.
“The quality looks worse after posting.”
- Avoid uploading tiny images; use a reasonably high-resolution export.
- Don’t over-sharpen before uploadingcompression will exaggerate it.
- Save in high-quality JPG (but not maximum-bloating-your-file-size level).
Security tips: Post smart, not sorry
- Stick to official tools first: Instagram.com, the official app, and Meta Business Suite are safest.
- Be careful with third-party “uploaders”: If a tool asks for your password directly, pause and research before handing it over.
- Use strong login protection: A unique password + two-factor authentication is the anti-drama combo.
- Log out on shared computers: Future-you will appreciate it.
Conclusion: Your best option depends on how you post
If you just want to upload a picture from your computer quickly, Instagram.com is usually the cleanest method.
If you post often from Windows, the Instagram app can be convenient. And if you’re managing content like a pro (or trying to),
Meta Business Suite is the move for scheduling and planning.
Pick one workflow, do it a few times, and you’ll stop thinking of desktop posting as a “hack” and start thinking of it as
“how I keep my life together.”
Experiences: What it’s really like posting to Instagram from your computer
The first time you post to Instagram from a computer, it feels a little like walking into a grocery store you’ve visited a hundred times
except someone rearranged the aisles and now cereal is where soap used to be. You know what you want to do (upload a photo),
but your brain is still searching for the old “phone-only” routine.
Then you notice the upside: the big screen. On mobile, you can convince yourself that your photo is straight, your caption is flawless,
and your hashtags are definitely not misspelled. On desktop, the truth arrives immediatelypolitely, but firmly. You catch the tiny tilt
in the horizon line. You notice the distracting object in the background. You realize your caption has two exclamation points too many
and is starting to sound like a carnival barker. The computer doesn’t judge you, but it absolutely shows you.
Desktop posting is also a lifesaver when your content starts on your computer. If you edit photos, design graphics, or manage product images,
uploading from the same device means fewer steps and fewer opportunities for chaos. No more emailing yourself images, no more sending giant files
through messaging apps, and no more discovering that the version you posted was the “FINAL_final_v7_USE_THIS_ONE_FOR_REAL.png” from three weeks ago.
You’re already holding the source filesso you can post the right one.
One surprisingly nice part is caption writing. A keyboard makes it easier to craft a caption that actually sounds like you.
You can write a stronger first line, break your text into readable chunks, and polish the message without feeling like you’re
typing a novel with your thumbs. If you’re posting educational content, announcements, or anything that needs clarity, desktop is a quiet advantage.
It turns “posting” into “publishing,” which is a fancy way of saying you’re less likely to post something you regret five seconds later.
The learning curve usually shows up in two places: cropping and features. Cropping is the classic “Why does my picture look wrong?” problem.
Once you start pre-cropping or choosing your aspect ratio intentionally, it stops being a problem and becomes a style choice. Features are the other piece:
some of Instagram’s most fun tools live on mobile. If your post depends on music stickers, interactive Story elements, or quick in-app effects,
you may still prefer mobile for that specific content type. But for Feed postsespecially clean photos, graphics, carousels, and planned contentdesktop feels steady.
And if you’ve ever managed a schedule, desktop posting becomes a productivity win. You can batch your work: upload three posts, draft captions,
line up a carousel, then either publish or schedule through Meta Business Suite. It’s the difference between “I post whenever I remember”
and “I post because I planned it,” which is basically adulting for social media. The funniest part is how quickly it becomes normal.
After a week, you stop thinking “Wow, I can post from my computer!” and start thinking “Of course I canwhy would I make this harder?”
The best experience is when you treat desktop posting like a system: create a folder for ready-to-post images, keep a note with caption ideas,
save a set of brand hashtags, and post with a calm, repeatable workflow. When you do that, Instagram stops being a stressful app you react to
and becomes a platform you use on purpose. And that’s the real upgradeyour computer isn’t just a bigger screen. It’s a better process.