Table of Contents >> Show >> Hide
- Before You Start: Set Yourself Up for a Smooth Build
- Step 1: Unbox, Inventory Parts, and Sort Hardware
- Step 2: Identify “Head,” “Foot,” Left/Right, and the Correct Holes
- Step 3: Build the Outer Rectangle (But Don’t Fully Tighten Yet)
- Step 4: Install the Center Support Bar and Legs
- Step 5: Add Cross Supports and Slats (Evenly, and in the Right Direction)
- Step 6: Square the Frame, Then Tighten Everything to “Done”
- Step 7: Attach the Headboard/Footboard (Optional) and Add Anti-Squeak Protection
- Step 8: Final Safety Check, Mattress Placement, and First “Bounce Test”
- Troubleshooting: Common Problems (and the Fast Fixes)
- Quick FAQ
- Conclusion
- Real-World Assembly Stories & Lessons (The Extra )
Putting together a metal bed frame is one of those life skills that feels oddly dramatic the first time you do itlike you’re
auditioning for a home-improvement show, except the only audience is a pile of bolts and one suspiciously tiny Allen key.
The good news: most metal bed frame assembly is straightforward once you know the order of operations.
The not-so-bad news: you’ll probably still end up with one “mystery screw,” and that’s why we do a final check.
This guide covers the most common styles: basic metal frames that need a box spring, and metal platform bed frames with slats
(often “no box spring needed”). The exact hardware varies by brand, but the build logic stays the same: build the rectangle, add support,
add slats, tighten everything, and stop the squeaks before they start.
Before You Start: Set Yourself Up for a Smooth Build
Tools you’ll want nearby
- Included tools (usually): Allen key/hex wrench, small wrench, maybe a basic screwdriver.
- Helpful upgrades: Phillips screwdriver, adjustable wrench, rubber mallet, flashlight/headlamp, tape measure, and a small level.
- For floors and noise: felt pads or rubber cups for the legs, and a silicone-based lubricant (optional, but clutch for squeaks).
Prep the room like a pro
- Clear space: You need room to lay rails flat and walk around them without doing gymnastics.
- Protect the floor: Build on a rug, blanket, or cardboard so you don’t scratch hardwood (or your patience).
- Read the manual once: Not because it’s thrilling, but because it reveals the one step you’ll regret skipping.
- Recruit help: One person can assemble many frames, but two people make aligning rails and flipping the frame safer and faster.
Step 1: Unbox, Inventory Parts, and Sort Hardware
Start by unboxing everything and laying it out where you can see it. Metal bed frame parts tend to look similar at first glance:
two long side rails, two shorter end rails, legs, a center support bar, cross braces, and slats (metal or wood).
Hardware usually includes bolts, washers, nuts, and sometimes spring/lock washers.
Do a quick inventory check against the parts list. Then sort bolts and washers into small piles. If you’ve ever dumped a hardware bag
onto the floor and immediately lost one bolt to the shadow realm, you already understand why this matters.
Pro tip: Put small hardware into a shallow bowl or cup. The floor is not a storage system.
Step 2: Identify “Head,” “Foot,” Left/Right, and the Correct Holes
Many metal frames are symmetrical, but plenty are notespecially platform bed frames with headboard brackets, labeled rails, or offset leg placement.
Look for stickers, stamped letters, or hole patterns that match the manual diagrams.
- Side rails usually have multiple holes for adjusting length (twin/full/queen/king).
- Headboard brackets often mount near the head end and may have extra holes or welded tabs.
- Center support will typically run head-to-foot (especially on queen/king) and may connect to a cross rail.
If your frame adjusts sizes, set it to the correct mattress size now. A queen mattress on a “close enough” frame is how you get
mattress driftalso known as “why is my bed slowly migrating into the corner?”
Step 3: Build the Outer Rectangle (But Don’t Fully Tighten Yet)
This is the backbone of your metal bed frame assembly. Connect the two side rails to the head and foot rails using the provided brackets and bolts.
If your frame uses hook-in corners, seat each hook fully into its slot before adding bolts (if any).
Here’s the trick that saves time later: tighten bolts only partway at first. Think “snug, not final.” Leaving a little wiggle room
helps holes align when you add the center support and slats. Many manufacturers even recommend a partial tighten first, then a full tighten once
everything is assembled and aligned.
- Insert bolts with washers as instructed (washers reduce loosening and protect the finish).
- Tighten each connection evenlydon’t crank one corner tight while others are still loose.
- If something won’t line up, don’t force it. Loosen adjacent bolts, align, then re-snug.
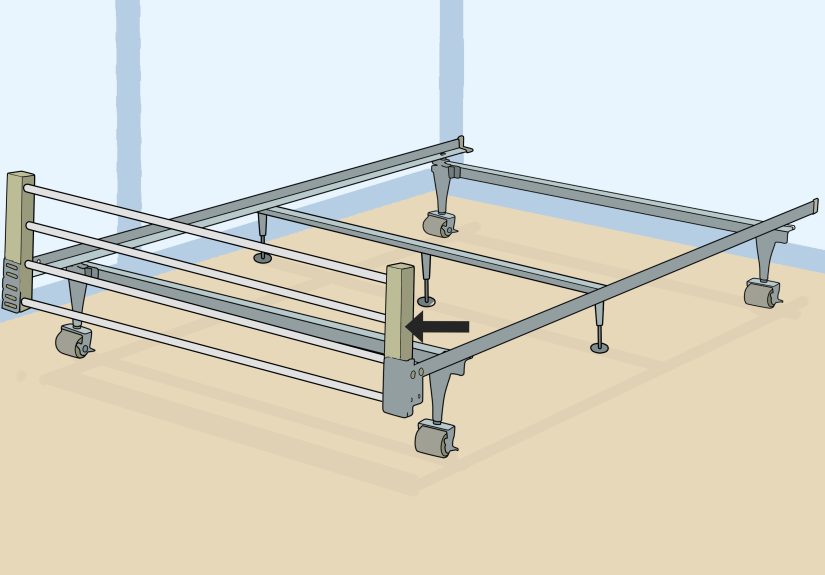
Step 4: Install the Center Support Bar and Legs
If your frame includes a center support bar (very common on full/queen/king), install it now. This part is not optional flairit’s
what prevents sagging in the middle and helps the frame stay stable and quiet over time.
You’ll usually do one of these setups:
- Head-to-foot center beam that attaches to the head and foot rails, often with 1–3 legs.
- Center beam + cross brace system that locks into side rails and supports slats.
- Multiple center legs (sometimes 6–9 legs total across the frame) for extra stability.
Adjust any glides/leveling feet so all legs touch the floor. A metal bed frame on uneven flooring can wobble, squeak, and generally
behave like it’s auditioning for a haunted-house role.
Step 5: Add Cross Supports and Slats (Evenly, and in the Right Direction)
Now you’re building the “mattress foundation” part. The method depends on your frame type:
If you have individual slats (metal or wood)
- Start at one end and work across.
- Place slats into grooves, slots, or on support ledges exactly as designed.
- Keep spacing consistent. Many frames have pre-set notches; follow them.
If you have roll-out slats
- Unroll slowly, aligning the first few attachment points before fully spreading them out.
- Attach as you go (often to a center rail/legs), which keeps everything straight.
If you have a basic metal frame that requires a box spring
You may not have slats at all. In that case, you’ll usually install cross bars or corner supports that hold a box spring in place.
Confirm that your box spring/foundation matches the frame size and sits flat without rocking.
Quiet-bed bonus: Some platform frames include anti-slip strips or foam pads. If yours came with them, apply them nowbefore the mattress
goes onso you don’t have to lift everything again later.
Step 6: Square the Frame, Then Tighten Everything to “Done”
Before final tightening, make sure the frame is square. The simplest method is measuring diagonals:
measure from the front-left corner to the back-right corner, then front-right to back-left. If the measurements match (or are very close),
you’re square. If they’re off, gently push/pull the frame until they match better.
Now do the final tightenbring bolts to full snugness across the entire bed frame, working in a balanced pattern (like tightening lug nuts).
This helps prevent twists and reduces future squeaks.
- Hand tools beat power tools for final tightening. Over-torquing can strip threads or damage the frame finish.
- Don’t “gorilla-tighten.” Tight is good; stripped hardware is not.
- If your frame uses locking nuts or lock washers, make sure they’re seated properly.
Step 7: Attach the Headboard/Footboard (Optional) and Add Anti-Squeak Protection
If you’re attaching a headboard, follow the bracket instructions carefully. Many metal frames include headboard brackets, but the headboard itself
may require separate bolts. Keep the headboard centered and upright while you fasten it.
Now is the perfect time to prevent squeaks before they start:
- Add felt pads under legs on hardwood/tile to reduce friction and noise.
- Check metal-on-metal contact points (joints, brackets). If you expect movement, a light silicone-based lubricant can reduce friction.
- Make sure all legs touch the floor. A single “floating” leg can create wobble and creaking.
Step 8: Final Safety Check, Mattress Placement, and First “Bounce Test”
Before you put the mattress on, do a quick safety inspection:
- Confirm the frame is on a stable, level surface.
- Make sure every bolt is tightened and every support piece is seated correctly.
- Ensure center legs and corner legs are fully contacting the floor.
- Remove packaging, spare hardware, and tools from inside the frame (yes, people forget).
Place your mattress on the frame. Then do a gentle test: press down along edges and the center, sit on different sides, and listen for shifting,
squeaks, or rocking. If you hear noise, don’t panicmost fixes are simple tightening or leveling.
Maintenance habit that pays off: Re-check bolt tightness after the first week of use, then periodically (for example, every few months),
especially if you move the bed or if the frame lives on thicker carpet.
Troubleshooting: Common Problems (and the Fast Fixes)
Problem: The holes don’t line up
- Loosen nearby bolts (don’t remove them), align the rails, then re-snug.
- Confirm you didn’t swap left/right rails or flip a rail upside down.
- Check you’re using the correct holes for your mattress size adjustment.
Problem: The bed frame squeaks
- Tighten all bolts and screws first (most squeaks are loose hardware).
- Add felt pads/rubber coasters under legs if the frame rubs the floor.
- Apply a small amount of lubricant at metal joints where parts rub together.
- If the mattress or slats shift, add anti-slip strips or reposition slats evenly.
Problem: The frame wobbles
- Verify every leg touches the floor; adjust glides/feet if included.
- Move the frame to a flatter spot or add a thin shim under a short leg.
- Double-check the center support is installed correctly and tightened.
Problem: The mattress slides around
- Make sure slats are properly seated and evenly spaced.
- Add a grippy mattress pad or non-slip strips if the frame doesn’t include them.
- Confirm your mattress size matches the frame size setting.
Quick FAQ
How long does it take to assemble a metal bed frame?
Many frames can be assembled in 20–60 minutes, depending on slat style and whether you’re attaching a headboard.
First-time builders should give themselves a little extra timemainly for sorting hardware and aligning parts.
Can one person assemble a metal bed frame?
Often yes, especially smaller sizes. But a second person makes it easier to align rails, attach headboards, and flip the frame safely without scraping walls
(or inventing new words).
Do I need a box spring?
If you bought a platform metal bed frame with slats, you often don’t need a box spring. If you bought a basic metal bed frame
(the kind that’s basically rails + legs), you typically do need a box spring or foundation. Always follow your mattress and frame manufacturer guidance.
Conclusion
Once you know the sequence, assembling a metal bed frame is less “engineering exam” and more “adult LEGO with better sleep at the end.”
The keys are simple: inventory parts, build the outer rectangle, add center support, install slats correctly, square the frame, and do your final tightening
only after everything is aligned. Finish with leveling and anti-squeak protection, and your bed should stay sturdy, quiet, and non-wobbly for the long haul.
Real-World Assembly Stories & Lessons (The Extra )
If you want the most honest advice on how to put together a metal bed frame, it’s this: the “instructions” are only half the battle.
The other half is everything that happens in a real bedroom with real floors, real time pressure, and real humans who are very sure they can do it faster
by skipping Step 1 (inventory) and going straight to Step 3 (regret).
One common experience is the “almost-right bolt” problem. Many frames include bolts that look identical until you notice one is a few millimeters
longer. If you use the slightly-too-long bolt in the wrong spot, you might still get it tightened… but the joint sits awkwardly, the rail won’t align later,
and you’ll spend 15 minutes fighting a hole that “should line up.” The fix is almost always to back up, compare bolts side-by-side, and match them to the parts list.
It feels slow in the moment, but it’s faster than forcing misaligned hardware and damaging threads.
Another very real moment: building on carpet. Carpet is soft, which seems niceuntil you tighten everything and the frame slowly settles unevenly,
leaving one leg barely touching. That tiny gap can create wobble and squeaks. People often think the frame is defective, but it’s usually the surface.
The practical move is to tighten the frame, then do a leveling pass: press down on corners, adjust any glides, and add a thin shim or furniture pad if needed.
On thick carpet, re-check tightness after a few days once the legs have “found their spot.”
Then there’s the “mystery squeak” that appears after you’ve slept on it for a week. That’s normal settling.
Metal frames can loosen slightly as weight shifts and joints compress. A quick re-tighten is often all it takes.
If tightening doesn’t solve it, the next most common culprit is metal-on-metal rubbing at a bracket or center support connection.
A small piece of felt, a rubber washer, or a tiny dab of silicone lubricant can turn a creaky bed frame into the stealthy, quiet sleep machine you paid for.
People also learn the hard way about leg placement and toe safety. Some frames have recessed legs (nice), while others put a center leg right where
your foot will absolutely find it at 2 a.m. (less nice). If your frame has a center leg near the edge, consider adding a bright felt pad or a small “bumper”
so it’s more noticeable. It sounds silly until you’ve done the midnight shuffle and discovered your bed has opinions.
Finally, there’s the moving-day lesson: if you think you’ll move in the next year, keep the manual and the spare hardware in a labeled bag.
When you disassemble a metal bed frame, it’s easy to lose washers and end up with a slightly different (and noisier) reassembly.
A simple zip bag taped to the underside of a slat or stored in your nightstand drawer can save you from a future scavenger hunt.
Put all of that together and the “experience” takeaway is clear: the best metal bed frame assembly isn’t rushedit’s organized.
Sort your hardware, tighten gradually, level the legs, and re-check after the first week. Do that, and you’ll have a sturdy bed that doesn’t squeak,
doesn’t wobble, and doesn’t try to slide its mattress into a new zip code.