Table of Contents >> Show >> Hide
- Before You Start: Know Your Stamper Type
- Tools and Supplies You’ll Need
- How to Refill a Stamper with Ink: 11 Steps
- Step 1: Check the Impression Before Refilling
- Step 2: Confirm the Stamp Type and Brand
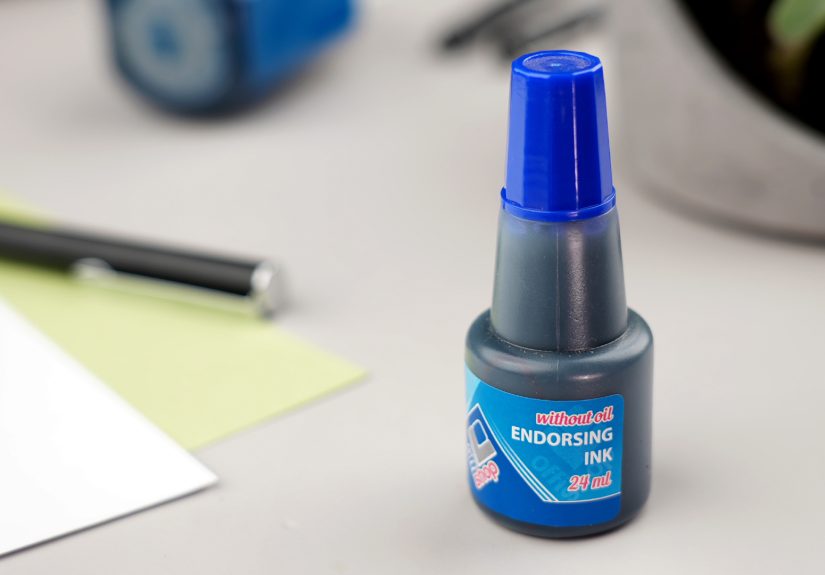
- Step 3: Match the Ink Correctly
- Step 4: Protect Your Workspace
- Step 5: Lock the Stamper in Position (Self-Inking Models)
- Step 6: Remove the Ink Pad or Access the Refill Port
- Step 7: Inspect the Pad (and Flip It If the Model Allows)
- Step 8: Add Ink Slowly in Small Drops
- Step 9: Let the Ink Absorb
- Step 10: Reassemble the Stamper Correctly
- Step 11: Make Test Impressions and Fine-Tune
- Common Mistakes to Avoid
- Quick FAQ About Stamper Ink Refills
- Real-World Experiences and Practical Lessons
- Conclusion
If your stamper has started printing like it skipped its morning coffee, don’t panic. A faded stamp impression usually means one thing: it’s time for a refill. The good news? Most stampers are designed to be refilled, and the process is usually quick, affordable, and much less dramatic than people expect.
Whether you use a self-inking office stamp, a pre-inked custom stamp, or a classic rubber stamp with a separate pad, the refill process follows the same basic idea: identify the stamp type, use the correct ink, add a small amount, and let it absorb. That’s it. No wizardry. No tiny screwdrivers (usually).
In this guide, you’ll get a practical, step-by-step walkthrough with clear instructions, helpful examples, and pro tips to avoid the most common mistakeslike overfilling the pad and turning your desk into an abstract ink painting.
Before You Start: Know Your Stamper Type
Before you refill a stamper with ink, take 30 seconds to identify what kind of stamp you’re working with. This matters because self-inking stamps and pre-inked stamps refill differently, and using the wrong ink can damage the stamp.
1) Self-Inking Stamp
This is the most common office stamper. It has a built-in ink pad that flips into place when you press down. You usually refill the internal stamp pad by sliding it out and adding ink directly to the pad.
2) Pre-Inked Stamp
These don’t use a traditional pad. The ink is stored inside the stamp body and fed through the stamp surface. Pre-inked models often have refill holes and need a very specific refill ink.
3) Traditional Rubber Stamp + Separate Ink Pad
This one’s old-school and reliable. You don’t refill the stamp itselfyou refill the external ink pad. It’s simple, but you still want the correct ink type for clean impressions.
Tools and Supplies You’ll Need
- Correct refill ink (same brand and color when possible)
- Scrap paper for test impressions
- Paper towel or lint-free cloth
- Disposable gloves (optional, but smart)
- A clean, flat workspace
Tip: Keep your refill ink bottle capped when not in use. Stamp ink has a talent for tipping over at the exact worst moment.
How to Refill a Stamper with Ink: 11 Steps
Step 1: Check the Impression Before Refilling
Make a few test stamps on scrap paper first. If the image is light, patchy, or missing areas, a refill is probably needed. If the print looks blurry or smudged instead, the issue may be too much inkor a dirty stamp face.
This quick test helps you avoid “fixing” something that isn’t actually low on ink.
Step 2: Confirm the Stamp Type and Brand
Look for a brand name or model number on the stamper body (for example: Trodat, Xstamper, ExcelMark, 2000 Plus, COLOP, Brother). Different brands use different refill methods and ink formulas.
If it’s a self-inking stamp, you’ll likely refill the internal pad. If it’s a pre-inked stamp, you may add ink through refill holes or a top opening. If it’s a traditional rubber stamp setup, skip ahead mentally: you’re refilling the separate pad, not the handle.
Step 3: Match the Ink Correctly
This is the most important step in the whole process. Always use the refill ink made for your stamp type. Not all stamp inks are interchangeable, and mixing formulas can clog the stamp material, damage the pad, or ruin the impression quality.
Here’s the safe rule:
- Use the same brand as your stamp whenever possible.
- Use the same color unless you’re intentionally changing colors.
- Do not mix water-based and oil-based inks unless the manufacturer specifically says it’s okay.
For dual-color date stamps, refill each side with the correct color. Yes, this matters. Unless you want a red date and a mysterious purple message.
Step 4: Protect Your Workspace
Place scrap paper, cardboard, or a paper towel under the stamper before you open anything. Stamp ink can stain desks, clothing, and fingers fast. If you’re refilling a self-inking stamp, the pad may still hold plenty of ink even if impressions look faint.
If you’re refilling several stampers at once (common in offices), line them up and refill one at a time. Trust methis avoids “Which pad goes in which stamper?” chaos.
Step 5: Lock the Stamper in Position (Self-Inking Models)
For most self-inking stampers, press the stamp down slightlynot all the wayand engage the side buttons or lock mechanism. This exposes the ink pad so it can slide out.
You’re aiming for a halfway position. If you press too far, the mechanism may retract and make pad removal harder. If the stamp doesn’t lock, gently hold it in place while you remove the pad.
Example: Many office stampers have two small side buttons (often red or white) that lock the unit when lightly compressed.
Step 6: Remove the Ink Pad or Access the Refill Port
Now remove the part that actually gets ink:
- Self-inking stamp: Slide the ink pad out from the side or back.
- Pre-inked stamp: Remove the holder or find the refill holes.
- Traditional pad: Open the pad case and expose the felt surface.
Handle pads by the edges whenever possible. The inked side will stain your fingers quickly, and fingerprints on the pad can affect ink distribution.
Step 7: Inspect the Pad (and Flip It If the Model Allows)
Before adding ink, inspect the pad or refill area. If the pad is dusty, has paper lint, or looks dry only in spots, clean lightly and refill carefully.
Some stamp pads (like certain ExcelMark-style self-inking pads) can be flipped and reinserted to extend the number of impressions. That’s a great trick when the pad still has life left but one side is wearing out.
If the pad is cracked, damaged, or heavily worn, replace it instead of refilling. Ink can’t fix a broken pad any more than coffee can fix a Monday.
Step 8: Add Ink Slowly in Small Drops
This is where patience pays off. Add ink in small amounts and spread it evenly across the pad or refill holes. Do not flood the surface.
General guideline for most stampers:
- Small self-inking pads: 1–4 drops
- Medium/Large self-inking pads: 5–20 drops depending on brand/model
- Pre-inked stamps: Follow the refill-hole instructions exactly (often a set number of drops per hole)
Apply ink across the surface rather than dumping it in one spot. If your stamp uses two colors, refill each section separately and carefully.
Pro move: If you accidentally add too much, gently blot pooled ink with scrap paper or a lint-free towel before reassembling.
Step 9: Let the Ink Absorb
Set the pad aside for a minute or two so the ink can soak in. Some brands recommend longer wait times, and many stamp users prefer refilling at the end of the day so the ink can saturate overnight for a more even print the next morning.
If you’re refilling a pre-inked stamp, follow any special directionssome require the stamp to stay face-down immediately after refilling so the ink flows correctly.
Don’t rush this step. Testing too early can lead to weak impressions or uneven spots that make you think the refill “didn’t work” when the ink simply hasn’t distributed yet.
Step 10: Reassemble the Stamper Correctly
Reinsert the pad or close the refill access point. Make sure:
- The inked side faces the correct direction
- The pad is fully seated in the slot
- The lock is released so the stamper returns to normal position
For pre-inked models, reattach the holder/cap securely. For self-inking units, press the stamper up slightly if needed to release the lock and let the mechanism snap back into place.
Step 11: Make Test Impressions and Fine-Tune
Stamp onto scrap paper 3–10 times. The first few impressions may look too dark, too light, or uneven while the ink settles. That’s normal.
Here’s what to do based on the result:
- Too light: Add a few more drops and wait longer.
- Too wet/smudgy: Blot excess ink and keep testing on scrap paper.
- Patchy: Let it absorb longer, then test again.
- Still bad after refilling: Clean the stamp face or replace the pad.
Once the impression looks sharp and consistent, you’re done. Congratulationsyou just saved money, reduced waste, and avoided buying a whole new stamper.
Common Mistakes to Avoid
Using the Wrong Ink
This is the fastest way to shorten the life of a stamp. If you’re unsure, check the brand’s support page or product instructions before refilling.
Overfilling the Pad
More ink is not better ink. Too much causes leaking, smudging, and messy prints. Always start small and add more only if needed.
Refilling Too Fast
If you test immediately after adding ink, the stamp may look uneven. Give it time to absorb, especially with pre-inked stampers.
Skipping Test Impressions
Never go straight back to official paperwork. Test on scrap paper first unless you enjoy “VOIDVOIDVOID” looking like modern art.
Quick FAQ About Stamper Ink Refills
How often should I refill a stamper?
It depends on usage, stamp size, and ink type. A busy office stamp may need frequent top-offs, while a personal address stamp can go much longer between refills.
Can I switch colors?
Yes, but it’s best with a fresh pad or a thoroughly cleaned/replaced pad. Mixing colors often gives muddy results.
Should I refill or replace the pad?
Refill when the pad is simply dry. Replace when the pad is worn, damaged, or no longer distributes ink evenly.
Do pre-inked stamps last a long time?
Yes. Many pre-inked stamps are designed for thousands of impressions and can be refilled multiple times when maintained properly.
Real-World Experiences and Practical Lessons
Refilling a stamper sounds like one of those “tiny office tasks” that should take 30 seconds and no thought. In real life? It’s usually a mix of confidence, confusion, and one person saying, “I think I broke it,” while holding the stamp upside down. The good news is that a little experience goes a long way.
In a small office setting, the most common stamper to refill is usually a self-inking date stamp or a “PAID” stamp used all day long. A typical pattern is easy to spot: the stamp starts out crisp in the morning, but by afternoon the impression looks faded in the center. Most people assume the stamp is dead. It usually isn’t. In many cases, the pad just needs a few drops of fresh ink and a couple of minutes to absorb. Once refilled and tested on scrap paper, the stamp goes right back to making clean, bold impressions.
Another common experience happens with teacher stamps or craft stamps used in batches. Someone refills the pad and immediately starts stamping papers. The first few prints come out blotchy, and they assume the refill failed. What actually happened? The ink didn’t have enough time to distribute. Letting the pad sit even a little longerand doing a few test impressions firstusually fixes it. This is one of those simple habits that makes a huge difference.
Pre-inked stamps can be even trickier if you’ve never handled one before. People often expect to see a removable pad, but there isn’t one. Instead, there are refill holes or a specific refill point. The first time someone refills a pre-inked stamp, they often add too much ink because the surface doesn’t look “wet” right away. Then a few minutes later, the stamp starts leaking or printing too dark. The lesson here is always the same: follow the drop count, use the correct ink, and be patient. Pre-inked stampers are precise tools, and they reward precise refills.
One of the most useful real-world tricks comes from people who manage several stamps at once: label your ink bottles and keep them grouped by stamp brand. This prevents the classic mistake of using the wrong refill ink in the wrong stamper. It sounds small, but it can save a lot of money. A mislabeled bottle can ruin a perfectly good stamp pad, especially if the ink chemistry doesn’t match.
Another practical lesson is timing. Many experienced users refill stampers at the end of the workday. That way, the ink has time to spread evenly overnight, and the stamp is ready by morning. This works especially well for self-inking stamps that get heavy use and need clean, reliable impressions on invoices, mail, or forms.
And finally, there’s the “test paper” lesson. People skip this step all the timeuntil the first stamp lands on a customer form and looks like a ghost. A stack of scrap paper next to your stamp station is one of the easiest workflow upgrades you can make. It turns refilling from a messy gamble into a repeatable routine.
So yes, refilling a stamper with ink is simple. But the real skill comes from the little habits: using the right ink, adding less than you think you need, waiting for saturation, and testing before use. Once you build those habits, you’ll refill stampers quickly, cleanly, and with zero panic.
Conclusion
Learning how to refill a stamper with ink is one of those small skills that pays off forever. It saves money, keeps your impressions sharp, and helps your stamp last longer. The key is simple: identify the stamp type, use the correct refill ink, add small drops, let the ink absorb, and always test before use.
If you remember just one thing, make it this: don’t over-ink and don’t mix formulas. Follow that rule, and your stamper will keep doing its job like a champwithout turning your desk into an ink crime scene.