Table of Contents >> Show >> Hide
- What Is the Grid Method in Drawing?
- Why Artists Use the Grid Method
- How to Scale Drawings Using the Grid Method: 9 Steps
- Step 1: Choose a Clear Reference Image
- Step 2: Measure the Reference and Decide on the Final Size
- Step 3: Pick a Grid Size That Matches the Subject
- Step 4: Draw the Grid on the Reference Image
- Step 5: Draw a Matching Grid on Your Paper or Canvas
- Step 6: Start with the Biggest Shapes First
- Step 7: Work One Square at a Time
- Step 8: Check Proportions as You Go
- Step 9: Remove the Grid and Refine the Drawing
- Common Mistakes to Avoid When Scaling Drawings
- Tips for Better Results
- When the Grid Method Works Best
- Real-World Example of Scaling with a Grid
- Experience and Practical Lessons from Using the Grid Method
- Final Thoughts
If you have ever looked at a tiny reference photo and thought, “Beautiful… but how exactly is this supposed to become a full-size drawing without my cat ending up with one giant ear and a suspiciously human elbow?” welcome to the club. The grid method is one of the simplest, smartest ways to scale drawings accurately without needing a projector, fancy software, or the blessing of the Renaissance gods.
At its core, the grid method helps you enlarge or reduce an image while keeping the proportions under control. Instead of trying to redraw the whole picture at once, you break it into smaller squares and transfer what you see one section at a time. It is part drawing lesson, part observation exercise, and part quiet reminder that rulers are not just for math class trauma.
Artists, teachers, and museums have used versions of this technique for years because it works. It slows your eye down in a good way, helps you notice angles and shapes you would otherwise miss, and makes scaling feel much less mysterious. Whether you are enlarging a portrait, a still life, a mural sketch, or a design for painting, the process is practical, low-tech, and surprisingly satisfying.
Below, you will learn exactly how to scale drawings using the grid method in 9 clear steps, plus tips for avoiding distortion, choosing the right grid size, and making the finished drawing look polished instead of like it escaped from graph paper prison.
What Is the Grid Method in Drawing?
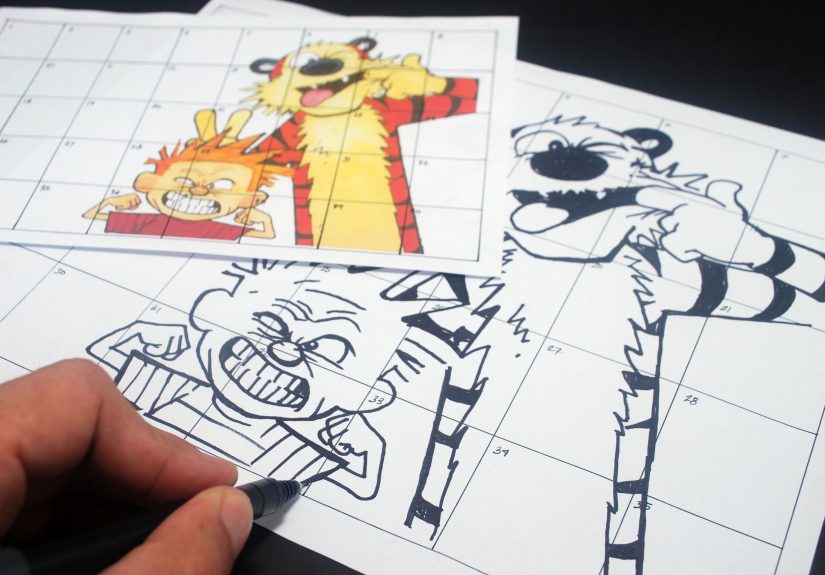
The grid method is a way to transfer and scale an image by drawing a matching grid over the original reference and on your drawing surface. Each square on the reference corresponds to a square on your paper. When the grid on your drawing paper is larger, the image gets enlarged. When the grid is smaller, the image gets reduced.
This method works because it preserves proportion. You are not guessing where the eye, leaf, or coffee mug handle goes. You are comparing locations square by square. That makes the process much more manageable, especially for beginners, but even experienced artists use it when accuracy matters.
Why Artists Use the Grid Method
- It helps maintain accurate proportions.
- It breaks complex images into smaller, easier parts.
- It improves observation skills over time.
- It works for enlarging or shrinking drawings.
- It is affordable and does not require digital equipment.
In other words, the grid method is not “cheating.” It is a tool. Nobody calls a measuring cup cheating when baking a cake. And frankly, nobody wants a lopsided cake or a lopsided portrait.
How to Scale Drawings Using the Grid Method: 9 Steps
Step 1: Choose a Clear Reference Image
Start with a reference image that is easy to read. Sharp contrast, visible edges, and clear shapes will make the process much smoother. If the image is blurry, dark, or cluttered, the grid method will not magically rescue it. It will simply let you reproduce the confusion with excellent proportion.
Portraits, animals, flowers, objects, and simple landscapes all work well. For beginners, a printed photo is often easiest because you can draw directly on it or place a transparent sheet over it. Black-and-white versions can also help because they reduce color distractions and let you focus on shape, contour, and value.
Step 2: Measure the Reference and Decide on the Final Size
Before you draw a single line, figure out two things: the size of your reference image and the size you want your final drawing to be. This is where proportion matters most.
Let’s say your reference photo is 5 by 7 inches and you want your final drawing to be 10 by 14 inches. Great. That means you are enlarging it by a factor of 2. Every measurement on the drawing grid should be twice the size of the corresponding measurement on the reference grid.
If your reference and final paper do not share the same proportions, you may need to crop the image first. Otherwise, the drawing can stretch or squash. A cat should not become a limousine just because the paper was the wrong shape.
Step 3: Pick a Grid Size That Matches the Subject
Now choose the size of the squares for your reference image. Smaller squares give you more control and detail, while larger squares are faster and better for simpler subjects.
As a general rule:
- Use larger squares for bold, simple shapes.
- Use smaller squares for faces, hands, and detailed textures.
- Use the same number of rows and columns on both images.
For example, if your reference is 8 by 10 inches, you might divide it into 1-inch squares. If you are doubling the image, your drawing surface would use 2-inch squares. Same number of boxes, different box size. That is the whole trick.
Step 4: Draw the Grid on the Reference Image
Use a ruler and a sharp pencil, or add a transparent overlay if you do not want to mark the original image. Draw the lines lightly but clearly enough to see. The goal is precision, not trench warfare.
If the image is printed, you can also number the columns and rows. Labeling the top with letters and the side with numbers can make the process much easier. Instead of asking, “Where exactly does the eyebrow start?” you can ask, “What is happening in square B4?” Your brain loves smaller questions.
Step 5: Draw a Matching Grid on Your Paper or Canvas
On your drawing surface, create a grid with the same number of squares as the reference. This part is critical. The squares do not have to be the same physical size, but their ratio must match.
Let’s use a simple example:
- Reference image: 6 by 8 inches
- Reference grid: 1-inch squares
- Final drawing: 12 by 16 inches
- Drawing grid: 2-inch squares
Because the scale factor is consistent, the shapes inside each square will enlarge correctly. Draw the grid lightly enough that you can erase it later. If you are working on canvas, use a hard pencil, chalk pencil, or another removable marking tool suited to the surface.
Step 6: Start with the Biggest Shapes First
Do not begin by lovingly rendering one perfect eyelash while the rest of the face is still a mystery. Start with the major contours and anchor points. Look for where lines enter and exit each square. Notice where shapes touch corners, cross the middle, or curve toward one edge.
For example, in a portrait, begin with the outline of the head, placement of the eyes, nose angle, and mouth width. In a still life, place the large silhouette first before fussing over decorative details. This keeps the drawing structurally sound before you layer in the smaller forms.
Step 7: Work One Square at a Time
This is the heart of the grid method. Focus on one box, not the whole image. Within each square, copy the lines, shapes, and intersections you see. Ask yourself:
- Where does the line begin?
- Where does it cross the edge?
- Is the curve shallow or sharp?
- Does the shape fill half the square or just a corner?
When you isolate each square, the subject becomes less intimidating. A complicated portrait becomes a series of small abstract problems. Suddenly, drawing an ear is not “draw an ear.” It is “draw a curve touching the upper-left edge and dipping toward the center.” That is much less scary and far more accurate.
Step 8: Check Proportions as You Go
Even with a grid, you still need to pause and compare. Step back every so often and look at the whole drawing. Make sure the features line up across neighboring boxes. A line that looks perfect in one square can go rogue when viewed in context.
Good checkpoints include:
- Does the jawline connect smoothly across squares?
- Do both eyes sit on the same horizontal path?
- Does the object still resemble the original from a distance?
- Are the negative spaces similar to the reference?
This is also a good time to make gentle corrections. Light lines are your friend. Heavy lines are much less forgiving and tend to announce, “I was wrong, but loudly.”
Step 9: Remove the Grid and Refine the Drawing
Once the full image is transferred, erase or soften the grid lines and begin refining the drawing. Clean up contours, strengthen important edges, and add shading, texture, or color as needed. At this stage, the grid has done its job. It can leave the stage and let the artwork enjoy its moment.
If you are painting, this is when you can start blocking in values and color. If you are creating a graphite or charcoal drawing, refine transitions, add depth, and sharpen focal areas. The goal is to move from mechanical transfer to expressive finish.
Common Mistakes to Avoid When Scaling Drawings
Using the Wrong Proportions
If the reference image and drawing surface do not share the same ratio, the final drawing will distort. Crop first if necessary.
Making the Grid Too Dark
Press lightly. Dark grid lines are difficult to erase and can muddy soft shading later.
Choosing Squares That Are Too Large
If the boxes are oversized, fine details become harder to judge. For portraits and detailed subjects, smaller squares are usually better.
Ignoring the Whole Image
Yes, work one square at a time. But no, do not forget to step back. Accuracy lives in both the details and the big picture.
Tips for Better Results
- Use a mechanical pencil for crisp, thin grid lines.
- Label rows and columns to stay organized.
- Print an extra copy of the reference if you want a clean backup.
- Start with simple subjects before tackling complicated portraits.
- Squint at the reference to simplify values and major shapes.
- Keep your ruler straight and double-check measurements before drawing every line.
When the Grid Method Works Best
The grid method is especially useful when you need accurate scaling and placement. It works beautifully for portraits, mural planning, classroom assignments, realistic drawing practice, canvas transfers, and even decorative design work. It is also a solid bridge between tracing and freehand drawing because it trains you to observe relationships rather than simply copy outlines.
That said, it is not the only way to draw. You can still practice gesture, freehand sketching, and sight-measuring. Think of the grid method as one excellent tool in the box, not the entire workshop.
Real-World Example of Scaling with a Grid
Imagine you have a 4 by 6-inch photo of a sunflower and want to create a 12 by 18-inch drawing for a poster. The scale factor is 3. If you divide the photo into 1-inch squares, your final drawing should use 3-inch squares. Because both images keep the same 2:3 ratio, every petal, seed cluster, and leaf placement can be transferred accurately. No weird stretched flower. No accidental mutant sunflower. Just clean, proportional enlargement.
Experience and Practical Lessons from Using the Grid Method
The first time many artists use the grid method, there is a strange emotional arc. It often begins with confidence, turns quickly into mild annoyance while drawing the grid lines, then becomes suspicious optimism around square number six, and finally ends with a small miracle: “Wait… this actually looks right.” That emotional roller coaster is part of the charm.
One of the biggest lessons people learn from the grid method is that drawing accuracy is not always about talent in the dramatic, movie-scene sense. It is often about slowing down and noticing what is actually in front of you. When you stop trying to draw “an eye” and instead draw a dark wedge touching the left edge of a square, you begin to see more truthfully. That shift is huge. It teaches observation, not just copying.
Another common experience is realizing how often the brain lies. A beginner might insist that the nose should be centered, the tree should be taller, or the cup handle should be rounder, because that is what the mind expects. But inside the grid, you have evidence. The line enters low, not high. The angle is steeper than expected. The shadow takes up almost half the square. The method gently forces you to trust what you see over what you assume, which is one of the most valuable habits any artist can build.
There is also a practical confidence boost that comes from using the method on larger work. Scaling a sketch into a mural, poster drawing, or canvas can feel intimidating. Blank large surfaces have a way of making even experienced people suddenly question every life decision that led them to a pencil. The grid method breaks that fear into manageable tasks. Instead of facing one giant impossible image, you face a sequence of small, solvable visual puzzles.
Many artists also discover that the grid becomes less necessary over time. After repeated use, you start internalizing proportion, angle comparison, and placement. You begin by depending on the squares, but eventually your eye gets sharper. That is why the method is so useful in classrooms and self-teaching. It provides structure while quietly training perception in the background. Sneaky? Yes. Effective? Also yes.
There are frustrations too, of course. If your measurements are off at the start, every square carries that mistake forward like bad gossip. If the grid lines are too dark, erasing becomes a full upper-body workout. If the squares are too big, details wobble. If they are too small, you may spend more time counting boxes than drawing. Those are normal problems, and most of them disappear once you learn to match the grid size to the complexity of the image.
Perhaps the best experience-related takeaway is this: the grid method is not only about scaling drawings. It is about learning how to look carefully, compare honestly, and build an image with patience. That skill transfers to freehand drawing, painting, design, and nearly every visual art process. So yes, the grid helps you make a bigger drawing. But more importantly, it helps you become a better observer. And that is worth far more than a perfectly placed sunflower petal.
Final Thoughts
If you want a reliable way to enlarge or reduce an image without losing proportion, the grid method is one of the best techniques to learn. It is simple, accessible, and surprisingly powerful. By measuring carefully, keeping the ratios consistent, and working one square at a time, you can turn a small reference into a polished, accurate drawing with far less guesswork.
So grab your ruler, sharpen your pencil, and embrace the squares. They may not look glamorous, but they are quietly doing heroic work behind the scenes.