Table of Contents >> Show >> Hide
- Why Chalk Paint Works So Well on Gold Mirror Frames
- Supplies You’ll Need
- Step-by-Step: Update a Gold Mirror With Chalk Paint
- 1) Set up your workspace (so you don’t redecorate the floor)
- 2) Clean the frame thoroughly (yes, really)
- 3) Decide: tape the glass or skip it
- 4) Scuff sand (optional, but smart on shiny frames)
- 5) Paint: thin coats beat thick coats
- 6) Let it dry, then add a second coat
- 7) Optional: distress to highlight details (the fun part)
- 8) Optional: add depth with dark wax or glaze
- 9) Seal it (because fingers will touch it)
- 10) Clean the glass edge
- Design Ideas: What Color Should You Paint a Gold Mirror?
- Common Problems (and How to Fix Them)
- Pro Tips for an “It Came Like That” Finish
- Quick Example: Two Popular Makeover Recipes
- of “Experience”: What DIYers Learn After Painting a Gold Mirror
- Conclusion
Gold mirrors have a special talent: they can make a room feel either “timeless and glam” or “I found this behind a futon in a college apartment.”
The good news? If the frame is solid (and the mirror isn’t haunted), chalk paint can take it from brassy to classy in a weekendoften in an afternoon.
In this guide, you’ll get a step-by-step process, options for ornate vs. simple frames, sealing choices (wax vs. water-based topcoats),
and a handful of “learn-from-my-mistakes-but-not-actually-mine” pro tips.
Why Chalk Paint Works So Well on Gold Mirror Frames
Chalk-style paints are popular for makeovers because they grip well, level nicely, and make it easy to create a matte, vintage finish
without a complicated primer-and-sand marathon. “Gold” frames (especially the shiny ones) can look loud in modern spaceschalk paint
softens that shine and lets you choose a finish that matches your home: cozy farmhouse, clean modern, or “moody library where secrets are kept.”
Best candidates for this makeover
- Ornate resin/wood frames (all the swirls and leafy bits): chalk paint is fantastic for highlighting details.
- Flat, simple frames: you can go sleek and modern with a smooth matte or satin-sealed finish.
- Thrifted mirrors: high impact, low cost, maximum bragging rights.
When to take a different route
- If the frame is flaking badly, greasy, or previously waxed/oiled, you’ll need extra prep (don’t worrystill doable).
- If it’s rusty metal, you may want a rust-inhibiting primer before chalk paint.
- If it’s a museum-grade antique… maybe don’t. Or at least don’t do it at 11:47 p.m.
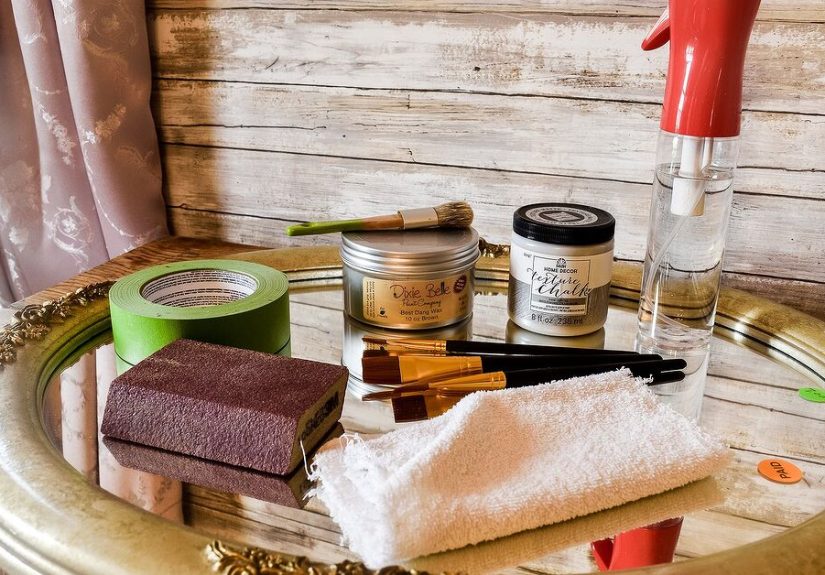
Supplies You’ll Need
You don’t need a craft-store shopping spree, but the right tools make this faster and cleaner.
Materials
- Chalk paint (brush-on) or chalk-style spray paint
- Cleaner/degreaser (mild dish soap + warm water works; a degreaser helps for thrift-store “mystery film”)
- Microfiber cloths or lint-free rags
- Painter’s tape (optional)
- Plastic drop cloth / cardboard
- Fine sanding sponge or sandpaper (220 grit is a friendly starting point)
- Small detail brush + a 1–2″ angled brush (or a round brush for carved details)
- Sealer: clear wax, tinted wax (optional), or a water-based topcoat
Nice-to-have extras
- Detailing brush for grooves (think: old toothbrush’s responsible cousin)
- Razor scraper for cleaning paint off glass
- Vacuum or tack cloth for dust
- Disposable gloves (wax is clingy like a needy ex)
Step-by-Step: Update a Gold Mirror With Chalk Paint
1) Set up your workspace (so you don’t redecorate the floor)
Lay the mirror face-up on a drop cloth or cardboard. If you’re painting indoors, choose a well-ventilated spot.
If you’re using spray paint, outdoors or a garage with doors open is your best friend.
2) Clean the frame thoroughly (yes, really)
Gold frames often hold onto dust, oils, hairspray, and whatever thrift-store adventures they’ve lived through.
Wash with warm soapy water, rinse with a damp cloth, and dry completely.
If the frame feels slick or greasy, use a stronger degreaser and rinse well.
3) Decide: tape the glass or skip it
You can tape off the glass edge for crisp lines, but many DIYers skip tape and simply clean paint off the glass later.
If your frame has lots of curves and the tape starts looking like a tiny origami tragedy, skipping tape can be easier.
4) Scuff sand (optional, but smart on shiny frames)
Chalk paint can adhere well, but glossy finishes are notorious for being slippery customers.
Lightly scuff sanding helps the paint grab and reduces chipping riskespecially on smooth, shiny “gold” coatings.
You’re not sanding to bare wood; you’re just dulling the shine.
- Ornate frame: Use a sanding sponge and glide over raised areas.
- Flat frame: Quick pass with 220 grit is usually enough.
5) Paint: thin coats beat thick coats
Choose your method:
- Brush-on chalk paint: Best control for detail and texture. Great for carved frames.
-
Chalk-style spray paint: Fast and smooth, especially for frames with lots of grooves.
(Use light coats to avoid drips.)
Apply the first coat thinly. Don’t panic if you see brush strokes or patchinesschalk paint often looks “meh” on coat one
and “wow” on coat two.
6) Let it dry, then add a second coat
Dry time depends on product, temperature, and humidity. As a general approach:
wait until it feels dry and not cool/tacky before recoating. Two thin coats usually look better (and chip less) than one thick coat.
7) Optional: distress to highlight details (the fun part)
This is where a formerly loud gold frame can become “antique boutique.” Once the paint is fully dry, lightly sand raised edges,
corners, and ornate details. You’ll reveal hints of gold underneath for dimension.
- Subtle distress: Sand only the highest points.
- Vintage distress: Hit corners + raised scrollwork + inner edge.
- Modern minimal: Skip distressing completely for a clean matte look.
8) Optional: add depth with dark wax or glaze
If your frame has deep carvings, a tinted wax (or a compatible decorative glaze) can settle into crevices and make details pop.
The key is control: apply sparingly, work in sections, and wipe back the excess so it looks intentionalnot like your mirror survived a chimney sweep.
9) Seal it (because fingers will touch it)
This is the step that takes a project from “pretty” to “practical.” Mirrors get handledhung, moved, dustedso a protective finish matters.
Option A: Clear wax (classic chalk paint finish)
Wax deepens the color slightly and gives a soft sheen after buffing. Apply a thin coat, wipe off excess, and buff after it sets.
Wax cures over time, so treat the frame gently for the first couple weeks.
Option B: Water-based topcoat (durable, easy to clean)
If the mirror will live in a high-touch zone (entryway, kid’s room, busy hallway), consider a water-based topcoat.
It’s typically more durable and easier to wipe clean than wax. Choose matte/satin if you want to keep the chalky look.
Option C: Do both (only if you know why)
Some DIYers apply wax for the look and then add a compatible water-based topcoat for durability.
If you go this route, follow the product directions carefullyfinishes can misbehave if layered at the wrong time or over the wrong surface.
10) Clean the glass edge
If paint kissed the glass (it happens), let it dry, then remove it with glass cleaner and a razor scraper held at a shallow angle.
Go slow, keep the blade flat, and wipe frequently. The goal is “crisp edge,” not “modern art scratch collection.”
Design Ideas: What Color Should You Paint a Gold Mirror?
Color choice is where your mirror stops being “a mirror” and becomes a design move.
Here are a few crowd-pleasers:
Warm whites and creamy neutrals
Great for traditional, farmhouse, and cozy spaces. Light distressing looks especially good on ornate frames.
Matte black
Instant modern drama. Works well in entryways and above mantels. Keep distressing minimal for a crisp look.
Greige, taupe, and soft clay
These “designer neutrals” calm down shiny gold without shouting for attention. Perfect if you want the mirror to blend, not dominate.
Muted greens and dusty blues
If your room has plants, wood tones, or vintage decor, these colors look intentional and timeless.
Add dark wax in crevices for an aged finish.
Common Problems (and How to Fix Them)
“My paint is streaky.”
Usually: too much paint on the brush, overworking it, or painting after it’s started drying.
Fix: use thinner coats, a better brush, and don’t go back over semi-dry paint like it owes you money.
“It’s chipping around the edges.”
Usually: surface was too glossy/dirty or the frame gets handled a lot.
Fix: clean thoroughly, scuff sand, repaint those areas, then seal with a more durable finish.
“My wax looks blotchy.”
Usually: too much wax or uneven application.
Fix: apply wax thinly, wipe excess as you go, and buff once it sets. If you used tinted wax and it got too dark,
a bit of clear wax can help lift and blend it.
“Help, paint is on the glass.”
It’s okay. Let it dry, then remove with glass cleaner and a razor scraper. Patience beats panic.
Pro Tips for an “It Came Like That” Finish
- Start with the crevices. On ornate frames, dab paint into details first, then smooth larger areas.
- Two thin coats. It’s the boring advice that delivers the best results.
- Sand with intention. Distress where natural wear would happen: corners, raised edges, high points.
- Choose your sheen early. Wax gives a soft glow; topcoats can range from flat to satin to gloss.
- Seal for the location. Entryway mirror? Durable topcoat. Guest room mirror? Wax is usually fine.
Quick Example: Two Popular Makeover Recipes
Recipe 1: Antique White + Subtle Gold Peek-Through
- Clean + dry frame
- Scuff sand lightly
- 2 coats warm white chalk paint
- Light distressing on raised details
- Clear wax (buff for soft sheen)
Recipe 2: Modern Matte Black (No Distress)
- Clean + dry frame
- Scuff sand more carefully if super glossy
- 2 thin coats black chalk paint (or light spray coats)
- No distressing
- Matte water-based topcoat for durability
of “Experience”: What DIYers Learn After Painting a Gold Mirror
The first thing most people learn is that gold frames have opinions. You’ll think, “This will be quick,” and the mirror will respond by revealing
one of three surprises: (1) a sticky residue that laughs at soap, (2) decorative grooves that collect paint like they’re being paid per ounce,
or (3) a mysterious slick finish that makes your first brushstroke slide around like it’s on ice skates.
The second thing they learn is that thin coats are not a suggestion. The temptation is real: you want coverage now.
But thick chalk paint loves to settle into ornate details and dry there like frostingcute on cupcakes, less cute on scrollwork.
The “I’ll just glob it on and sand later” approach almost always leads to extra sanding, extra dust, and the kind of arm workout
you didn’t ask for. Thin coats dry faster, look smoother, and make distressing look like a design choicenot an emergency.
Then comes the glass edge drama. Taping seems logical until you try to curve tape around a baroque frame and it starts buckling like a cheap suitcase.
Many DIYers discover that letting paint hit the glass isn’t a catastrophe. Once it dries, it can usually be scraped clean with a razor tool and a little
glass cleaner. The “experience” part is learning not to rush this: scrape slowly, keep the blade flat, and don’t treat it like you’re trying to win a speedrun.
Clean edges make the whole project look professional, even if you painted in pajama pants.
Another universal lesson: wax is both magical and weird. The first time you use it, you will apply too much. Almost everyone does.
Too much wax feels tacky, looks blotchy, and collects lint as if it’s hosting a sweater convention. The better move is applying a thin layer,
wiping off excess immediately, then buffing later. And if you’re using tinted wax for an antique look, the “start light” rule is your best friend.
It’s easy to add more depth; it’s annoying to remove “accidental goth mirror.”
Finally, people learn that placement matters. Paint transforms the frame, but the mirror still needs good lighting and a good location.
An updated frame in an entryway can bounce light and make the space feel bigger. Over a dresser, it becomes a focal point.
Above a mantel, it can look customespecially if you match the finish to nearby hardware or decor. The real win isn’t just “I painted a thing.”
It’s “I made a thing that looks like it always belonged here.”