Table of Contents >> Show >> Hide
- Why Thrifted Lamps Are the Ultimate High-End Hack
- Before You Make It Pretty, Make It Safe
- Tools and Materials That Make This Easy
- The High-End Upgrade Blueprint (Step-by-Step)
- Step 1: Disassemble Like You Mean It
- Step 2: Deep Clean (Because Paint Hates Mystery Grease)
- Step 3: Tighten, Level, and Stabilize
- Step 4: Rewire (Optional… Until It’s Not)
- Step 5: Prep the Surface for a Flawless Finish
- Step 6: Choose a Finish That Looks Expensive
- Step 7: Upgrade the Lampshade (This Is Where the Luxury Lives)
- Step 8: Add Tiny Details That Scream “High-End”
- Step 9: Style It Like a Designer (So It Looks Custom, Not Random)
- Three Specific Thrift-to-Luxe Makeover Examples
- Common Mistakes (and How to Avoid Them)
- Conclusion: High-End Decor Isn’t a Price TagIt’s a Process
- Experience Corner: What This Makeover Actually Feels Like (and Why That’s Normal)
You know that feeling when you walk into a fancy home store, see a lamp with a “small car” price tag,
and immediately decide you don’t actually need light? Yeah. Let’s fix that.
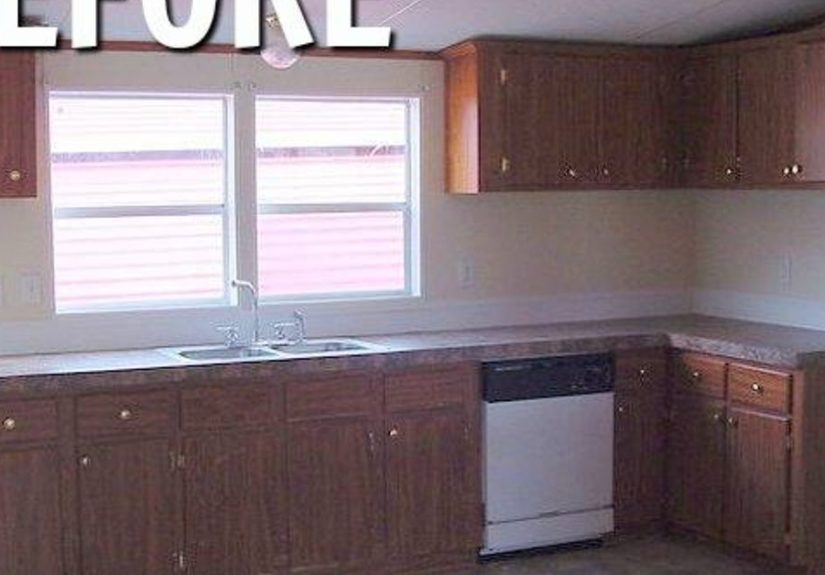
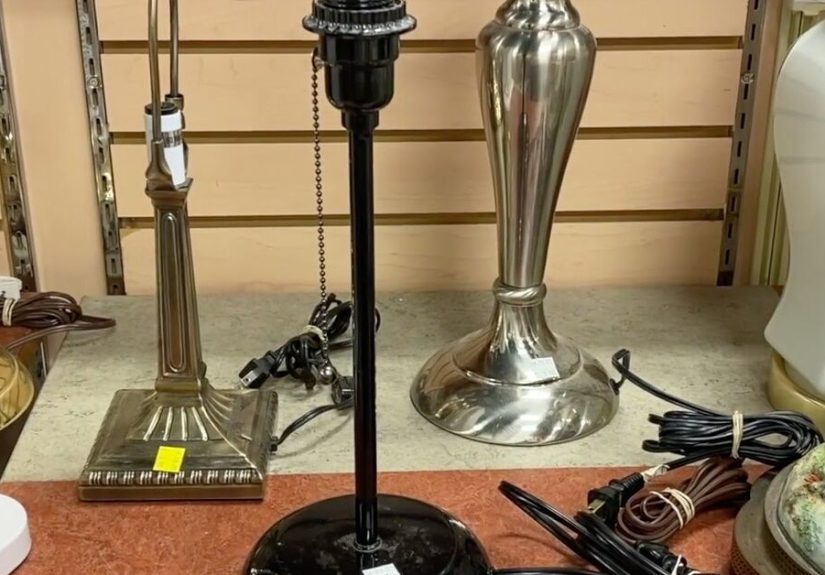
Thrift stores, estate sales, and Facebook Marketplace are basically secret showrooms for lamp bases with
excellent bonessolid metal, real wood, weighty ceramicjust dressed in outdated shades and questionable cords.
With a little strategy (and a lot less money than “designer lighting”), you can upgrade a thrifted lamp into
high-end decor that looks custom, curated, and not-at-all like it once lived next to a waterbed.
Why Thrifted Lamps Are the Ultimate High-End Hack
Many vintage lamps were built with better materials than today’s bargain lighting. Translation:
they’re heavier, sturdier, and more forgiving when you refinish them. The “luxury look” usually comes down to:
(1) proportions, (2) finish quality, and (3) the shade. The base is just the foundation.
Before You Make It Pretty, Make It Safe
A lamp is decor… that plugs into your wall. So do a quick safety check before you fall in love:
- Cord condition: If it’s cracked, stiff, frayed, or taped (taped!), plan to replace it.
- Socket health: If the socket is wobbly, scorched, or the switch feels crunchy, replace it.
- Smell test: A burnt smell near the socket is a “nope.”
- Stability: If the lamp wobbles like a baby deer, make sure you can tighten the hardware or add weight.
- UL/ETL markings: Older lamps may not have modern labels. That doesn’t automatically make them unsafe,
but it’s another reason to rewire with a modern cord and socket kit.
If anything feels beyond your comfort levelespecially if the lamp is an unusual construction, has internal damage,
or you suspect wiring issues you can’t seetake it to a reputable lamp repair shop or electrician. High-end decor is
supposed to feel relaxing, not like a suspense movie.
Tools and Materials That Make This Easy
You don’t need a full workshop. You need a small “lamp glow-up kit.”
Safety + electrical basics
- Lamp rewiring kit (cord, plug, socket, strain relief, sometimes a harp)
- Screwdriver (flathead + Phillips)
- Wire cutters/strippers
- Needle-nose pliers
- Electrical tape (optional, but handy)
- LED bulb (cooler, efficient, and gentler on shades)
Refinishing basics
- Degreaser or dish soap, microfiber cloths
- Sandpaper (180–220 grit) or sanding sponge
- Primer appropriate for the surface (metal/wood/plastic)
- Spray paint or specialty finish (see options below)
- Painters tape + paper for masking
- Drop cloth + nitrile gloves
“Designer details”
- New lampshade (the real glow-up)
- New harp (if needed) + finial (tiny but powerful)
- Felt pads for the base (prevents scratches and adds polish)
- Cord cover or cord clips (especially for visible cords)
The High-End Upgrade Blueprint (Step-by-Step)
Step 1: Disassemble Like You Mean It
Unplug the lamp. Remove the shade, finial, harp, and bulb. If the base has a felt bottom, peel it back gentlyyou may
need to access a nut or screw underneath. Take quick photos as you go so reassembly feels like a victory,
not an escape room.
Step 2: Deep Clean (Because Paint Hates Mystery Grease)
Thrifted lamps often wear a fine layer of “vintage vibes” (dust + nicotine + furniture polish). Wash the base with
dish soap and warm water when possible, or wipe it down with a degreaser. Let it dry completely.
If you skip this, your paint job may peel laterand nothing says “not high-end” like a finish that flakes.
Step 3: Tighten, Level, and Stabilize
High-end lamps feel solid. If yours wobbles, tighten the hardware: check the nut beneath the socket and the base.
Add felt pads to level it on uneven surfaces. If it’s too light, you can sometimes add discreet weight inside the base
(depending on construction). The goal is that “expensive lamp thud” when you set it down.
Step 4: Rewire (Optional… Until It’s Not)
If the cord is damaged or the socket is sketchy, rewiring is the glow-up that matters most. A basic lamp kit is
affordable and makes an older lamp feel brand new.
- Remove the old socket and cord by loosening the socket shell and disconnecting wires.
- Thread the new cord through the lamp base and up to the socket.
- Identify neutral vs. hot: many cords have one ribbed conductor (neutral) and one smooth (hot).
- Tie an Underwriter’s knot (strain relief) so the cord can’t pull on the terminals.
- Connect wires to the socket terminals:
neutral typically goes to the silver-colored screw; hot to the brass-colored screw. - Reassemble the socket and test with an LED bulb.
Pro tip: If your new plug is polarized (one prong wider), it’s designed to reduce shock risk when inserted properly.
Treat that wide blade like it has opinionsand respect them.
Step 5: Prep the Surface for a Flawless Finish
The difference between “spray painted” and “designer finish” is prep. For metal, remove rust and scuff glossy areas
so primer can grip. For glossy ceramic or lacquer, lightly sand to de-shine. Wipe away dust.
Then prime (yes, even if your paint says it’s “paint + primer,” because thrifted surfaces love chaos).
Step 6: Choose a Finish That Looks Expensive
Here are high-end-looking options that don’t scream “weekend project,” plus where they shine:
1) Modern Matte (Black, White, Greige)
Matte finishes look contemporary and hide minor imperfections. Use light coats and keep the can moving.
Let it cure fully before handlingmatte shows fingerprints if you rush.
2) Soft Metallic (Aged Brass, Champagne, Warm Gold)
The key is restraint. High-end metallics look “warm,” not mirror-shiny. Consider a layered approach:
a darker base coat with a lighter metallic on top for depth. This creates that boutique, custom-patina vibe.
3) Faux Stone or Plaster Texture
Texture is trending in high-end interiors because it reads artisanal. Use a textured spray or a specialty finish
designed for stone/plaster looks, then top it off with a subtle matte sealer if recommended by the product.
Texture is also a magic trick for hiding small dents and chips.
4) Two-Tone “Designer Hack”
Paint the base one color and the stem or accents another (think black + brass, ivory + gold, espresso + linen).
Crisp masking lines make it look intentional. Fuzzy lines make it look like… a craft.
Whatever finish you choose, apply multiple light coats rather than one heavy coat. That’s how you avoid drips
and get that smooth, factory-like surface.
Step 7: Upgrade the Lampshade (This Is Where the Luxury Lives)
If you only do one thing, do this: buy a new shade. A fresh shade instantly modernizes a lamp and
dramatically changes the vibe of the light.
How to pick the right size
- Width rule: A common guideline is the shade’s diameter should be about twice the width
of the lamp base at its widest point. - Height rule: Many designers aim for the shade height to be roughly one-third of the lamp’s total height
(including harp and bulb), or around two-thirds of the base height (measured to the socket). - Coverage: The shade should cover the socket area so you don’t see too much “neck.”
Choose the right shape
- Drum shades: Clean, modern, and great for most bases.
- Empire/tapered shades: Classic, traditional, and flattering on curvy bases.
- Pleated shades: Having a momentadds softness and a custom look.
Fittings matter
The most common shade fitting for table lamps is a spider fitter used with a harp and finial. Clip-on shades exist,
but harp + finial usually reads more “grown-up” and upscale. If your proportions feel off, swapping the harp size can
be the fix that makes everything click.
Step 8: Add Tiny Details That Scream “High-End”
- A quality finial: Swap the default finial for something substantialstone, brushed metal, sculptural shapes.
- Felt on the bottom: It’s a small detail that makes the lamp feel finished (and protects furniture).
- Better bulb choice: Use a warm LED (often around 2700K) for that cozy, boutique glow.
- Cord management: A cord cover or tidy clips instantly looks more intentional.
- Optional: inline dimmer: The fastest way to make lighting feel expensive is control.
Step 9: Style It Like a Designer (So It Looks Custom, Not Random)
Even a perfect lamp can look “meh” if it’s styled like an afterthought. Use these quick designer moves:
- Pair it: Lamps look more intentional in pairs on consoles or nightstands.
- Scale check: The shade shouldn’t be wider than the table surface (or it feels cramped).
- Layer lighting: Combine table lamps with overhead and accent lighting for depth.
- Echo materials: Repeat the lamp’s finish elsewhere (frame, hardware, tray) for a cohesive look.
Three Specific Thrift-to-Luxe Makeover Examples
Example 1: The “Brassy Grandma” Lamp → Modern Boutique Black
Start with a heavy brass lamp base. Clean thoroughly, scuff, prime for metal, then spray in a soft matte black.
Add a crisp white linen drum shade and a warm brass finial. The contrast looks high-end and intentional.
Example 2: The Dinged Wooden Lamp → Scandinavian Calm
Fill chips with wood filler, sand smooth, and paint in a warm white or muted greige. Choose a natural linen
tapered shade and a simple wooden finial. Finish with felt pads and a warm LED for that cozy, minimal glow.
Example 3: The Odd Ceramic Base → Textured “Designer” Statement
If the shape is interesting but the glaze is dated, lean into texture. Use a stone-like finish and pair it with a pleated
shade for a layered, editorial look. Keep the finial simple so the silhouette stays the star.
Common Mistakes (and How to Avoid Them)
- Skipping primer: Leads to peeling. Prime correctly for the surface.
- Heavy spray coats: Causes drips. Use light coats and patience.
- Wrong shade size: Makes the lamp look cheap. Measure first, then buy.
- Keeping a gross old shade: Old shades can be stained or smoky. A new shade is the fastest upgrade.
- Ignoring safety: If the cord is questionable, replace it. Period.
Conclusion: High-End Decor Isn’t a Price TagIt’s a Process
Upgrading a thrifted lamp is one of the most satisfying “before and after” projects because the transformation is dramatic,
practical, and budget-friendly. Focus on safety first, then finish quality, then the shade. Add one or two thoughtful details,
and suddenly your $12 thrift find looks like it came from a showroom with good music and expensive candles.
Go forth and make your lighting fancy. Your room deserves better than overhead glare and regret.
Experience Corner: What This Makeover Actually Feels Like (and Why That’s Normal)
Let’s talk about the part no one glamorizes: the real-life experience of turning a thrift-store lamp into something
you’d proudly put in a “house tour” video. It’s a little treasure hunt, a little science experiment, and a tiny bit of
emotional growth (because spray paint teaches humility).
First comes the thrill of the find. You spot a lamp with a great silhouettemaybe it’s heavy brass, maybe it’s a chunky
ceramic base, maybe it’s wood with interesting lines. You mentally place it in your living room, you picture the shade,
you imagine compliments from guests who “just happen” to ask where you got it. You buy it. You carry it home like a
trophy. And then you notice the cord. It’s stiff. Or sticky. Or both. This is where the makeover becomes less
“Pinterest glow-up” and more “adulting with a screwdriver.”
Cleaning is the next reality check. Thrifted items often come with invisible layers of grime. Once you start wiping,
you realize you’re not just removing dustyou’re removing years. The lamp base changes color by the minute, like it’s
confessing its past. This step feels slow, but it’s weirdly satisfying: it’s the moment you go from “used lamp” to
“project with potential.” And it’s also the moment you learn that paint will not stick to furniture polish, no matter
how optimistic you are.
Then there’s the paint phase, which is basically a relationship test between you and patience. You’ll want to do one
thick coat because you’re excited. Don’t. Light coats are the difference between “smooth and modern” and “drippy
citrus peel texture.” You may also have a brief period of doubt after the first coatbecause the first coat can look
streaky or patchy. That’s normal. Let it dry, keep going, and trust the process. Most “expensive-looking” finishes
are just the result of controlled repetition and proper cure time.
Shade shopping is where many DIYers have their big “aha” moment. You can have a beautifully painted base, but the wrong
shade size will make it look awkwardlike it borrowed clothes from a friend. When you finally get the proportions right,
the lamp suddenly looks intentional and elevated. It’s almost comical how fast the vibe changes. This is why designers
obsess over scale: it’s the cheat code for making a room feel “done.”
Finally, there’s the magical moment when you turn it on. If you rewired it yourself, there’s an extra burst of pride.
The light is warm, the shade glows, the finish looks crisp, and you realize you created something that looks custom and
personalwithout paying luxury pricing. And here’s the best part: the next time you’re thrifting, you’ll see potential
everywhere. Not clutter. Not “old stuff.” Potential. That’s the real upgrade.