Table of Contents >> Show >> Hide
- Cash Register 101: What You’re Actually Using
- Before the First Customer: Opening the Register the Right Way
- Ringing Up a Sale: The Core Steps (Works on Almost Any Register)
- Discounts, Coupons, and “Please Don’t Just Change the Price”
- Taking Payments: Cash, Card, Split Tender, and Other Real Life Stuff
- Fixing Mistakes: Voids, Refunds, Returns, and Exchanges
- Cash Handling Habits That Keep Your Drawer Right (and Your Stress Low)
- Closing the Register: End-of-Shift Without the Mystery Novel
- Troubleshooting: The Stuff That Happens Mid-Line
- Conclusion: Confidence Is a Process, Not a Personality Trait
- My First Week Behind the Register: A 500-Word Reality Check
Welcome to the command center. Whether you’re staring down an old-school button-covered cash register (the kind that sounds like a tiny printer and a typewriter had a baby) or a modern touchscreen POS, the job is the same: ring up items accurately, take payment confidently, and keep the cash drawer balanced so nobody has to play “Where did the $20 go?” at closing time.
This guide walks you through the real-world basicsopening a register, ringing sales, handling cash/card, fixing mistakes, managing returns, and closing outwith practical examples and habits that make you faster and more accurate. Your exact buttons may differ, but the workflow is wonderfully predictable.
Cash Register 101: What You’re Actually Using
“Cash register” can mean two common setups:
- Traditional / electronic cash register (ECR): Physical keys, department buttons, and a built-in receipt printer. Great at doing register things and not much else.
- POS system (point of sale): Usually a touchscreen (tablet or terminal) plus a cash drawer and receipt printer. Often tracks inventory, staff permissions, and sales reports.
Most checkout stations include:
- Cash drawer: Holds bills/coins (and your hopes and dreams during rush hour).
- Display: Shows totals, tax, and change due.
- Receipt printer: Prints receipts and sometimes report tapes.
- Scanner: Reads barcodes (when it’s in the mood).
- Card reader: Chip/tap/swipe payments on POS setups.
- Keys or permissions: Manager functions, voids, refunds, and reports.
Before the First Customer: Opening the Register the Right Way
Start strong. Most register problems aren’t “math issues.” They’re “we skipped setup” issues.
1) Log in and confirm you’re on the right shift
Touchscreen POS systems usually require a login or PIN. Traditional registers may use a key position (like REG) or cashier number. Use your own loginthis protects you and keeps reporting accurate.
2) Count your starting cash (your “float”)
A register typically starts the shift with a set amount of cash (for making change). Common floats might be $100–$200, depending on the business. The important part is consistency.
- Count the bills and coins before you begin.
- Record the starting amount in the POS system or on your store’s log sheet.
- Organize the drawer: large bills in the back, small bills in front, coins separated.
3) Check your supplies and settings
- Receipt paper stocked (and loaded the correct directionyes, it matters).
- Scanner working and clean.
- Correct date/time and tax settings (if you notice it’s wrong, tell a manager immediately).
- If available, use training mode to practice without recording real sales.
Ringing Up a Sale: The Core Steps (Works on Almost Any Register)
The goal is simple: every item gets recorded correctly, then you finalize payment.
Step-by-step: a basic sale
- Start the sale screen (often automatic when you scan the first item).
- Add items by:
- Scanning a barcode, or
- Entering a PLU (price look-up code), or
- Using department/category buttons (common on traditional registers).
- Confirm the item and price on the screen. Catching mistakes early is the fastest kind of fixing.
- Adjust quantity if the customer buys multiples (many systems have a Qty key/button).
- Apply discounts/coupons (more on that below).
- Confirm subtotal, tax, and total.
- Select tender type (cash/card/gift card/etc.) and complete payment.
- Provide receipt (printed, emailed, textedwhatever your system allows).
Quick example: ringing a simple basket
Customer buys:
- 1 bottled drink: $2.49
- 2 snack bars: $1.29 each
You scan the drink, then scan a snack bar and hit Qty 2 (or scan the second one). Confirm the screen shows 2 x $1.29 and the drink at $2.49. Then you move to payment.
Discounts, Coupons, and “Please Don’t Just Change the Price”
Discounts are where registers get spicy. The good news: most systems support a few common discount types.
Common discount methods
- Item discount: Applies to a single product (e.g., 10% off one shirt).
- Transaction discount: Applies to the whole sale (e.g., 15% off everything today).
- Coupon: A specific reduction, often with rules (e.g., $5 off $25).
- Price override: Changes an item price directly. Usually manager-controlled because it’s easy to abuse.
Best habit: If your register has a specific function for a discount or coupon, use it. That preserves reporting accuracy (sales, promos, margins) and reduces “mystery math” later.
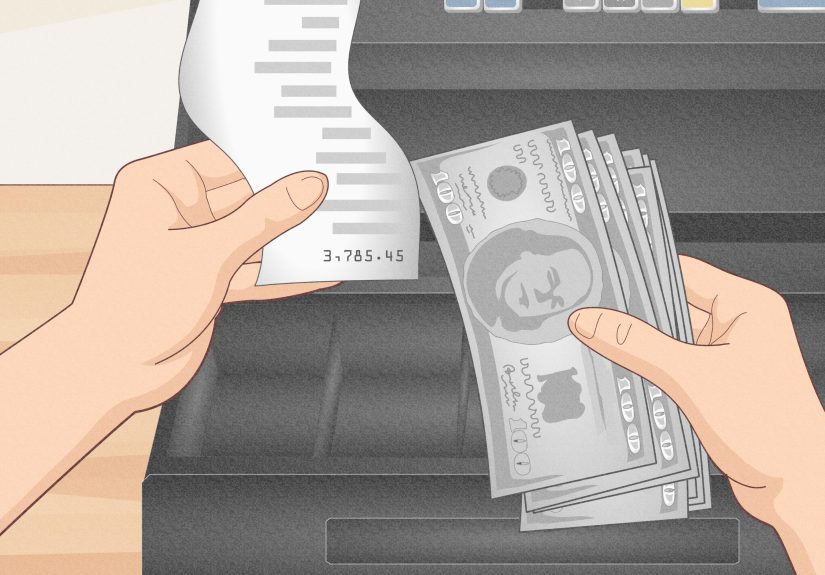
Taking Payments: Cash, Card, Split Tender, and Other Real Life Stuff
Registers call payments “tenders.” You’ll usually choose a tender type and enter the amount received (for cash), or let the card reader handle authorization.
Cash payment: how to do it cleanly
- Tap/select Cash.
- Enter the amount the customer gives you (if needed) or press Cash to accept exact payment.
- The register calculates change due.
- Give change, close the drawer, and hand the receipt.
Making change without panic: the “count back” method
Even if the register tells you the change, counting it back is a classic anti-error move.
Example: Total is $13.58. Customer gives $20.00. Change due is $6.42.
- Start at $13.58.
- Add coins to reach the next dollar:
- + $0.02 = $13.60
- + $0.40 = $14.00
- Add bills to reach $20:
- + $1 = $15
- + $5 = $20
So you hand back 42¢ (2¢ + 40¢) and $6 in bills. It’s fast, confident, and makes customers trust youeven if you’re sweating inside.
Card payments (chip/tap/swipe)
On a POS, you typically hit Charge (or Card) and the customer completes payment on the reader. Your job is to:
- Confirm the amount on the screen matches what the customer expects.
- Follow prompts (tip, signature, receipt option, ID check if your store requires it).
- Wait for approval before finalizing the transaction.
Split payments (a.k.a. the “two cards and a $10 bill” special)
Many systems allow split tender. The clean approach:
- Select the first tender type (e.g., Card) and enter the amount to charge (e.g., $15.00).
- Complete that payment.
- Select the next tender type (Cash) for the remaining balance.
Always confirm the remaining balance before taking the second payment.
Fixing Mistakes: Voids, Refunds, Returns, and Exchanges
Mistakes happen. The difference between a good cashier and a great cashier is how calmly they fix them.
Void vs. refund (why managers care)
- Void: Cancels a transaction (or line item) before it fully settles/finalizes, depending on the system.
- Refund: Money goes back to the customer after payment has been processed and recorded.
Many businesses require manager approval for voids/refunds because those actions can hide theft or errors if abused. Follow your store policy, every time.
Common “save this sale” fixes
- Void a line item: If you scanned the wrong product, highlight it and use Void/Remove Item.
- Quantity correction: If you rang 3 instead of 2, adjust quantity instead of voiding and re-scanningif your system supports it.
- Post-total correction: If the sale is already totaled, call for manager help. Don’t freestyle it with random discounts.
Returns and exchanges (basic workflow)
- Confirm return eligibility (receipt, time window, condition). Policies vary widely.
- Locate the transaction (scan receipt barcode, search by card, or look up by date/time).
- Select the items being returned and confirm quantities.
- Choose refund method (original tender is common, store credit is also common).
- Print or send return receipt for records.
Pro tip: If a customer wants an exchange, many systems do it as a return + new sale. That keeps inventory and reporting cleaner.
Cash Handling Habits That Keep Your Drawer Right (and Your Stress Low)
Cash registers don’t lose money. Humans dousually in tiny, avoidable ways.
1) Keep big bills in the back and do quick drops
If your store uses a drop safe or requires “cash drops,” do them on schedule. Less cash in the drawer reduces risk and makes counting easier.
2) Don’t count cash in front of customers
Count change, yes. But don’t fan out the drawer like you’re auditioning for a heist movie. Keep the workflow discreet.
3) Watch for counterfeit bills (feel, look, tilt)
You don’t need a detective hatjust a routine:
- Feel: Real U.S. currency has distinctive texture and raised ink.
- Look: Check for watermark and security thread (on denominations where applicable).
- Tilt: Look for color-shifting ink on certain denominations and other visible effects.
If your store has a counterfeit pen or UV light, use it the way you were trained (and follow store policy if a bill seems suspicious).
4) Record paid-ins and paid-outs
Sometimes cash moves for reasons other than saleslike adding change, making a safe drop, or paying out a refund. Many POS systems have a Pay In/Pay Out function so your expected cash total stays accurate.
Closing the Register: End-of-Shift Without the Mystery Novel
Closing is where accuracy becomes visible. The basic closeout process looks like this in most retail environments:
1) Stop new sales and print/register reports
Traditional registers may use X and Z reports (X is often “read only,” Z is often “reset/close”). POS systems usually offer a “close drawer,” “end shift,” or “close register” flow with a report screen.
2) Count the cash drawer
- Count bills and coins carefully.
- Separate starting float from earnings if your policy requires leaving the float in the drawer.
- Compare what you counted to what the system expects.
3) Resolve over/short (don’t guessdocument)
If your drawer is over or short, follow store policy. The correct response is usually document and notify, not “I’ll just toss in a dollar and pretend it never happened.” (Registers have receipts. And memories. And sometimes cameras.)
4) Secure cash and receipts
Bundle cash per store process, store paperwork where required, and lock the drawer/register as instructed.
End-of-shift checklist
- ✅ Drawer counted and reconciled
- ✅ Paid-in/paid-out actions recorded
- ✅ Reports printed/saved
- ✅ Cash secured (drop safe / deposit bag)
- ✅ Station cleaned and stocked (paper, bags, etc.)
Troubleshooting: The Stuff That Happens Mid-Line
“The drawer won’t open!”
- Check if a sale needs to be completed (some drawers only open on tender).
- Use “No Sale” only if policy allows.
- Confirm the drawer cable is connected to the printer/terminal (POS setups often route the drawer through the printer).
- If it’s a jam or lock issue, call a managerdon’t pry it like a treasure chest.
“The scanner isn’t scanning!”
- Wipe the scanner window.
- Try a different angle/distance.
- Enter the barcode/PLU manually if allowed.
- If it’s dead, switch to manual entry and notify support/manager.
“Receipt printer is printing blank paper / weird symbols”
- Reload paper (it may be upside down).
- Check for jams.
- Confirm you’re using the correct paper type/size for the printer.
Conclusion: Confidence Is a Process, Not a Personality Trait
Learning how to use a cash register is mostly about mastering a repeatable flow: open the shift, ring items correctly, tender accurately, fix mistakes properly, and close out cleanly. Once you’ve done it a few times, your hands will move faster than your brain can say, “Wait, where’s the quantity button?”
Use the register the way it was designed: scan/PLU for items, built-in discount functions for promotions, proper tender steps for payments, and manager-approved workflows for voids and refunds. Pair that with solid cash-handling habits (organized drawer, count-back change, consistent reconciliation), and you’ll be the person everyone wants scheduled on the busy shiftbecause the drawer stays right and the line keeps moving.
My First Week Behind the Register: A 500-Word Reality Check
I thought my first day using a cash register would be mostly math. I was wrong. It was mostly buttonsand the strange emotional journey of hearing the receipt printer start up during a rush and realizing, “Oh wow, this is happening whether I’m ready or not.”
The first lesson was speed doesn’t come from moving fast. It comes from not needing to fix things. On Day 1, I tried to hurry and ended up scanning an item twice. Then I panicked, hit the wrong button, and somehow made the screen look like I was returning a product that was still sitting in the customer’s basket. A manager came over, pressed three calm little keys, and everything was fine. The customer smiled politely in that way that says, “I forgive you, but I will remember this forever.”
By Day 2, I learned to trust the screen. Not blindlytrust it like you trust a friend who is mostly reliable but occasionally forgets to charge tax. I started reading the item name and price after each scan. That single habit prevented more mistakes than any “move faster” pep talk ever could. It also helped with weird barcodes that rang up the wrong variantsame product, different size, wildly different price. Catching it early saved everyone time and prevented the dreaded “void after total.”
Day 3 was the “split payment era.” A customer paid with a gift card, then wanted to put the remaining balance on a card, then remembered they had cash they wanted to use “because it’s just sitting in my wallet.” The register handled it fine, but my brain briefly left the building. What saved me was slowing down and following the tender sequence like a checklist: first payment completed, confirm remaining balance, second payment, receipt. I also learned to say, “One moment while I confirm the balance,” which sounds professional and buys you the five seconds you need to avoid charging the wrong amount.
Later that week, making change became my confidence flex. I started using the count-back method out loudquiet enough not to perform for the entire store, but clear enough that the customer could follow. It reduced mistakes and made awkward moments less awkward. If the register said $6.42 back, I didn’t just scoop coins like a pirate. I built the change logically: coins to the next dollar, then bills to the amount given. Customers noticed. Some even said, “Thanks,” like I’d done something heroic. (I hadn’t. I’d just avoided accidentally giving away a quarter.)
By Day 5, I discovered the real secret of cash registers: the best cashiers aren’t the fastestthey’re the most consistent. Same routine, every sale. Same drawer organization, every shift. Same policy for refunds, every time. When you do that, the register stops feeling like a machine that judges you and starts feeling like a tool that helps you run the store. And yes, the printer still sounds like a tiny angry robot. But eventually you’ll hear it and think, “Perfect. Next customer.”