Table of Contents >> Show >> Hide
- What “Self-Clean” Actually Does (And Why It Smells Like Regret Sometimes)
- Before You Start: Safety, Prep, and a Quick Reality Check
- Step-by-Step: How to Use Self-Clean on an Oven (The Safe Way)
- Step 1: Pick the right time
- Step 2: Empty the oven and remove racks
- Step 3: Pre-clean the easy stuff (this is where you win the smoke battle)
- Step 4: Choose your clean level or time
- Step 5: Start the cycle (and let the oven lock the door)
- Step 6: Let it rundon’t open the door, don’t poke the bear
- Step 7: Cool-down is part of the cycle
- Step 8: Wipe out ash like you’re dusting a tiny fireplace
- What to Expect During the Self-Clean Cycle
- After Self-Clean: The “Finish Strong” Checklist
- Troubleshooting: When Self-Clean Gets Moody
- How Often Should You Use Self-Clean?
- If You’d Rather Not Use Self-Clean: Safer Alternatives
- Real-World Experiences: What People Learn After Their First Self-Clean
Your oven’s self-clean mode is basically the “leave me alone, I’ve got this” buttonexcept it’s powered by
extreme heat and a door lock that means business. Used the right way, the self-clean cycle can turn baked-on
splatters into a light, wipeable ash. Used the wrong way, it can turn your kitchen into a smoky audition for a
fire-alarm commercial.
This guide walks you through how to use self-clean on an oven safely and effectively, what to expect during the
cycle, and when you should skip self-clean and use a different oven cleaning method instead.
What “Self-Clean” Actually Does (And Why It Smells Like Regret Sometimes)
High-heat self-clean (pyrolytic cleaning)
Most self-cleaning ovens use a high-temperature cleaning cycle (often called pyrolytic cleaning).
The oven heats to very high temps, burning food residue and grease into a powdery ash. After everything cools, you
wipe the ash away with a damp cloth. The oven stays locked during the cycle (and sometimes well after) to prevent
accidental burns.
Steam clean / “EasyClean” style cycles
Some ovens also offer a lower-temperature steam clean (sometimes branded differently). Steam cycles
are shorter and designed for light messesthink “fresh splatter” more than “three-month lasagna incident.” Steam
clean doesn’t replace deep cleaning, but it’s great for maintenance and usually produces less odor and smoke.
Before You Start: Safety, Prep, and a Quick Reality Check
1) Check your owner’s manual first (yes, really)
Every brandand sometimes every modelhandles self-clean a little differently: cycle lengths, rack rules, and
controls vary. If your oven has a special “self-clean safe” rack coating, you may be allowed to leave certain racks
inside, while other racks must be removed.
2) Ventilation is non-negotiable
Self-clean can produce heat, odors, and smokeespecially if the oven is heavily soiled. Turn on your range hood (if
it vents outdoors), open a couple windows, and consider running a fan to keep air moving. If your smoke alarms are
hair-trigger sensitive, be prepared for the dramatic beep solo.
3) Kids and pets: make a plan
The oven’s exterior can get very hot during self-clean, and the door is locked for safety. Keep kids away from the
kitchen, and keep pets away tooespecially birds, which can be extremely sensitive to fumes during self-clean.
4) Don’t treat self-clean like a “magic erase” for heavy gunk
A common best practice: remove what you can first. Wipe up large spills, puddles of grease, and loose
crumbs before you run self-clean. Doing a quick pre-clean helps reduce smoke and can lower the chance of stubborn
stains getting “baked on” even harder.
5) Remove anything that doesn’t belong in there
- Remove racks (unless your manual says a specific rack is self-clean safe).
- Remove cookware, thermometers, pizza stones, foil, and any oven liners.
- Never use self-clean with loose items in the oven cavity (they can discolor, warp, or create a mess).
Step-by-Step: How to Use Self-Clean on an Oven (The Safe Way)
The exact buttons vary, but the process is basically the same. Here’s the universal playbook with practical tips.
Step 1: Pick the right time
Choose a time when you can be home and awake (no “set it and go to sleep”). You’ll want to monitor for excessive
smoke and keep the kitchen clear. Also: don’t do this 20 minutes before guests arrive unless your party theme is
“mystery haze.”
Step 2: Empty the oven and remove racks
Take out oven racks, broiler pans, and anything else inside. If your racks are shiny/silver, many manufacturers
recommend removing them to prevent discoloration and difficult sliding later. If you have dark, porcelain-coated or
“self-clean safe” racks, your manual may allow them to stayverify first.
Step 3: Pre-clean the easy stuff (this is where you win the smoke battle)
- Let the oven cool completely before you start.
- Wipe out loose crumbs and chunks with a damp paper towel or cloth.
- Carefully wipe the inside door area and the frame edge where grime collects.
-
Avoid soaking or scrubbing the door gasket. That gasket helps seal in heat, and damaging it can cause leaks and
poor performance.
Step 4: Choose your clean level or time
Many ovens offer light/medium/heavy settings or a time range. Light soil typically takes less time; heavy soil takes
longer. If your oven hasn’t been cleaned in a long time, consider removing more grime manually first, then choosing a
medium cycle (rather than jumping straight to the longest setting).
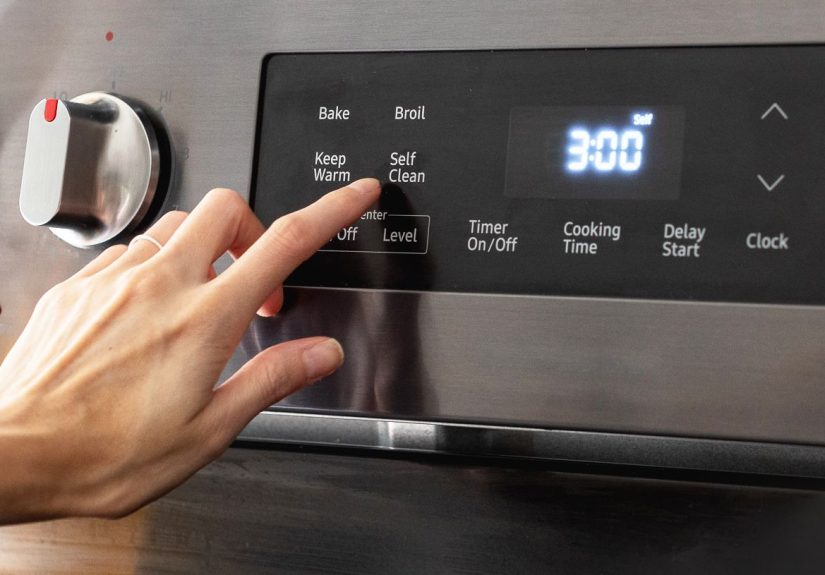
Step 5: Start the cycle (and let the oven lock the door)
Close the door fully. Press Self Clean or Clean, select the level/time, and press
Start. Some models also have a manual lock lever you must slide into the locked position.
Step 6: Let it rundon’t open the door, don’t poke the bear
During self-clean, the door stays locked and a fan may run. The oven will be extremely hot. You may notice a smell,
a little smoke, and the sound of the cooling fan cycling. This is normal. What’s not normal is thick smoke pouring
out like your oven is sending a distress signal to nearby satellites.
Step 7: Cool-down is part of the cycle
When the timer ends, the oven still needs time to cool. Many ovens remain locked until the internal temperature drops
to a safer level. Don’t force the door open if it won’t unlocklet the cool-down finish.
Step 8: Wipe out ash like you’re dusting a tiny fireplace
Once the oven is completely cool, use a damp cloth to wipe away the powdery ash on the bottom and sides. If a few
spots remain, use mild soap and water or a non-scratch sponge. You’re cleaning ash nownot chiseling stone.
What to Expect During the Self-Clean Cycle
- Odor: Normal, especially if there’s baked-on grease.
- Some smoke: Possible, especially in a heavily soiled oven.
- Door lock: Normal and required for safety.
- Fan noise: Many models run cooling fans during and after the cycle.
- Extra heat in the kitchen: Also normalventilate and keep the area clear.
After Self-Clean: The “Finish Strong” Checklist
Clean the racks separately
If you removed racks, wash them by hand in warm, soapy water. For stubborn residue, soak them in the bathtub or a
large plastic bin (just rinse well and dry completely). Avoid harsh abrasives that can scratch the rack finish.
Wipe the door glass carefully
Once the oven is fully cool, wipe the inner glass with a damp cloth. If there’s haze, a little mild dish soap and
water often helps. Avoid slamming cold water onto warm glasstemperature shock is not a vibe.
Run a short bake to clear lingering smells (optional)
If the oven smells “toasty” after self-clean, open windows and let it air out. Some people run the oven at a low
temperature for 10–15 minutes after wiping to help clear remaining odor (only after the ash is removed and the oven
is dry).
Troubleshooting: When Self-Clean Gets Moody
The oven won’t start self-clean
- Make sure the door is fully closed (some models won’t lock if it’s even slightly ajar).
- On manual-lock models, confirm the lock lever is engaged.
- Some ovens require the oven temperature to be below a certain level before self-clean can begin.
The door won’t unlock after the cycle
This is usually a cool-down issue. Wait until the oven is completely cool. If it stays locked for an unusually long
time, try turning the oven off, waiting, and checking again. Don’t force the dooryou can damage the latch.
Too much smoke
Press cancel if your model allows it, keep the door closed, and ventilate the kitchen. Once everything cools, remove
remaining debris manually before attempting self-clean again. Excess smoke often means there was too much grease or
loose residue to incinerate politely.
It’s still dirty afterward
Self-clean works best on light-to-moderate soil. If you’ve got thick, baked-on spillover, you may need a second pass
(after wiping ash) or a targeted manual clean. In the future, quick wipe-downs after messy bakes will make self-clean
more effective and less smoky.
How Often Should You Use Self-Clean?
“It depends” is the honest answer. If you cook daily and your oven sees a lot of bubbling casseroles and sugary
drips, you’ll need deeper cleaning more often than someone who mostly reheats pizza. A practical approach:
- Maintenance: Wipe fresh spills when the oven is cool.
- Monthly-ish: Do a quick manual wipe-down or steam clean (if available).
- Occasionally: Use high-heat self-clean when buildup is noticeableideally before it becomes a thick layer.
Also, if your oven is older or you’ve heard that self-clean stresses components on some models, consider using it
less frequently and leaning more on routine wipe-downs and steam cleaning.
If You’d Rather Not Use Self-Clean: Safer Alternatives
Baking soda paste method (low drama, high payoff)
- Make a paste of baking soda and water.
- Spread it on cool oven surfaces (avoid the heating elements and gasket).
- Let it sit for several hours or overnight.
- Wipe away with a damp cloth; use a little vinegar on the cloth to help lift residue.
Steam clean (if your oven has it)
Follow your model’s instructionsmany steam clean cycles use a measured amount of water, run for a short time, and
end with wiping out softened grime. It’s great for routine upkeep and smaller messes.
Real-World Experiences: What People Learn After Their First Self-Clean
The first time someone runs a self-clean cycle, it often goes one of two ways: (1) “Wow, that was easy,” or (2)
“Why does my house smell like a hot penny and a campfire had a disagreement?” Most of the difference comes down to
prep and expectations.
A common “aha” moment is realizing self-clean is not a substitute for basic oven manners. If you start the cycle
with a floor full of crumbs and a sticky syrup spill under the bottom rack, self-clean doesn’t politely whisk it away.
It turns it into smoke, ash, and possibly a brand-new personality trait: being jumpy at the sound of a smoke alarm.
People who have the best experience usually do a quick pre-wipenothing fancy, just removing loose debris and obvious
puddles of grease. That simple step can dramatically cut down on smoke and odor (and your neighbors’ curiosity).
Another real-world lesson: racks are the underrated plot twist. Many folks leave racks in because it feels logical:
“If the oven is cleaning itself, the racks are… in the oven… so… boom.” Then the cycle ends, and the racks slide like
they’re coated in sandpaper, or they discolor, or they just feel rough. The people who end up happiest remove the racks
and wash them separatelyannoying, yes, but far less annoying than wrestling with a rack that now squeaks like a haunted
drawer. A tip that pops up repeatedly is soaking racks in hot, soapy water (bathtub or a large bin), then using a
non-scratch sponge for the stubborn spots.
Timing matters more than you’d think. Plenty of people try self-clean right before a holiday meal or a party because
they want a sparkling oven for company. The problem is that self-clean cycles can take hours plus cool-down time,
and the oven may stay locked longer than expected. If you need to bake something at 5 p.m., starting self-clean at noon
is not the stress-free flex it sounds like. The “experienced” approach is running self-clean on a day you can open
windows and let the house air outideally when you don’t need the oven immediately afterward.
Ventilation is the other big reality check. People who turn on the hood fan and crack windows usually report a much
smoother experience than those who try to power through with everything closed. If you have pets, the safest move is
keeping them out of the kitchen entirely and giving the house a good air exchange. Bird owners, in particular, learn
quickly to relocate birds to a closed, well-ventilated room far from the kitchen before starting the cycle.
Finally, there’s the “finish line” lesson: self-clean doesn’t end when the timer ends. The best results come from
waiting until the oven is fully cool, then wiping out ash thoroughly. People who skip the wipe-out step often complain
that the oven still looks dusty or smells odd on the next bake. But when you wipe the ash, clean the door edge, and
put everything back once it’s dry, the oven feels genuinely refreshedlike it took a shower and changed into clean
clothes. Not a brand-new oven, but definitely a “we can work with this” oven.