Table of Contents >> Show >> Hide
- Filters vs. Lenses: Same Vibe, Different Job
- Quick Setup Checklist (So Filters Actually Show Up)
- How to Use Lenses While Recording a Video Snap
- How to Apply Filters After Recording (Including Reverse + Speed Effects)
- How to Add Voice Filters (Because Your Voice Deserves a Costume Too)
- Find More Video Filters and Lenses (Lens Explorer, Favorites, Snapcodes)
- Tips to Make Snapchat Video Filters Look Better (Not Glitchy)
- Troubleshooting: When Snapchat Video Filters Aren’t Working
- Extra Credit: Snapchat Filters on Desktop (Calls, Web, and What Changed)
- The “Experience” Section: of Very Real Snapchat Filter Moments (and What They Teach You)
- Conclusion
Snapchat video filters are basically costumes for your clips. Some make your footage look cinematic. Some slap on your location, the weather, or your Bitmoji.
And some… turn you into a raccoon. (No judgment. Raccoons are thriving.)
The trick is knowing where filters live, when to apply them, and how to stack them without turning your video into a glittery mess.
This guide breaks it all downstep-by-step, with real examplesso you can go from “Where did the filters go?” to “I’m the Spielberg of dog-ear AR.”
Filters vs. Lenses: Same Vibe, Different Job
Snapchat uses two main “video magic” tools, and mixing them up is the #1 reason people think the app is haunted:
Lenses (AR effects you use while filming)
Lenses are the augmented reality effects that change your face, add 3D objects, transform backgrounds, or drop animated chaos into the world.
You usually choose these before you record (or while recording), and they react to movementlike face tracking, gestures, and environment scanning.
Filters (overlays and effects you apply after filming)
Filters are overlays and effects you swipe through after you record: color grading, time, location, speed effects (like reverse), captions, and more.
You can even layer multiple filters for extra flavorbecause one filter is “cute,” but two filters is “I understand Snapchat.”
Quick Setup Checklist (So Filters Actually Show Up)
Before we get fancy, make sure Snapchat is allowed to do its job:
- Update Snapchat (new Lenses and filters roll in constantly).
- Enable Filters inside Snapchat settings if they’re missing.
- Turn on Location Services if you want geofilters and location-based overlays.
- Allow Camera + Microphone so video effects and voice features work properly.
If filters suddenly vanish, it’s often because Filters are toggled off in Snapchat settings or location services are offespecially if you used to see
location/time/weather-style overlays and now it’s just… raw reality.
How to Use Lenses While Recording a Video Snap
Lenses are the “live” effects. Think: puppy ears, face swap, animated characters, surreal makeup, AR propsanything that reacts in real time.
Step-by-step: Turn on a Lens and record
- Open Snapchat and land on the Camera screen.
-
Open the Lens carousel (you’ll see Lens options you can swipe through).
Pick one by tapping it. - Follow any on-screen prompts (raise eyebrows, open mouth, tilt headSnapchat loves a good face workout).
-
Record your video:
- Press and hold the capture button to record.
- On many phones, you can slide to lock recording for hands-free filming.
- Release to stop recording (or tap stop if recording is locked).
Face Lenses: The classic selfie effects
Face Lenses work best on the front camera and track facesyours, your friends’, your dog’s if your dog will hold still for two seconds (good luck).
If you’re filming with multiple people, try to keep faces well lit and in frame so tracking doesn’t stutter.
World Lenses: AR objects in your environment
World Lenses use the rear camera to place effects into the world3D objects, characters, and animations that look like they’re “in the room.”
For smoother results:
- Move your phone slowly so the AR effect can “stick” to surfaces.
- Give it decent lightingAR hates dark rooms almost as much as your front camera does.
- Tap or interact if the Lens offers controls (some Lenses have hidden mini-games or triggers).
Scan Lenses: Effects that recognize stuff
Some Lenses include Scan features (think: scanning objects, text, or scenes). If a Lens supports scanning, Snapchat will typically prompt you to tap to enter
the scan experience. These are great for “what is this?” moments and interactive AR.
Connected Lenses: Use a Lens with friends (real-time)
Connected Lenses let you and friends interact together in the same Lens experienceeven if you’re not in the same place.
Some prompt you to map a shared space, then invite friends (often via Snapcode) so everyone can jump into the same AR situation.
It’s like multiplayer… but with more face distortion.
How to Apply Filters After Recording (Including Reverse + Speed Effects)
Once you record a video Snap, Snapchat takes you to a preview/edit screen. This is where Filters shine.
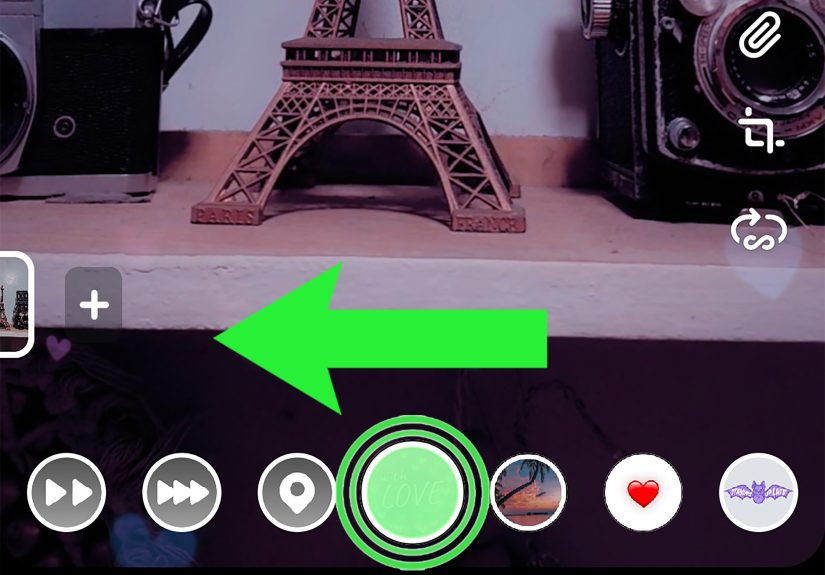
Step-by-step: Add a filter to a video
- Record your video (with or without a Lens).
- On the preview screen, swipe left or right to cycle through available filters.
- Stop when you find the one you want (Snapchat applies it immediately).
- Send it to friends, add it to your Story, or save it.
Popular video filter types you’ll see
- Color and mood filters (warm, cool, high-contrast, vintage-ish vibes).
- Info overlays (time, day, temperature, speedavailability varies).
- Geofilters (location-based designs, event filters, local stickers).
- Speed filters (slow-motion style, fast-forward style, and reverse).
Example: Reverse a Snapchat video (the “rewind” filter)
Want a clip of you tossing a drink that magically leaps back into your hand? That’s Snapchat’s reverse-style filter.
Record your video, then swipe through filters until you find the reverse/rewind effect (often shown as an icon like three triangles).
Snapchat flips the video playback instantlyno editing software required.
Layering multiple filters (yes, you can stack them)
Here’s where Snapchat gets sneaky-in-a-good-way: you can stack multiple filters on one Snap.
After choosing a filter, look for the layer option (often a “stacked layers” icon), then add another filter on top.
Fun stacks that usually work well on video:
- Color filter + location filter (clean and classic)
- Color filter + time/day overlay (subtle “this happened now” energy)
- Geofilter + Bitmoji-style overlay (if you’re feeling animated)
Pro tip: stacking is powerful, but restraint is attractive. If your video looks like a sticker explosion, your friends will watch exactly 0.8 seconds before swiping away.
How to Add Voice Filters (Because Your Voice Deserves a Costume Too)
Voice filters are separate from visual filtersand they’re only available on video (because photos can’t talk… yet).
Step-by-step: Add a voice filter or mute audio
- Record a video Snap.
- On the preview screen, find the speaker icon.
-
Tap the speaker icon to mute audio, or
press and hold it to open voice filters (options vary by device/account). - Select a voice effect and preview the result.
Bonus: Add a voiceover (narration) for storytelling
If you’re making a mini vlog, a “here’s what’s happening” narration can save your videoespecially if the original audio is
wind + chaos + your friend yelling “WAIT DO IT AGAIN.”
Snapchat offers a Voiceover option through its timeline-style editing tools on some accounts/devices.
Find More Video Filters and Lenses (Lens Explorer, Favorites, Snapcodes)
If your Lens carousel feels stale, you’re not out of filtersyou’re just not shopping the good aisle.
Lens Explorer: the giant library of community Lenses
Lens Explorer lets you browse a huge catalog of Lenses made by Snapchat and creators.
When the Lens carousel is active, look for the magnifying glass to search and explore.
You can typically add Lenses to your carousel temporarily, and tap a heart to favorite the ones you want to keep handy.
Snapcodes: unlock a Lens instantly
If someone shares a Snapcode for a Lens, you can scan it in Snapchat to unlock that effect.
This is especially useful for branded Lenses, event Lenses, and niche creator effects you’ll never find by casual scrolling.
Why a Lens disappeared (and you didn’t do anything wrong)
Snapchat rotates available Lenses often to make room for new ones. If a favorite vanishes, it may simply be out of rotation.
The easiest workaround: check Lens Explorer and see if it’s still discoverable there, or find something similar and move on like the emotionally resilient icon you are.
Tips to Make Snapchat Video Filters Look Better (Not Glitchy)
- Light your face: Front-facing AR works best when your face isn’t a shadow.
- Hold steady for AR tracking: Quick camera whips can break World Lenses.
- Keep faces fully in frame: Partial faces = partial tracking = cursed results.
- Let the Lens load: Some Lenses take a moment to fully applyespecially on older phones.
- Record first, then filter when needed: If you want speed/reverse effects, apply them after recording via filters.
Troubleshooting: When Snapchat Video Filters Aren’t Working
Problem: “I don’t see filters when I swipe.”
- Make sure Filters are enabled inside Snapchat settings.
- Turn on Location Services if you expect geofilters/location overlays.
- Restart Snapchat (yes, it’s annoying, but it works).
Problem: “The Lens is laggy or looks wrong.”
- Try better lighting and keep your face centered.
- Close other heavy apps (your phone can only do so much multitasking).
- Some Lenses aren’t available on all devicesespecially complex World/AI effects.
Problem: “Voice filters don’t appear.”
- Voice filters are for video Snaps, not photos.
- On many versions, you need to press and hold the speaker icon (tap may only mute).
- Availability can vary by device/account.
Extra Credit: Snapchat Filters on Desktop (Calls, Web, and What Changed)
If you remember the old Snap Camera desktop app: you’re not imagining itit was a thing. But Snapchat has shifted away from it as a standalone app.
Today, Snapchat points users toward options like a browser extension and Snapchat for Web for certain desktop use cases.
For most people, though, the bestand most updatedfilter experience is still inside the Snapchat mobile app, where new Lenses and video effects land first.
The “Experience” Section: of Very Real Snapchat Filter Moments (and What They Teach You)
Using Snapchat video filters is a lot like trying on outfits in a store where the lighting changes every five seconds. You walk in confident,
you pick a Lens, and suddenly you’re a sad clown with sparkling eyebrows who can’t blink without summoning a digital pigeon. It’s chaoticbut there are patterns,
and once you notice them, filters get way easier (and funnier) to use on purpose.
One of the most common experiences: you find a Lens that looks incredible in the preview, hit record, and then it glitches mid-sentence like your phone just remembered
it has a battery. That’s usually not “Snapchat being broken,” it’s AR tracking being picky. The fix is almost always the same: more light, a steadier hand,
and keeping your face fully in frame. If you’re filming at night, aim your face toward a lamp (soft lighting is best) and keep your phone a consistent distance away.
Suddenly the Lens stops jittering, and your video goes from “possessed” to “polished.”
Another classic: you record something you think is hilarious, then start swiping filters and accidentally discover that the reverse effect makes it
10x funnier. Simple actions become magic tricks. Dropping keys turns into keys leaping back into your palm. A sip of a drink becomes an “anti-sip.”
The lesson here is that Snapchat’s post-recording filters are basically a mini editing suite hiding in plain sight. If your clip feels a little flat,
swipe through the filters before you give up on itsometimes the perfect effect is one swipe away.
Then there’s the “filter stacking” glow-up. People often assume stacking is only for photos, but layered video filters are how you go from casual Snap to
“this could be a Story highlight.” A subtle color filter + a clean geofilter + a tiny time overlay can make your video feel intentional without screaming,
“I spent 40 minutes editing this.” It’s like seasoning: a little salt makes everything better, but nobody wants to eat a tablespoon of salt.
Voice filters are their own rite of passage. The first time you press and hold the speaker icon and hear your voice turn into a cartoon creature,
you’ll understand why Snapchat has survived every social app trend cycle. But voice effects also teach restraint: if your message matters, keep it clear.
If your message is “look at this weird sandwich,” then by all means, use the chipmunk voice and commit to the bit.
The biggest takeaway from all these moments is simple: Snapchat filters reward experimentation. Record first if you need a timing-perfect moment,
then try filters after. Use Lenses live when you want performance and reactions. Save favorites when you find a winner. And remember: if a filter makes you laugh,
it’s doing its jobeven if it also makes you look like a glamorous raccoon with laser eyes.
Conclusion
Snapchat video filters are easy once you know the flow: use Lenses while recording for AR transformations, then swipe through Filters
after recording for overlays, color effects, and speed tricks like reverse. Explore Lens Explorer to find new effects, stack filters for a cleaner style,
and don’t forget voice filters when your video needs extra personality.