Table of Contents >> Show >> Hide
- Why This IKEA Hack Works So Well
- Before You Start: Pick Your Deco Direction
- Tools and Materials Checklist
- Step-by-Step: How to Build an Art Deco IKEA Hack Table
- Design Recipes You Can Copy Today
- Common Mistakes (and How to Dodge Them)
- How to Style Your Finished Table Like a Pro
- Budget and Time Reality Check
- Durability, Safety, and Practical Use
- Final Thoughts
- Experience Journal: Real-World Lessons from Building an IKEA Hack Art Deco Table (Extended 500+ Words)
Some furniture projects whisper. This one arrives in a feathered robe, orders a mocktail, and politely steals the spotlight.
If you’ve ever looked at a simple IKEA table and thought, “You could be fabulous with the right geometric drama,” you’re in the right place.
This guide walks you through turning a basic IKEA piece into an Art Deco-inspired statement table that looks far more expensive than it is.
We’re talking sharp lines, bold symmetry, glossy finishes, and metallic accentsthe kind of details that make guests ask, “Wait… where did you buy that?”
You can answer, “I made it,” and enjoy the tiny standing ovation happening inside your own heart.
Better yet, this is a practical DIY: no boutique workshop required, no exotic tools, and no need to have a design degree from the planet Gatsby.
Why This IKEA Hack Works So Well
Art Deco Is Perfect for Furniture Makeovers
Art Deco is built on visual confidence: geometric patterns, mirrored balance, luxe-looking materials, and high-contrast color choices.
Translation for DIYers: you can create a dramatic result with tape, paint, and a clear design plan.
The style rewards precision and repeatable motifs, which makes it ideal for turning plain furniture into something sculptural and intentional.
IKEA Gives You a Clean, Affordable Canvas
Many IKEA tables are simple by designwhich is exactly what makes them great for hacking.
A clean silhouette lets Art Deco detailing shine instead of fighting with heavy ornament.
The well-known square side table format is especially useful: the proportions are balanced, easy to pattern, and friendly for first-time upcyclers.
You can use this method on side tables, coffee tables, or even nested pieces if you want a matching set.
Before You Start: Pick Your Deco Direction
The fastest way to make a DIY project look “expensive” is to choose one visual language and commit.
Art Deco has room for variation, but random choices can turn glam into chaos.
Choose your look first, then build your materials list around it.
Three Foolproof Style Directions
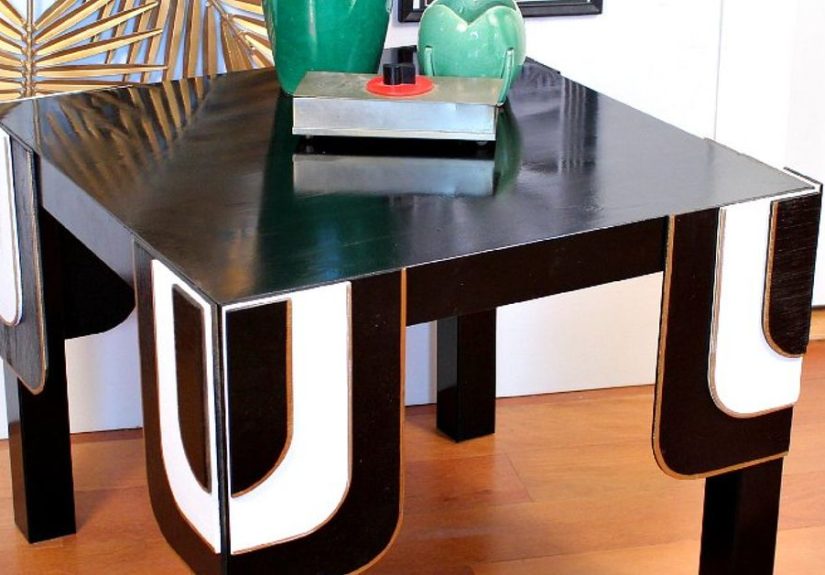
- Classic Noir Deco: Black + gold + ivory, high gloss, crisp lines, dramatic contrast.
- Warm Walnut Deco: Faux wood grain tones + matte black + brass accents for a vintage-luxe vibe.
- Pastel Miami Deco: Blush, mint, or pale aqua with metallic details and curved motifs for a lighter, playful take.
Choose One Primary Pattern Family
- Sunbursts
- Chevrons
- Stepped arches
- Fan motifs
- Greek key borders
Pro tip: use one hero pattern on the tabletop and keep legs/edges simpler.
Your table should feel styled, not like every geometry worksheet at once.
Tools and Materials Checklist
You can absolutely improvise, but this kit gives the best chance of a durable finish:
- Degreasing cleaner + microfiber cloths
- Fine and medium grit sandpaper (or sanding sponge)
- Tack cloth or vacuum with brush attachment
- Bonding primer suitable for laminate/melamine
- Paint (cabinet/furniture-grade latex, acrylic enamel, or similar durable finish)
- Painter’s tape (multiple widths)
- Mini foam roller + angled brush
- Metallic paint, gilding wax, or rub-on leaf for accents
- Clear topcoat (water-based polyurethane or furniture sealer)
- Optional: adhesive trim, half-round molding, corner appliqués, mirror tiles
- Safety gear: mask/respirator, gloves, eye protection, ventilation fan
Step-by-Step: How to Build an Art Deco IKEA Hack Table
Step 1: Clean Like You Mean It
Paint hates grease, dust, and mystery fingerprints.
Wipe every surface thoroughly, especially corners and edges.
If your table has glossy laminate, remove all residue and let it dry fully.
Skipping this step is the number-one reason “my paint peeled” becomes your next sentence.
Step 2: Scuff Sand for Adhesion
You’re not trying to remove the existing finish; you’re creating tooth so primer can grip.
Lightly sand the tabletop, aprons, and legs.
Then remove all dust with a vacuum and tack cloth.
If dust remains, your finish can feel rough and look cloudy.
Step 3: Prime the Surface
Apply a thin, even coat of bonding primer rated for laminate/particleboard furniture.
Let it cure according to label instructions, then lightly sand if needed for smoothness.
For high-contrast designs (black over light base, or vice versa), two thin primer coats may be worth the patience.
“Thin and boring” beats “thick and drippy” every time.
Step 4: Lay Down the Base Color
Use a roller for broad surfaces and a brush for edges.
Two light coats are better than one heavy coat.
Let each coat dry fully before the next.
If you’re creating a glossy Deco look, surface smoothness matters: sand lightly between coats only if necessary.
Step 5: Build the Geometric Deco Pattern
This is the fun partthe “wow” layer.
Mark your pattern with a ruler and pencil first.
Use painter’s tape for clean lines, pressing edges firmly to prevent bleed.
Paint your contrasting color (or metallic stripe), then remove tape while paint is still slightly tacky for sharper edges.
If you want a raised designer look, add thin trim pieces in geometric layouts:
frames, stepped rectangles, fan rays, or mirrored “sunburst” spokes.
Paint everything in one color afterward for a sculpted, architectural effect.
Step 6: Add Metallic Accents Without Going Full Disco Ball
Metallics are essential in Art Deco, but restraint is your secret weapon.
Highlight corners, border lines, trim edges, or motif intersections.
Gold or brass looks classic; chrome/silver reads cooler and more modern.
Keep metallic detail to roughly 10–20% of visible surface area for a premium look.
Step 7: Seal and Cure
Seal with a durable clear coat suitable for tabletops.
Apply two to three thin coats as directed.
Allow full cure before heavy use, especially if you plan to style with books, trays, or ceramic decor.
Paint that feels dry is not always paint that is cureddon’t rush this finish line.
Design Recipes You Can Copy Today
Recipe 1: “The Gatsby Side Table”
- Base: satin black
- Pattern: centered sunburst in soft gold
- Detail: thin gold border around top edge
- Styling: black-and-white book stack, small brass tray, emerald ceramic vase
Recipe 2: “The Hotel Lobby Moment”
- Base: deep navy
- Pattern: stepped-arch panels on each table side
- Detail: metallic champagne accents on arch outlines
- Styling: smoked glass candle holder + sculptural object
Recipe 3: “Miami Deco Lite”
- Base: pale mint or blush
- Pattern: repeated chevrons on tabletop
- Detail: brushed gold corner caps
- Styling: fluted glass, pastel art print nearby, curved lamp silhouette
Common Mistakes (and How to Dodge Them)
- Mistake: Painting directly on slick laminate.
Fix: Scuff sand + bonding primer first. - Mistake: Thick coats for “faster coverage.”
Fix: Multiple thin coats for smoother, tougher finish. - Mistake: Pulling tape too late.
Fix: Remove when paint is tacky, not fully hardened. - Mistake: Ignoring ventilation.
Fix: Cross-ventilate, use fans, and follow product safety labels. - Mistake: Over-decorating every surface.
Fix: One hero motif + supporting accents = higher-end result.
How to Style Your Finished Table Like a Pro
Your DIY table deserves a thoughtful “landing zone.”
Use the rule of three for tabletop styling: one vertical element, one horizontal element, one textured or reflective element.
Example:
- Vertical: slim vase or candlestick
- Horizontal: coffee-table book or tray
- Texture/shine: glass bead box, mirrored coaster, brass object
Keep the arrangement tight so the pattern remains visible.
If your hack includes a bold top design, avoid covering the center completely.
Let your handiwork breathe.
Budget and Time Reality Check
A polished IKEA Art Deco table hack can be surprisingly affordable.
Typical cost range:
- Table base: budget-friendly IKEA model
- Paint + primer + topcoat: moderate cost depending on quality and leftovers on hand
- Decorative accents: optional, highly variable
Timeline for most people:
- Day 1: prep, sand, prime
- Day 2: base coats + pattern paint
- Day 3: metallic details + clear coat
- Day 4+: curing and styling
Yes, you can try to sprint it in one weekend.
But if you want a finish that survives mugs, remotes, and enthusiastic guests, give each layer the dry time it asks for.
Durability, Safety, and Practical Use
Beauty is great; durability is better.
Use coasters, avoid dragging rough decor across the surface, and refresh topcoat annually in high-use spaces.
For households with children, place the table where climbing risk is lower and secure taller furniture around it using anti-tip safety practices.
During your project, prioritize ventilation and dust control, especially while sanding and painting.
A glamorous table should not come with a headacheliterally.
Final Thoughts
The best part of an IKEA Art Deco table hack is the mix of accessibility and personality.
You start with an affordable, minimalist base and end with a piece that feels custom, expressive, and genuinely fun to live with.
You don’t need to recreate a museum period room.
Just borrow the Deco spiritgeometry, shine, symmetry, confidenceand adapt it to your space.
If your first version isn’t perfect, congratulations: you’re officially a real DIYer now.
Every brush mark teaches you something.
Every tape line makes the next one cleaner.
And every guest who asks where you bought it gives you the same deeply satisfying answer:
“I hacked it.”
Experience Journal: Real-World Lessons from Building an IKEA Hack Art Deco Table (Extended 500+ Words)
The first time I attempted an Art Deco IKEA table hack, I was wildly overconfident and underpreparedthe classic DIY cocktail.
I thought, “How hard can it be? It’s a square table and some tape lines.”
Three hours later, I had one sticky roller, a crooked chevron pattern, and a new respect for measuring twice.
But that first project taught me the practical rhythm of this kind of makeover.
The real magic is not in complicated tools; it’s in sequence and patience.
Clean first, sand lightly, prime properly, then layer color with intention.
Once I stopped trying to skip steps, everything looked ten times more polished.
On my second build, I treated the table like a design exercise instead of a paint emergency.
I sketched the top pattern on paper and set rules: one hero motif, one accent metallic, one neutral anchor color.
That single decision eliminated the visual clutter that ruined my first try.
I went with a black base and stepped gold lines inspired by old theater interiors.
The result felt dramatic but not loudlike vintage glamour with modern manners.
Friends immediately thought it was store-bought, which is always the DIY equivalent of winning a tiny Oscar.
I also learned how much lighting changes the project.
Under warm evening light, gold accents looked rich and soft.
In bright daylight, the same accents looked sharper and more architectural.
If you’re choosing between brass and chrome tones, test swatches in the actual room at different times of day.
That five-minute check can save you from repainting an entire top panel.
Another lesson: matte finishes hide imperfections better, but satin and gloss scream “Art Deco” more convincingly.
For me, satin became the sweet spotenough sheen to feel luxe, not so much that every tiny brush trail becomes headline news.
On my third version, I pushed the style farther and experimented with raised trim to create a framed geometric border.
It looked incredible, but only after I corrected one rookie move: I used trim that was too thick at first, which made the tabletop feel clunky.
Swapping to thinner strips gave that elegant Deco geometry without turning the table into a visual brick.
I also switched to a better bonding primer, and the difference in finish durability was obvious within weeks.
Coasters no longer felt like emergency equipment; they were just good manners.
The topcoat cured harder, and the table handled daily use much better.
The most useful non-aesthetic lesson was workflow.
I now batch tasks: measure and tape all lines first, then paint all similar sections, then detail, then seal.
It reduces decision fatigue and keeps your edges cleaner because you’re less likely to rush.
I keep a “mistake brush” nearby tooa small angled brush for quick corrections while paint is still workable.
That one tool has saved me from many unplanned abstract art moments.
And yes, ventilation matters.
Opening windows and running a fan made the process more comfortable and helped me stay focused longer.
Emotionally, these projects became more than furniture upgrades.
There’s something satisfying about transforming a very ordinary object into a piece that reflects your taste.
It shifts your home from “assembled” to “curated.”
Guests notice, but more importantly, you notice every day.
You walk by and think, “That’s mine. I made that.”
If you’re on the fence, start simple: one table, one motif, one weekend.
Don’t chase perfection on version one.
Chase momentum.
Because once you complete one successful IKEA Art Deco table hack, your brain immediately starts scouting the next blank surface like a design detective.
Side table today, console tomorrow, world domination by geometric pattern next month.