Table of Contents >> Show >> Hide
- Why Sliding Puzzles Still Rule (Yes, Even in 2026)
- The 3D Printed Upgrade: A Puzzle That Can’t Lose Its Tiles
- How 3D Printed Sliding Puzzles Keep Every Piece Accounted For
- Design and Printing Tips for Smooth Sliding (Without the “Sandpaper Symphony”)
- Customization Ideas That Make Your Puzzle Actually Worth Showing Off
- Specific Examples of 3D Printed Sliding Puzzles People Actually Use
- Why This Is Great for STEM, Gifts, and Marketing (Yes, Marketing)
- Buying vs. Printing: Which Route Makes Sense?
- Care, Maintenance, and “How to Keep It Sliding Like New”
- FAQ: Quick Answers Before Your Printer Starts Judging You
- Conclusion (Plus of Real-World Maker Experiences)
Sliding puzzles are the perfect low-tech dopamine machine: you move one tile, the board shifts, your brain whispers
“one more move,” and suddenly it’s 40 minutes later and you’ve forgotten what food tastes like. The only downside?
Traditional sliding puzzles love to shed pieces. One missing tile turns a brain teaser into a fancy coaster.
That’s where 3D printed sliding puzzles come in. With smart “captive” designsframes, lids, rails,
and print-friendly clearancesyou can make a puzzle that slides smoothly while keeping every tile locked in.
No lost pieces. No rummaging through couch cushions like you’re panning for gold. Just satisfying, clicky problem-solving
you can toss in a bag without fear.
Why Sliding Puzzles Still Rule (Yes, Even in 2026)
Sliding tile puzzles have been messing with our confidence since the late 1800s. The most famous version is the
classic 15-puzzle: 15 numbered tiles in a 4×4 frame with one empty space. The goal is simple
(put the tiles in order), but the path is gloriously humbling. At one point, this puzzle became such a craze
that it even showed up in political cartoonsbecause apparently nothing says “leadership” like being stuck with tile #14.
The magic is in the constraints
Sliding puzzles are fun because they’re restrictive. You’re not picking up pieces like a jigsaw; you’re navigating a
tight system with rules. That constraint creates a special kind of satisfaction: each move matters, patterns emerge,
and your brain gets a workout in planning and spatial reasoning. (Also, your ego gets a workout in learning humility.)
The 3D Printed Upgrade: A Puzzle That Can’t Lose Its Tiles
When you 3D print a sliding puzzle, you’re not just printing tilesyou’re printing a system. You can design
the frame so pieces are permanently captured, add a lid that snaps on, or print parts “in place” so the puzzle comes
out of the printer as a single, ready-to-play object.
In other words: you’re building the opposite of that cheap travel puzzle that explodes in your backpack and reappears
two states later with fewer parts.
What “captive tile” design actually means
- Captured track: Tiles slide under a top lip or within rails, so they can’t pop out.
- Snap-fit or screw-on lid: A removable top keeps tiles inside while allowing maintenance.
- Print-in-place frame: The puzzle prints as one assembly (no post-assembly needed).
- Optional magnetic closure: Great feeljust be mindful of safety if kids are around.
How 3D Printed Sliding Puzzles Keep Every Piece Accounted For
1) The “top lip” trick (simple, durable, travel-friendly)
The classic approach is a base tray with walls and a thin top lip that overlaps the tiles. The tiles are slightly
thinner than the tray depth, so they slide freely but can’t lift out. This is the easiest design to print and the
hardest to breakperfect for desk toys, classroom kits, or anything that will be handled by a person who believes
“gentle” is a myth.
2) Snap-fit lids (because screws are a commitment)
Snap-fit lids make your puzzle serviceable: you can open it to clean out dust, swap tile sets, or rescue that one tile
you printed slightly too chunky. With the right tolerances, a snap lid feels satisfyinglike closing a lunchbox, but
for your inner nerd.
3) Print-in-place puzzles (the “wizardry” option)
Print-in-place designs come off the bed already assembled. The tiles are printed inside the frame with tiny gaps that
prevent fusing. This style is wildly convenient, but it demands good printer calibration and realistic clearances.
If your first layer is too squished, your tiles may fuse and you’ll be holding a very pretty, very stubborn square.
4) Magnets (premium feel, serious responsibility)
Tiny magnets can give lids a crisp, luxury “click.” But high-powered magnets can be dangerous if swallowedespecially
by children and teensso use them carefully, secure them well, and skip them entirely for kid-focused builds.
If you do use magnets, design fully enclosed pockets so they can’t work loose over time.
Design and Printing Tips for Smooth Sliding (Without the “Sandpaper Symphony”)
A sliding puzzle can feel buttery-smooth… or like you’re dragging a brick across a driveway. The difference usually
comes down to clearance, surface finish, and first-layer accuracy.
The good news: you don’t need NASA-grade precision. You just need to design like someone who’s met a 3D printer before.
Clearances: give your tiles room to breathe
Many consumer 3D printing design guidelines recommend starting around 0.5 mm clearance for moving parts
(and adjusting based on your printer, material, and design). For some print-in-place assembliesespecially those made
with different technologiesyou may need more. Translation: test a small prototype before you print a 10-hour masterpiece.
Watch out for “elephant’s foot”
Elephant’s foot is when the bottom of a print bulges slightly from heat and first-layer squish. It can turn
“smooth slider” into “why is tile #3 glued to reality?” Consider adding a small chamfer on the bottom edges of tiles
or tuning first-layer settings. A tiny design tweak here often feels like cheatingin the best way.
Material choices: PLA, PETG, and the “desk toy reality” test
- PLA: Easy to print, crisp detail, great for prototypes and indoor puzzles.
- PETG: Tougher and more heat-resistant, but can be a bit stringy; dial in settings for clean rails.
- Resin prints: Excellent detail; make sure surfaces that slide aren’t tacky and tolerances are tested.
Layer lines and orientation: pick your friction battles
Tiles sliding across layer lines can feel rougher than tiles sliding across a smoother face. If possible, orient your
tiles so the sliding surface prints as a clean plane, not a staircase. When that’s not practical, a light sanding on
the contact surfaces can make a dramatic difference.
Post-processing: 5 minutes that can save your sanity
For most puzzles, you don’t need a full finishing montage with dramatic music. Just:
- Deburr edges with a hobby knife (especially around rails and lips).
- Lightly sand the tile sides if they bind.
- Clean dust from the traytiny plastic crumbs are surprisingly good at ruining “smooth.”
Customization Ideas That Make Your Puzzle Actually Worth Showing Off
The internet is full of generic tile puzzles. Your printer’s superpower is personalization. With a few design tweaks,
you can make a custom sliding tile puzzle that feels like a gift, a keepsake, or a tiny piece of functional art.
Photo puzzles (yes, you can do this without heartbreak)
You can create a mosaic image across the tilesfamily photo, pet portrait, vacation skyline, or a “funny face” selfie
that gets more cursed the more it scrambles. For best results, use high contrast and avoid ultra-fine detail.
If it looks good as a thumbnail, it will look good as a tile puzzle.
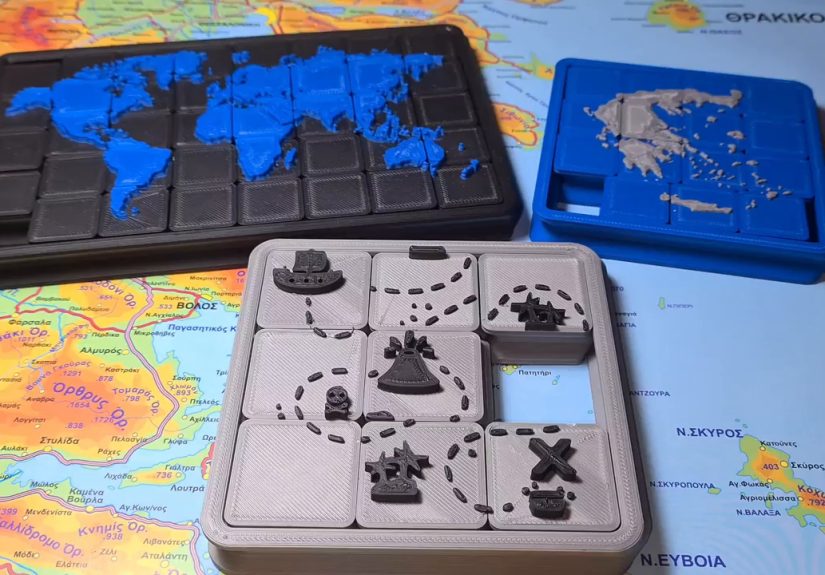
Maps, flags, and “teach-y” designs
Sliding puzzles are sneaky educational tools. Print a U.S. state map puzzle, a solar system diagram, or a periodic table
mini-board. In a classroom, these can turn abstract information into something students physically manipulatewhich is
basically learning with extra dopamine.
Difficulty tuning: make it friendlier or more evil
- Bigger tiles: Easier handling, less friction, great for kids or accessibility.
- Smaller tiles: Harder, fiddlier, more “pocket brain teaser.”
- More constraints: Add internal blockers or “one-way” paths for advanced puzzle mechanics.
Specific Examples of 3D Printed Sliding Puzzles People Actually Use
1) The classic 15-puzzle, modernized
A 3D printed 15-puzzle can be made in a pocket-size form factor with captured tiles and a durable frame. Upgrade the
tiles with raised numbers, Braille-friendly bumps, or color inlays. You can even design a reversible set: numbers on one
side, image mosaic on the other.
2) “Rush Hour”-style sliding block challenges
Not all sliding puzzles are tile grids. Sliding block puzzles use different piece sizes and goalslike moving a special
block to an exit. 3D printing shines here because you can prototype new levels fast, iterate on fit, and print
a compact travel case that stores everything (again: no missing pieces).
3) Puzzle boxes with sliding panels
Sliding mechanisms aren’t just for boards. Puzzle boxes use sliding panels and hidden tracks to create delightful
“open the secret compartment” experiences. With 3D printing, you can design nested rails, snap-fit covers, and even
modular difficulty inserts. It’s like a treasure chest for people who enjoy being inconveniencedin a fun way.
Why This Is Great for STEM, Gifts, and Marketing (Yes, Marketing)
STEM classrooms and makerspaces
3D printing naturally supports hands-on learning: design, test, iterate, and improve. A sliding puzzle is a perfect
project because it combines geometry, tolerances, and user experience. Students can measure clearances, adjust tile sizes,
and learn why “close enough” is a dangerous phrase.
Gifts that don’t feel like last-minute panic
A custom puzzle with a photo or inside joke hits the sweet spot: personal, practical, and fun. And unlike many gifts,
it doesn’t require the recipient to pretend they love scented candles. They’ll actually use it.
Promotional swag that people keep
Most branded giveaways become landfill speed-runs. A small sliding puzzle with a logo mosaic or product reveal mechanic
can be a desk toy people keep for yearsespecially if it’s compact, durable, and satisfying to play.
Buying vs. Printing: Which Route Makes Sense?
If you want a puzzle today and don’t care about customization, buying is easy. But printing wins when you want:
- Customization: photos, maps, branded designs, tailored difficulty
- Captive tiles: a travel-friendly puzzle that won’t scatter
- Iteration: quick prototypes and “version 2” improvements
- Repairability: reprint a tile, lid, or frame instead of replacing the whole thing
Care, Maintenance, and “How to Keep It Sliding Like New”
- Keep it clean: dust and plastic crumbs add friction fast.
- Avoid heat: don’t leave PLA puzzles in hot carsyour tiles may develop “creative geometry.”
- Check fit over time: if a lid loosens, reprint with a slightly tighter snap or add a mechanical latch.
- Use safe finishes: if you paint or seal tiles, keep coatings thin so you don’t ruin clearances.
FAQ: Quick Answers Before Your Printer Starts Judging You
What clearance should I use for a 3D printed sliding puzzle?
Start around 0.5 mm for moving parts on many consumer printers, then test and adjust. Printer tuning,
material, and design style (print-in-place vs. assembled) can push you toward tighter or looser fits.
Can I make it “print-in-place” on an FDM printer?
Yesif your printer is calibrated and your design includes enough clearance to prevent fusing. A small test print is the
fastest way to confirm what your machine can do reliably.
Are magnets safe?
Magnets can be dangerous if swallowed, especially high-powered types. If your puzzle is for children, skip magnets.
If it’s for adults, fully enclose magnets in designed pockets so they can’t come loose.
Conclusion (Plus of Real-World Maker Experiences)
The best thing about 3D printed sliding puzzles isn’t just that they’re customizableit’s that they’re
complete. A well-designed sliding puzzle is a tiny mechanical system that feels good in the hand, challenges the
brain, and doesn’t lose pieces. When you combine captive tile design with sane clearances and a little finishing polish,
you get a puzzle that survives travel, kids, offices, and the occasional “I can solve this with brute force” moment.
Below are practical, experience-driven lessons makers commonly report when designing and printing sliding puzzlesbecause
the printer always teaches you something, and it’s usually the same lesson: “test the clearance first.”
Maker Experiences: What Actually Happens After You Hit “Print”
The first prototype is almost always a comedy sketch. A lot of makers start with tiles that look perfect in CAD, then
discover their real printer has opinions. The most common surprise is friction: tiles that should glide end up
squeaking, chattering, or sticking at the corners. When that happens, the fix is rarely dramatic. People usually win
with tiny changesadding 0.2 mm more clearance, chamfering the tile edges, or sanding just the high-contact surfaces.
It’s not glamorous, but it works. Think of it as puzzle “seasoning”: you’re not changing the recipe, you’re adjusting
the salt.
Another classic moment is the “print-in-place heartbreak.” Someone prints a gorgeous one-piece puzzle, pulls it off the
bed, and… nothing moves. The tiles are fused like they signed a lifelong lease. In maker circles, the usual recovery plan
looks like this: gently flex the frame, try wiggling tiles with a thin plastic pick (not metal, unless you like scars),
and if that fails, accept the prototype as a motivational paperweight. Then comes the real solution: reprint with a
bit more clearance, reduce first-layer squish, and consider an elephant’s-foot chamfer. That second print often feels
like magicsame model idea, but now it slides with that addictive “shff-shff-click” rhythm.
Material choice is another place where real life gets spicy. PLA is the go-to because it’s easy and crisp, and for desk
puzzles it’s usually perfect. But makers who toss puzzles in bags, leave them in cars, or hand them to energetic kids
often migrate toward tougher materials (or thicker walls). Some report PETG holds up better to drops and flexing, while
others prefer PLA for its cleaner detail and lower stringing risk. The practical takeaway is simple: match the material
to the abuse level. If your puzzle will live on a calm adult desk, PLA is happy. If it’s going to a classroom where
gravity is treated as a suggestion, consider a tougher setup and thicker rails.
Custom image puzzles bring their own learning curve. Makers quickly discover that ultra-detailed photos don’t always
translate well into tile-sized segments. The winners tend to be high-contrast images, bold shapes, or stylized graphics.
A favorite approach is the “two-mode” puzzle: numbers on one side (easy to read, classic gameplay) and an image mosaic on
the other (more visual, more giftable). People also love hidden-message designs: scrambled tiles reveal a phrase, a logo,
or a punchline only when solved. It’s the wholesome version of a jump scare.
Finally, there’s the “closure debate.” Snap-fit lids feel great when they’re tuned right, but if they’re too tight,
opening the puzzle can feel like wrestling a crab. If they’re too loose, the lid pops off at the worst possible time
usually in public. Many makers settle on a practical compromise: a snap-fit that’s easy to open plus a small secondary
latch feature, or a lid that slides into rails and locks with a tiny twist tab. The best designs acknowledge reality:
puzzles get handled, tossed, dropped, and loaned to someone who absolutely will not be careful. Designing for that
reality is what turns a cute print into a truly keepable object.