Table of Contents >> Show >> Hide
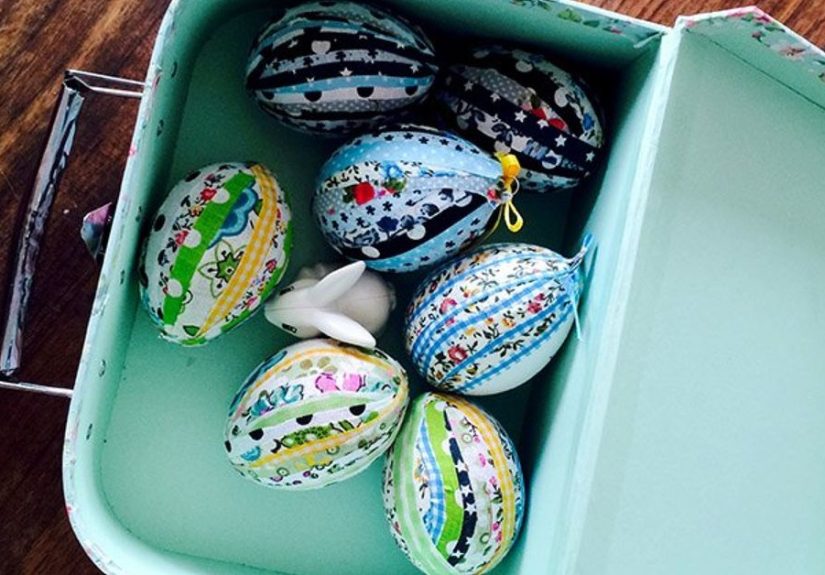
- Why Patchwork Fabric Eggs Are Worth the (Delightful) Fuss
- Supplies You’ll Need
- Method 1: Tuck-In Patchwork (Kimekomi-Style) for Clean “Seamed” Panels
- Method 2: Quilted Fold-and-Pin Patchwork for a Plush, Textured Look
- Method 3: Scrap-Fabric Decoupage for a “Painted” Finish (Still No Sew)
- Fabric Picking: What Works Best on Curves
- Pattern Planning: How to Make “Scrappy” Look Stylish, Not Random
- Troubleshooting: Common Issues and Easy Fixes
- How to Display Your No Sew Patchwork Eggs
- Care and Storage
- FAQ
- Crafters’ Notes: What It’s Like Making These Eggs (Experience Section)
If you love the look of quilting but your sewing machine is currently acting like a moody housecat (present, but not helpful),
no sew patchwork fabric Easter eggs are your springtime miracle. These eggs look fancy, feel cozy, andbest of alldon’t involve
boiling water, vinegar fumes, or that one blue dye tablet that somehow stains your soul.
In this guide, you’ll learn three reliable ways to make fabric-covered eggs that look patchwork-y and polished:
a tuck-in (kimekomi-style) method, a quilted fold-and-pin method, and a scrap-fabric decoupage option for “painted egg” vibes
without the paint drama. Along the way, we’ll talk fabric choices, pattern planning, common mistakes, and how to display your eggs
like you casually own a spring lifestyle catalog.
Why Patchwork Fabric Eggs Are Worth the (Delightful) Fuss
No sew patchwork eggs check a lot of boxes at once: they’re reusable year after year, perfect for using up fabric scraps,
and sturdy enough for tabletops, baskets, mantels, and egg trees. Many crafters also love that these are “dye-free”
Easter decorationsgreat if you want a craft you can pull out whenever, not just the day you feel like turning your kitchen into a pastel lab.
Patchwork eggs are especially great for:
- Scrap busting: quilting cotton, old shirts, fat quarters, ribbon leftovers
- Long-lasting decor: foam, wooden, or plastic eggs won’t crack in storage
- Group crafting: easy to batch-make with friends or family (with safe tool handling)
- Custom aesthetics: modern minimal, vintage florals, farmhouse neutrals, maximalist chaosyour egg, your rules
Supplies You’ll Need
The exact list depends on which method you pick, but here are the core supplies that show up again and again.
Base materials
- Craft eggs: foam (polystyrene) eggs are the most common; wooden or plastic also work for some methods
- Fabric: quilting cotton is the easiest; lightweight woven fabrics behave best on curves
- Ribbon or trim: to cover seams, add hang loops, or create bows
Tools (choose based on method)
- Sharp fabric scissors
- Ruler or flexible measuring tape
- Marker or pencil (for light guidelines)
- Blunt tucking tool: butter knife, plastic knife, or craft tool (for tuck-in method)
- Straight pins or sequin pins: (for fold-and-pin method)
- Craft glue or decoupage medium: optional, for trim and decoupage method
Safety note: If you’re using pins, hot glue, or any cutting tool, get an adult to helpespecially with cutting foam or handling hot glue. Your craft should be cute, not an ER side quest.
Method 1: Tuck-In Patchwork (Kimekomi-Style) for Clean “Seamed” Panels
This method creates crisp sections that look almost like you sewed fabric panels together, except you absolutely did not.
You cut shallow grooves in a foam egg and tuck fabric edges into them. The seams are then covered with ribbon or trim for a finished look.
Step-by-step
-
Plan your sections. Lightly draw guidelines on the foam egg. Start simple: 4 panels (quarters) or 6 panels.
If you want a more “patchwork” look, you can do 8 or even 12 sectionsjust know the egg gets busier fast. -
Cut grooves (shallow!). Carefully create grooves along your lines (roughly a little under half an inch deep).
The goal is a slot that will hold fabric edgesno need to carve a canyon. -
Make fabric pieces. Cut fabric shapes slightly larger than each section. Teardrop or petal shapes usually fit egg curves well.
If your fabric fights the curve, cut on a slight diagonal (bias) so it stretches a bit. -
Tuck the edges. Place the fabric over a section and push the edges into the grooves using a blunt tool.
Trim excess if the fabric is bulky; tuck again until it sits smooth. -
Repeat and refine. Add the next fabric panel, aligning edges into the same groove. Work around the egg.
Don’t panic if seams aren’t perfectribbon is basically the Spanx of craft finishing. -
Cover seams with ribbon/trim. Wrap ribbon over grooves and secure with small dots of glue or tiny pins.
Add a bow at the top or a hanger loop if you want the egg to hang.
Best uses for this method
- Classic “paneled” eggs (think: elegant, structured, gift-worthy)
- Modern prints where clean lines make the pattern pop
- Eggs you want to display up close (because the finish can look very pro)
Pro tip: If your fabric is fraying like it’s auditioning for a dramatic role, consider pinking shearsor simply trim closer and tuck deeper so raw edges stay hidden.
Method 2: Quilted Fold-and-Pin Patchwork for a Plush, Textured Look
This is the method people mean when they say “no sew quilted eggs.” You fold small fabric pieces into tidy triangles (or layered shapes)
and pin them onto a foam egg in repeating patterns. It looks intricate, but it’s mostly repetitionand repetition is just crafting’s way of saying,
“Put on a playlist and become unstoppable.”
Step-by-step
-
Mark your egg. Draw light guidelines: top-to-bottom center line, plus section lines (commonly 8 segments around the egg).
This helps your pattern stay symmetrical. -
Cut fabric rectangles. Start with consistent rectangles (for example, a few inches long and about an inch wide, depending on egg size).
Consistency is what makes the finished egg look “intentional” rather than “I made choices in a hurry.” -
Fold into triangles. Fold the rectangle ends inward to form a triangle shape. Finger-press the folds.
No ironing required unless you enjoy ironing (in which case, please teach the rest of us your ways). -
Pin the first row. Place the first triangle near the centerline and pin it down (often at corners and/or the center).
Add more triangles, overlapping slightly, keeping spacing even. -
Build the pattern. Continue adding rows, overlapping like shingles on a roof.
Rotate colors/patterns in a planned repeat (ABAB, ABCABC) or go scrappy for a charming quilt vibe. -
Finish the top and bottom. Cover the last raw edges with ribbon, braid, or a small fabric cap.
Add a bow, button, bead, or hanger loop if desired.
Why people love this method
- Texture: It looks dimensional and “quilted,” even from across the room.
- Scrap-friendly: Tiny fabric bits can become something showy.
- Custom patterns: stripes, spirals, diamonds, chevrons, pinwheelsyour egg can have a personality.
Pin choice matters: Short sequin pins often sit flatter and look cleaner than long straight pins. If kids are crafting with you, consider handling the pins as the “grown-up job.”
Method 3: Scrap-Fabric Decoupage for a “Painted” Finish (Still No Sew)
If you want patchwork energy but prefer a smooth surface (or you just don’t feel like pinning 80 tiny triangles), decoupage is your friend.
You glue small fabric pieces onto an egg, overlapping them like shingles until the whole egg is covered. The look is artsy, layered, and very forgiving.
Step-by-step
- Cut small scraps. Squares, torn bits, thin stripsanything goes. Small pieces conform to curves better.
- Apply adhesive. Brush a thin layer of decoupage medium (or craft glue) on a small area of the egg.
- Lay fabric and smooth. Press fabric down gently, smoothing wrinkles as you go.
- Overlap and continue. Add the next piece slightly over the previous edge for a patchwork mosaic effect.
- Seal (optional). Brush a light coat on top once dry for durability and a unified finish.
When this method shines
- “Modern collage” eggs with lots of tiny prints
- Quick batch crafting (especially if you’re making a big bowl filler)
- Anyone who wants patchwork style without pins or grooves
Fabric Picking: What Works Best on Curves
Eggs are basically the hardest shape to wrap neatly because they curve in every direction. A few fabric guidelines will save you time:
- Quilting cotton is the easiest all-around: stable, predictable, and available in endless prints.
- Lightweight woven fabrics (like some shirting) can work well, especially in the tuck-in method.
- Very thick fabric (heavy denim, thick upholstery) can get bulky at seams and corners.
- Stretchy knits are tricky: they can warp patterns and look wavy unless glued smoothly.
Example combos that look great:
• Modern spring: white + sage + tiny black checks + natural linen ribbon
• Vintage cottage: small florals + faded stripes + lace trim
• Bold graphic: two high-contrast prints plus a solid “rest” fabric to calm things down
Pattern Planning: How to Make “Scrappy” Look Stylish, Not Random
Patchwork can go charmingly eclectic or accidentally chaotic. If you want the first one, try these simple planning tricks:
- Pick a color anchor. Choose one recurring color (navy, blush, cream, black) that appears in most fabrics.
- Mix scale intentionally. Pair a small print with a medium print and a solid. Too many busy prints can blur from a distance.
- Repeat fabrics. Repetition is what makes “scrappy” read as “designed.”
- Use trim as a frame. Ribbon or braid can visually organize the egg and hide minor seam crimes.
Troubleshooting: Common Issues and Easy Fixes
Problem: Wrinkles and puckers
Fix: Use smaller fabric pieces (decoupage method) or cut your panel pieces slightly on the bias (tuck-in method).
Smooth from the center outward before tucking or pinning.
Problem: Fabric won’t stay tucked
Fix: Your groove may be too shallow or the fabric edge too bulky. Trim excess and tuck deeper. Add a tiny dot of glue inside the groove if needed.
Problem: Pins look messy
Fix: Switch to shorter sequin pins and keep pin placement consistent (corners and centers). Cover “busy” areas with ribbon, a bow, or a small embellishment.
Problem: The pattern drifts off-center
Fix: Mark guidelines first and keep checking alignment as you go. If you’re halfway in and notice drift, correct gradually over the next rows instead of forcing a sudden jump.
How to Display Your No Sew Patchwork Eggs
- Egg tree: Hang eggs on blooming branches in a vase for a classic spring centerpiece.
- Bowl filler: Pile eggs in a shallow bowl with moss, faux grass, or fabric napkins.
- Place settings: Use one egg per plate as decor, with a little name tag tied to the ribbon.
- Basket styling: Mix fabric eggs with a few real dyed eggs for contrast and texture (if you’re serving food, keep decor eggs separate).
Care and Storage
Store finished eggs in a small box with tissue paper or soft fabric between them, especially if you used pins or raised embellishments.
Keep them dry, away from extreme heat (hot glue can soften), and you’ll have spring decor that’s ready to pop out every year.
FAQ
Can I use plastic Easter eggs instead of foam?
Yesfor decoupage and some wrap methods. For tuck-in grooves and fold-and-pin quilting, foam works best because it holds fabric edges and pins securely.
Do I need special fabric?
Not specialjust manageable. Quilting cotton is the easiest starting point. If you’re upcycling clothes, aim for woven fabrics and avoid extra-thick seams.
How long does one egg take?
Once you know the steps, decoupage eggs can be quick. Tuck-in and quilted fold-and-pin methods take longer, but the results look heirloom-level.
(Also: time passes differently when you’re crafting. One egg can feel like ten minutes or a full cinematic experience.)
Crafters’ Notes: What It’s Like Making These Eggs (Experience Section)
The first time you make a no sew patchwork fabric Easter egg, you’ll probably have a brief moment of overconfidencesomething like,
“I am absolutely going to make twelve of these by dinner.” Then reality shows up, politely taps you on the shoulder, and says,
“Hi, I’m the curve of an egg. Nice to meet you.” And honestly? That’s part of the fun.
Most crafters notice right away that eggs reward patience more than speed. On a flat surface, fabric behaves. On an egg,
fabric becomes philosophical. It asks deep questions like, “What if I wrinkle here?” and “What if this print looks straight on one side
but suddenly tilts like a confused necktie on the other?” The good news is that every method has a built-in rescue plan:
tuck deeper, overlap more, or cover it with ribbon like you meant to do it all along.
If you try the tuck-in method, the most satisfying moment is when your first panel goes in smoothly and the edge disappears into the groove.
It feels like magic. The second most satisfying moment is when you realize you can trim tiny slivers off the fabric edge, retuck it,
and instantly clean up what looked like a mess two minutes ago. It’s a craft that teaches gentle problem-solving:
small adjustments beat dramatic do-overs. Many people end up enjoying this method because it’s quiet, methodical,
and oddly calminglike folding laundry, but with a much cuter final product.
The fold-and-pin “quilted” style has a different emotional arc. At first, folding triangles feels repetitive, maybe even a little fussy.
Then you start pinning them in a pattern, and suddenly the egg looks textured and intentional. That’s when people get hooked.
Crafters often describe it as the “potato chip effect”: you plan to stop after one row, but you keep going because you want to see the next layer.
It also turns into a sneaky design lesson. You learn fast that alternating two fabrics can look crisp and modern, while three or four fabrics
can look more traditional and quilt-like. You also learn that solids are the best “resting spots” for the eyeespecially when your prints are busy.
Decoupage eggs tend to create the most playful experiences. You can tear fabric into imperfect little pieces and still get a gorgeous result,
which makes this method feel forgiving and creative. People often use it as a “warm-up craft” before tackling the more structured methods.
It’s also popular for group crafting because everyone can work at their own pace, swap scraps, and build surprisingly cohesive eggs just by sharing
a common color palette. And if someone glues a piece slightly crooked? Congratulations: you’ve invented “art.”
One thing crafters consistently mention is how personal these eggs become. You start noticing which fabrics make you smile:
the gingham that feels like spring picnics, the floral that reminds you of your grandmother’s curtains, the bold geometric print that makes your
egg look like it listens to indie music. It’s common for people to make “sets” that match their homesoft neutrals for farmhouse decor,
bright prints for kids’ baskets, or elegant monochrome for a modern table. Some even make memory eggs from meaningful fabric scraps
(an old baby blanket, a shirt from a loved one, leftover fabric from a quilt). The eggs become more than decorationsthey become tiny story capsules.
Finally, there’s the delightful after-effect: once you’ve made a couple, you start seeing “egg potential” everywhere.
That ribbon you saved from a gift bag? Egg trim. That stack of tiny scraps you couldn’t throw out? Egg mosaic.
That one fabric print you bought because it was cute but never used? Egg redemption arc. The craft doesn’t just make Easter decorit makes your
whole scrap bin feel like a treasure chest. And that’s a very satisfying way to hop into spring.