Table of Contents >> Show >> Hide
- Why Paper Mache Palm Leaves Work So Well (Even If You’re Not “Crafty”)
- Paper Mache Basics (So You Don’t Fight the Paste)
- Supplies for Paper Mache Palm Leaves
- Two Palm Leaf Styles to Pick From
- Step-by-Step: Classic Paper Mache Palm Frond
- Step 1: Make a Template That Looks Like a Palm Leaf (Not a Fish)
- Step 2: Add a Spine So Your Leaf Doesn’t Give Up Midair
- Step 3: Cut the Frond Slits (The Palm Leaf Look)
- Step 4: Mix Your Paste
- Step 5: Layer Paper Strips (Thin, Crossed, and Patient)
- Step 6: Dry Like You Mean It
- Step 7: Shape and Detail
- Optional Upgrade: Smoother Leaves with Paper Mache “Clay”
- Painting Paper Mache Palm Leaves (Make Them Look Real-ish)
- Sealing and Protecting (A.K.A. “Please Don’t Let Humidity Ruin This”)
- Quick Notes for Fan Palms (Big, Bold, and Pleated)
- Ways to Use Paper Mache Palm Leaves
- Troubleshooting (Because Crafting Is Basically Problem-Solving with Glue)
- Storage Tips (So You Can Reuse Them Like a Decorating Genius)
- of “Crafting Experiences” You’ll Probably Relate To
- Conclusion
- SEO Tags
If your space is begging for a tropical glow-upbut your budget is giving “I just bought eggs and it felt like a luxury purchase”
paper mache palm leaves are your new best friend. They’re big, dramatic, surprisingly lightweight, and made mostly from
stuff you already have: paper, glue (or flour), and the determination to create something fabulous while wearing an old T-shirt you
wouldn’t cry over.
In this guide, you’ll learn how to make sturdy, good-looking papier-mâché palm fronds that can handle wall displays,
party backdrops, photo booth moments, and that one friend who insists on touching everything “just to feel the texture.”
We’ll cover materials, paste options, shaping tricks, painting, sealing, and the little fixes that separate “Pinterest-worthy”
from “why does this leaf smell like regret?”
Why Paper Mache Palm Leaves Work So Well (Even If You’re Not “Crafty”)
Palm leaves are basically nature’s fireworks: bold shape, dramatic lines, instant vibe. Replicating them with paper mache is popular for
three simple reasons:
- They’re scalable. Make a cute 12-inch frond for a shelf, or go giant for a party backdrop.
- They’re forgiving. Real palm leaves have texture, ridges, and imperfectionspaper mache fits right in.
- They’re budget- and planet-friendly. Paper scraps + simple paste = decor you can reuse or recycle.
And there’s something deeply satisfying about turning everyday paper into a hard, sculptable material. Papier-mâché has been used for
centuries to create objects that are lightweight, strong, and decorativeso yes, your leaf project is part of a long tradition.
(Congrats. You are basically an artist with a glue bowl.)
Paper Mache Basics (So You Don’t Fight the Paste)
Paper mache is paper (usually strips or pulp) combined with a binderglue, starch, or flour pastethen layered and dried until it hardens.
The magic is in the layering: thin, crossed layers dry stronger and flatter than thick, soggy clumps.
Choose Your Paste: Quick Comparison
- Flour + water paste: Cheap, classic, easy to mix. Best for low-humidity homes and quick-dry setups (fans help).
- Cooked flour paste: Smoother and often stronger-feeling; a good option when you want fewer lumps and better spread.
- White glue + water: Less likely to mold, great for humid climates, strong bond. Slightly higher cost, but very reliable.
- Liquid starch / wallpaper paste: Convenient and consistent; good for cleaner projects and predictable results.
For paper mache palm leaves, glue-based paste is often the easiest route if you want crisp edges and fewer drying worries.
Flour paste can absolutely work toojust keep layers thin and airflow strong.
Supplies for Paper Mache Palm Leaves
You can keep this simple or get a little “craft store gremlin” about it. Here’s what actually helps:
Core Materials
- Paper for layers: newspaper, brown kraft paper, tissue paper, or paper towel (paper towel adds texture fast).
- Base shape: cardstock, cereal box cardboard, or poster board.
- Structure (the anti-flop system): floral wire, a wooden skewer, thin dowel, or a strip of corrugated cardboard.
- Binder: flour paste or glue paste (recipes below).
- Painter’s tape or masking tape: to attach the spine and hold shapes while drying.
Tools That Make Life Easier
- Scissors and a craft knife
- Mixing bowl + whisk
- Paintbrush (cheap is finethis is glue work, not the Sistine Chapel)
- Sandpaper (optional, for smoothing edges)
- Fan or dehumidifier (highly recommended)
Two Palm Leaf Styles to Pick From
Before we build, decide what palm leaf “language” you’re speaking:
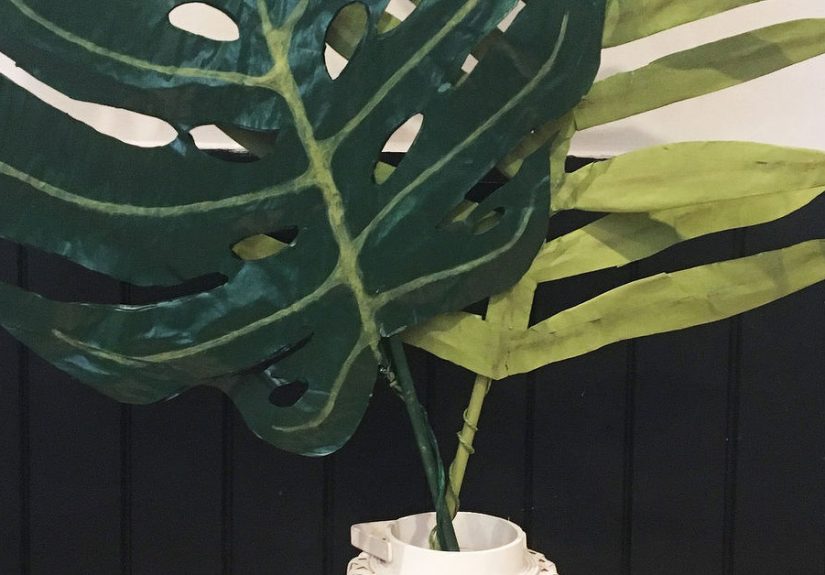
1) Classic Frond (Feather-Like)
The long center spine with many thin leaflets coming off the sides. This style looks amazing in clusters and backdrops.
2) Fan Palm (Big and Pleated)
A wide, fan-shaped leaf with radiating lines. This is the “statement piece” leafgreat for wall art and oversized party decor.
This tutorial focuses on the classic frond first (most requested), then you’ll get quick notes for fan palms and smoother “clay” finishes.
Step-by-Step: Classic Paper Mache Palm Frond
Step 1: Make a Template That Looks Like a Palm Leaf (Not a Fish)
On poster board or cardboard, draw a long leaf shapethink: narrow at the base, widest around the middle, tapering at the tip.
Common sizes:
- Small: 12–18 inches (shelf styling, party table accents)
- Medium: 24–36 inches (wall clusters, corner styling)
- Large: 48+ inches (backdrops, photo booths, “wow” moments)
Cut it out. If you’re making multiple leaves, stack and cut a few at once. (Bonus: you’ll feel wildly efficient.)
Step 2: Add a Spine So Your Leaf Doesn’t Give Up Midair
Tape floral wire, a skewer, or a thin strip of corrugated cardboard down the center of the leaf.
Leave a little extra at the base to act as a “stem” for arranging in a vase or attaching to a wall.
If you want a gentle curve (more realistic), lightly bend the spine now. You can also shape it again after the first layer dries.
Step 3: Cut the Frond Slits (The Palm Leaf Look)
Starting about 2–3 inches from the base, cut angled slits toward the center spine on both sides. Don’t cut through the spine.
Alternate angles slightly for a natural look.
Pro tip: Vary the slit lengthshorter near the tip and base, longer through the middle. Real fronds aren’t perfectly uniform,
and neither should yours (unless your palm tree is secretly a robot).
Step 4: Mix Your Paste
Option A: Quick Flour Paste
- 1 cup flour
- 1 cup cold water
- Optional: 1–2 tablespoons salt (helps discourage mold)
Whisk until smooth. Aim for a texture like thin pancake batterable to coat paper without forming glue “globs.”
Option B: Glue Paste (Reliable in Humidity)
- White PVA school glue
- Water (to thin)
Mix until it’s brushable and not overly thick. Glue paste is excellent when you need crisp edges and quick drying without funky smells.
Step 5: Layer Paper Strips (Thin, Crossed, and Patient)
Tear paper into strips (tearing blends edges better than cutting). Dip a strip, run it between your fingers to remove excess paste,
and lay it across the leaf surface. Work in overlapping layers, changing direction as you go.
- Layer 1: Cover the whole leaf, including around the spine and into the cut slits.
- Layer 2: Add strengthfocus on the spine and the areas between slits.
- Layer 3 (optional): If you’re going big, add one more thin layer for durability.
Keep it thin. Thick paste + thick paper layers = slow drying and higher mold risk. You want “strong and light,” not “wet papier-mâché lasagna.”
Step 6: Dry Like You Mean It
Lay the leaf on wax paper or a plastic sheet. Aim a fan across it (not directly blasting like a hurricanesteady airflow is the goal).
Let it dry completely before flipping and coating the back side.
If your climate is humid, consider glue paste and extra airflow. Drying fully between layers is one of the biggest keys to a clean finish.
Step 7: Shape and Detail
Once the first side is dry, flip and repeat on the back. While the second side is still slightly flexible (not wet, just “bendable”),
adjust your curve and add gentle creases along the spine for realism.
Want extra texture? Add a few thin strips running from the spine outward to hint at veins. Keep it subtlepalms are textured, not ribbed like a waffle fry.
Optional Upgrade: Smoother Leaves with Paper Mache “Clay”
If you want a more sculpted, smooth finish (especially for fan palms or high-end wall decor), paper mache clay is a popular approach.
It’s spreadable, sandable, and great for hiding seams. Use it like a thin skim coat over your base, then dry thoroughly.
Clay-style mixes often use paper fibers plus glue and other ingredients to create a smooth spread. For palm leaves, a thin coat is enough
you’re not frosting a cake, you’re enhancing a leaf.
Painting Paper Mache Palm Leaves (Make Them Look Real-ish)
Acrylic paint is a favorite for paper mache because it’s easy to find and dries quickly. Start with a base coat in medium green,
then build dimension:
Easy Paint Recipe for “Leaf Depth”
- Base: medium green
- Shadow: a little dark green brushed near the spine and where leaflets overlap
- Highlight: lighter green dry-brushed along edges and raised texture
For a modern look, go matte and slightly muted (think “stylish boutique hotel”). For party decor, brighter greens photograph beautifully.
Sealing and Protecting (A.K.A. “Please Don’t Let Humidity Ruin This”)
Paper mache isn’t naturally waterproof. But you can protect it for longer life indoors by sealing it after it’s fully dry and painted.
Common sealers include clear acrylic spray sealer, brush-on acrylic varnish, or a clear craft sealer like Mod Podge.
Important: paper mache creations are generally considered decorativenot food-safeso keep your palm leaves in the “pretty objects” lane,
not the “serving tray” lane.
Quick Notes for Fan Palms (Big, Bold, and Pleated)
Fan palms look great when you build in pleats:
- Cut a large half-circle or fan shape from poster board.
- Score fold lines radiating from the base (don’t cut through).
- Accordion-fold gently to create the fan texture.
- Reinforce folds with thin paper mache layers (go light so you don’t fill in the pleats).
- Add a short “stem” at the base with cardboard + paper layers.
Painted fan palms look especially striking as a trio in different sizeslike a mini tropical mural that doesn’t require you to actually own a tropical home.
Ways to Use Paper Mache Palm Leaves
- Wall cluster: Arrange 3–7 leaves in different sizes for instant statement decor.
- Party backdrop: Tape or pin them to foam board, curtain panels, or a photo booth frame.
- Table decor: Use smaller fronds as placemat accents or centerpiece “fans.”
- Vase styling: Make a few stems longer and stand them in a tall floor vase.
- Prop moment: Photo shoots, costume accessories, or themed events love an oversized frond.
Troubleshooting (Because Crafting Is Basically Problem-Solving with Glue)
“My Leaf Warped”
- Warping usually means uneven drying. Dry on a flat surface and flip only when the first side is fully dry.
- Use a fan for steady airflow.
- Press gently under light weights (like books with wax paper between) once it’s mostly dry.
“It’s Cracking”
- Cracks happen if the layer is too thick or dries too fast in spots. Patch with a thin paper strip layer or a skim of paper mache clay.
- Sand lightly after drying, then repaint.
“It Smells… Not Great”
- That’s often moisture + flour paste. Use thinner layers, more airflow, and consider switching to glue paste next time.
- Adding a little salt to flour paste can help discourage mold, but airflow is still the MVP.
“My Edges Are Fuzzy”
- Use thinner paper near edges (tissue or kraft), and smooth with a damp brush.
- After drying, lightly sand and seal before painting.
Storage Tips (So You Can Reuse Them Like a Decorating Genius)
- Store fully dry leaves flat in a large box, or upright behind a shelf.
- Avoid damp basements or humid storage spotssealed or not, paper prefers “dry and cozy.”
- If they get slightly bent, reshape gently and touch up paint if needed.
of “Crafting Experiences” You’ll Probably Relate To
The first time someone makes paper mache palm leaves, there’s a magical moment where the cardboard-and-paper situation suddenly starts to look like
an actual leaf. It’s usually right around the time they stop overthinking the perfect template and accept the truth:
real palm leaves are messy, asymmetric, and living their best imperfect lives.
One common experience: discovering that paste has a personality. Flour paste is like a golden retrieverfriendly, affordable, and eager to help,
but it needs supervision. If you lay it on too thick, it gets clingy and takes forever to dry. Glue paste is more like a reliable coworker:
slightly pricier, less drama, and it shows up ready to workespecially when the weather is humid and your project is on a deadline.
Then there’s the “drying stage optimism.” At first you think, “It’s just paper. How long can it take?” And the answer is:
long enough for you to tidy your craft area, snack twice, and start a new hobby in your head. Many makers learn quickly that
airflow is not optionalit’s basically the difference between “crispy and strong” and “soft and suspicious.”
A fan becomes your silent crafting partner, humming in the corner like it’s paid rent.
Painting is where confidence skyrockets. A plain, beige paper leaf looks like a prop from a school play. Add a base green coat and suddenly it’s
“tropical decor.” Add shadows near the spine and highlights on the edges and it becomes “wait… did you buy that?”
This is also the stage where people discover dry-brushing and feel like they unlocked an art cheat code.
Another very real experience: the urge to make “just one more” leaf. It starts with a single medium frond. Then you decide it needs a friend.
Then that friend needs a smaller companion. Next thing you know, you’re arranging five leaves on the floor like you’re curating a gallery exhibit
titled Ode to Paper and Poor Life Choices. But honestly? That cluster is usually the best-looking decor in the room.
Finally, there’s the quiet pride of reuse. People who make these leaves often bring them out again for summer parties, birthdays, or a random Tuesday
when the living room feels dull. They touch up a little paint, re-bend a stem, and suddenly the space feels warmer. It’s proof that crafting isn’t just
“making stuff”it’s building a mini library of decor you can remix whenever you need a mood boost.
Conclusion
Paper mache palm leaves are one of those rare DIY projects that hit the sweet spot: affordable, customizable, and genuinely impressive
once they’re painted and styled. Keep layers thin, dry thoroughly, build in a strong spine, and finish with paint + sealer for a long-lasting result.
Whether you’re decorating for a party, making wall art, or just craving a tropical moment without booking a flight, these palms deliver big impact with
small materials.