Table of Contents >> Show >> Hide
- What “More Magical” Usually Means (Even If Nobody Can Explain It)
- Start With the Foundation: Light, Color, and a Tiny Bit of Plot
- The “Magical” Toolkit in Photoshop (Without Turning Your Layers Into Chaos)
- Work non-destructively (so you can undo your enthusiasm)
- Glow and bloom: the fastest way to say “magic” without words
- The Orton effect: dreamy softness that still feels sharp
- Fog, mist, and atmosphere: the secret ingredient for depth
- Light rays and beams: when you need a “moment”
- Bokeh, sparkles, and light leaks: tiny highlights that feel enchanted
- Color grading: the difference between “edited” and “enchanted”
- AI Tools: Great Assistants, Terrible Sorcerers (Unless You Supervise)
- Three “Make It Magical” Recipes You Can Repeat
- Common Mistakes That Make “Magical” Look Fake
- Ethics, Realism, and Not Accidentally Editing Someone Into a Different Person
- Conclusion: The Photo You Started WithJust With Better Mythology
- Real-World Experiences: When “Please Photoshop This Photo So It Looks More Magical” Actually Happens
If you’ve ever posted a photo online and thought, “This is fine,” you already understand the problem. “Fine” is the enemy of
“magical.” Magical is the photo that feels like it has a soundtrack. Magical is the picture that makes people zoom in and ask,
“Wait… how did you DO that?”
And thenlike clockworksomeone drops a perfectly normal image in your inbox with the most delightfully vague request in the
English language: Please Photoshop this photo so it looks more magical.
Good news: “magical” isn’t random. It’s a set of visual cueslight, atmosphere, color, and storythat your brain associates with
wonder. Better news: you can build those cues in Photoshop (or similar editors) with repeatable, non-destructive steps that look
intentional instead of “sparkle sticker pack #3.”
What “More Magical” Usually Means (Even If Nobody Can Explain It)
When people say “magical,” they typically mean one (or a mix) of these looks:
- Dreamy & soft: gentle glow, lifted shadows, smooth transitions, slightly reduced clarity.
- Enchanted & whimsical: warm highlights, tiny light sources, subtle sparkles, cozy color palette.
- Fantasy cinematic: dramatic light direction, fog for depth, rich color grading, controlled contrast.
- Storybook: cleaner background, guided attention, a “hero subject,” and mood that matches the scene.
Notice what’s missing: “Add a million effects.” Real magic comes from restraint. The goal is to make viewers feel something,
not to make them wonder which app you accidentally sat on.
Start With the Foundation: Light, Color, and a Tiny Bit of Plot
Before you add glow, fog, or cosmic fairy dust, fix what’s already there. Magical edits work best when your base image is
clean and balanced.
1) Correct first, grade second
Do a quick “reality pass” before you do a “fairytale pass.” Adjust exposure, white balance, and contrast so the photo feels
natural. Then, and only then, push it toward a mood with color grading.
2) Decide where the magic lives
Pick the focal point (face, lantern, doorway, tree line, etc.). Every magical element you addlight rays, haze, sparklesshould
support that focal point, not compete with it.
3) Choose your light direction and commit
Magic looks fake when highlights and shadows disagree. If your scene’s light is coming from the left, your glow, fog brightness,
and added flares need to respect that. Photoshop is powerful, but it cannot negotiate with physics forever.
The “Magical” Toolkit in Photoshop (Without Turning Your Layers Into Chaos)
Work non-destructively (so you can undo your enthusiasm)
If you want edits that look professional, keep them editable:
- Use Adjustment Layers (Curves, Color Balance, Hue/Saturation) instead of direct edits.
- Convert key layers to Smart Objects before heavy filters (blur, Camera Raw, liquify).
- Mask everything. Yes, everything. Your future self will send you a thank-you card.
Glow and bloom: the fastest way to say “magic” without words
Glow works because it mimics how bright light behaves in real lenses and human perception. In Photoshop, you can build glow in
a controlled way:
- Create a glow layer: duplicate your image (or a merged copy), blur it, and set the blend mode to Screen or Soft Light.
- Control it with a mask: keep glow in highlights (lamps, windows, hair rim light) and avoid muddying shadows.
- Fine-tune: lower opacity until you barely notice it… then stop right before you can’t resist “just a little more.”
Pro tip: glow should have a source. If nothing in the scene would realistically emit light, use a subtle “bloom” instead of a
big halo.
The Orton effect: dreamy softness that still feels sharp
The Orton effect is a classic way to add an ethereal, storybook softness while keeping important details readable. The trick is
blending blur with contrast so the photo becomes “soft-sharp” (yes, that’s a real vibe).
A practical approach: blur a duplicate layer, then blend it back with a gentle contrasty mode (or use Camera Raw/filters on a
Smart Object), masking it off faces/eyes as needed. This is especially good for landscapes, forest scenes, and portraits with
backlight.
Fog, mist, and atmosphere: the secret ingredient for depth
Want instant cinematic magic? Add atmosphere. Fog and haze create depth by separating foreground, subject, and backgroundlike
your scene has layers of air, not just pixels.
- Keep it low-contrast: real fog rarely looks crispy.
- Use depth logic: fog is usually stronger in the distance and collects in low areas.
- Respect light direction: brighten fog where light hits, darken where it’s shaded.
You can build fog with soft brushes on a new layer (low flow), gradients, or texture overlaysthen refine with masks so it wraps
around subjects instead of covering them like a gray bedsheet.
Light rays and beams: when you need a “moment”
Light rays work best when there’s a plausible source: sun through trees, a window in a dusty room, headlights in mist. Add rays
subtly, then shape them with masks so they taper and fade naturally. The goal is “holy wow,” not “laser tag.”
Bokeh, sparkles, and light leaks: tiny highlights that feel enchanted
Bokeh (those soft out-of-focus light circles) is magical because it suggests depth, motion, and a “glow world” just beyond focus.
You can capture bokeh in-camera (best), or add it carefully in post (fineas long as it matches the scene).
- Match perspective: bokeh should sit behind the subject most of the time, not on their eyebrows.
- Use Screen/Lighten blend modes: so dark areas stay dark while highlights bloom.
- Vary size and opacity: uniform bokeh looks stamped on.
Light leaks can add a dreamy film vibe, but use them like seasoning. If viewers immediately see the overlay instead of the
subject, you’ve spilled the salt.
Color grading: the difference between “edited” and “enchanted”
Color grading is where magic becomes a mood. A few reliable directions:
- Warm highlights + cooler shadows: cinematic, cozy, dimensional.
- Muted greens + warm skin tones: forest-fantasy without looking radioactive.
- Lifted blacks + gentle contrast: dreamy, nostalgic, “soft film” energy.
Use Curves, Color Balance, Gradient Maps (low opacity), or LUTs (Color Lookup) to unify tones. Then do a final pass: if your
subject’s skin looks like it belongs in the scene, you’re winning.
AI Tools: Great Assistants, Terrible Sorcerers (Unless You Supervise)
Modern Photoshop includes generative AI features that can speed up “magical” editsespecially when you need to remove distractions,
extend backgrounds, or add elements quickly. But AI doesn’t know your story unless you do.
Where AI shines
- Cleanup: remove distracting objects so the scene feels more intentional.
- Expand: give your composition breathing room for a more cinematic frame.
- Add small story elements: subtle fireflies, a gentle mist, a soft glow near a lanternthen refine manually.
Where AI can wreck the spell
- Lighting mismatches: additions that ignore your scene’s shadows and highlights.
- Texture weirdness: repeating patterns, “almost-real” edges, odd reflections.
- Overconfidence: “It looks fine” is how you end up with a second moon.
The winning workflow is hybrid: use AI for fast building blocks, then use masks, color matching, and manual dodge/burn to make it
believable.
Three “Make It Magical” Recipes You Can Repeat
These are quick, reliable combinations you can adapt to almost any photo. Keep them subtle, and they’ll look expensive.
Recipe 1: Enchanted Forest Portrait
- Base: correct exposure and white balance; slightly lift shadows.
- Depth: add light fog in the background with soft brushes; reduce contrast in distant trees.
- Glow: add a soft bloom to highlights (hair rim light, sun spots) using Screen/Soft Light.
- Color grade: warm highlights, cooler shadows; mute overly-bright greens.
- Finishing: add tiny “firefly” points near the subject (very low opacity), blur slightly, mask to keep behind.
Recipe 2: Cozy Candlelit Magic (Indoor)
- Base: gently warm white balance; protect highlight detail around flames.
- Glow source: paint warm light around candles/lamps; blur and set to Screen; mask to control spill.
- Atmosphere: subtle haze near the light source for a “dusty beam” vibe.
- Color grade: slightly desaturate shadows; keep skin tones natural.
- Finishing: add vignette softly to pull focus; sharpen only the subject’s key details.
Recipe 3: Urban Night Spell (Neon + Rainy Mood)
- Base: deepen blacks carefully; recover highlights so neon doesn’t clip.
- Glow: duplicate neon areas, blur, set to Screen; mask to keep glow hugging signs.
- Atmosphere: add mist in the distance; lighten it near street lights.
- Color grade: push teals/blues in shadows; keep highlights slightly warm for contrast.
- Finishing: add subtle light leaks at the edge (optional); reduce opacity until it feels “felt,” not “seen.”
Common Mistakes That Make “Magical” Look Fake
- Glow everywhere: if the whole image blooms, nothing feels special.
- One-size-fits-all overlays: bokeh that’s the same size and brightness screams “sticker.”
- Color chaos: too many competing tints (green shadows + purple highlights + orange mids) turns into circus lighting.
- Ignoring edges: sloppy cutouts and halos around hair instantly break the illusion.
- No story: effects without intent feel like filters; effects with purpose feel like magic.
Ethics, Realism, and Not Accidentally Editing Someone Into a Different Person
“Make it magical” should mean “make it wondrous,” not “change who someone is.” A few practical guidelines:
- Keep identity features intact: don’t reshape faces or bodies unless you have explicit consent and a clear creative goal.
- Be careful with documentary contexts: event, news, or evidence photos should not be “magicked up.”
- When in doubt, disclose: if an edit adds major elements, it’s okay to say it’s a composite or creative grade.
Conclusion: The Photo You Started WithJust With Better Mythology
The most convincing “magical” edits aren’t about piling on effects; they’re about directing attention with light, creating depth
with atmosphere, and unifying emotion with color grading. Once you learn to build glow from real light sources, add mist that
follows depth, and keep your edits non-destructive, you can deliver “more magical” on demandwithout the dreaded over-filtered look.
Think of Photoshop as a stage, not a costume shop. You’re not dressing your image in magic; you’re lighting it, setting the mood,
and making the story easier to believe. And if someone asks for “just a tiny bit more sparkle,” you’ll know exactly how much is
too muchbecause you’ve seen that movie. It ends with neon glitter in the shadows and regret.
Real-World Experiences: When “Please Photoshop This Photo So It Looks More Magical” Actually Happens
In real life, “make it more magical” usually shows up in three places: social media requests, client edits, and friend-of-a-friend
favors that begin with “You’re good with computers, right?” The interesting part isn’t the softwareit’s the expectation gap.
People often imagine magic as a single button. Editors know it’s a sequence of small decisions that add up to a feeling.
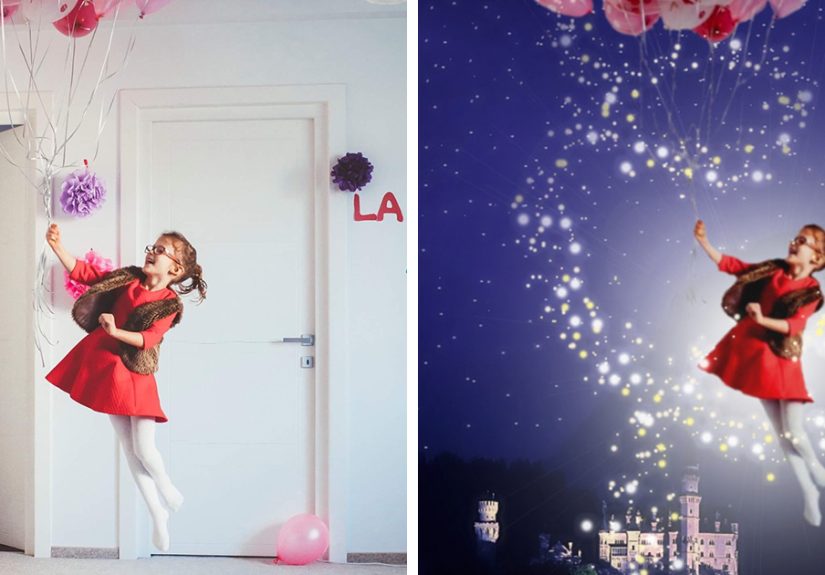
One common experience: the photo itself is perfectly fine, but the moment didn’t photograph the way it felt. Maybe the sunset
looked incredible in person, but the camera captured a flat sky. Maybe a proposal happened under string lights, but the phone
darkened everything into a gloomy blur. In those cases, “magical” editing is basically emotional translation. You’re not inventing
a new realityyou’re rebuilding the mood the camera failed to record. That’s where gentle glow, lifted shadows, and warm highlight
grading do their best work.
Another frequent experience: the request is vague, but the person has a specific reference in their headusually a movie still,
a fantasy book cover, or a popular “cinematic” Instagram style. They may not say “teal shadows with warm highlights” or “soft Orton
bloom,” but they’ll react instantly when the color grade matches their mental picture. The fastest path is to show two or three
variations: one dreamy, one cinematic, one whimsical. Most people can’t describe the look they want, but they can choose it in
seconds when they see it.
You’ll also run into the “more magical, but still real” constraintespecially for portraits. People want sparkle and atmosphere,
but they don’t want to look plastic, overly smoothed, or oddly re-shaped. That’s why selective editing becomes the real superpower:
keep eyes and key details crisp, keep skin texture believable, and push the dreamy softness into the background, hair highlights,
and light sources. When the subject still looks like themselves, the magic reads as “wow,” not “who is that?”
Community-driven edits (like playful online “photoshop this” threads) create another pattern: the best results usually come from
editors who commit to a story. A single added beam of light can be nice; a beam of light that clearly spills from a cracked door,
reflects on the floor, and fades into mist feels like a scene. Viewers don’t just see an effectthey feel a narrative. That’s why
editors who think like cinematographers often win “magical” requests: they’re building lighting logic, depth, and focus, not
sprinkling random glitter.
Finally, there’s the practical experience of revisions. “Can you make it more magical?” often becomes “Can you make it magical
but not too magical?” The best way to survive that loop is to keep your workflow flexible: adjustment layers, smart objects, and
masks. When someone changes their mind (and they will), you can dial glow down, shift color temperature, or move fog back in depth
without redoing everything. In other words: your real magic trick isn’t the sparkle brushit’s being able to change the sparkle
brush later.
The takeaway from these experiences is simple: magical edits succeed when they’re grounded in real photographic cues. Light should
have a source. Fog should have depth. Color should have a mood. And the subject should still look like they belong in their own
photo. If you can do those four things, “Please Photoshop this photo so it looks more magical” stops being a scary request and
becomes a fun onelike a creative challenge with a clearly winnable ending.