Table of Contents >> Show >> Hide
- Why Sheet Pan Quesadillas Are a Weeknight Power Move
- Main Keyword, Meet the Method
- Ingredients
- Equipment
- Sheet Pan Chicken Quesadillas: Step-by-Step
- Pro Tips for Crispy Oven-Baked Quesadillas
- Flavor Variations (So You Don’t Get Bored)
- What to Serve with Sheet Pan Chicken Quesadillas
- Make-Ahead, Storage, and Reheating
- Conclusion
- Real-Kitchen Experiences (The Stuff That Actually Happens)
If you love quesadillas but hate the part where you stand at the stove flipping tortilla after tortilla like you’re training for the Quesadilla Olympics,
welcome home. Sheet pan chicken quesadillas take everything you wantcrispy edges, melty cheese, smoky-seasoned chickenand move it to the oven
where it belongs. One pan. Big batch. Minimal drama. Maximum crunch.
This recipe is basically a weeknight cheat code: you build one giant quesadilla on a rimmed baking sheet, bake it with a little “top pan press” (more on that magic soon),
then slice it into tidy squares like you’re serving Tex-Mex lasagna. It’s perfect for busy dinners, game day, meal prep, or feeding a group of hungry humans who
mysteriously “aren’t that hungry” until the cheese hits the table.
Why Sheet Pan Quesadillas Are a Weeknight Power Move
Traditional quesadillas are deliciousbut making them one at a time can feel like running a tiny tortilla restaurant out of your kitchen. The sheet pan method flips the script:
you assemble everything at once, bake until golden, and slice into portions that are easy to grab and dip.
- Feeds a crowd fast: One pan can make 8–12 servings depending on how you slice.
- Even crisping: Baking + a little fat (butter or oil) helps the tortillas brown without frying.
- Less mess: No filling spilling out mid-flip. No cheese lava on your burner.
- Highly customizable: Use rotisserie chicken, leftover grilled chicken, or swap in veggies and beans.
Main Keyword, Meet the Method
When people search for an easy sheet pan chicken quesadillas recipe, they’re usually chasing three things: crisp tortillas, juicy chicken, and that stretchy,
gooey cheese pull. The method below is designed around those goalswith smart choices that keep the filling flavorful but not watery (soggy quesadillas are a crime of texture).
Ingredients
Think of this as a “build-your-own masterpiece” situation. The list below is the reliable, crowd-pleasing classic, but you’ll see swaps and upgrades later.
For the chicken filling
- Cooked chicken (about 3 cups shredded or chopped): Rotisserie chicken is the weeknight VIP, but leftovers work great.
- Bell peppers + onion (thinly sliced): Adds sweetness and crunch without turning mushy.
- Seasoning: Taco seasoning or fajita seasoning, plus a pinch of salt as needed.
- Garlic (optional): Because garlic improves most life situations.
- Corn and/or black beans (optional): Bulk it up and make it extra satisfying.
- Salsa or diced tomatoes (small amount): Flavor boosterjust don’t overdo the liquid.
- Lime juice: Brightens everything and makes the chicken taste “awake.”
For assembly
- Large flour tortillas: The easiest for sheet pan coverage and folding.
- Shredded cheese: Monterey Jack, cheddar, pepper jack, or a blend. Use what melts well.
- Oil or melted butter: Helps the tortillas get golden and crisp in the oven.
- Optional extras: Pickled jalapeños, chopped cilantro, green onions, or a little chipotle in adobo.
Equipment
- Rimmed half sheet pan (about 18 x 13 inches)
- Parchment paper or foil (optional, for easier cleanup)
- A second sheet pan (or another oven-safe pan) to press on top
- Large skillet (for sautéing veggies and warming the chicken mixture)
- Sharp knife or pizza cutter for slicing
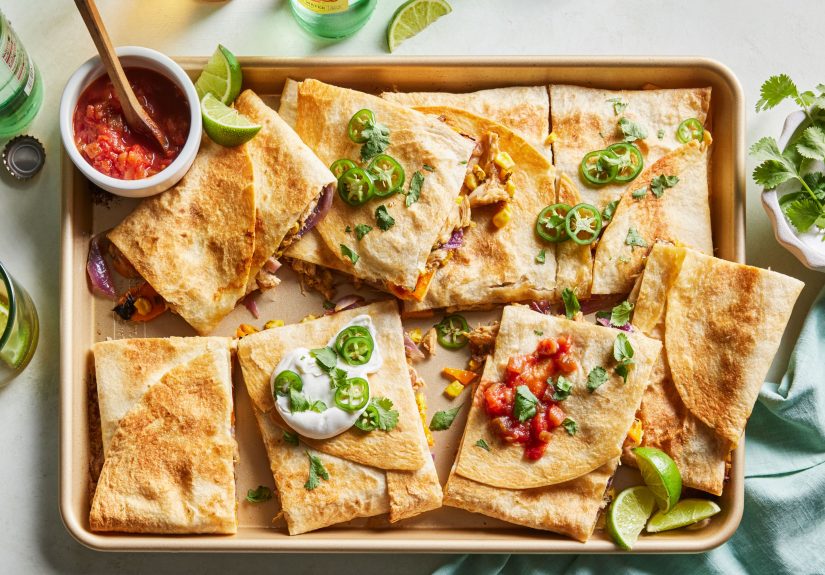
Sheet Pan Chicken Quesadillas: Step-by-Step
1) Preheat like you mean it
Heat your oven to 425°F. You want enough heat to crisp tortillas and melt cheese quicklywithout drying out the filling. If you’re chasing extra crunch,
set the rack in the lower-middle position so the bottom browns confidently.
2) Build a flavorful, not-watery filling
In a skillet over medium-high heat, sauté sliced onions and peppers with a little oil until softened and lightly brownedabout 5–7 minutes.
Stir in garlic for the last 30 seconds if using. Add your cooked chicken, seasoning, and a small spoonful of salsa (or a few tablespoons of diced tomatoes).
Finish with a squeeze of lime.
Important: If your mixture looks wet, cook it down for another minute or two. Too much moisture is the fastest way to turn crisp tortillas into sad, floppy blankets.
3) Prep the pan and tortillas
Lightly brush (or spray) your sheet pan with oil or brush with melted butter. Lay tortillas around the edges of the pan so half of each tortilla hangs over the sides.
Then place one or two tortillas in the center to fully cover the bottomno gaps.
4) Layer cheese like a structural engineer
Sprinkle a generous layer of shredded cheese over the bottom tortillas first. This is not just for joyit’s for stability.
Cheese melts and acts like edible glue, helping the filling stay put when you slice.
5) Add the chicken mixture evenly
Spread the chicken and veggie filling in a thin, even layer. Keep it away from the very edges so folding is easier.
Add beans and corn here if you’re using them (drain and pat dry if they’re extra moist).
6) Add the top cheese layer
Sprinkle more cheese over the filling. Yes, more. This helps the top tortillas stick and gives you that gooey interior that makes people stop talking mid-sentence.
7) Close it up
Place a tortilla in the center on top of the filling. Then fold the overhanging tortillas inward, one by one, until the filling is fully enclosed.
Think of it like wrapping a present, except the gift is melted cheese and nobody needs a receipt.
8) The “top pan press” trick
Brush the top with a little melted butter or oil. Place a second sheet pan on top and press gently.
This step encourages even browning, helps the quesadilla hold its shape, and improves that crisp-meets-melty texture you want.
9) Bake in two stages
- Bake with the top pan: 10–15 minutes, until the tortillas begin to set and lightly crisp.
- Remove the top pan: Continue baking 8–15 minutes, until the top is deeply golden and the cheese is fully melted.
Want extra color? Turn on the broiler for 1–2 minutes at the endwatch closely so it goes “golden” and not “I have regrets.”
10) Rest, then slice
Let the quesadilla rest for 5–10 minutes before slicing. This gives the cheese time to set slightly so your squares hold together instead of sliding apart like a cheesy landslide.
Slice into rectangles or squares and serve warm.
Pro Tips for Crispy Oven-Baked Quesadillas
Keep moisture under control
Drain beans and corn well. Use salsa sparingly, or choose a thicker salsa. If you’re adding sautéed mushrooms or zucchini, cook off their water first.
Cheese goes on the bottom and the top
A thin layer of cheese against the tortilla helps the filling cling together. It also creates a barrier that reduces sogginess.
You’re not just adding cheeseyou’re installing structural support.
Brush the tortillas
A light coat of oil or melted butter helps tortillas brown and crisp in the oven. You don’t need to drench themthink “light tan,” not “deep-fried vacation.”
Press for even browning
The second sheet pan on top is the secret handshake of sheet pan quesadillas. It encourages contact, browning, and a more cohesive final slice.
Flavor Variations (So You Don’t Get Bored)
Smoky chipotle chicken
Stir a teaspoon of minced chipotle in adobo into the chicken mixture and add a pinch of smoked paprika. Serve with lime crema (sour cream + lime + salt).
Buffalo chicken quesadillas
Toss chicken with Buffalo sauce, add a little ranch seasoning, and use cheddar + Monterey Jack. Serve with celery sticks and extra ranch or blue cheese.
Is it traditional? No. Is it wildly good? Yes.
BBQ chicken “Tex-Mex mashup”
Use BBQ sauce instead of salsa (go easyBBQ sauce can be sweet and wet). Add red onion, corn, and cilantro. Pepper jack works great here.
Bean-and-veggie (meatless but mighty)
Swap chicken for black beans + sautéed peppers and onions. Add spinach at the end (wilt it first so it doesn’t steam the tortillas).
You’ll still get a hearty, high-protein sheet pan dinner.
What to Serve with Sheet Pan Chicken Quesadillas
Quesadillas love dipping sauces the way fries love ketchup: enthusiastically and without apology. Try:
- Guacamole or sliced avocado
- Sour cream or Mexican crema
- Pico de gallo or salsa
- Hot sauce or jalapeño sauce
- Simple side salad with lime vinaigrette
- Mexican rice or cilantro-lime rice
Make-Ahead, Storage, and Reheating
Make-ahead
You can prep the chicken filling up to 3 days ahead and keep it refrigerated. When ready, assemble and bake fresh for the best crunch.
Storage
Store leftovers in an airtight container in the fridge. For best texture, keep dipping sauces separate.
Reheat (so it stays crispy)
- Oven/toaster oven: Bake at 375°F until hot and crisp again.
- Skillet: Crisp each side over medium heat.
- Microwave: Works in a pinch, but expect softer tortillas (still tasty, just less crunchy).
Conclusion
This sheet pan chicken quesadillas recipe is the kind of dinner that feels like you did something impressivewithout actually having to do an impressive amount of work.
It’s crunchy, cheesy, customizable, and ridiculously practical: one big bake, one big slice, and suddenly everyone’s happy.
Keep the filling bold, the moisture low, and the cheese generous. And if anyone asks how you got them so crisp, just wink and say,
“My oven and I have an understanding.”
Real-Kitchen Experiences (The Stuff That Actually Happens)
Sheet pan quesadillas look effortless in photos, but real kitchens are chaotic little ecosystemsespecially on weeknights. Here are the most common “this is my life now”
moments people run into, plus how to make them work in your favor.
First: the rotisserie chicken rescue mission. It’s 6:12 p.m., you’re hungry, and suddenly cooking raw chicken feels like a personal attack.
This recipe shines here because rotisserie chicken turns it into a 30–40 minute dinner that tastes like you planned ahead.
The key is giving that pre-cooked chicken a quick flavor boostwarm it with sautéed onions and peppers, taco seasoning, and lime so it tastes intentional, not leftover.
(Leftover can be delicious. It just needs confidence.)
Second: the soggy-bottom scare. Someone adds “just a little more salsa” and now the filling looks like it’s auditioning for soup.
The fix is simple: cook the filling down for a minute, and don’t spread it too thick. Another move is using thicker add-inslike drained beans, corn, and shredded cheese
to balance moisture. Even better, put cheese down first: it creates a barrier that helps protect the tortilla from wetter ingredients.
If you want to feel like a wizard, bake the quesadilla on a lower rack so the bottom browns more aggressively.
Third: the picky eater negotiation. One person “doesn’t like onions,” another fears peppers, and a third acts betrayed by beans.
Sheet pan quesadillas can still work because the flavor is spread out, not concentrated in one scary bite. Chop veggies smaller, cook them until sweet and tender,
and keep the spice level moderate. Then let people customize at the table with dips: salsa for the brave, sour cream for the cautious, hot sauce for the chaos gremlins.
It’s essentially a choose-your-own-adventure with melted cheese as the universal translator.
Fourth: the “why won’t it slice neatly?” moment. If you cut too soon, the cheese is still molten and your beautiful slab can slide apart.
Resting for 5–10 minutes fixes most of this. Also, don’t overload the filling. A sheet pan quesadilla isn’t a burrito; it’s more like a warm, crispy sandwich system.
Even layers slice better than towering piles.
Fifth: leftovers that don’t taste like leftovers. A surprising win here is how well these reheatif you use the right method.
The microwave is fine for emergency lunch, but a toaster oven or skillet brings back the crisp edges and makes it feel freshly baked.
Many people end up intentionally making extra because the next-day squares are perfect for quick snacks, lunchboxes, or a “standing at the counter eating quietly” moment.
(No judgment. That’s a classic.)
And finally: the party scenario. When you’re feeding a group, sheet pan chicken quesadillas are almost unfairly convenient.
You can bake, slice, and serve on one big board with bowls of guacamole, salsa, and crema. The squares hold up well, travel well, and disappear fast.
Pro tip from the trenches: make two pans if you can. The first one goes immediately. The second one makes you look like a hosting genius.