Table of Contents >> Show >> Hide
- What Is a Single-Leg Hip Thrust?
- Benefits of the Single-Leg Hip Thrust
- Muscles Worked
- How To Do a Single-Leg Hip Thrust (Step-by-Step)
- Form Cues That Make the Exercise Work (and Keep Your Back Happy)
- Common Mistakes (and Quick Fixes)
- Progressions and Variations
- How To Program Single-Leg Hip Thrusts
- Who Should Be Careful (and How To Modify)
- Real-World Experience: What It Feels Like to Learn the Single-Leg Hip Thrust (and Get Good at It)
- Conclusion
If your glutes had a résumé, “hip extension” would be in bold, highlighted, and probably listed twice (but we won’t do thatno keyword stuffing here).
The single-leg hip thrust is one of the most efficient ways to train that job description with a twist: one side works while the other side
tries not to sabotage the situation by wobbling like a shopping cart with one bad wheel.
Done right, this move builds strong, capable hips that show up for real life (stairs, getting out of a chair, picking up your backpack) and sports
(sprinting, jumping, cutting). Done wrong, it becomes a lower-back “how did we get here?” moment. Let’s keep it in the first category.
What Is a Single-Leg Hip Thrust?
A single-leg hip thrust is a unilateral hip extension exercisemeaning one leg is primarily responsible for driving your hips upward.
Typically, your upper back is supported on a bench (hip thrust style), one foot is planted, and the other leg is lifted to reduce assistance.
Your goal is to lift your hips until your torso forms a straight line from shoulders to kneewithout turning your spine into a banana.
You’ll also hear people use “single-leg glute bridge” interchangeably. The pattern is similar, but the setup is usually different:
a glute bridge is commonly done on the floor, while a hip thrust often uses a bench to increase range of motion.
Same mission, slightly different battlefield.
Benefits of the Single-Leg Hip Thrust
1) Unilateral glute strength (a.k.a. no more “dominant side drama”)
Most of us have a stronger legthe one that “mysteriously” takes over during squats, deadlifts, or climbing stairs. Single-leg hip thrusts force each side
to contribute honestly. Over time, that can help even out strength differences and improve control from left to right.
2) Better pelvic stability and control
When you lift on one leg, your pelvis wants to rotate or drop. Resisting that trains the smaller hip stabilizers (especially along the outer hip)
and your core to keep things level. Translation: you’re practicing being stable while producing forceone of the most useful athletic skills there is.
3) Stronger hip extension for daily life and athletic performance
Hip extension is a big deal. It helps you stand tall, climb stairs, run, sprint, and jump. Because hip thrust variations load the hips through extension,
they’re often used to build glute strength in a way that carries over to movement outside the gym.
4) Glute focus without needing heavy weights
Single-leg work increases difficulty without requiring a mountain of plates. That’s helpful if you train at home, prefer dumbbells, or simply don’t want to
spend 12 minutes negotiating with a barbell in a crowded gym.
5) A knee-friendly way to train the posterior chain
While every body is different, hip thrust/bridge patterns are often chosen because they emphasize the hips and glutes without demanding deep knee bend
like some squat variations. If you’re building lower-body strength with comfort in mind, this can be a smart tool in the toolbox.
Muscles Worked
The single-leg hip thrust is glute-centered, but it’s not a one-muscle show. Here’s who’s clocking in:
Primary muscles
- Gluteus maximus the main hip extensor and the star of the lift (drives your hips up).
- Gluteus medius/minimus help stabilize the pelvis so you don’t twist or dip mid-rep.
Secondary/supporting muscles
- Hamstrings assist with hip extension; may feel extra “present” if your foot placement is off.
- Adductors (inner thigh) contribute to hip stability and extension support.
- Core (abs/obliques) keeps ribs down and pelvis steady (no wobble, no arch).
- Spinal erectors should stabilize, not take over; if they’re doing the heavy lifting, adjust your form.
- Upper back helps anchor you against the bench in the hip-thrust setup.
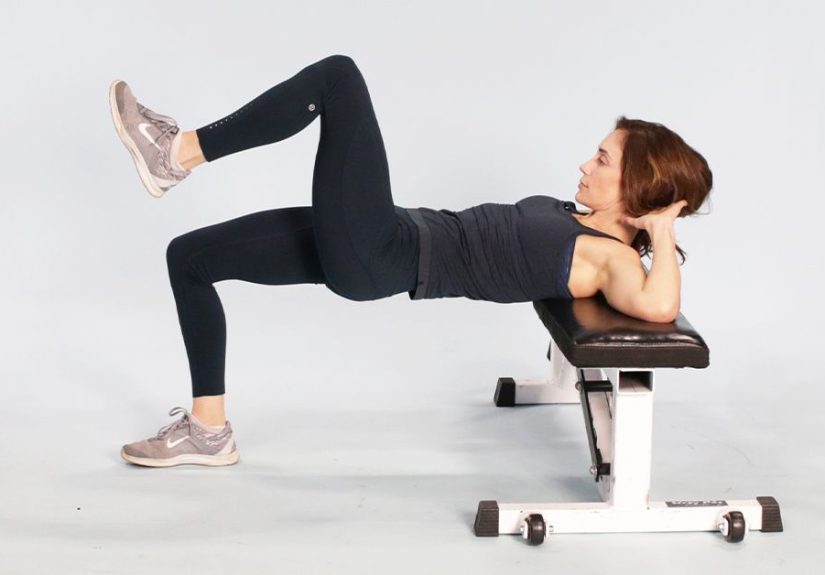
How To Do a Single-Leg Hip Thrust (Step-by-Step)
Setup (bench version)
- Set your bench height: A standard flat bench works. Sit with your mid-back against the bench edge.
- Plant one foot: Place your working foot flat on the floor. Start with your shin roughly vertical at the top position.
- Lift the other leg: Bend the non-working leg so the knee stays over the hip (or extend it slightlyeither is fine if you stay level).
- Brace: Keep your ribs “down” and core gently tight. Think: zipper up the front of your torso.
- Drive up through the heel: Push the floor away with your working foot and lift your hips.
- Finish strong: At the top, your shoulders, hips, and knee form a straight line. Pause and squeeze your glute.
- Lower with control: Bring hips down slowly, keeping your pelvis square and your core engaged.
No bench? Do the floor version
Same idea, simpler setup: lie on your back, one foot planted, other leg lifted, then bridge your hips up. The floor limits range of motion,
which can be great for learning the pattern (and for avoiding the “who put this bench so far away?” problem).
Form Cues That Make the Exercise Work (and Keep Your Back Happy)
- Keep your pelvis level: Imagine your hip bones are headlightskeep them pointing straight ahead.
- Ribs down, chin neutral: This helps prevent over-arching through the lower back.
- Drive through the heel (or midfoot): Too much toes can shift effort away from the glutes.
- Pause at the top: A 1–2 second squeeze makes it harder to “cheat” with momentum.
- Move like you mean it, not like you’re late: Controlled reps beat flailing reps every time.
Common Mistakes (and Quick Fixes)
Mistake 1: Overarching the lower back
What it looks like: You hit the top and your ribs flare up, back arches, and your glutes take a coffee break.
Fix it: Keep ribs down, brace your core, and stop the lift when you’re in a straight linedon’t chase “higher” if it costs your spine position.
Mistake 2: Hips rotating or dropping
What it looks like: One hip dips like it’s trying to wave at the floor.
Fix it: Reduce range of motion, slow down, or start with the floor version until you can keep your pelvis steady.
Mistake 3: Pushing with your arms/elbows instead of your glutes
What it looks like: You’re basically doing a weird triceps press on the bench.
Fix it: Relax your arms, let your upper back be the pivot point, and focus on driving through the planted foot.
Mistake 4: Foot placement that turns it into a hamstring cramp festival
What it looks like: Hamstrings seize up and your glute never really “turns on.”
Fix it: Adjust the planted foot so that at the top your shin is close to vertical. If hamstrings dominate, bring the foot a touch closer and
emphasize a glute squeeze at lockout.
Mistake 5: Knee collapsing inward
What it looks like: The knee caves toward midline as you lift.
Fix it: Think “knee tracks over toes.” A light mini-band above the knees can give you feedback to press out gently.
Progressions and Variations
Use these to scale the difficulty up or downwithout turning your workout into a circus trick audition.
Make it easier
- Double-leg glute bridge (floor): learn the pattern and build baseline strength.
- Single-leg glute bridge on the floor: unilateral challenge with less range of motion.
- Shorter range reps: lift to a pain-free, stable height and gradually increase.
- “B-stance” hip thrust: keep one foot planted lightly for balance while the other does most of the work.
Make it harder
- Add a pause: 2–3 seconds at the top for more time under tension.
- Tempo reps: 3 seconds down, 1 second up; control builds strength fast.
- Add load: dumbbell on the hip crease, a weight plate, or even a loaded backpack (home gym ingenuity counts).
- Add a band: band above knees to increase hip stability demand.
- Feet-elevated variation: changes leverage and can raise difficultyonly if your form stays solid.
How To Program Single-Leg Hip Thrusts
Where you place this move depends on your goal. If you want it to improve your big lifts, treat it like a quality accessory.
If you want it as glute-focused strength work, give it more attention (and better rest).
Sets and reps
- For technique & activation: 2–3 sets of 8–12 reps per side, controlled tempo, short rests.
- For strength: 3–5 sets of 6–8 reps per side with load, longer rests, strong pauses.
- For muscle endurance: 2–4 sets of 12–20 reps per side, steady pace, minimal pelvic movement.
Where it fits in a workout
- Warm-up primer: 1–2 light sets before squats/deadlifts to “wake up” glutes.
- Accessory after main lift: after squats, deadlifts, or lunges for targeted hip extension work.
- Standalone home session: pair with split squats, rows/push-ups, and core work for a complete routine.
Sample mini-workout (no fancy equipment required)
- Single-leg hip thrust: 3 sets x 10 reps each side (2-second squeeze at top)
- Reverse lunge: 3 sets x 8–10 reps each side
- Side-lying hip abduction or band walks: 2–3 sets x 12–15 reps
- Dead bug or plank: 2–3 sets x 20–40 seconds
Who Should Be Careful (and How To Modify)
This exercise is generally joint-friendly when performed with control, but you should modify or pause if you feel sharp pain (not normal muscle effort).
If you have a current low-back injury, hip injury, or hamstring strain, start with the floor version and a smaller range of motionor get guidance from a qualified clinician.
A good rule: you should feel the work primarily in the glute of the planted leg. If you feel it mostly in your lower back, hamstring, or the front of your hip,
treat that as a form cluenot a “push through it” badge.
Real-World Experience: What It Feels Like to Learn the Single-Leg Hip Thrust (and Get Good at It)
The first time most people try a single-leg hip thrust, the biggest surprise isn’t how hard the glute worksit’s how much the body wants to
avoid letting one glute do the job. The hips twist. The bench feels wobbly. The “free” leg starts doing interpretive dance. And somehow,
the working glute insists it has never heard of hip extension in its life.
Early on, it’s common to feel the hamstring crank up fastsometimes with a mild crampy sensation. That usually isn’t a sign you’re “bad” at the exercise.
It’s often a setup issue: your planted foot may be too far away, you may be driving through your toes, or you might be arching your back and asking everything
except the glute to do the lift. A small foot adjustment (aiming for a more vertical shin at the top), a slower lowering phase, and a deliberate glute squeeze
usually changes the whole experience in one session.
Balance improves quicklyoften within a couple of weeksbecause your body gets better at keeping the pelvis level. A helpful “aha” moment is placing your hands
on your hip bones during the first few reps. You can literally feel if one side drops or rotates. When you correct it, the working glute tends to light up more,
and the movement feels smoother and more controlled. It’s less “heave-and-hope” and more “drive-and-own.”
As you get comfortable, you’ll notice the exercise becomes a form test you can use anywhere. On days when you’re tight from sitting, a few controlled reps can
make your hips feel more mobile and switched onespecially if you pause at the top and keep your ribs down. On days when you’re already warmed up, it becomes a
serious strength builder. Add a dumbbell to the hip crease, and suddenly 8–10 reps per side feels like you’re negotiating with your glute for permission to finish.
Another common experience: the “weaker” side often fatigues faster, even with perfect form. Instead of matching reps by force, it’s smarter to match them by quality.
If the left side stays level for 10 clean reps but the right starts twisting at rep 8, stop at 8 and build from there. Over a month of consistent practice,
many people report more even effort during bilateral lifts (like squats), improved stability in lunges, and better confidence in single-leg movements overall.
It’s not magicit’s just the boring superpower of doing honest reps and letting the weak link catch up.
The best part is how “transferable” it feels in everyday life. Stairs can feel easier. Standing up from low seats becomes more effortless. And if you play sports,
single-leg push-off strength and control is exactly what you’re training hereone hip, one leg, one clean drive at a time. Your glute doesn’t need motivation.
It needs a plan. This is a good one.
Conclusion
The single-leg hip thrust is a simple-looking move with serious payoff: stronger glutes, better hip stability, and more balanced lower-body strength.
Focus on a steady pelvis, ribs down, and controlled reps. Start with the floor version if needed, progress to the bench setup, and add load only when your form stays solid.
If you want one accessory exercise that punches above its weight (sometimes literally), this is it.