Table of Contents >> Show >> Hide
- Introduction: Why One Wrong Bit Can Crack Your Tile Dream
- H2: What to Look for in a Great Tile Drill Bit
- H2: Top Picks from Bob Vila’s Testing (and Why They Matter)
- H2: How to Use These Bits Like a Pro (and Avoid Cracked Tile Nightmares)
- H2: My Honest Take – Which Bit I’d Buy (and Why)
- Conclusion
- Addendum – My Own Field Experience ()
Alright DIYers, tile tinkerers, and home-reno heroes: if you’ve ever heard that dreaded *crack* when your drill bit wanders off an already-installed tile, you’re in the right place. We’re diving into the world of tile-drilling the kind of work that demands more than just a regular twist bit from the drawer. We’ll walk you through what makes a tile bit truly great, what kinds of tile you’ll encounter, and (yes) which bits earned top marks in the real-world testing by the team at Bob Vila. So strap on your safety glasses, grab the dust mask, and let’s get drilling (without the drama).
Introduction: Why One Wrong Bit Can Crack Your Tile Dream
Drilling through tile isn’t like drilling through wood, drywall, or even concrete (as I once humorously found out when I tried to “just wing it”). Kitchen backsplashes, bathroom shower walls, mosaic accent strips these tiles are glazed, brittle, and unforgiving when the wrong bit meets them. According to Bob Vila’s team, “attempting to drill tile with a standard steel bit … can cause the bit to overheat, bend or even break in half.”
So the stakes are high: pick the wrong bit, and you’ll end the job with cracked tile, rough edges, or worse a wasted panel and an extra trip to the store. Get the right bit, match it to the tile type, and you’ll wonder why you ever feared drilling in the first place.
H2: What to Look for in a Great Tile Drill Bit
Material & Tip Type
The magic often happens at the tip. Drill bits for tile generally fall into a few main categories:
- Carbide-tipped masonry bits: Ideal for glazed ceramic tile. Bob Vila’s testing found a set of carbide-tip bits provided excellent durability and clean holes through ceramic and similar materials.
- Diamond-tipped bits: Required when you move into harder territory think porcelain, glass tile or natural stone. As tiling experts note: “glazed ceramic tiles often require a carbide bit, while porcelain and glass tiles call for a diamond-tipped bit”
Bit Shape, Coating & Shank
Look for bits that:
- have a raised spear-point or “cone shape” tip to help start smoothly instead of walking across the tile’s glaze;
- have flutes or spiral paths to eject dust so the bit doesn’t bind in the hole (Bob Vila mentions deep flutes in the tips they tested).
- have compatible shanks (especially if you’re using an impact driver or quick-change chuck) though for tile you’re often better off avoiding hammer/impact mode anyway;
- feature durable coatings or tip materials for longevity over dozens of drilled holes.
Match to Your Tile Type
Not all tile is created equal. From softer ceramic to ultra-dense porcelain, the substrate changes how the bit behaves. Experts at Rubi Tools explain that the tile material dictates the proper bit type: a carbide bit might suffice for a glazed ceramic, but it’s likely to burn out or chip a porcelain tile unless you go diamond.
Tip: If your tile label isn’t clear, look at the edge colour. Porcelain often shows the same tone throughout whereas ceramic often has a white body beneath a glaze. The harder the tile, the tougher the bit must be.
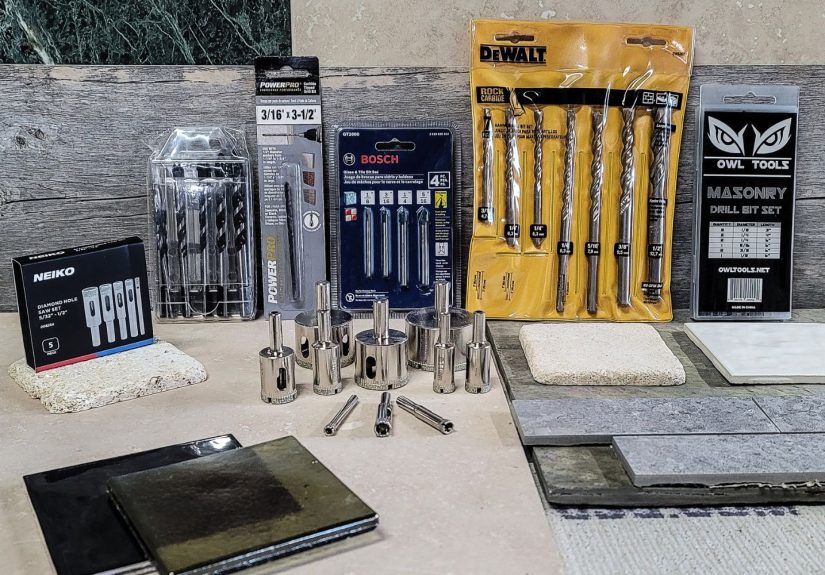
H2: Top Picks from Bob Vila’s Testing (and Why They Matter)
The team behind Bob Vila.com tested dozens of bits on ceramic, porcelain, glass, marble and slate tiles and ranked them by performance, durability and value. Here are key winners and what they tell us.
Best Overall: DeWalt Rapid Load Carbide Masonry Drill Bit Set
This set stood out because the bits drilled through travertine, slate, marble, ceramic and glass with minimal wear after drilling dozens of holes each. Bob’s testers said: “After drilling 10 holes with each, I saw virtually no softening … as I drilled an additional 30 holes per bit, I still didn’t notice much slowing down.” The takeaway? A high-quality carbide tip can carry serious workload and still deliver clean holes in assorted tile types.
Best for Glass & Tile: Bosch GT2000 4-Piece Glass and Tile Bit Set
If your project leans heavily into glass tile (think backsplashes, accent walls) this set made the list thanks to refined tips suited to slick surfaces. Bob’s testing labeled it “best glass tile set.”
Best Bang for the Buck & Multi-Material: Hillman Tapper Carbide Tipped Drill Bit / Irwin Multi-Material Masonry Drill Bit Set
For those who just need a few holes (say towel bars, toilet paper holder anchors) and want to say “hey, I didn’t spend a ton,” these picks deliver. Bob’s testers noted they’re not the premium, heavy-duty champions, but they’re perfectly adequate when you’re not doing an all-day tile drill marathon.
H2: How to Use These Bits Like a Pro (and Avoid Cracked Tile Nightmares)
Having the right bit is half the battle using it correctly is the other half. Here are solid technique tips to avoid splits, chips and frustration.
Set Up Your Drill Right
– Use **slow speed**: For hard tiles, slow and steady wins. A whip-fast drill might overheat the bit or cause the tip to skip.
– Turn off hammer/impact mode: Drilling tile with hammer action is like doing ballet in hiking boots wrong mode, wrong surface.
– Secure the tile surface: Use masking tape over the drilling location to help prevent the bit from slipping on the glaze.
Start at an Angle, Then Go Straight
Many pros recommend starting the bit at a slight angle (say ~30°) so it “bites” into the surface, then gradually bring the drill perpendicular once the groove is established. This helps avoid wandering. Forum users and tilers echo the advice:
> “start at an angle … and slowly bring the bit up as it cuts.”
Cool It Down and Clear Debris
Especially with diamond bits on hard tile, heat is the enemy. Use a spray bottle of water, a damp sponge, or a constant trickle to cool the bit and prevent damage. One guide notes: “use a damp sponge or spray bottle … keep the temperature low and remove debris” Also, periodically clear out the dust so the flutes don’t jam.
Finish Carefully on the Backside
As you near the back of the tile, lighten your pressure; this helps avoid “exit chipping” where the bit breaks through the back face and causes a rough edge. Installer guides warn that near the end of drilling you should ease up considerably.
H2: My Honest Take – Which Bit I’d Buy (and Why)
If I were in your shoes and picking one go-to bit set for tile work, here’s what I’d do: buy a quality carbide-tipped tile bit set (like the DeWalt set mentioned above) for everyday ceramic and glass tile work. Then keep a diamond-tipped bit on standby for those heavier tasks porcelain tile or natural stone which laugh at standard bits. The cost difference isn’t huge, and the frustration savings are huge.
And if you’re only drilling a few holes (anchors for shelves or fixtures), go for the budget-friendly single-bit options and use careful technique. You don’t need a massive set if your job is minimal just the right single bit sized for your anchor and tile type.
Conclusion
Drilling tile doesn’t have to feel like stepping into a minefield. With the right drill bit, matched to your tile type, and a few smart technique tweaks (slow speed, cooling, correct angle), you’ll save time, money and stress. Bob Vila’s reviewers drilled dozens of holes across materials and found durable sets that performed consistently so take their findings, mix in your own care, and consider your tile installation mission: fully achievable.
Sapo
If you’re about to drill into tile and want to avoid cracked surfaces, endless store trips, and a tool kit full of “meh” bitsthis is your briefing. We’re diving into why certain drill bits earn the title “best for tile” (thanks to the hands-on lab at Bob Vila), how to match the bit to the tile type (ceramic vs porcelain vs glass), and exactly how to use the bit so you don’t turn a smooth backsplash into mosaic by accident. With a fun tone, real-world examples and clear criteria, you’ll walk away ready to pick the right bit, set it up correctly, and get clean, chip-free holes. Let’s turn that drilling dread into a smooth, satisfying task.
Addendum – My Own Field Experience ()
Okay, now for the “been there, done that” portion. A few months back I had to install a decorative tile accent in my kitchen backsplashlarge subway-style porcelain tiles (the ones that look like marble but are tough as nails). I reached into my tool box and grabbed a generic masonry bit (big mistake). As soon as I plunged into the tile, the bit skidded off the glazed surface, slipped, and etched a line across the tile face. Cue expletives and wasted tile. Lesson one: don’t assume a general-purpose bit will cut it.
The second time around I invested in a quality carbide-tipped tile bit recommended in a Bob Vila article (the DeWalt set). This time I took my time: applied a bit of painter’s tape to the mark, started drilling at a shallow angle, reduced the drill speed, and kept a spray bottle ready for misting. The bit bit into the surface smoothly, the flutes carried out the dust, and I ended up with a clean holeno chips, no mess.
Then came a separate project: a shower floor renovation with glazed porcelain and glass mosaic tile. For that I pulled out a diamond-tipped bit. When I hit the porcelain edges, the diamond tip chewed right through no “walk,” no wobble. The catch? I had to go slower, used light pressure, and had to cool the bit with water from time to time. Also, I avoided hammer mode. By contrast, earlier attempts with carbide bits would dull fast, and the holes looked rough at the exit side.
From those two experiences I distilled some “golden rules” that I share with you now:
- Always match the bit to tile hardness: glazed ceramic? Carbide is fine. Porcelain or glass? Diamond is safest.
- Never rely on speed alonecontrol your drill’s RPM, keep pressure even, and cool the bit.
- Don’t skip the setup: a little tape, level, starting angle will save you re-tiling later.
- Kill the hammer/impact mode when drilling tile unless the manufacturer explicitly says “safe for tile with impact.” Most don’t.
- Have one “go-to” quality bit for everyday tile holes (anchors, fixtures) and a backup heavy-duty bit for the occasional hard-tile job.
In my case, after those lessons, I no longer dreaded drilling into tile I actually enjoyed the moment when the bit glided through and the hole looked perfect. And honestly, that little “click” of satisfaction when you’ve drilled a perfect hole in tile without cracking it is one of the little joys of home improvement.
So next time you face that tiled wall, you’ll know you’ve got the right bit, the right method, and the confidence to execute. Happy drilling!