Table of Contents >> Show >> Hide
- What Is PEX and Why the Connections Matter
- Types of PEX Pipe (PEX-A, PEX-B, PEX-C) and Why It Affects Your Connections
- The Big Four PEX Connection Methods
- How to Choose the Right PEX Connection for Your Project
- Code, Safety, and Common Mistakes with PEX Connections
- Step-By-Step: Making a Solid PEX Crimp Connection
- Maintenance and Troubleshooting for PEX Connections
- Real-World Experiences with PEX Pipe Connections
If you’ve ever wandered through the plumbing aisle and wondered why all the pros are grabbing colorful flexible tubing instead of shiny copper, you’ve already met PEX. It’s flexible, affordable, and surprisingly DIY-friendly. But the real magic of a leak-free system isn’t just the pipe – it’s the PEX pipe connections that hold everything together.
Choose the wrong fitting, skip a little step, or squeeze a ring in the wrong spot and you’ll discover exactly how fast a “quick project” can flood a basement. The good news? Once you understand the main types of PEX fittings and how they work, you can build rock-solid connections that rival a pro’s work.
What Is PEX and Why the Connections Matter
PEX (cross-linked polyethylene) is a flexible plastic tubing used for water supply lines in homes and small commercial buildings. It’s popular because it:
- Bends around corners instead of needing a dozen elbows
- Resists corrosion and scale buildup that can attack metal pipes
- Handles freezing better than copper by expanding instead of splitting in many cases
- Costs significantly less than copper and installs faster, especially on remodels
All of that is great, but every piece of tubing eventually needs to start, stop, turn, or connect to a valve, fixture, or another pipe. That’s where PEX fittings and connections come in. Each connection type uses its own hardware and tools, and each has strengths, weaknesses, and best-use scenarios.
Types of PEX Pipe (PEX-A, PEX-B, PEX-C) and Why It Affects Your Connections
Before you pick a connection method, it helps to know what kind of PEX you’re working with. The three most common types are:
PEX-A
- The most flexible type with strong “shape memory” – it shrinks back after being stretched
- Great kink resistance and easy to route around obstacles
- Compatible with expansion fittings (its star use case), plus crimp, clamp, and push-fit in many systems
PEX-B
- Stiffer than PEX-A but widely available and often cheaper
- Typically used with crimp, clamp (cinch), or push-fit fittings
- Higher burst pressure than PEX-A, which can be helpful in certain installations
PEX-C
- Least flexible of the three and not as commonly used for whole-house supply
- Often reserved for smaller projects or where it’s specified by a system manufacturer
The type of PEX you buy determines which PEX connection types are compatible. For example, expansion fittings are designed specifically for PEX-A, while PEX-B is usually paired with crimp or clamp systems.
The Big Four PEX Connection Methods
Walk into any home center and you’ll see dozens of PEX fittings, but for most DIYers, four methods matter:
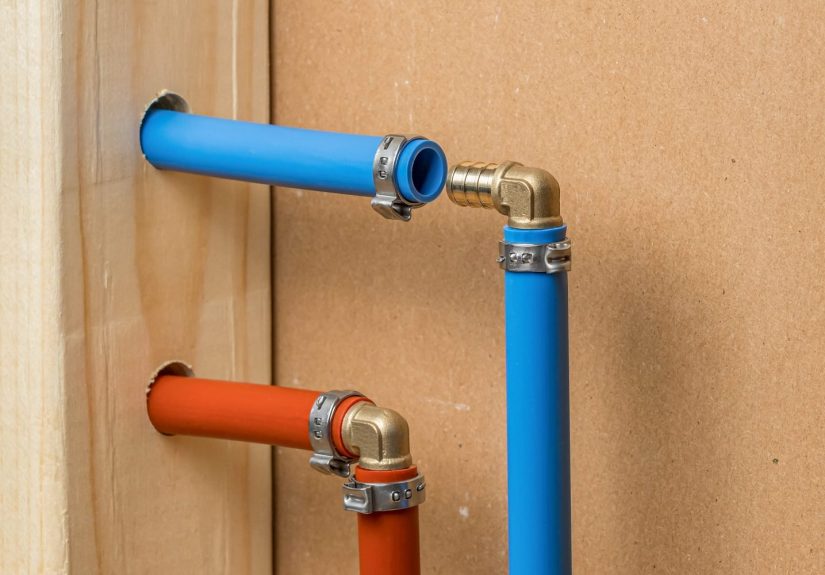
1. Crimp Ring Connections
Crimp connections are the workhorse of PEX plumbing. Here’s how they work:
- Slide a copper crimp ring over the PEX pipe.
- Push the pipe fully onto a barbed brass or poly fitting.
- Position the ring 1/8 to 1/4 inch from the end of the pipe.
- Use a PEX crimp tool to squeeze the ring until it forms a tight, uniform circle around the pipe and fitting.
Pros:
- Inexpensive rings and fittings – a favorite of pros and budget-conscious DIYers
- Easy to learn with consistent results when a go/no-go gauge is used
- Widely available at big-box stores and plumbing suppliers
Cons:
- Requires a dedicated crimp tool (or a multi-head tool) and room to swing it
- Copper rings can corrode in aggressive environments if not protected
- Fittings slightly reduce internal diameter and can add minor flow resistance
2. Clamp (Cinch) Connections
Clamp connections use a stainless steel “cinch” ring instead of copper. The process:
- Slide the clamp ring over the pipe.
- Seat the pipe on the fitting barb.
- Position the ring and tighten it with a cinch tool until it locks.
Pros:
- Stainless steel ring resists corrosion and is approved in many damp locations
- One size of clamp can often work on multiple pipe sizes for some systems
- The cinch tool fits into tighter spaces than larger crimp tools
Cons:
- Clamps can be a bit fussier to install correctly and evenly
- Rings are usually more expensive than basic copper crimp rings
3. Push-Fit (Push-to-Connect) Fittings
If you’ve seen fittings you simply push onto a pipe until they click and seal, that’s push-fit technology. These fittings usually have metal teeth that grip the pipe and an internal O-ring to create a watertight seal. They can join PEX to copper, CPVC, and sometimes other plastics.
Pros:
- Fast, tool-free installationperfect for tight spaces or quick repairs
- Excellent for transitions between PEX and existing copper or galvanized lines
- Removable with a simple release tool in many brands
Cons:
- More expensive per fitting than crimp or clamp options
- Some models are not recommended for permanent concealed or buried connections without additional protection
- Teeth can potentially slip on poorly cut or scratched pipe in extreme conditions
4. Expansion Fittings
Expansion systems take advantage of PEX-A’s “memory.” You temporarily stretch the pipe and a matching ring, slide them over a larger-diameter fitting, and let everything shrink down to clamp it tight.
- Slide an expansion ring over the PEX-A pipe.
- Use an expansion tool to repeatedly expand the pipe and ring.
- Quickly insert the fitting while the pipe is still expanded.
- Wait a short time as the PEX shrinks to form an extremely tight connection.
Pros:
- Maximizes the natural shape memory of PEX-A for long-term reliability
- Larger internal diameter at the fitting means better flow compared with many crimp fittings
- Approved for direct burial and concrete encasement in many systems
Cons:
- Requires PEX-A and a dedicated (and pricier) expansion tool
- Colder temperatures can slow down the “shrink back” time
How to Choose the Right PEX Connection for Your Project
There’s no single “best” methodonly the best match for your project and budget. Here’s how to think about it:
For Most DIY Home Projects
- Crimp systems offer an ideal balance of cost, availability, and reliability. Many plumbers and building-products pros consider copper crimp rings with brass barbed fittings a top value option.
For Repairs in Tight or Awkward Spaces
- Push-fit fittings shine for quick fixes when you don’t want to haul in specialty tools.
- Clamp rings with a compact cinch tool are also handy where a bulky crimp tool won’t fit.
For New Construction or Full Re-Pipes in PEX-A
- Expansion systems are popular for full-house runs because once you own the tool, the fittings are robust and flow-friendly, and the connections are extremely secure.
For Mixed Systems and Transitions
- Push-fit adapters are great for connecting PEX to old copper or galvanized pipe.
- Threaded and sweat adapter fittings allow you to bridge PEX to valves, water heaters, and fixtures.
Regardless of the method, always buy fittings and tools that are listed for potable water and match your PEX tubing’s size and type. That keeps you in line with both plumbing codes and manufacturer warranties.
Code, Safety, and Common Mistakes with PEX Connections
PEX is friendly, but it still has rules. Plumbing codes and manufacturer instructions highlight a few key points:
- Support the pipe. Even flexible pipe needs proper hangers and supports to prevent sagging, noise, and stress on fittings.
- Protect from UV. PEX is not a fan of direct sunlight; don’t store or install it where it will bake in UV for long periods.
- Use the right fittings in concealed locations. Many push-fit connections need special sleeves or are restricted for in-wall or underground use.
- Follow temperature and pressure ratings. PEX has specific limitsyour local code may restrict where it can connect directly to water heaters or boilers.
Common mistakes that cause leaks or failures include:
- Not pushing the pipe fully onto the fitting barb
- Crimping or clamping too far from the fitting shoulder
- Skipping the go/no-go gauge on crimp rings
- Using the wrong ring or fitting size for the tubing
- Rough, angled, or burred cuts on the pipe end
Step-By-Step: Making a Solid PEX Crimp Connection
If you’re new to PEX pipe connections, here’s a simple, practical example using a basic crimp system.
Tools and Materials
- PEX tubing (proper type and size)
- Barbed PEX fitting (elbow, tee, coupling, etc.)
- Copper crimp ring sized for your tubing
- PEX tubing cutter
- PEX crimp tool
- Crimp go/no-go gauge
Steps
- Cut the pipe square. Use a PEX cutter to make a clean, straight cut. No jagged edges, no squashed oval ends.
- Slide on the crimp ring. Push it a couple of inches back from the end for now.
- Seat the fitting. Push the pipe fully onto the fitting until it bottoms out against the fitting shoulder.
- Position the ring. Slide the ring so its edge sits about 1/8 to 1/4 inch from the end of the pipeclose to, but not over, the shoulder.
- Crimp. Place the crimp tool jaws squarely over the ring and squeeze the handles fully until the tool releases.
- Check the crimp. Use the go/no-go gauge on the ring. If it passes on the “go” side and doesn’t fit in the “no-go” side, you’re good.
- Pressure test. Once all connections are done, follow code and manufacturer guidance for a pressure test before closing walls.
Once you’ve done a few, you’ll understand why pros can run out an entire manifold in the time it takes to sweat a couple of copper joints.
Maintenance and Troubleshooting for PEX Connections
PEX systems are generally low-maintenance, but it pays to know what to look for over time.
Signs a Connection Needs Attention
- Damp spots or stains near fittings
- Slow, periodic drips from a joint during pressure cycles
- Visible corrosion on exposed metal parts of the fitting or rings
- Unusual hissing when water is flowing (could signal restriction or partial failure)
What to Do if You Find a Problem
- Shut off the water and relieve pressure.
- Inspect the fitting and pipelook for misaligned rings, visible cracks, or deformed pipe.
- Cut out the suspect section plus a little extra, and install a new fitting using your chosen method.
- If multiple joints in the same area are failing, consider whether the wrong fittings were used for the pipe type or environment.
The beauty of PEX is that once you have the tools and a few extra fittings on hand, most small repairs are simple and quick.
Real-World Experiences with PEX Pipe Connections
Reading about PEX connection types is one thing. Actually crawling through a crawlspace at 10 p.m. because a pipe burst? That’s where you really get an education. Here are some practical lessons and “wish I’d known that earlier” moments that homeowners and handy folks often discover the hard way.
Lesson 1: Don’t Cheap Out on the Tools
It’s tempting to grab the least expensive crimp tool on the rack and call it a day. But a poorly calibrated or flimsy tool can under-crimp rings, over-crimp them, or go out of adjustment after just a few projects. That’s when tiny leaks start to show up behind drywall months later.
People who work with PEX a lot will tell you: spend a little more on a solid, ratcheting crimp or cinch tool, and treat the go/no-go gauge like a sacred object. Check a few rings when you start, and anytime the tool takes a hard knock or gets loaned out. It’s not glamorousbut it’s much cheaper than repairing water damage.
Lesson 2: Plan Your Layout Around Fitting Access
PEX is flexible enough that you can reduce the number of fittings in the first place, especially on long runs. When you do need fittings, think ahead about where they’ll live. An expansion fitting that’s buried under insulation behind a finished wall is not your friend if it ever needs attention.
Smart DIYers route main lines with gentle bends, place manifolds and key fittings in accessible utility areas, and use fewer joints in hot zones like attics and crawlspaces. Many also use access panels behind tubs, showers, and key fixture groups so they can check connections without demolishing tile.
Lesson 3: Label Everything
PEX comes in red, blue, and white or clear, but once you start branching out multiple fixtures, manifolds can turn into a spaghetti buffet. Labeling each line at the manifold and near key fittings saves an incredible amount of time later.
A simple label maker or even permanent marker tags on the pipe can tell you, “This blue line is the upstairs hall bath cold,” or “This red line is the kitchen sink hot.” When a future issue pops uplow flow, a suspected leak, or a fixture changeyou’ll spend minutes, not hours, figuring out which PEX pipe connection you actually need to inspect.
Lesson 4: Account for Expansion and Movement
One of PEX’s superpowers is its ability to expand and contract as water temperature changes. That’s good for freeze resistance and noise reduction, but it also means the tubing likes to move.
Experienced installers leave gentle sweeps instead of tight, forced bends, and use cushioned supports to allow a little movement without chafing. They also avoid pulling the pipe guitar-string tight between fasteners. That tiny bit of slack reduces tension on fittings and helps prevent scuffing at sharp edges.
Lesson 5: Keep a “PEX Emergency Kit” on Hand
Homeowners who have lived with PEX for a while often keep a small “just in case” kit: a few feet of matching tubing, a handful of their preferred fittings (crimp, clamp, or push-fit), some rings, and the right tool. That kit has saved more than one Friday night when a nail or screw accidentally found a hidden line.
When you know how your system is put together and you’ve practiced making solid connections, even a surprise leak becomes a manageable repair instead of a full-blown crisis.
The overall takeaway from real-world PEX experience? The material is forgiving, connections are straightforward once you understand them, and most problems trace back to rushing, skipping small steps (like the gauge check), or mixing components that weren’t designed to work together. Respect the system, follow the manufacturer’s directions, and your PEX pipe connections can quietly do their job for years while you move on to more exciting projectslike arguing about paint colors.