Table of Contents >> Show >> Hide
- What Is Peeling Paint, Really?
- Top Reasons Your Paint Is Peeling
- How to Diagnose Why Your Paint Is Peeling
- How to Fix Peeling Paint the Right Way
- When to Call a Pro Instead of DIY
- Simple Habits to Prevent Future Peeling
- Real-Life Experiences: Lessons From Peeling Paint Disasters
- Conclusion: From Peeling Mess to Lasting Finish
Few things are more discouraging than walking into a freshly painted room and noticing bubbles, flakes, or entire sheets of paint quietly sliding off the wall. It’s like your house is molting. The good news: peeling paint isn’t a personal attack. It’s your home’s way of saying, “Something’s not right under hereplease fix it before you just slap on another coat.”
Understanding why paint peels (and how to fix it the right way) is the key to getting that smooth, long-lasting finish This Old House–style. Let’s break down the most common causes, how to diagnose the real problem, and what you should do before you even think about opening another gallon.
What Is Peeling Paint, Really?
Peeling paint is essentially a failure of adhesion. The paint film loses its grip on the surface beneath and starts to lift, curl, or flake away in chips, sheets, or blisters. Sometimes it’s obviousa big patch of wall shedding like a sunburn. Other times it starts as small edges lifting around trim, window sills, or high-moisture spots on ceilings and bathroom walls.
You might see:
- Flaking: small chips coming off in thin pieces.
- Blistering: bubbles or blisters under the surface that pop and peel.
- Alligatoring or cracking: a pattern of cracks that eventually turns into peeling.
No matter which version you’re dealing with, the underlying message is the same: the surface and the paint are no longer on speaking terms.
Top Reasons Your Paint Is Peeling
1. Moisture Is Sneaking In (or Sitting Around)
Moisture is the #1 villain behind peeling paint, both indoors and out. When water gets behind or into the paint film, it pushes the paint away from the surface as it moves and evaporates. Over time, the bond fails and the paint lets go.
Common moisture-related scenarios include:
- Leaky roofs or plumbing: stains and peeling on ceilings or upper walls, especially around bathrooms or kitchens.
- High humidity rooms: bathrooms, laundry rooms, and sometimes basements where steam and moisture aren’t vented properly.
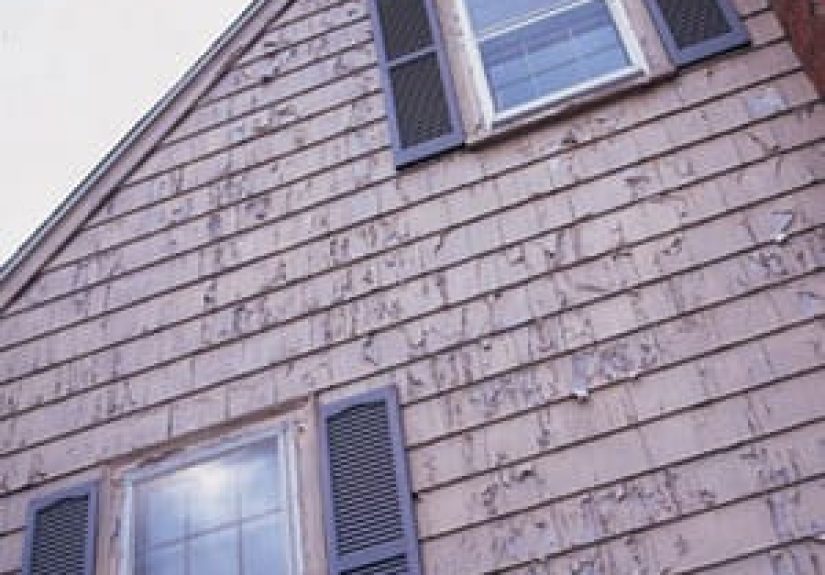
- Damp exterior walls: poor drainage, clogged gutters, or missing flashing can drive water into siding and trim, lifting paint on the outside.
Paint near showers, over poorly vented tubs, or on exterior siding that stays damp after rain will almost always fail early if moisture isn’t controlled.
2. Poor Surface Preparation
The fastest way to make paint peel? Paint over dust, grease, old loose paint, glossy surfaces, or bare wood without proper priming. Most major paint manufacturers agree that poor prep is one of the biggest causes of peeling and flaking.
Prep mistakes that lead to peeling include:
- Not cleaning the surface: painting over cooking residue, hand oils around light switches, or mildew in damp corners.
- Skipping sanding: shiny, glossy paint can be too slick for a new coat to grab onto.
- Ignoring loose or chalky old paint: if the old paint is already failing, your new coat just becomes a passenger on a sinking ship.
- No primer where you needed one: bare drywall, patched areas, or raw wood need the right primer to seal and grip.
3. Incompatible Paint Layers
Paint chemistry matters. One classic mistake: applying latex (water-based) paint directly over old oil-based paint without the right prep and primer. The latex can’t properly bite into the slick oil surface, and eventually it peels off in sections. This Old House notes that older homes with oil-based coatings can be especially prone to peeling when they’re updated with modern latex paints but the transition isn’t handled correctly.
Other compatibility problems include:
- Using interior paint outdoors, where UV, rain, and temperature swings are harsher.
- Applying new paint over old coatings that weren’t fully cured or were already failing.
- Mixing cheap primers and high-end topcoats that aren’t designed to work together.
4. Temperature and Humidity During Painting
Even if you choose a great paint, applying it in the wrong conditions can set it up to fail. High humidity, extreme heat, or cold can interfere with drying and curing, leading to poor adhesion and, eventually, peeling or flaking.
Watch out for:
- High humidity: paint dries slowly and may never cure correctly, especially in bathrooms and kitchens.
- Hot, direct sun: exterior paint can dry too fast on the surface but stay soft underneath, leading to cracking and peeling later.
- Cold weather: paint may not form a proper film at all, staying weak and prone to failure.
5. Low-Quality or Aging Paint
Cheaper paints often skimp on binders and resinsthe ingredients that help paint flex and cling to surfaces. Over time, those weaker films become brittle and crack. Premium paints from major brands are formulated to expand and contract with changing temperatures and humidity, which keeps them intact longer.
Even high-quality oil-based paints, widely used in older homes, will eventually oxidize and peel as they age. As one expert quoted by This Old House notes, every house painted with oil will eventually peelthat’s just how those coatings age over decades.
How to Diagnose Why Your Paint Is Peeling
Before you jump to fixing, you need a little detective work. A scraper and a flashlight are your magnifying glass and trench coat.
- Look for moisture clues. Water stains, musty smells, soft drywall, or peeling near plumbing, windows, or roofs suggest moisture is involved.
- Check the substrate. Is it drywall, plaster, wood, masonry, or old siding? Different materials fail in different ways.
- Inspect the layers. Use a utility knife or scraper to lift a chip. Do you see multiple paint layers? Is the failure between the newest paint and the one below, or all the way down to bare substrate?
- Test for oil vs. latex. In older homes, a simple denatured alcohol test (on a cotton ball, applied to a hidden spot) can help tell if the existing paint is oil or latex. If the old layer is oil and you went straight to latex, that’s a big hint.
- Consider timing. Did the peeling start soon after a paint job? That often points to surface prep or application issues rather than long-term aging.
How to Fix Peeling Paint the Right Way
Step 1: Deal With Moisture First
If moisture is the culprit and you don’t fix it first, you’ll just be repainting the same spot every year like a very boring tradition.
- Repair roof leaks, flashing, or gutters.
- Caulk gaps around windows and exterior trim.
- Install or repair bathroom and kitchen exhaust fans and actually use them.
- Address damp basements or crawl spaces with drainage, dehumidifiers, or vapor barriers as needed.
Step 2: Remove Loose and Failing Paint
Every major paint manufacturer agrees: all loose, flaking, or peeling paint has to go before you repaint.
Use:
- A paint scraper or putty knife for larger flakes.
- A wire brush to clean rough edges on wood or masonry.
- Sandpaper (medium, then fine grit) to feather the edges so you don’t see a ridge where the old paint stops and new begins.
In older homes, always consider the possibility of lead-based paint on layers applied before the late 1970s. Use proper safety precautions and, when in doubt, consult local guidelines or a pro.
Step 3: Clean and Repair the Surface
Once the loose paint is gone, clean the area. Dirt, grease, and dust will sabotage even the best primer.
- Wash walls with a mild detergent solution and rinse lightly.
- Treat mildew or mold with a cleaner formulated for that purposedon’t just paint over it.
- Patch holes or deep chips with joint compound or exterior-grade filler; let dry and sand smooth.
Step 4: Prime Like You Mean It
Primer is the bridge between your surface and your paint. For peeled areas, it’s non-negotiable.
Choose a primer suited to:
- The surface: drywall vs. wood vs. masonry.
- The problem: stain-blocking primer for water stains, bonding primer for shiny or difficult surfaces, moisture-resistant primer for bathrooms and kitchens.
- Compatibility: if you’re going from oil to latex, a high-quality bonding primer is key.
Step 5: Repaint With Quality Paint and Good Technique
Now comes the fun partcolor and sheen. To keep your new finish from peeling:
- Use a reputable brand and the right paint for the room (moisture-resistant formulas for kitchens and baths, exterior-grade paint outdoors).
- Follow the recommended spread ratedon’t stretch the paint too thin, but don’t glob it on either.
- Respect recoat times and environmental conditions on the label.
- Maintain good ventilation and moderate humidity while the paint cures.
When to Call a Pro Instead of DIY
Peeling paint is DIY-friendly when it’s small, localized, and clearly related to something you can fixlike a bit of steam damage above a shower. But bring in a pro when:
- Large areas of exterior paint are peeling, especially on upper stories.
- There’s suspected lead paint and you’re not equipped to handle it safely.
- The peeling is tied to serious moisture problems (rotted wood, structural issues, chronic leaks).
- You’ve already “fixed” the same spot more than once and it keeps coming back.
A professional can diagnose hidden causes and has the tools to strip, prep, and repaint large areas efficiently and safely.
Simple Habits to Prevent Future Peeling
- Use your exhaust fans during and after showers or cooking.
- Keep gutters clean and downspouts directing water away from the foundation.
- Inspect exterior paint every year for early signs of cracking or flaking.
- Address leaks and damp spots immediatelydon’t wait until the paint tells on them.
- Stick with quality primers and paints, and follow the label (annoying, yes; effective, also yes).
Real-Life Experiences: Lessons From Peeling Paint Disasters
If it makes you feel any better, nearly every homeowner has a peeling paint story. The difference between a quick touch-up and a full-on redo often comes down to what you do after that first flake shows up.
Picture a classic older house with layers upon layers of mystery paint on the exterior clapboards. The owner decides it’s finally time for a fresh color and hires a friend with a ladder and a sprayer. They knock off a few loose chips, give everything a quick rinse with the hose, and start spraying. It looks fantasticfor about one year. Then, whole sheets of paint start to release, especially on the sun-baked south side. Why? Old, brittle paint, minimal prep, and no real primer meant the new coat was never truly bonded to the wood underneath. The “shortcut” job ended up costing more when a pro had to come back, strip the failing layers, prime properly, and repaint from scratch.
On the inside, a common story involves bathrooms. Someone remodels, buys a beautiful new color, and rolls it right over a glossy, slightly mildewed surface above the shower. There’s no sanding, no mildew remover, and no moisture-resistant primer. Within months, the paint starts to bubble and peel in little rings where steam hits the wall hardest. The homeowner blames the brand of paint, but the real issue was everything that happened before the roller touched the walland the lack of a working vent fan.
Another surprisingly frequent scenario involves kids’ rooms and chalky old walls. A parent patches a few holes from posters and shelves, doesn’t prime those patches, and then rolls on a fresh color. Once it dries, you can clearly see where the new paint bonded to the patch differently than the old paint. Over time, the edges around those unprimed patches begin to peel or chip when bumped by furniture or toys. A simple coat of primer over patched areas would have helped the new paint behave more consistently across the whole wall.
Then there’s the seasonal exterior project that goes sideways because of weather. Imagine a homeowner racing against an incoming heat wave. They paint in mid-afternoon sun on a very warm day. The paint skins over quickly but doesn’t cure evenly. A year or two later, there are fine cracks that eventually widen into peeling strips, especially on horizontal trim that bakes in the sun. Had they painted earlier in the day, in shade, or at a more moderate temperature, the paint would have dried more evenly and stayed flexible longer.
The common thread in all these stories isn’t bad luckit’s skipped steps. Peeling paint is almost always more about what happened (or didn’t happen) before painting than about the color on the label. The homeowners who end up happiest in the long run are the ones who:
- Take the time to investigate stains or damp patches instead of just covering them.
- Respect primer as a must, not a maybe.
- Match the paint to the roomespecially in steamy bathrooms and busy kitchens.
- Choose realistic weather windows for exterior work rather than forcing the project in the worst conditions.
When you treat peeling paint as a chance to diagnose and correct what’s happening beneath the surface, you get more than a prettier wall. You get a healthier, drier, better-protected house. And the next time you open a can of paint, you’ll know you’re building on a solid foundationnot just hoping this coat will magically behave differently than the last one.
Conclusion: From Peeling Mess to Lasting Finish
Peeling paint might look like a cosmetic issue, but it almost always points to something deepermoisture, poor prep, incompatible layers, or rushed application. When you slow down, fix the root causes, and follow a solid prep–prime–paint process, your walls, ceilings, siding, and trim reward you with a smooth finish that actually stays put.
So the next time you notice a flaky corner or a suspicious bubble, don’t just reach for the touch-up brush. Channel your inner This Old House pro: investigate, repair, prep properly, and then repaint with the right materials. Do that, and you won’t be asking, “Why is my paint peeling?” nearly as oftenyou’ll be too busy admiring how good it looks.