Table of Contents >> Show >> Hide
- Why Wood Planter Boxes Work So Well
- Choosing the Best Wood for Planter Boxes
- Design Basics That Prevent Rot and Plant Drama
- What to Put Inside a Wood Planter Box
- Liners: When You Need Them and How to Do It Right
- Weatherproofing: Sealers, Stains, and Smart Protection
- DIY Build: A Simple, Sturdy Planter Box Plan (Beginner-Friendly)
- Specific Examples: Matching Planters to What You Grow
- Common Mistakes (So You Don’t Learn Them the Hard Way)
- Maintenance: How to Make Wood Planter Boxes Last
- Real-Life Experiences With Wood Planter Boxes (About )
Wood planter boxes are the “jeans and a nice shirt” of gardening: casual enough for herbs on a patio, classy enough for a front-porch glow-up, and rugged enough to handle a summer thunderstorm (as long as you don’t ask them to swim in it). Whether you’re growing basil, begonias, or a tomato plant that thinks it’s training for a triathlon, a well-built wood planter box gives roots room, keeps soil where it belongs, and makes your outdoor space look intentionally beautifullike you planned it this way the whole time.
This guide breaks down what actually matters: which woods last, how to design for drainage, what to line (and what not to), how to keep rot at bay, and how to match planter size to what you want to grow. You’ll also get practical examples, a simple DIY build outline, and real-world lessons that gardeners pick up after a season or two of “oops, that was soggy.”
Why Wood Planter Boxes Work So Well
Wood is a natural fit for gardensliterally and aesthetically. It’s easy to cut, easy to repair, and kinder on tools than stone or metal. It also insulates roots better than thin plastic in heat and cold, and it can be customized to any space: narrow balcony boxes, deep veggie tubs, or long, low “border” planters that behave like mini raised beds.
- Flexible sizing: Build for the plant you want (not the pot aisle you happen to walk past).
- Comfortable gardening: Taller boxes reduce bending and make weeding less of a full-body event.
- Design-friendly: Paint, stain, char, or keep it rusticwood plays along with your style.
Choosing the Best Wood for Planter Boxes
The “best” wood depends on your priorities: longevity, cost, looks, and whether you’re planting edibles. Outdoors, the enemy is moisturenot just rain, but constant dampness where wood meets wet soil. Your goal is to either choose a wood that naturally resists decay or build in defenses that keep boards from staying wet.
Top wood choices (from “naturally tough” to “budget-friendly”)
| Wood Type | Why People Like It | Tradeoffs | Best For |
|---|---|---|---|
| Cedar | Naturally rot-resistant, widely available, smells like a fancy closet | Costs more than pine; still benefits from smart drainage | Herbs, flowers, veggies, patio planters |
| Redwood | Excellent decay resistance and stability | Often pricey; availability varies by region | Showpiece planters, long-lasting builds |
| Cypress | Good natural rot resistance (region-dependent) | Can be harder to find; cost varies | Classic Southern-style planters |
| Hemlock / Douglas fir | Often more affordable and easy to work with | Less rot resistance; may need thicker boards or added protection | Shorter-term planters, painted boxes |
| Pressure-treated lumber | Budget-friendly longevity, especially for ground contact | Some gardeners prefer avoiding it for edibles; requires compatible fasteners | Long beds, wet climates, structural frames |
Pressure-treated wood: the “Can I?” question everyone asks
If you’re growing ornamentals, pressure-treated lumber is commonly used for outdoor projects because it resists decay and insects. For edible gardens, opinions vary. Many modern treatments differ from older formulas, but some gardeners still prefer naturally rot-resistant woods like cedar or redwood to avoid any concern and to keep materials simple. If you do use treated wood and you’re uneasy about soil contact, you can reduce contact by adding an interior barrier liner while still allowing water to drain (more on that below).
Design Basics That Prevent Rot and Plant Drama
A planter box fails for two reasons: the wood stays wet too long, or the roots do. Great planters are basically “moisture managers” with good looks. Nail these basics and you’ll avoid the classic mid-summer moment where you lift a corner and the wood answers by crumbling.
1) Size it for roots (not just for looks)
Deeper soil means happier plants and fewer emergency waterings. As a general rule:
- 6–8 inches works for shallow-rooted flowers and some herbs (basil will still ask for more water).
- 10–12 inches is a sweet spot for most herbs, leafy greens, and compact flowers.
- 12–18 inches gives room for peppers, bush tomatoes, and deeper-rooted plants.
- 18+ inches is great if you want serious veggies or a “mini raised bed” vibe.
2) Drainage is not optional
A planter box without drainage is basically a slow-motion root spa… and roots do not want that kind of luxury. Plan for water to leave the box quickly after a soak:
- Drill multiple drainage holes in the bottom (several small-to-medium holes beat one dramatic hole).
- Elevate the box slightly on feet, bricks, or a slatted base so water can escape freely.
- Add a mesh screen over holes to keep soil in and let water out.
3) Skip the “rocks at the bottom” myth (use structure instead)
Adding a thick layer of rocks at the bottom often reduces root space and can create a perched water effect where moisture lingers above the rock layer. A better approach is: proper holes, a breathable screen, and a well-draining potting mix. If you need stability, use a thin layer of coarse material only as a practical basenot as your drainage strategy.
4) Soil choice matters more than people think
For planter boxes (especially those that function like containers), avoid scooping soil straight from the yard. It compacts, drains poorly, and turns into a brick after a few heavy waterings. Use a quality potting mix or a raised-bed blend designed to stay airy while holding moisture.
What to Put Inside a Wood Planter Box
Best soil mixes (practical options)
- Store-bought container or raised-bed mix: Easiest and reliable. Look for mixes with ingredients like composted bark, peat or coir, and perlite/vermiculite.
- Simple DIY raised-bed blend: A common approach is a balance of topsoil + compost + an aeration ingredient (like coarse sand, perlite, or pine bark fines).
- For veggies in “container-style” boxes: Prioritize drainage and structure. Add compost, but don’t let compost become the whole mixtoo much can reduce air space.
Fertilizer and watering (the non-glamorous heroes)
Planter soil loses nutrients faster than in-ground beds because water flows through and carries some nutrients with it. If you want steady growth:
- Mix in slow-release fertilizer at planting time, or feed with a balanced liquid fertilizer during the growing season.
- Mulch the top with shredded leaves, straw, or fine bark to slow evaporation.
- Water deeply until you see it drain outthen let the top inch dry slightly before watering again (most plants hate constant soggy roots).
Liners: When You Need Them and How to Do It Right
A liner can protect wood from constant wet soil contact and help extend the planter’s life. But a liner done wrong can trap moisture against the wood and speed up rot (ironic, but very real).
Good liner options
- Landscape fabric (breathable): Helps keep soil from washing out while allowing water to pass through.
- Heavy plastic (use thoughtfully): Can act as a barrier between soil and woodjust make sure water can still escape and the base doesn’t become a bathtub.
- Composite liner panels: Some gardeners use thin plastic or recycled panels as an interior “sleeve,” leaving drainage paths open at the bottom.
Liner tips that prevent rot
- Don’t wrap the bottom like a gift. If you use plastic, allow drainage by leaving the bottom open or cutting drainage slits aligned with holes.
- Keep the planter slightly elevated so the wood base can dry after watering or rain.
- Consider lining only the sides if bottom drainage is already strong.
Weatherproofing: Sealers, Stains, and Smart Protection
The best protection strategy is “keep it from staying wet,” then “use finishes that slow water absorption.” You don’t need to dip the whole planter in spaceship-grade resin. You do need to respect outdoor moisture like it’s a tax auditor: assume it will show up and plan accordingly.
Finishing options
- Exterior stain: Helps shed water while letting wood move naturally; reapply as needed.
- Exterior latex paint: Great for style and protection, especially on non-edible planters or outer surfaces.
- Plant-friendly oils (used correctly): Some gardeners choose curing oils like pure tung oil for a natural finish. Oils typically need multiple coats and cure time.
- Charred wood (shou sugi ban-inspired): Light charring can improve weather resistance and looks dramatic (in a good way). Seal afterward if desired.
If you’re planting edibles and want to keep materials simple, a common approach is: naturally rot-resistant wood, plus a breathable barrier inside, and no finish applied to interior surfaces that directly contact soil. If you do use a finish, follow the product label and allow full cure time before planting.
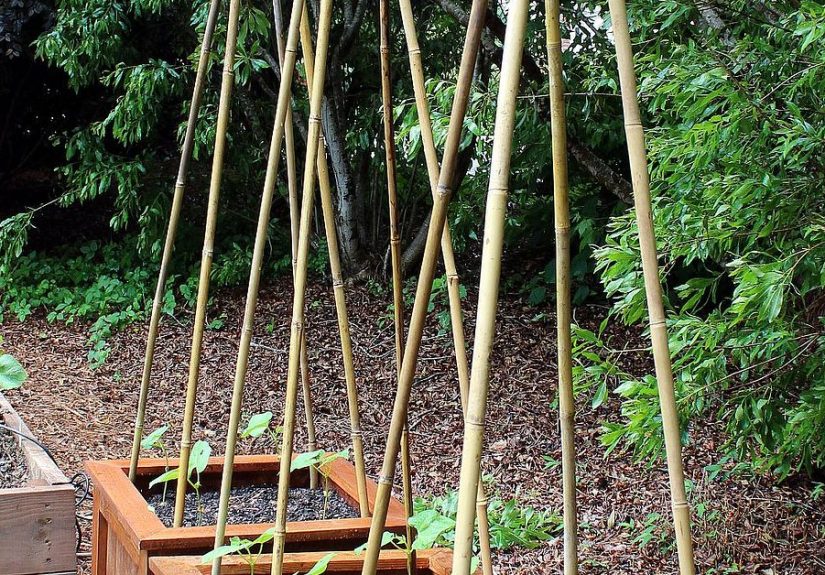
DIY Build: A Simple, Sturdy Planter Box Plan (Beginner-Friendly)
Here’s a straightforward build that works for herbs, flowers, and compact veggies. Think of it as the “classic sandwich” of planter boxesreliable, adaptable, and hard to mess up if you measure twice and cut once.
Example dimensions
- Length: 36 inches
- Width: 18 inches
- Depth: 12 inches
Materials
- Rot-resistant boards (cedar is a popular choice), thickness 3/4″ to 1″
- Exterior-grade screws (choose corrosion-resistant hardware for outdoor use)
- Optional: 2×2 corner supports for extra rigidity
- Mesh screen or landscape fabric for the bottom
- Feet, pavers, or a slatted base to elevate the planter
Build steps (high-level)
- Cut boards for two long sides and two short sides.
- Pre-drill holes to prevent splitting, especially near board ends.
- Assemble the box using screws; add corner supports inside if the box is long or deep.
- Add a bottom (slats with gaps work well) and drill drainage holes if using a solid panel.
- Attach mesh over drainage openings to hold soil in place.
- Elevate the planter so water can drain and air can circulate.
- Fill with mix, water to settle, top off, then plant.
Want a longer, raised-bed style planter? Use thicker boards, add a center brace, and consider internal corner posts. The longer the box, the more it benefits from structural supportbecause wet soil is heavier than it looks (and it will prove it).
Specific Examples: Matching Planters to What You Grow
Herb planter for a sunny patio
A 6–10 inch deep box works for many herbs, but give basil, parsley, and cilantro a little extra depth if you can. Use a potting mix that holds moisture without getting swampy, and mulch lightly so you’re not watering twice a day in July. Group herbs with similar watering needsrosemary and mint do not want the same lifestyle.
Flower box for curb appeal
Flower planters shine when they’re slightly taller and narrower, making blooms more visible. Add slow-release fertilizer, deadhead regularly, and don’t be afraid to mix heights (spillers, fillers, thrillers). Wood looks especially good with trailing plants softening the edges.
Vegetable planter box for small-space gardening
If you’re growing veggies, deeper is better. Aim for 12–18 inches if you want strong roots and fewer water panics. For tomatoes and peppers, plan for support: stakes, cages, or a trellis attached to the back of the box. Use a consistent feeding routinecontainer-style growing burns through nutrients faster than in-ground beds.
Common Mistakes (So You Don’t Learn Them the Hard Way)
- Not enough drainage: If water can’t leave, roots can’t breathe.
- Using dense garden soil: It compacts and suffocates roots in containers.
- Letting the planter sit flat on the ground: This traps moisture and accelerates rotelevate it.
- No plan for maintenance: Even rot-resistant wood benefits from periodic cleaning and a fresh protective coat on the exterior.
- Over-lining with plastic: Liners should protect wood without turning the planter into a bathtub.
Maintenance: How to Make Wood Planter Boxes Last
Think of maintenance as “small chores that prevent big heartbreak.” A few simple habits extend the life of your planter:
- Elevate and ventilate: Airflow under the box helps everything dry faster.
- Refresh the exterior finish: Recoat stains/paints when water stops beading.
- Inspect corners and bottom edges: That’s where moisture lingers and rot starts.
- Empty and clean periodically: If you rotate plants seasonally, brush out old roots and top-dress with compost.
Real-Life Experiences With Wood Planter Boxes (About )
Ask a handful of gardeners about wood planter boxes and you’ll get the same theme: “I love them… and I learned a few things.” One common early experience is building a box that looks perfect on day onethen discovering that plants don’t care about your craftsmanship as much as they care about drainage. People often remember the first time they watered, walked away feeling proud, and came back to find puddles lingering like the planter was hosting a pool party. That’s usually when drainage holes, airflow underneath, and a lighter planting mix suddenly become very interesting topics.
Another shared experience is the surprise of weight. Dry soil is manageable. Wet soil plus mature plants is “call a friend” territory. Many folks who place a large box directly on a deck or patio later realize they should have planned for feet, casters, or a permanent spot. The good news is that wood makes upgrades easyadding small risers, a slatted base, or a simple platform feels doable even if you’re not a woodworking wizard.
Gardeners also talk about the emotional roller coaster of the first season’s success. In spring, a fresh cedar planter with neat rows of seedlings can make anyone feel like they’ve got their life together. By midsummer, the same planter may reveal its personality: sun-baked corners that dry faster, thirsty plants that need deeper watering, and the moment you realize your “quick check” turned into a 20-minute pruning session. Still, that’s part of the charmplanters make gardens more visible, so you notice problems sooner and fix them faster.
Many people learn to appreciate how wood planter boxes encourage experimenting. Trying a new herb? Drop it in a box near the kitchen door. Want a pop of color by the mailbox? Build a narrow planter and toss in petunias and trailing vines. If something flops, it’s not the end of the world. Planters make it easier to reset the stage next season. That flexibility becomes addictivein a wholesome way.
There’s also a recurring “aha” moment about soil. Gardeners often start with whatever soil is handy and later switch to a better container mix after realizing roots need air as much as water. When the mix stays fluffy, plants respond with faster growth and fewer yellow leaves, and the gardener feels like they discovered a cheat code. And maybe the best experience is the simplest: stepping outside with coffee, seeing a tidy wood planter full of thriving green, and thinking, “Okay… this was worth it.” Wood planter boxes don’t just hold plantsthey hold the little wins that make gardening feel good.