Table of Contents >> Show >> Hide
- Why No-Bake Bars Deserve a Permanent Spot in Your Dessert Rotation
- What Makes This Yummy No-Bake Bars Recipe So Good?
- Ingredients for the Best Yummy No-Bake Bars
- How to Make Yummy No-Bake Bars Recipe
- What These Bars Taste Like
- How to Customize This Easy No-Bake Bars Recipe
- Common Mistakes to Avoid
- Storage Tips for No-Bake Dessert Bars
- When to Serve Yummy No-Bake Bars
- Why This Recipe Works for SEO and Real-Life Readers
- My Experience With No-Bake Bars: The Dessert That Saved More Than One Gathering
- Final Crumb
If dessert had a lazy genius cousin, it would absolutely be the no-bake bar. These sweet little squares are the kind of treat that says, “Yes, I came to impress,” without asking you to preheat a single thing. No oven. No fussy pastry drama. No standing in a hot kitchen wondering why you chose a complicated life. Just mix, press, chill, slice, and prepare to look like the person who always brings the good dessert.
This Yummy No-Bake Bars Recipe is everything a great American dessert bar should be: rich, chewy, chocolatey, easy to make, easy to transport, and wildly popular at potlucks, family parties, bake sales, and those mysterious “just because” snack attacks that seem to happen around 9:14 p.m. It borrows the best qualities from classic no-bake dessert bars, including peanut butter-chocolate favorites, cereal-based bars, and chewy oat bars, but lands in a sweet spot that feels classic, practical, and very worth hiding a piece for yourself.
If you have ever wanted an easy no-bake bars recipe that tastes nostalgic and crowd-pleasing while still feeling a little homemade and a little smarter than store-bought, this one is for you. Grab a pan, a saucepan, and your snack-loving ambition. We are about to make magic without ever turning on the oven.
Why No-Bake Bars Deserve a Permanent Spot in Your Dessert Rotation
There is a reason no-bake dessert bars keep showing up in American kitchens year after year: they work. They are forgiving, fast, adaptable, and built for real life. A baked brownie can crack, a cookie can spread too far, and a cheesecake can decide to become soup. No-bake bars, on the other hand, are refreshingly low-maintenance. They ask for simple pantry ingredients, a bit of stirring, and a little patience while they chill.
They are also excellent for beginners. If you can melt butter, stir oats, and press a mixture into a pan, you can make a great batch of bars. And if your bars come out a tiny bit rustic? Congratulations. That is called “homemade charm,” and people tend to eat it anyway.
Better yet, no-bake bars are flexible. Want something classic? Go peanut butter and chocolate. Want something snack-ish? Add oats, seeds, or nuts. Want something dessert-table dramatic? Top them with a glossy chocolate layer and a sprinkle of flaky salt so everyone thinks you watch competitive baking shows for research.
What Makes This Yummy No-Bake Bars Recipe So Good?
1. The Texture Is a Big Deal
Good no-bake bars should not be rock-hard, crumbly, or weirdly sticky. This recipe aims for the happy middle: a chewy, slightly crisp base with enough body to hold together cleanly and enough tenderness to keep every bite pleasant. The combination of oats and crispy rice cereal gives you structure without turning the bars into edible drywall.
2. The Flavor Is Familiar in the Best Way
Peanut butter and chocolate are basically the prom king and queen of the dessert world. They are reliable, they are popular, and they make everybody else look underdressed. Brown sugar and honey deepen the sweetness, vanilla rounds everything out, and a pinch of salt keeps the bars from tasting flat.
3. It Is Easy Enough for a Weeknight, Good Enough for a Party
This recipe does not require a stand mixer, candy thermometer, or spiritual guidance. It is practical enough for a Tuesday and delicious enough for a holiday tray. That is a rare and beautiful combination.
Ingredients for the Best Yummy No-Bake Bars
This recipe makes about 16 bars, depending on how generous you feel with your slices.
- 2 1/2 cups old-fashioned rolled oats
- 1 1/2 cups crispy rice cereal
- 3/4 cup creamy peanut butter, plus 2 tablespoons for the topping
- 1/2 cup unsalted butter
- 1/2 cup packed light brown sugar
- 1/3 cup honey
- 1 teaspoon vanilla extract
- 1/4 teaspoon fine sea salt
- 1 cup semisweet chocolate chips
- 1/3 cup butterscotch chips
- Flaky salt, optional but highly recommended if you enjoy tiny glamorous details
Ingredient Notes That Actually Matter
Rolled oats give the bars chew and substance. Quick oats will work in a pinch, but they create a softer, more compact texture. Crispy rice cereal keeps the bars from becoming too dense. Creamy peanut butter blends more smoothly than chunky, though crunchy peanut butter can be used if you like extra texture. Butterscotch chips add that old-school dessert-bar personality, but you can swap them for more chocolate chips if butterscotch is not your thing.
How to Make Yummy No-Bake Bars Recipe
- Prepare the pan. Line an 8-inch or 9-inch square pan with parchment paper, leaving a little overhang on two sides so you can lift the bars out later. This is not just helpful. This is sanity insurance.
- Mix the dry ingredients. In a large bowl, combine the rolled oats and crispy rice cereal. Give them a quick toss so they are evenly mixed and ready for action.
- Make the binder. In a medium saucepan over medium-low heat, melt the butter with the brown sugar and honey. Stir until the mixture looks smooth and glossy and the sugar is mostly dissolved, about 2 to 3 minutes. Remove from the heat and stir in the 3/4 cup peanut butter, vanilla, and sea salt until silky.
- Combine everything. Pour the warm peanut butter mixture over the oats and cereal. Stir until everything is evenly coated. The mixture should look shiny and clumpy, not dry.
- Press into the pan. Transfer the mixture to the lined pan and press it down firmly into an even layer. Use the back of a measuring cup or a spatula. Pressing firmly matters because it helps the bars slice neatly later.
- Make the topping. In a microwave-safe bowl, combine the chocolate chips, butterscotch chips, and remaining 2 tablespoons peanut butter. Microwave in 20-second bursts, stirring between each round, until smooth.
- Finish the bars. Spread the melted topping evenly over the base. If using flaky salt, sprinkle a little over the top while the chocolate layer is still soft.
- Chill. Refrigerate for at least 1 hour, or until the bars are firm enough to slice cleanly. If your kitchen is warm, give them closer to 90 minutes.
- Slice and serve. Lift the bars out using the parchment overhang, place on a cutting board, and slice into squares or rectangles. Try to keep them even, but no one has ever rejected a dessert because it was cut with enthusiasm.
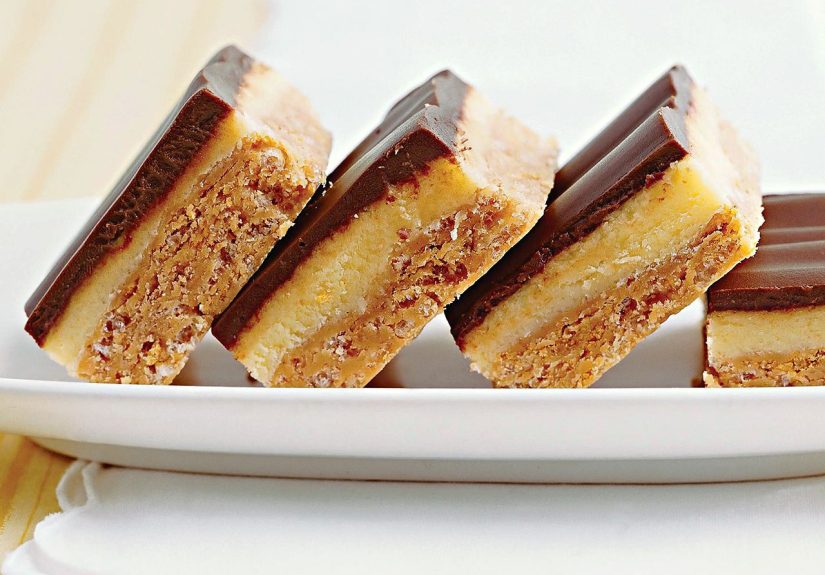
What These Bars Taste Like
Imagine the comfort of a peanut butter cup, the chew of a classic oat bar, and the snackable crunch of a cereal treat all joining forces. The base is buttery and nutty, with a pleasantly toasty oat flavor. The chocolate-butterscotch topping adds richness and a little candy-bar nostalgia. The final result is sweet but not one-note, soft but not floppy, and sturdy enough to travel to a picnic without becoming dessert confetti.
How to Customize This Easy No-Bake Bars Recipe
Make Them Nut-Free
Swap the peanut butter for sunflower seed butter. The flavor changes a bit, but the bars still hold beautifully and remain delicious.
Give Them a Granola-Bar Twist
Add 1/4 cup chopped nuts, pumpkin seeds, or unsweetened coconut. This makes the bars feel a little more snack-like and a little less like they are wearing a chocolate tuxedo.
Lean Into Chocolate
Replace the butterscotch chips with dark chocolate chips and stir mini chocolate chips into the base after it cools slightly. This version is rich, bold, and not at all shy.
Brighten the Flavor
Add a little orange zest to the topping or a pinch of cinnamon to the base. Both options give the bars a warmer, more layered finish.
Turn Them Into Party Bars
Top the chocolate layer with crushed pretzels, mini marshmallows, chopped peanuts, or colorful candy pieces. These are excellent for birthday parties, game nights, and events where subtlety has already left the building.
Common Mistakes to Avoid
Do Not Overheat the Binder
If you boil the butter-sugar-honey mixture too aggressively or for too long, the bars can set up harder than you want. Gentle heat is your friend here. You want smooth and melted, not candy-shop chemistry.
Do Not Skip Pressing the Base Firmly
Loose bars fall apart. A firmly packed base creates those satisfying clean slices that look great on a plate and do not collapse the second somebody picks one up.
Do Not Rush the Chill Time
I understand the temptation. The bars smell amazing. The topping is glossy. Your self-control is hanging by a thread. Still, let them chill long enough to fully set. Warm bars are delicious, but sliced-too-soon bars are more spoon situation than bar situation.
Storage Tips for No-Bake Dessert Bars
Store the bars in an airtight container in the refrigerator for up to 1 week. Place parchment or wax paper between layers if you are stacking them. For a softer bite, let them sit at room temperature for 10 to 15 minutes before serving.
You can also freeze them for up to 2 months. Wrap the bars tightly or store them in a freezer-safe container. Thaw in the refrigerator overnight or at room temperature for about 20 to 30 minutes. This makes them ideal for make-ahead dessert planning, which is a fancy phrase for “future you will be thrilled.”
When to Serve Yummy No-Bake Bars
These bars fit almost anywhere. They make excellent lunchbox treats, easy weekend desserts, road-trip snacks, casual holiday sweets, and bake-sale staples. They are especially good during warm-weather months when turning on the oven feels like volunteering for suffering. But honestly, these bars are not seasonal. They are mood-based, and the mood is usually “I would like dessert now.”
Why This Recipe Works for SEO and Real-Life Readers
Let us talk briefly about what people actually search for. They are not always looking for a lofty dessert manifesto. Most readers want a yummy no-bake bars recipe that is easy, fast, and trustworthy. They want ingredient clarity, simple steps, storage tips, and ideas for substitutions. That is exactly why recipes like this perform well: they solve a real kitchen problem and sound approachable while doing it.
Keywords such as no-bake bars recipe, easy no-bake dessert bars, peanut butter chocolate bars, and oat no-bake bars belong here naturally because they reflect how real people search. Good SEO is not keyword stuffing. Good SEO is useful writing that answers the question better than the next page does. In dessert terms, it is the difference between a bar that looks pretty and a bar that actually disappears from the tray.
My Experience With No-Bake Bars: The Dessert That Saved More Than One Gathering
I have a soft spot for no-bake bars because they solve the kind of kitchen problems real people actually have. Sometimes you need dessert, but you do not have time to bake. Sometimes your oven is occupied by dinner, a casserole, garlic bread, or the ambitious roast you swore would be “simple.” Sometimes it is ninety degrees outside and turning on the oven feels like a direct attack on your electricity bill and emotional stability. That is exactly when no-bake bars step in like the overachieving friend who always arrives early and somehow looks perfect.
The first time I made a batch of bars like these, I was not aiming for greatness. I was aiming for survival. I needed a quick dessert for a last-minute get-together, I had a jar of peanut butter in the pantry, a bag of chocolate chips in the cabinet, oats that had been patiently waiting for purpose, and exactly zero interest in making anything delicate. What I wanted was a dessert that could not judge me. No-bake bars are excellent for that.
What surprised me most was not how easy they were to make, but how fast people claimed them. You know that moment at a party when everyone politely inspects the dessert table first, as if they are comparing options with academic seriousness? Then one person takes a bite, raises their eyebrows, and suddenly the plate starts looking alarmingly empty. That was the moment. People went back for seconds. Someone asked for the recipe. Someone else asked if I bought them from a bakery, which is one of the top five compliments a home dessert can receive without needing a ribbon.
Since then, I have learned a few useful truths. First, no-bake bars reward confidence more than perfection. If the topping is not completely smooth, nobody cares. If one corner slice looks a little lopsided, it will still mysteriously vanish first. Second, texture matters more than decoration. A chewy base, a creamy chocolate top, and a clean bite will win over a dessert with twelve fancy garnishes and the personality of cardboard.
I have also learned that these bars are one of the easiest desserts to adapt to the people around you. Want them sweeter? Add butterscotch. Want them more wholesome? Toss in seeds or chopped nuts. Want them a little more grown-up? Use dark chocolate and flaky salt. Want kids to lose their minds in the best possible way? Add rainbow sprinkles and call it a day. The recipe bends without breaking, which is more than I can say for most of my weeknight plans.
My favorite no-bake bar moments are usually the least glamorous ones: slicing them on a random Sunday afternoon, pulling one from the fridge after dinner, packing a few into a container for a friend, or discovering that the batch you thought would last three days somehow lasted one. They are the kind of dessert that slips into ordinary life and makes it feel slightly more generous.
That is why this Yummy No-Bake Bars Recipe earns repeat status. It is not trying to be trendy. It is trying to be good, dependable, and craveable. And sometimes that is exactly the dessert people want most.
Final Crumb
If you are looking for a foolproof, crowd-friendly, deeply snackable dessert, this is it. These bars are easy enough for beginners, flexible enough for improvisers, and tasty enough to make people hover near the fridge pretending they are “just checking.” With a chewy oat-cereal base, a rich peanut butter flavor, and a silky chocolate topping, they hit the sweet spot between nostalgic and irresistible.
Make a batch once, and there is a strong chance this recipe becomes part of your regular dessert lineup. It is simple, satisfying, and just flashy enough to seem like you put in more effort than you actually did. Frankly, that is the kind of efficiency we should all respect.