Table of Contents >> Show >> Hide
- Why Canning Jar Lids Make Great Christmas Ornaments
- Before You Start: Pick the Right Lids
- Basic Supplies for Up Cycled Christmas Ornaments With Canning Jar Lids
- How to Prep Canning Jar Lids for Crafting
- 7 Easy Ornament Ideas You Can Make With Canning Jar Lids
- Step-by-Step: Make a Simple Rustic Jar Lid Wreath Ornament
- Design Tips for Better-Looking DIY Ornaments
- Mistakes to Avoid
- How to Make Them Feel Personal
- Experiences With Up Cycled Christmas Ornaments With Canning Jar Lids
- Conclusion
- SEO Tags
There are two kinds of people at Christmas: the ones who buy a fresh box of ornaments every year, and the ones who look at a pile of canning jar lids and whisper, “I can work with this.” This article is proudly for the second group.
If you have extra canning jar lids and rings tucked in a drawer, you already own the beginnings of some seriously charming holiday decor. These humble little circles are sturdy, lightweight, budget-friendly, and perfectly sized for tree ornaments, gift toppers, mini wreaths, and keepsake crafts. In other words, they are basically tiny Christmas miracles wearing a metal disguise.
Up cycled Christmas ornaments with canning jar lids are a smart mix of cozy style and practical reuse. They let you decorate on a budget, turn leftovers into something memorable, and create handmade pieces that feel more personal than anything pulled off a store shelf. Even better, you can make them rustic, farmhouse, vintage, modern, kid-friendly, or gloriously glittery. Christmas does not judge. Christmas simply sparkles.
Why Canning Jar Lids Make Great Christmas Ornaments
Canning jar lids are tailor-made for ornament making. The round shape feels classic on a Christmas tree, the metal ring creates a built-in frame, and the flat insert gives you a neat little surface for photos, paint, paper scenes, fabric, or tiny embellishments. You do not need a workshop, expensive tools, or the patience of a saint. You mostly need a table, a glue gun, and the willingness to get festive.
They are also a practical choice for upcycling. Reusing household materials is one easy way to reduce waste and stretch items a little further before tossing them out. That matters during the holidays, when decorations, gift wrap, and disposable extras can pile up faster than cookies at an office party. Turning leftover lids into ornaments is a small project, sure, but it is exactly the kind of clever reuse that makes holiday decorating feel more thoughtful.
Another bonus: canning components come in multiple common sizes, so you can mix and match regular-mouth and wide-mouth pieces for visual variety. Small lids look sweet on the tree, while larger ones are ideal for statement ornaments, wall decor, or oversized gift toppers.
Before You Start: Pick the Right Lids
Not every lid in your stash needs to become a snowman. Start by sorting your pieces into two groups: metal screw bands and flat sealing lids. The bands are perfect for wreath-style ornaments because they are already open in the center. The flat lids are great for photo ornaments, painted ornaments, and layered paper designs.
If a lid has already been used for food canning, retire it from future canning duty and send it into the craft life instead. That is its holiday promotion. Slight scuffs are fine for ornament projects, but skip pieces that are badly bent, sharp, or heavily rusted unless you are intentionally going for a rough vintage look and you can smooth any hazardous edges first.
Basic Supplies for Up Cycled Christmas Ornaments With Canning Jar Lids
Core materials
- Canning jar rings and flat lids
- Ribbon, twine, yarn, or jute for hangers
- Hot glue gun and glue sticks
- Acrylic craft paint or spray paint
- Scissors
- Mini faux greenery, berries, bells, or pinecones
- Cardstock, scrapbook paper, or old Christmas cards
- Photos, fabric scraps, buttons, beads, or pom-poms
Nice extras
- Glitter or faux snow
- Mod Podge or craft sealer
- Foam adhesive dots for dimension
- Mini bottlebrush trees or tiny figurines
- Fine sandpaper
- Primer for metal surfaces
How to Prep Canning Jar Lids for Crafting
This is the part many crafters skip, then later wonder why the paint peeled off like it had personal boundaries. Give your lids a quick cleaning first. Wash them with warm, soapy water and dry them thoroughly. If they feel greasy, dusty, or sticky from label residue, clean them again until the surface is fully dry and smooth.
If you plan to paint the metal, lightly sand glossy areas or spots with loose rust so the finish grips better. A metal primer can help paint adhere more evenly, especially if you want a smoother, longer-lasting finish. Thin coats work better than one thick, gloopy coat that looks like your ornament got dressed in pancake batter.
For a rustic look, you can leave the metal mostly as-is and just add ribbon and embellishments. For a polished look, paint the rings white, red, green, gold, black, or matte bronze. Farmhouse styles look great with muted neutrals and natural twine, while playful ornaments can handle plaid ribbon, metallic paint, and all the tiny jingle bells your sanity will allow.
7 Easy Ornament Ideas You Can Make With Canning Jar Lids
1. Mini Wreath Ornaments
This is the classic canning ring project, and it deserves the hype. Wrap the ring in green twine, yarn, or narrow ribbon until the metal is covered. Add faux boxwood, mini ornaments, berries, pinecones, or a tiny bow. Finish with a hanging loop. The result looks like a miniature front-door wreath for your tree, which is objectively adorable.
2. Christmas Card Keepsake Ornaments
Do not toss old holiday cards with pretty illustrations. Trace the shape of a flat canning lid onto a favorite section of the card, cut it out, and glue it inside the lid. Layer extra details on top, such as trees, stars, snowflakes, or glitter accents. This style is especially good if you want ornaments that preserve memories without storing a giant box of full cards forever.
3. Mini Landscape Dioramas
If you like your ornaments with a touch of tiny drama, build a miniature winter scene inside the lid. Paint the background, add faux snow, and glue in mini bottlebrush trees, pom-poms, little animals, or a tiny house. Wrap the outer edge with pipe cleaner, ribbon, or yarn. Suddenly you are not just crafting. You are directing a holiday movie in a metal circle.
4. Photo Frame Ornaments
Use the ring and flat lid together as a rustic photo frame. Cut a family photo to size, attach it to the center insert, and decorate the rim with ribbon, greenery, or a stamped date. These make wonderful keepsakes for grandparents, new parents, newlyweds, or anyone who becomes emotional when they see a dog in a Santa hat.
5. Farmhouse Gift Topper Ornaments
Dress up wrapped presents with a jar-lid ornament that doubles as a gift topper. A simple ring decorated with faux cedar, bells, and a ribbon loop looks elegant on a package and then becomes a reusable ornament later. That means your wrapping job suddenly looks expensive, even if the paper came from the clearance bin and your tape dispenser is held together by hope.
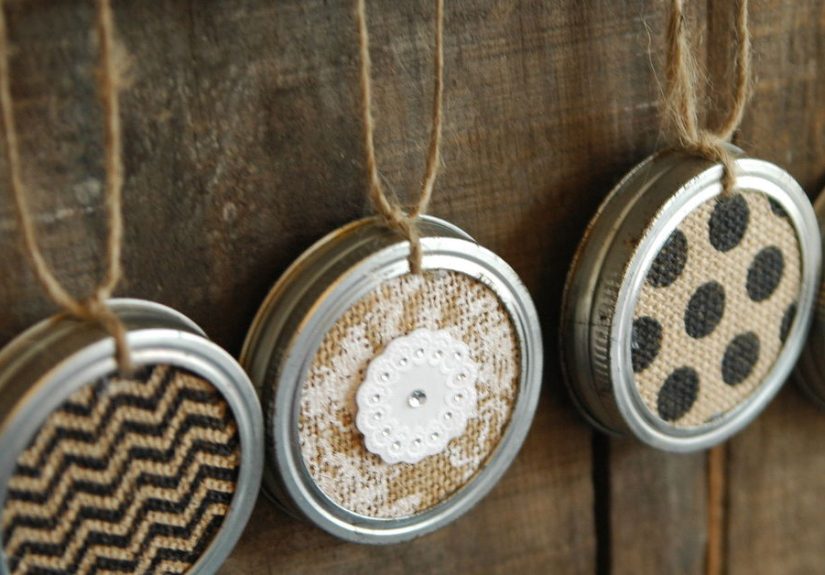
6. Fabric or Paper Covered Lid Ornaments
Cut circles of holiday fabric, sheet music, plaid paper, or vintage-looking book pages to fit the lid insert. Glue them in place, then add a monogram, snowflake, tiny wooden shape, or a button cluster. This is one of the easiest ways to make a coordinated set for the entire tree.
7. Faux Snow Globe Lid Ornaments
You can borrow inspiration from traditional snow globe crafts without making a full water-filled globe. Use a clear plastic circle, acetate sheet, or a domed craft insert over a tiny winter scene attached to the lid base. Add glitter or faux snow and seal it shut. It gives that magical snow-globe vibe without the risk of surprise glitter soup leaking onto your rug.
Step-by-Step: Make a Simple Rustic Jar Lid Wreath Ornament
- Choose a clean canning ring. Wipe it down and make sure there are no rough edges.
- Wrap the ring. Use green twine, yarn, or ribbon. Secure the starting end with hot glue and continue wrapping until the ring is fully covered.
- Add greenery. Glue on tiny sprigs of faux cedar, boxwood, or pine.
- Decorate. Add mini bells, red berries, a pinecone, or a small bow.
- Create a hanger. Tie a loop of ribbon or twine and glue or knot it to the top.
- Optional finishing touch. Add a dusting of glitter, white paint splatter for “snow,” or a name tag for personalization.
This project is quick, affordable, and easy to batch-produce. If you are decorating with kids, making teacher gifts, or trying to fill a tree without spending a small fortune, this is your overachieving little ornament.
Design Tips for Better-Looking DIY Ornaments
Stick to a color palette
Pick two or three main colors so the ornaments look intentional rather than craft-supply chaos. Red and cream, green and gold, black and white plaid, or silver and icy blue all work beautifully.
Mix textures
Metal alone can feel flat. Pair it with soft ribbon, rough jute, velvet bows, faux greenery, or paper layers to create depth and warmth.
Use repetition
Even if every ornament is different, repeat one detail across several pieces. The same ribbon, the same gold paint, or the same type of greenery helps everything feel cohesive.
Think beyond the tree
These ornaments look great hanging from cabinet knobs, tied onto stockings, clipped to garland, attached to napkin rings, or used as package decorations. One little jar lid can travel all over your holiday house like it is booked and busy.
Mistakes to Avoid
- Skipping surface prep: Dirt, oil, or moisture can mess with glue and paint adhesion.
- Using too much glue: A tiny dot is charming. A giant glue blob is a cry for help.
- Overloading the ornament: Too many heavy embellishments can make it tilt or fall off the tree branch.
- Ignoring sharp edges: Sand or cover rough spots for safety.
- Mixing every style at once: Rustic plaid plus neon glitter plus beach seashells is a bold lifestyle choice. Maybe not for one ornament.
How to Make Them Feel Personal
The best up cycled Christmas ornaments with canning jar lids do more than look cute. They tell a story. Add names, dates, family photos, children’s drawings, snippets from old Christmas cards, or tiny symbols that mean something to your household. A ski charm for the family winter trip. A little paw print for the dog. A tiny house cutout for a first Christmas in a new home. Suddenly the ornament is not just decor. It is memory storage with ribbon.
You can even create a yearly tradition: make one jar lid ornament every December using leftover wrapping scraps, cards, photos, or tags from that season. After a few years, your tree becomes a highlight reel of family life, which is much sweeter than a random glitter ball that nobody remembers buying.
Experiences With Up Cycled Christmas Ornaments With Canning Jar Lids
If you have ever made Christmas ornaments from canning jar lids, you already know the experience is half craft project and half time machine. It starts with a very ordinary moment: opening a kitchen drawer, finding a small pile of spare rings and lids, and realizing they are too useful to throw away but too random to leave rattling around forever. Then Christmas enters the chat, and suddenly those metal bits become full of possibility.
One of the nicest things about this project is how approachable it feels. You do not need to be a master crafter with a studio worthy of a magazine spread. You can do this at the kitchen table with a mug of cocoa, a pair of scissors that are never where they should be, and one family member asking every seven minutes, “Do we have more ribbon?” There is something deeply satisfying about turning such plain materials into something that looks warm, nostalgic, and surprisingly polished.
For many people, the best part is the memory-making. Kids can help choose pom-poms, paint little scenes, or pick the silliest miniature embellishments in the stash. Adults tend to get sentimental fast, especially when the ornaments include photos, old Christmas card images, or scraps saved from past holidays. A jar lid ornament can hold more feeling than its size suggests. It is tiny, yes, but it can carry a whole season with it.
There is also a certain joy in the imperfections. Store-bought ornaments are shiny and symmetrical, but handmade jar lid ornaments have personality. The bow sits slightly crooked. The paint looks a little weathered. The faux greenery has one rebellious sprig sticking out like bedhead. Somehow, that is exactly what makes them lovable. They feel lived in. They feel real. They feel like Christmas at home instead of Christmas in a catalog.
Another common experience is surprise. People often start with one quick ornament idea and accidentally end up making twelve. You begin with a wreath ornament because it looks easy, then decide one would be cute as a gift topper, then realize you could make a photo ornament for Grandma, then a mini winter scene for the kids, then a matching set for your own tree. Before long, your table looks like a craft store sneezed on it, and you are weirdly thrilled about that.
These projects also create a different kind of holiday mood. They slow you down. Instead of rushing through a shopping cart full of decorations, you spend an evening wrapping twine, trimming tiny bits of greenery, and fussing over where a miniature bell should go. It is simple, repetitive, and calming in the best way. Even the mess feels seasonal. Glitter on your sleeve? Holiday spirit. Twine scraps on the floor? Festive confetti. Hot glue string hanging off your elbow? A badge of honor.
And when the ornaments finally go on the tree, they tend to stand out. Not because they are the flashiest, but because they are the most personal. Guests ask where you bought them, and it is deeply satisfying to say, “Oh, those? They used to be canning jar lids.” That sentence has the exact energy of a holiday mic drop.
In the end, the experience of making up cycled Christmas ornaments with canning jar lids is about more than reuse. It is about creativity, memory, thrift, and that cozy kind of pride that comes from making something beautiful with your own hands. Also, it is about proving that even the leftovers in your kitchen drawer can become part of the magic.
Conclusion
Up cycled Christmas ornaments with canning jar lids are proof that festive decor does not need to be expensive, complicated, or fresh off a store shelf. With a few simple supplies, a little imagination, and a couple of spare lids, you can create ornaments that are charming, personal, and full of holiday character. Whether you love farmhouse wreaths, photo keepsakes, tiny winter scenes, or paper-and-ribbon classics, jar lids give you a sturdy little canvas for all kinds of seasonal creativity.
So the next time you see leftover canning rings rolling around in a drawer, do not ignore them. They are not clutter. They are Christmas ornaments waiting for their big debut.