Table of Contents >> Show >> Hide
- What Is the Crochet Cat Stitch?
- Supplies You Need
- Abbreviations Used in This Guide
- Before You Start: Make a Practice Swatch
- How to Crochet a Cat Stitch Step by Step
- Color Ideas for the Cat Stitch
- Best Projects for the Crochet Cat Stitch
- Troubleshooting Common Cat Stitch Problems
- Tips for a Cleaner, Cuter Cat Stitch
- How to Add a Simple Border
- Care and Finishing
- Experience Notes: What Crocheting the Cat Stitch Actually Feels Like
- Conclusion
Note: This guide is written in U.S. crochet terminology and is based on widely used crochet teaching standards, stitch-pattern practices, yarn-selection advice, and real cat stitch tutorial methods from reputable crochet and yarn education resources.
If crochet stitches had personalities, the cat stitch would be the one knocking your yarn off the table while looking completely innocent. Cute? Absolutely. A tiny bit mischievous? Also yes. The crochet cat stitch is a playful textured stitch pattern that creates rows of little cat-like shapes using familiar techniques such as chains, double crochet stitches, shell stitches, and longer stitches worked into lower rows.
The best part is that this stitch looks far more complicated than it really is. Once you understand the repeat, it becomes a relaxing rhythm: shell, space, long stitch, shell again, and suddenly your fabric has tiny feline silhouettes marching across it like they own the place. Which, of course, cats usually do.
In this fun and easy guide, you will learn what the cat stitch is, what supplies you need, how to read the abbreviations, how to crochet the stitch step by step, and how to use it in blankets, scarves, baby gifts, bags, and home decor. You will also find troubleshooting tips, project ideas, and practical experience notes to help your first cat stitch swatch look less like a confused potato and more like a proud parade of kittens.
What Is the Crochet Cat Stitch?
The crochet cat stitch is a textured crochet pattern that forms small cat-like shapes across the fabric. Most versions use a combination of double crochet shells and longer stitches worked into spaces from previous rows. The shells create the body and ears, while the long stitches help define the shape and give the pattern its adorable “cat face” effect.
This stitch is especially popular for baby blankets, pet-themed gifts, scarves, shawls, cushion covers, and colorful stash-busting projects. Because the pattern often works beautifully in stripes, it is also a great way to use leftover yarn in coordinated colors.
Is the Cat Stitch Beginner-Friendly?
Yes, but with one tiny whisker of warning: it is best for advanced beginners. You do not need to be a crochet wizard living in a yarn castle, but you should be comfortable making a chain, double crochet, and basic shell stitch. If you can count stitches without immediately questioning your entire life, you are ready.
The trickiest part is working longer stitches into spaces from two rows below. Once you practice that movement a few times, the pattern becomes much easier to follow.
Supplies You Need
You do not need fancy tools to learn the cat stitch. In fact, simple supplies are better when practicing because they make your stitches easier to see.
- Yarn: Medium-weight yarn, also called worsted weight or category 4 yarn, is ideal for beginners.
- Crochet hook: A size H-8 (5 mm), I-9 (5.5 mm), or the hook recommended on your yarn label usually works well.
- Scissors: For cutting yarn when changing colors or finishing your swatch.
- Yarn needle: For weaving in ends.
- Stitch markers: Optional, but helpful for marking edge stitches.
- Tape measure: Useful if you are making a blanket, scarf, or wearable project.
Choose a smooth yarn for your first attempt. Fuzzy, boucle, velvet, or super-dark yarn may look gorgeous in the skein, but it can hide the stitch definition. For learning, pick a light or medium color so you can clearly see the shells and spaces.
Abbreviations Used in This Guide
Before jumping into the pattern, here are the main U.S. crochet abbreviations you will see:
- ch: chain
- dc: double crochet
- st: stitch
- sk: skip
- sp: space
- ch-1 sp: chain-one space
- rep: repeat
- shell: 2 dc, ch 1, 2 dc worked into the same stitch or space
- dc spike: a double crochet worked into a lower row, pulling the loop up to the height of the current row
Before You Start: Make a Practice Swatch
A practice swatch is your crochet rehearsal. It lets you test the stitch, adjust tension, and make mistakes without committing to a full blanket that later looks like it was designed by a raccoon with ambition.
For your first swatch, chain a multiple of 5. A good beginner sample is 30 chains. This gives you enough width to see the repeat without making the project feel endless.
If you are making a finished item, always check gauge. Gauge means the number of stitches and rows within a measured area, often 4 inches by 4 inches. If your fabric is too tight, go up a hook size. If it is too loose and floppy, go down a hook size.
How to Crochet a Cat Stitch Step by Step
The cat stitch is usually built from a foundation row, a shell row, a shaping row, and then repeated shell rows. The following version is written for clarity and practice, not as a strict commercial pattern. It is perfect for learning the structure of the stitch.
Step 1: Make the Foundation Chain
Start with a chain in a multiple of 5. For example, chain 30 for a small practice swatch. Keep your foundation chain loose enough that you can work into it comfortably. If your starting chain is too tight, your swatch may curl at the bottom like a cat refusing bath time.
Step 2: Work the First Row
Make 1 double crochet in the 4th chain from the hook. The skipped chains count as the turning chain. Next, skip 3 chains. In the next chain, work one shell: 2 double crochet, chain 1, 2 double crochet all in the same chain.
Continue across the row by skipping 3 chains and making a shell in the next chain. When you reach the final section, work double crochet stitches at the edge to keep the sides neat. Edge stitches are important because they give your project structure and prevent the sides from wandering off like a curious kitten.
Step 3: Work the Second Row
Chain 3 and turn. The chain 3 counts as your first double crochet. Make 1 double crochet in the next stitch to form a firm edge. Then work a shell into each chain-one space from the previous row. Continue across until you reach the end, then finish with double crochet stitches along the edge.
At this point, your fabric will look like a row of shells. It may not look like cats yet. Do not panic. The cats are simply hiding, which is extremely on-brand for cats.
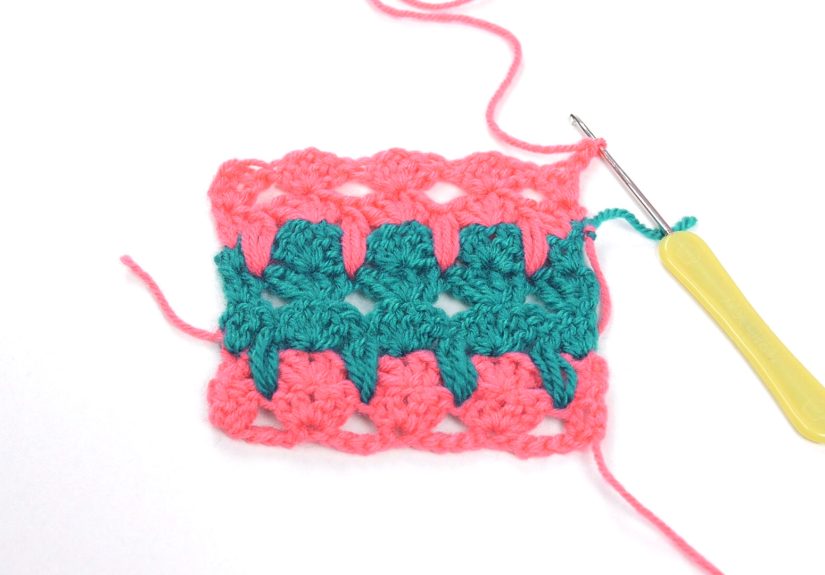
Step 4: Work the Cat Shaping Row
Chain 3 and turn. Make 1 double crochet in the next stitch. Now you will begin shaping the cat effect by working longer stitches into spaces from lower rows.
Work a pair of long double crochet or double crochet spike stitches into the space two rows below, usually between shell groups. Pull the loop up gently so it reaches the height of the current row. Do not pull too tightly, or the fabric will pucker. After the long stitches, work a shell into the next chain-one space.
Repeat this rhythm across the row: long stitches into the lower space, shell into the chain-one space, long stitches into the lower space. End with double crochet stitches at the edge.
This is the row where the little cat shapes begin to appear. The long stitches create visual lines that separate the shells and make the pattern look like tiny cats sitting in a row.
Step 5: Repeat the Pattern
After the shaping row, continue with shell rows and repeat the shaping row at regular intervals. Many crocheters like to repeat a three-row sequence: one shaping row followed by two shell rows. This creates a balanced pattern with clear cat shapes and a smooth fabric texture.
You can change colors every few rows for stripes. Color changes make the cat motif easier to see and give the finished project a playful, graphic look.
Color Ideas for the Cat Stitch
The cat stitch loves color. You can keep it soft and cozy or go full rainbow cat parade. Both are acceptable life choices.
Classic Cat Colors
Try gray, cream, black, white, tan, and soft orange. These colors make the stitch feel naturally feline and work beautifully for baby blankets, nursery decor, and pet-lover gifts.
Modern Stripes
Use two or three colors in repeating stripes. For example, cream, dusty blue, and charcoal create a calm modern look. Pink, lavender, and white make the pattern sweet and cheerful.
Scrap Yarn Style
The cat stitch is a fun stash-busting option because the repeated rows can handle small amounts of leftover yarn. Just keep the yarn weight consistent so your fabric does not suddenly change thickness halfway through.
Best Projects for the Crochet Cat Stitch
Once you learn how to crochet a cat stitch, you can use it in many projects. The stitch has enough personality to be the star of the show, so simple project shapes work especially well.
Cat Stitch Blanket
A cat stitch blanket is one of the most popular uses for this pattern. Make it in soft acrylic yarn for easy washing, especially if it is for a baby, child, or pet-friendly household. Use gentle stripes to highlight the cat shapes.
Cat Stitch Scarf
A scarf is a great first wearable project. Keep the width narrow, repeat the stitch until the scarf reaches your desired length, and add a simple border if the edges need polish.
Cat Stitch Pillow Cover
For home decor, crochet two panels and seam them around a pillow insert. Choose colors that match your room, or make one gloriously dramatic black-cat pillow for Halloween season.
Pet Blanket
A small cat stitch blanket can be used as a decorative pet mat. Use machine-washable yarn and avoid loose fringe if the blanket will be used around animals.
Troubleshooting Common Cat Stitch Problems
The Cats Do Not Look Like Cats
This is common on the first try. Usually the issue is tension or stitch placement. Make sure your shell stitches are lined up in the chain-one spaces and your long stitches are going into the correct lower spaces. The pattern becomes clearer after several rows.
The Fabric Is Curling
Curling often means the foundation chain is too tight or the long stitches are pulled too firmly. Try using a larger hook for the foundation chain or relax your tension when pulling up long loops.
The Edges Are Uneven
Uneven edges usually happen when turning chains are skipped or extra stitches are added at the sides. Use stitch markers in the first and last stitch of each row until the edge rhythm feels natural.
The Stitch Looks Too Dense
If your fabric feels stiff, go up a hook size. The cat stitch needs enough drape for the shells and long stitches to sit neatly.
Tips for a Cleaner, Cuter Cat Stitch
- Count often: Counting is not glamorous, but neither is frogging six rows while muttering at your yarn.
- Use smooth yarn: Stitch definition matters for this pattern.
- Keep long stitches relaxed: Pull them up to row height without tightening.
- Block your swatch: Light blocking helps open the stitch and even out texture.
- Choose contrast wisely: Medium contrast makes the cat shapes easier to see.
- Practice color changes: Striped versions look best when color changes are neat.
How to Add a Simple Border
A border gives your cat stitch project a finished look. For blankets and scarves, start with one round of single crochet around the entire piece. Place extra stitches in the corners so they do not curl. Then add a second round of half double crochet, single crochet, or a simple shell border.
If your cat stitch fabric already has plenty of texture, keep the border simple. A loud border around a playful stitch can be like putting a marching band in a library: technically possible, but a lot.
Care and Finishing
Weave in your yarn ends carefully with a yarn needle, especially if you changed colors several times. For washable projects, follow the yarn label instructions. Acrylic yarn is usually easy-care, while cotton may stretch when wet. Lay the project flat to dry if you want to preserve shape.
Blocking can improve the appearance of the cat stitch. Lightly dampen the fabric, shape it flat, and let it dry. Avoid aggressive stretching because it may distort the cat shapes.
Experience Notes: What Crocheting the Cat Stitch Actually Feels Like
The first experience most crocheters have with the cat stitch is a mix of delight and suspicion. You start with shells, and for a moment, nothing looks particularly cat-like. It looks pretty, yes, but not exactly like a tiny feline masterpiece. Then the shaping row appears, the long stitches drop into the lower spaces, and suddenly the design begins to make sense. It is one of those crochet moments where your brain says, “Oh! That is why we did all that counting.”
One practical lesson is that yarn choice makes a huge difference. A smooth worsted-weight yarn turns the stitch into a clear, readable pattern. A fuzzy yarn, on the other hand, can swallow the details. The cats are still there, but they look like they are hiding behind a fog machine. For a first project, light gray, cream, soft blue, or gentle pastel yarn is much easier on the eyes than black or deep navy.
Another real-world tip is to slow down on the long stitches. These stitches are the personality of the pattern. If you pull them too tightly, the fabric puckers. If you leave them too loose, they can look floppy. The sweet spot is a loop that rises comfortably to the current row without tugging the lower row upward. Think of it as giving the stitch enough room to stand politely, not enough room to start tap dancing.
Color changes are also worth practicing. Many cat stitch projects look best when the color changes happen every few rows because the stripes emphasize the motif. If you are making a baby blanket, try repeating three colors in a soft sequence. If you are making a scarf, two colors may be enough. If you are making a stash-busting blanket, embrace the chaos, but keep yarn weights similar so the fabric remains even.
The edges may feel awkward at first. This is normal. The inside repeat of the cat stitch is usually easier than the beginning and end of each row. Using stitch markers on the edge stitches can save you from accidental increases or decreases. After several repeats, your hands will start remembering where to go, and the pattern becomes much more relaxing.
The cat stitch is also a surprisingly good confidence builder. It teaches several useful crochet skills in one project: reading repeats, recognizing chain spaces, working shells, managing tension, changing colors, and crocheting into lower rows. Once you learn it, other textured crochet stitches feel less intimidating.
For gifts, the cat stitch has instant charm. A small blanket in neutral colors can look modern and sweet, while bright colors make it playful and kid-friendly. A pillow cover can be a fun handmade present for a cat lover. A scarf in muted tones gives just enough whimsy without looking like you are wearing a full pet adoption poster around your neck.
Most importantly, do not judge the stitch too early. A tiny swatch of two rows will not show the full effect. Work at least five or six rows before deciding whether your tension, yarn, and colors are right. Crochet often has an awkward teenage phase, and the cat stitch is no exception. Give it time, keep your rows steady, and eventually those little cats will show up looking smug and adorable.
Conclusion
Learning how to crochet a cat stitch is a fun way to add charm, texture, and personality to your crochet projects. The stitch combines basic crochet skills with a clever repeat that creates rows of tiny cat-like shapes. Once you understand the structure, it becomes relaxing, creative, and wonderfully addictive.
Start with a small swatch, use smooth medium-weight yarn, and take your time with the long stitches. After a few rows, the pattern will begin to reveal itself. Whether you turn it into a blanket, scarf, pillow, or pet-themed gift, the cat stitch is a cheerful technique that proves crochet can be practical, beautiful, and just a little bit sillyin the best possible way.