Table of Contents >> Show >> Hide
- What Is “Scene From The Ceiling” Photography?
- The Creative Power of Everyday Items
- How to Plan a Ceiling Scene Before You Start
- Composition Tips for Stronger Overhead Photography
- Lighting: The Secret Ingredient Nobody Should Ignore
- Camera Setup for Shooting From Above
- Storytelling Makes the Image Memorable
- Working With Kids in Creative Ceiling Scenes
- Editing Without Overdoing It
- Why This Style Works So Well on Social Media
- Creative Scene Ideas You Can Try at Home
- Common Mistakes to Avoid
- The Deeper Appeal: Turning Ordinary Life Into Art
- Extra Experiences: What Creating Ceiling Scenes Teaches You
- Conclusion
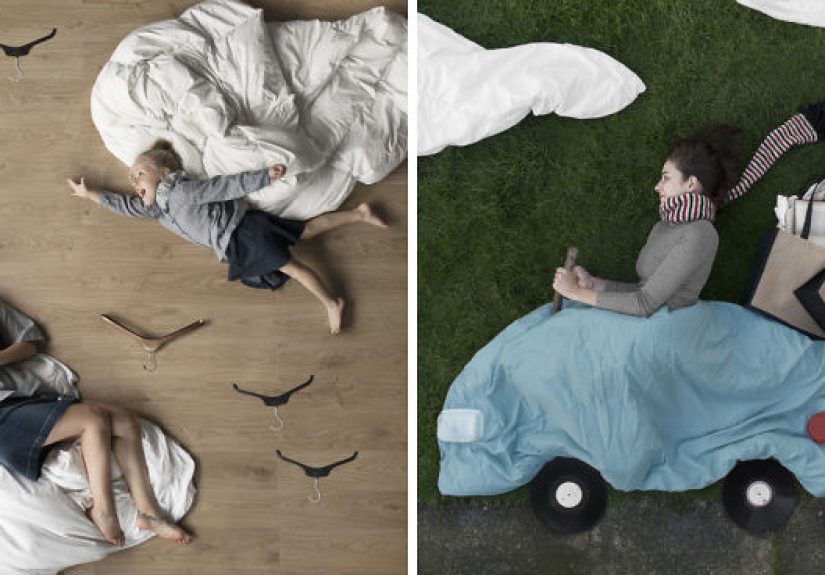
Some people look at a laundry basket and see laundry. Others see a hot-air balloon, a jungle cage, a spaceship cockpit, or possibly the beginning of a very confusing conversation with the neighbors. That is the charm behind “Scene From The Ceiling: I Create Fun Settings Using Everyday Items”: it turns normal household objects into playful, imaginative worlds by photographing a scene from above.
This style of creative photography is part flat lay, part forced perspective, part family activity, and part “please do not step on the carefully arranged spaghetti river.” Instead of relying on expensive sets or complicated digital effects, the magic comes from everyday items: blankets, toys, hangers, cereal, books, towels, pillows, craft supplies, socks, leaves, string, and whatever else happens to be sitting around the house looking suspiciously useful.
The idea became especially popular through the creative work of Dominic McCann, whose “Scene From The Ceiling” series showed how a camera positioned overhead can transform ordinary floors into theatrical stages. The images often feature children lying on the floor while props around them create the illusion of flying, swimming, traveling, dreaming, or stepping into miniature adventures. The result feels whimsical, personal, and wonderfully low-tech.
But beneath the fun is a surprisingly thoughtful photography technique. These scenes work because of composition, lighting, scale, storytelling, and visual clarity. In other words, yes, that towel ocean has artistic principles behind it. The rubber duck is not just there for emotional support.
What Is “Scene From The Ceiling” Photography?
Scene from the ceiling photography is a creative overhead photo style where objects are arranged on the floor or a flat surface and photographed from above. The camera angle makes the setup appear like a complete scene rather than a pile of random household items. A blanket can become a mountain. Blue bedsheets can become the sea. Cotton balls can become clouds. A child lying sideways can appear to be flying, falling, floating, or running across a fantasy landscape.
This type of image borrows from flat lay photography, where objects are photographed from directly above, often with careful spacing, lighting, and styling. It also borrows from forced perspective photography, which uses camera placement and object scale to trick the eye. When these two ideas meet, the floor becomes a canvas and the ceiling becomes the photographer’s viewpoint.
Why the Overhead View Works So Well
The overhead perspective removes much of the real-world depth that gives away the trick. When the camera points straight down, objects appear flatter and easier to reinterpret. A scarf does not look like a scarf anymore; it looks like a river, a road, smoke, wind, or a dragon’s tail depending on how you shape it.
This is why the technique is so effective for storytelling. Viewers instantly understand the illusion, but they also enjoy discovering the objects used to create it. It is a two-layer joke: first you see the scene, then you notice the kitchen whisk pretending to be a helicopter rotor. That little moment of recognition is what makes the image memorable.
The Creative Power of Everyday Items
The best part of creating fun settings using everyday items is that the materials are already available. You do not need a studio warehouse, a fog machine, or a budget that makes your wallet whisper goodbye. You need imagination, patience, and maybe a lint roller if your “snowy mountain” is made from a white blanket that has recently met a dog.
Household objects work beautifully because they are familiar. Viewers know what a spoon, sock, towel, or hanger is supposed to be. When those items are rearranged into something unexpected, the brain enjoys the playful transformation. This is the heart of visual creativity: showing people something they recognize in a way they have not seen before.
Examples of Everyday Items That Make Great Scenes
A blue sheet can become an ocean, sky, swimming pool, or rainy background. White pillows can become clouds, snowdrifts, or foam on waves. Brown towels can become desert dunes, tree trunks, mountain paths, or pirate islands. Books can form stairs, buildings, bridges, or magical portals. Hangers can become birds, wings, or architectural lines. Kitchen utensils can turn into antennas, wheels, tools, or tiny machines.
Food can also become part of the scene, though it comes with a warning: snacks have a mysterious habit of disappearing before the shoot is done. Cereal can become pebbles, pasta can become hair, lettuce can become a forest, and powdered sugar can become snow. Just remember that edible props should be handled safely, especially when kids are involved.
How to Plan a Ceiling Scene Before You Start
Spontaneity is fun, but a little planning keeps your creative scene from becoming what experts call “a floor tornado.” Start with a simple idea. A child flying through space. A person sailing on a blanket ocean. A tiny camper under a pillow mountain. A superhero leaping over a city made from books. The concept should be clear enough that someone can understand it in two seconds.
After choosing the idea, list the objects needed to suggest the setting. You do not need realistic props; you need recognizable shapes, colors, and textures. For example, if the scene is “flying through the clouds,” you might need a light blue blanket, white pillows, a scarf for wind, goggles, and a toy airplane. That is enough. Adding twelve more props may make the image busier, but not better.
Sketch the Scene Like a Tiny Movie Director
A quick sketch helps you decide where everything goes. It does not need to be beautiful. Stick figures are welcome. The goal is to plan the position of the person, props, background, and open space. Think of the image as a poster: where should the eye go first? What supports the story? What can be removed?
Good overhead scenes usually have one main subject, a few supporting props, and a clean background. If every corner is shouting for attention, the viewer does not know where to look. Your laundry basket spaceship deserves the spotlight.
Composition Tips for Stronger Overhead Photography
Composition is what separates a charming creative photo from a suspicious pile of craft supplies. The overhead angle gives you a lot of control, but it also makes every object visible. Nothing hides. That rogue sock in the corner? It is now part of the story whether you invited it or not.
Use the rule of thirds to place the main subject slightly off-center, or center the subject intentionally for a bold, poster-like image. Leading lines also help. A scarf road, string balloon, ribbon river, or trail of toy blocks can guide the viewer’s eyes through the scene.
Balance Color, Shape, and Negative Space
Color is one of the easiest ways to make everyday-object photography look intentional. Choose two or three main colors and repeat them. A beach scene might use blue, white, and yellow. A space scene might use black, silver, and purple. A garden scene might use green, pink, and brown.
Negative space is just as important. Empty areas give the image room to breathe. In overhead photography, crowded scenes can quickly become visual soup. Delicious in theory, confusing in practice.
Lighting: The Secret Ingredient Nobody Should Ignore
Lighting can make or break a ceiling scene. Soft, even light works best for most overhead setups because it reduces harsh shadows and keeps the illusion clean. Window light is often perfect. Place the scene near a large window, avoid direct midday sun if it creates harsh contrast, and use a white sheet, poster board, or foam board to bounce light back into the shadows.
If you are shooting at night, use lamps with diffused light. A thin white curtain, diffusion fabric, or even a safe distance from the lamp can soften the effect. Never place fabric directly on a hot bulb. Creative photography should not become an emergency room origin story.
Watch the Direction of Shadows
Shadows can either support the illusion or reveal the setup. If the subject is supposed to be floating, harsh side shadows may make them look very much attached to the floor. On the other hand, a controlled shadow can add depth and drama. Test a few angles before committing. Move the light, take a photo, check the result, and adjust.
Camera Setup for Shooting From Above
The safest and cleanest way to shoot from above is to use a tripod with a horizontal arm, a phone mount, or a secure overhead rig. If you do not have that, you can stand carefully on a sturdy stool or ladder and shoot downward. Safety comes first. No photograph is worth turning the family room into a gymnastics fail compilation.
Make sure the camera or phone is parallel to the floor. If it tilts, the scene may look distorted. Many smartphones have grid guides that help keep the frame straight. Use them. They are like tiny responsible adults living inside your camera app.
Use a Timer or Remote Shutter
A timer or remote shutter helps reduce blur and gives everyone time to get into position. This is especially useful when children are part of the scene. Kids are wonderfully expressive, but they also operate on squirrel-level timing. A countdown helps everyone freeze long enough to capture the shot.
Storytelling Makes the Image Memorable
The strongest ceiling scenes are not just decorative; they tell a small story. A child holding an umbrella while cotton-ball clouds swirl around them suggests weather, imagination, and movement. A person lying beside a blanket river with a paper boat suggests travel. A kid surrounded by books arranged like skyscrapers becomes a giant in a city of stories.
Ask three questions before shooting: What is happening? Who is the main character? What emotion should the viewer feel? The answer might be adventure, calm, humor, surprise, nostalgia, or pure silliness. Silliness is valid. In fact, silliness pays rent in this art form.
Add Motion Without Moving Anything
Because the subject is usually lying still, motion has to be suggested through shapes. Curved scarves can show wind. Diagonal lines can suggest action. Repeated objects can create rhythm. A trail of paper stars can make the subject appear to be flying. A blanket twisted into waves can make a floor look like a stormy sea.
Working With Kids in Creative Ceiling Scenes
Children often love this kind of project because it feels like play, not posing. They can help choose props, suggest ideas, and create characters. The more involved they are, the more natural the final image feels. A child who helped design the dragon made from socks is far more likely to look delighted while bravely facing it.
Keep sessions short. Young kids do not want to lie still while adults debate whether the pillow cloud needs “more emotional range.” Prepare the scene first, then bring the child in when everything is nearly ready. Give simple instructions: look up, pretend to fly, hold the spoon like a sword, laugh at the invisible monster, please stop eating the moon.
Editing Without Overdoing It
Post-processing can polish the image, but the charm of everyday-object scenes often comes from their handmade quality. Adjust brightness, contrast, crop, and color balance. Remove small distractions if needed. But avoid editing so heavily that the scene loses its playful, homemade personality.
The viewer should still be able to recognize the clever use of real objects. That recognition is part of the fun. If everything becomes too digitally perfect, the image may look like an illustration instead of a creative setup built from household treasures.
Why This Style Works So Well on Social Media
Scene from the ceiling photography is naturally shareable because it is visual, surprising, and easy to understand. People do not need a technical explanation to enjoy it. They see the illusion, smile, and then zoom in to identify the props. That second look increases engagement because viewers spend more time with the image.
The format also encourages conversation. Someone might comment, “Is that a bedsheet ocean?” or “I love the hanger birds!” or “I tried this with my toddler and now my living room looks like a craft store exploded.” The images invite people to try their own versions, which makes the idea travel quickly online.
Creative Scene Ideas You Can Try at Home
1. The Blanket Ocean Adventure
Use a blue blanket as water, white towels as waves, a laundry basket as a boat, and a wooden spoon as an oar. Add a paper sun and toy fish. Have the subject lie inside or beside the “boat” and pretend to sail. Bonus points if the family pet wanders in and becomes the sea monster.
2. The Pillow Cloud Flight
Use a pale blue sheet as the sky and white pillows or cotton batting as clouds. A scarf can become a cape, and paper airplanes can fill the frame. Position the subject diagonally to create movement. This setup works beautifully for dreamy portraits and birthday photos.
3. The Book City
Stack books into towers, roads, or bridges. Add toy cars, paper windows, and string lights for a city feel. The subject can appear as a giant, a superhero, or a traveler walking through a literary skyline. It is also an excellent way to make the unread book pile feel productive.
4. The Kitchen Space Mission
Use a dark blanket for space, jar lids as planets, aluminum foil as stars, and a colander as a helmet. A vacuum hose can become an oxygen tube. Suddenly the kitchen is NASA, but with more snacks.
5. The Garden Fairy Tale
Use green towels, leaves, flowers, and craft paper mushrooms to create a magical forest. A child can lie in the middle as a fairy, explorer, or tiny giant. Natural textures make the image feel rich without expensive props.
Common Mistakes to Avoid
The first mistake is overcrowding. When every object you own makes a guest appearance, the story gets lost. Choose props that support the idea and remove anything that does not help. The second mistake is poor lighting. Even the cutest concept can look dull if the light is muddy or uneven.
The third mistake is forgetting the edges of the frame. Check corners before shooting. Stray shoes, charging cables, pet toys, and mysterious crumbs can sneak into the photo like tiny agents of chaos. The fourth mistake is making the subject uncomfortable. If someone is lying on the floor, use padding where needed and keep the session quick.
The Deeper Appeal: Turning Ordinary Life Into Art
At its heart, “Scene From The Ceiling” is not just about clever photography. It is about seeing possibility in ordinary life. It reminds us that creativity does not always require new materials. Sometimes it requires a new angle. The floor you walk across every day can become a stage. The blanket on your couch can become a sea. The spoon in your drawer can become a sword, rocket, bridge, or royal scepter.
This kind of art is approachable because it does not ask people to be professional photographers before they begin. It says: start with what you have. Use the light from your window. Use the toys on the floor. Use the cereal box, the scarf, the towel, the paper clips, the dog bed if the dog allows negotiations. Make something small and delightful.
Extra Experiences: What Creating Ceiling Scenes Teaches You
After making a few scenes from the ceiling, you start seeing the house differently. A basket is no longer just a basket. It is a balloon basket, a boat, a cave entrance, a turtle shell, a tiny theater, or an emergency storage unit for props that were definitely supposed to be cleaned up yesterday. This shift in perception is one of the best parts of the process. You become more observant, more playful, and more willing to experiment.
The first experience many creators have is surprise. The scene usually looks ridiculous from the side. You may stand there thinking, “This is not art. This is laundry having a breakdown.” Then you climb up, look through the camera, and suddenly it works. The overhead view compresses the scene into a picture, and the illusion appears. That moment feels a little like magic, except the wand is a phone and the spell is “please hold still for five seconds.”
The second experience is problem-solving. Maybe the blanket ocean looks too flat, so you pinch it into waves. Maybe the paper sun blends into the background, so you place it on a darker cloth. Maybe the child’s arm disappears into the pillow cloud, so you adjust the pose. Every scene becomes a puzzle. You learn that creativity is not one big lightning strike; it is a series of tiny fixes.
Another important experience is collaboration. These projects are perfect for families because everyone can contribute. One person suggests the theme, another finds props, another arranges the background, and someone else becomes the brave astronaut, mermaid, dragon rider, or pancake-sized superhero. Kids are especially good at this because they have not yet been trained to think a whisk must remain a whisk. To them, a whisk can absolutely be a comet, and frankly, they are correct.
There is also a lovely memory-making element. The finished photo is not only a creative image; it records a moment of shared play. Years later, you may not remember the exact camera settings, but you will remember everyone laughing when the pillow mountain collapsed or when the cat sat directly in the middle of the pretend solar system. These imperfections become part of the story.
Creating ceiling scenes can also teach patience. Some setups take longer than expected. Objects roll away. Fabric wrinkles. Children blink. Adults overthink. The best approach is to stay flexible. If the original plan is not working, change the story. A failed pirate ship can become a storm scene. A messy garden can become a jungle. A crooked road can become, well, a road with personality.
Finally, this style encourages gratitude for simple things. In a world full of polished digital content, there is something refreshing about handmade visual humor. You do not need perfect props. You need curiosity. You need the willingness to look at a coat hanger and wonder whether it might secretly be a bird. Once you begin seeing everyday objects as creative tools, the whole home becomes a studio, and ordinary afternoons become opportunities for tiny adventures.
Conclusion
“Scene From The Ceiling: I Create Fun Settings Using Everyday Items” proves that imagination is still the best creative tool in the house. With a floor, a camera, soft light, and a handful of ordinary objects, anyone can build a whimsical world that feels personal, funny, and memorable. The technique blends flat lay photography, forced perspective, prop styling, and storytelling into a project that is simple enough for beginners but rich enough to keep improving over time.
Whether you are creating photos with kids, building content for social media, exploring DIY photography, or simply trying to make a Saturday afternoon more interesting, ceiling scenes offer a joyful reminder: art does not always begin in a studio. Sometimes it begins with a bedsheet, a spoon, a stack of books, and the bold decision to look down from above.