Table of Contents >> Show >> Hide
- Why DIY Terrariums Are So Popular
- What You Need to Build a Terrarium
- 12 Tips for Making a DIY Terrarium
- 1. Decide First: Open Terrarium or Closed Terrarium?
- 2. Choose a Clear Container That Is Easy to Work With
- 3. Start With a Clean, Dry Container
- 4. Build a Proper Drainage Layer
- 5. Use the Right Soil, Not Just Whatever Bag Is Nearby
- 6. Pick Small, Slow-Growing Plants With Similar Needs
- 7. Plan Your Design Before You Plant
- 8. Give Plants Room to Grow
- 9. Use Decorations Sparingly
- 10. Water Less Than You Think You Should
- 11. Give It Bright, Indirect Light
- 12. Watch for Condensation, Prune Regularly, and Adjust as Needed
- How to Build a Terrarium Step by Step
- Common DIY Terrarium Mistakes to Avoid
- My DIY Terrarium Experience: What Worked, What Failed, and What I Learned
- Conclusion
- SEO Tags
If you have ever looked at a glass jar full of moss, tiny ferns, and miniature drama and thought, “Yes, I would like to build a tiny jungle and become its benevolent ruler,” welcome. A DIY terrarium is one of the easiest and most satisfying indoor garden projects you can make. It is part plant display, part science experiment, part home decor, and part excuse to buy adorable pebbles you absolutely do not need but suddenly cannot live without.
The beauty of a terrarium is that it can be simple enough for a beginner and creative enough for someone who wants their living room to look like a botanical fairy tale. But the difference between a thriving mini garden and a foggy jar of regret usually comes down to a few smart choices at the beginning. The right container, the right plants, the right amount of water, and the ability to resist treating your terrarium like a thirsty tomato plant all matter.
In this guide, you will learn how to build a terrarium step by step, plus 12 practical tips that make the process easier and the results better. Whether you want a closed terrarium full of humidity-loving greenery or an open terrarium with a cleaner, drier feel, this guide will help you build one that looks good and stays healthy.
Why DIY Terrariums Are So Popular
A terrarium is basically a miniature indoor garden inside a clear container. Some are open at the top, and some are closed with a lid. Closed terrariums create a humid environment that works well for mosses, fittonia, small ferns, peperomia, and other tropical plants that enjoy moisture in the air. Open terrariums are better for plants that prefer more airflow and less humidity.
People love terrariums because they are compact, decorative, and surprisingly relaxing to make. They also fit into homes that do not have much outdoor space. If you want a gardening project without digging a backyard bed or wrestling with a hose, a terrarium is the little glass answer.
What You Need to Build a Terrarium
- A clear glass container
- Small pebbles, gravel, or lava rock for drainage
- Activated charcoal
- Sphagnum moss or sheet moss (optional but useful)
- Potting mix appropriate for your plants
- Small terrarium plants
- A spoon, chopstick, or long tweezers for planting
- Decorative stones or miniature accents if you want them
- A spray bottle or small watering tool
That is the basic terrarium starter pack. No cape required.
12 Tips for Making a DIY Terrarium
1. Decide First: Open Terrarium or Closed Terrarium?
This is the most important choice you will make, because it affects everything else. A closed terrarium traps moisture and creates a humid environment, which is great for small tropical plants and moss. An open terrarium allows more air circulation, so it is better for plants that dislike heavy humidity.
If you are dreaming of lush greenery, condensation, and a tiny rainforest vibe, go closed. If you want something cleaner, drier, and easier to ventilate, go open. Do not mix desert-loving plants with humidity-loving plants in the same setup unless your goal is confusion.
2. Choose a Clear Container That Is Easy to Work With
The best terrarium container is clear, clean, and sized for both your plants and your hands. A wide opening makes planting much easier, especially for beginners. Jars, fishbowls, apothecary containers, glass canisters, and old glass bowls can all work beautifully.
Yes, narrow-neck bottles look magical. They also require the patience of a saint and the wrist control of a watchmaker. If this is your first DIY terrarium, choose something with an opening wide enough to reach inside comfortably.
3. Start With a Clean, Dry Container
Before you add anything, wash and dry the container thoroughly. This simple step helps reduce the chance of mold, funky smells, and unwanted residue. Terrariums are enclosed environments, so whatever starts in there tends to stay in there longer than you might expect.
Think of it this way: if you are building a tiny ecosystem, it is rude to begin by inviting grime to the party.
4. Build a Proper Drainage Layer
Because most terrariums do not have drainage holes, excess water has nowhere to go. That is why a drainage layer matters. Add a layer of gravel, pebbles, or lava rock at the bottom of the container so extra moisture has a place to collect rather than soaking the roots nonstop.
Many terrarium guides also recommend a thin layer of activated charcoal above the stones. This is commonly used to help manage odors and keep the setup fresher over time. Some gardeners also add a thin layer of moss above the charcoal to keep soil from drifting down into the rocks.
5. Use the Right Soil, Not Just Whatever Bag Is Nearby
Your terrarium soil should match your plants. For most closed terrariums, a light, well-draining potting mix works well. You want something airy enough to avoid turning into swamp pudding. For open terrariums, especially those designed for drier plants, a grittier mix with better drainage is usually smarter.
A good rule is to avoid overly heavy soil that compacts easily. Terrarium plants live in a small space, so the soil needs to support roots without holding too much moisture for too long.
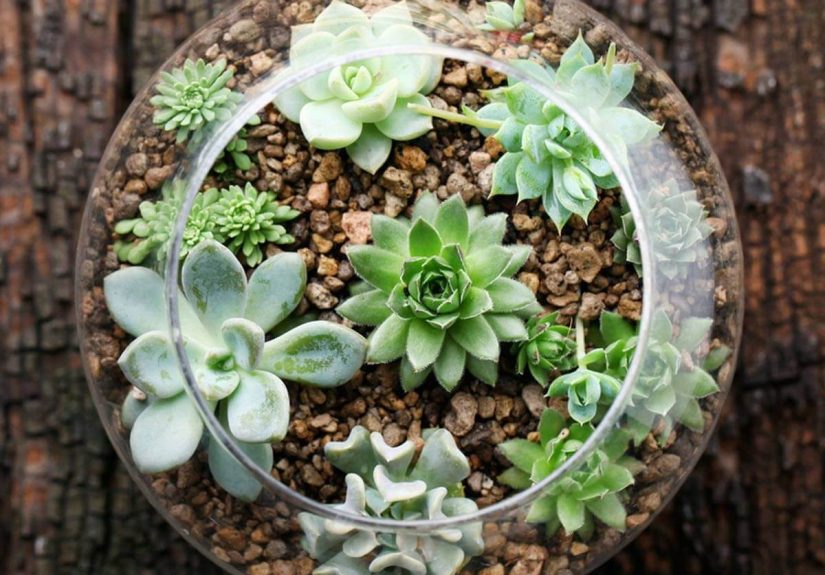
6. Pick Small, Slow-Growing Plants With Similar Needs
One of the biggest DIY terrarium mistakes is choosing plants based only on looks. Yes, that tiny fern is adorable. Yes, that succulent is also adorable. No, they probably do not want to live together in the same glass apartment.
Choose plants that stay relatively small, grow slowly, and like the same light and moisture conditions. Great options for humid terrariums include fittonia, moss, selaginella, peperomia, small ferns, and some miniature begonias. If you are making an open terrarium, you have more flexibility, but you still want plants with similar care needs.
7. Plan Your Design Before You Plant
A good terrarium is not just planted; it is composed. Before you start, picture how you want the finished piece to look. Place taller plants toward the back or center, medium plants around them, and trailing or low plants near the front and edges.
Mix textures and leaf shapes to create interest. A terrarium full of plants that all look the same can still be lovely, but a combination of fine moss, broad leaves, upright stems, and trailing growth tends to feel more dynamic. You are building a miniature landscape, not arranging a houseplant traffic jam.
8. Give Plants Room to Grow
When you plant, resist the temptation to cram everything in. A terrarium always looks slightly sparse on day one and slightly crowded by week twelve. Leaving room for growth is one of the smartest things you can do.
Gently loosen root balls if needed, trim roots only when necessary, and settle each plant into the soil with care. Press the soil lightly around the roots so the plants stay stable, but do not pack everything down like you are building a brick patio.
9. Use Decorations Sparingly
Rocks, shells, mini figurines, and decorative accents can make your terrarium more personal and fun. A few well-placed details can turn a simple planting into a tiny woodland, a beach-inspired scene, or a little mossy world that looks suspiciously ready for a gnome real estate boom.
That said, less is usually more. Too many decorations can crowd the plants and distract from the natural beauty of the terrarium. Avoid materials that may break down too quickly in a humid environment. Choose clean, stable items that complement the design instead of overpowering it.
10. Water Less Than You Think You Should
This tip deserves a marching band. Most terrarium problems come from overwatering. In a closed terrarium, moisture is retained far longer than in a regular pot. If you drench the soil, there is nowhere for that extra water to escape, which can lead to rot, mold, and general leafy despair.
Start with a light watering or a gentle misting to moisten the soil. In many closed terrariums, that is enough for quite a while. If the glass is constantly fogged, the soil looks soggy, or water is pooling heavily at the bottom, you have probably overdone it. Step away from the spray bottle.
11. Give It Bright, Indirect Light
Most terrarium plants prefer bright, indirect light. Place the terrarium near a window where it gets good light without harsh direct sun. Direct sunlight can quickly turn a closed glass container into a tiny plant sauna, and not the relaxing kind.
North- or east-facing light often works nicely. If your home is dim, supplemental grow lights can help, but avoid placing them so close that they overheat the container.
12. Watch for Condensation, Prune Regularly, and Adjust as Needed
A terrarium is low maintenance, not no maintenance. If you see heavy condensation, crack the lid or leave the top off for a while so excess moisture can escape. If plants start touching the glass or crowding each other, trim them back. Remove dead leaves promptly so they do not decay in the container.
The best terrariums evolve over time. You may need to swap a plant that outgrows the space, trim a vine that got ambitious, or adjust the light if growth starts leaning. A little maintenance keeps the tiny world looking intentional rather than wild in the “someone forgot about me for six months” sense.
How to Build a Terrarium Step by Step
- Clean the container. Wash and dry it fully.
- Add the drainage layer. Pour in pebbles, gravel, or lava rock.
- Add activated charcoal. Use a thin layer above the stones.
- Add moss if desired. This helps keep soil from slipping into the drainage layer.
- Add potting mix. Create enough depth for roots to settle comfortably.
- Arrange plants before planting. Test the layout first.
- Plant carefully. Add taller plants first, then smaller and trailing ones.
- Add decorations. Keep them light and balanced.
- Water lightly. Moisten the soil without soaking it.
- Place in bright, indirect light. Then monitor moisture and growth.
Common DIY Terrarium Mistakes to Avoid
- Using plants with totally different light and moisture needs
- Choosing a container too small for root growth
- Skipping the drainage layer
- Overwatering right after planting
- Putting a closed terrarium in direct sun
- Ignoring mold, dead leaves, or heavy condensation
- Filling the terrarium so full that maintenance becomes impossible
My DIY Terrarium Experience: What Worked, What Failed, and What I Learned
The first time I built a DIY terrarium, I was far too confident for someone holding a spoon, a jar, and a completely unreasonable amount of moss. I assumed it would be impossible to mess up. After all, how hard could a tiny indoor garden be? Very hard, apparently, if you treat it like a regular potted plant and water it with the enthusiasm of a person trying to impress the rain.
My first terrarium looked amazing for about four days. I had layered pebbles, added charcoal, tucked in fittonia and moss, and even placed a few decorative stones like I was styling a magazine shoot. Then the glass fogged up so much that I could barely see inside. The soil looked wet all the time. One plant started leaning dramatically like it was auditioning for a soap opera. That was when I learned the most important lesson in terrarium care: you almost always need less water than your instincts tell you.
On my second try, I slowed down. I picked a wider glass container, which made planting easier and less like a claw-machine challenge. I chose fewer plants and made sure they all liked similar conditions. I also stopped trying to cram every cute plant into one jar. This was emotionally difficult, but botanically correct.
What worked best was planning the design before planting anything. I set the plants near the container first and figured out which one would be the tallest focal point, which ones would fill the middle, and which one would trail slightly near the front. That made the whole arrangement look more intentional. It also helped me avoid digging up and replanting everything five times, which plants do not exactly applaud.
I also learned to pay attention to the glass. In a closed terrarium, the glass tells you a lot. A little condensation can be normal. Constant heavy fog means there is too much moisture. Completely dry glass for a long stretch can mean the setup needs a bit of water. Once I started treating the terrarium like a conversation instead of a decoration, it became much easier to care for.
One of my favorite terrarium moments came a few weeks after planting, when the moss began to settle in and the whole arrangement started to look like a tiny forest floor. That is the magic of a terrarium. It does not usually look its absolute best on day one. It gets better as the plants adapt, fill in, and soften the edges of the design.
If I were giving advice to someone making their first terrarium, I would say this: keep it simple, choose the right plants, and do not panic if it is not perfect right away. Your first version might be slightly too wet, slightly too crowded, or slightly too ambitious. That is fine. Every terrarium teaches you something. Mine taught me patience, restraint, and the shocking truth that tiny gardens can have very big opinions.
Conclusion
A DIY terrarium is one of those rare projects that manages to be creative, practical, and genuinely calming all at once. With the right container, a solid drainage layer, well-matched plants, and a light hand with watering, you can build a terrarium that feels like a miniature world under glass. Start simple, enjoy the process, and remember: the goal is not perfection. The goal is to create a healthy little landscape that makes you smile every time you walk past it.