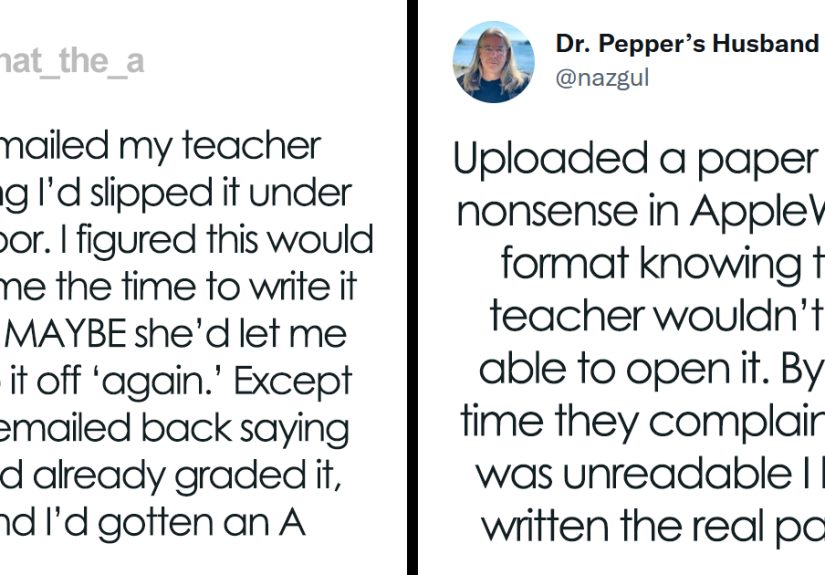
Table of Contents >> Show >> Hide
- Know Your Vinyl: Pick the Installation Method Before You Pick Up a Tool
- Tools and Materials Checklist
- Step 1: Plan the Job Like a Pro (So You Don’t Buy Planks Like a Panicked Squirrel)
- Step 2: Remove Trim and Old Flooring (Without Turning Your Walls Into Abstract Art)
- Step 3: Prep the Subfloor (The “Secret” to a Floor That Looks Expensive)
- Step 4: Underlayment and Vapor Barriers (Only If Your Floor Wants Them)
- Step 5: Layout and Dry Run (Where You Avoid the “1-Inch Sliver of Shame”)
- Step 6: Install Click-Lock Vinyl Plank (The Most Common DIY Vinyl Install)
- Step 7: Glue-Down Vinyl Plank/Tile (High Commitment, High Reward)
- Step 8: Sheet Vinyl Basics (Big Piece Energy)
- Step 9: Finishing Touches (Where It Finally Looks Like a Real Floor)
- Common Mistakes (And How to Avoid Them)
- Quick Troubleshooting
- Final Thoughts
- Real-World Experiences: What People Learn After Installing Vinyl Flooring (The “I Wish Someone Told Me” Edition)
- 1) Subfloor prep takes longer than you thinkplan for it
- 2) Buy extra flooringand then buy a little more
- 3) The first row is the “boss level”
- 4) Walls are rarely straightmeasure each last-row piece
- 5) Door jambs are the secret make-or-break detail
- 6) Mixing planks from different boxes helps more than you expect
- 7) Comfort upgrades are realbut only if your product allows them
- Bottom line from real installs
Vinyl flooring is the Swiss Army knife of floors: it’s tough, it’s budget-friendly, it can look surprisingly fancy, and it forgives a lot of normal-life chaos (muddy shoes, spilled coffee, pets with questionable morals). The good news: most modern vinylespecially luxury vinyl plank (LVP)is designed for DIY installation. The not-so-good news: vinyl is also the world’s greatest snitch. If your subfloor has a bump, dip, crumb, or mystery blob, vinyl will find it, highlight it, and invite all your guests to stare at it.
This guide walks you through installing vinyl flooring the right wayclean, flat, and drama-minimizedwhether you’re using click-lock planks, glue-down planks/tiles, or sheet vinyl. Expect step-by-step instructions, real-world tips, and a few gentle jokes to keep your spirit alive when you’re cutting planks around a door jamb that was clearly installed by a raccoon.
Know Your Vinyl: Pick the Installation Method Before You Pick Up a Tool
“Vinyl flooring” is a category, not a single product. Installation steps vary based on what you bought, so start here:
1) Click-lock (floating) vinyl plank or tile
- Most DIY-friendly. Planks click together and “float” over the subfloor.
- Usually needs an expansion gap around the perimeter (often about 1/4 inch, but follow your product).
- May require underlayment or a vapor barrier depending on the subfloor and product specs.
2) Glue-down vinyl plank/tile
- Adhered to the subfloor using the manufacturer’s recommended adhesive.
- More demanding prep: the subfloor must be very smooth.
- Often preferred in commercial spaces or areas with heavy rolling loads.
3) Sheet vinyl
- Comes in large rolls; fewer seams can mean better water resistance.
- Can be installed as loose-lay, perimeter-bond, or full-spread glue depending on the product.
- Cutting and fitting can be trickier, especially around cabinets and tight corners.
If you’re not sure what you have, check the box, label, or product sheet. Then read the manufacturer’s installation guide onceyes, the whole thing. Not because it’s thrilling, but because warranties are picky and vinyl manufacturers love rules.
Tools and Materials Checklist
Common tools for most vinyl installs
- Tape measure, pencil/marker, and a straightedge or T-square
- Utility knife with plenty of sharp blades (dull blades are the enemy)
- Spacers (for floating floors)
- Rubber mallet and tapping block (for click-lock planksuse the correct type)
- Pull bar (for the last plank near the wall)
- Chalk line (helpful for layout and keeping rows straight)
- Pry bar (for removing baseboards/shoe molding)
- Jigsaw or oscillating multi-tool (for notches, vents, and odd shapes)
- Miter saw (optional, for fast/clean cuts on planks)
- Knee pads (your knees will send thank-you notes)
- Shop vacuum/broom and a damp microfiber cloth
Subfloor prep supplies (don’t skip these)
- Floor patch/leveling compound (for dips, holes, and low spots)
- Sandpaper or grinder (for high spotsuse dust control and PPE)
- Underlayment (only if your product calls for it)
- Vapor barrier/moisture barrier (often needed over concretefollow product requirements)
Finishing materials
- Transition strips (T-molding, reducers, end caps) where flooring meets another surface
- Quarter round or shoe molding (if needed to cover the expansion gap)
- Baseboards (reinstall existing or replace)
Step 1: Plan the Job Like a Pro (So You Don’t Buy Planks Like a Panicked Squirrel)
Measure the room and order enough material
Measure the length and width of the room, then multiply to get square footage. Add extra for waste:
- +10% for straight installs in simple rooms
- +15% (or more) for diagonal patterns, lots of angles, or tricky layouts
Example: A room that’s 12 ft by 10 ft = 120 sq ft. For a straightforward click-lock plank install, aim for about 132 sq ft of flooring (120 × 1.10).
Pick plank direction (it’s not just vibes)
- Most people run planks parallel to the longest wall for a more open look.
- In hallways, planks usually look best running lengthwise.
- If you have a strong light source (big windows), running planks with the light can make seams less noticeable.
Acclimate the flooring
Many vinyl products want to sit in the room (flat, unopened or opened per instructions) for a periodoften around 48 hoursso the material adjusts to temperature and humidity. This reduces the chance of gapping, peaking, or other “why is my floor doing that?” moments later.
Step 2: Remove Trim and Old Flooring (Without Turning Your Walls Into Abstract Art)
Remove baseboards or shoe molding carefully using a utility knife to score paint lines first, then a pry bar. Label the back of each piece if you plan to reuse it. You’ll thank yourself later.
Remove old flooring if needed. Some click-lock vinyl can go over existing hard surfaces, but you must follow the manufacturer’s rules. Also: if your home is older and you’re disturbing old vinyl, adhesive, or underlayment, consider testing for asbestos and using a qualified professional if there’s any risk. Safety beats savings.
Step 3: Prep the Subfloor (The “Secret” to a Floor That Looks Expensive)
Vinyl needs a subfloor that’s clean, dry, smooth, and flat. “Flat” matters more than “level.” A floor can be slightly sloped and still be finewhat causes problems is bumps and dips.
Clean thoroughly
- Vacuum like you’re being judged by a toddler with white socks.
- Remove paint drips, drywall mud, old staples, and adhesive residue (use methods approved by the flooring maker).
Fix squeaks and loose spots
On wood subfloors, screw down loose areas. Squeaks don’t always ruin a vinyl floor, but they’ll ruin your peace.
Flatten the surface
- Fill low spots and holes with floor patch/leveler and let it cure fully.
- Sand down high spots. Check frequently with a straightedge.
- Follow your product’s flatness requirement (many rigid core floors want a very flat surface).
Moisture matters (especially on concrete)
Concrete can release moisture long after it looks dry. Many vinyl products require a moisture test and/or a vapor barrier. If the manufacturer calls for a specific barrier or underlayment system, do thatthis is not the moment for “close enough.”
Step 4: Underlayment and Vapor Barriers (Only If Your Floor Wants Them)
Some vinyl planks come with an attached pad. Some require a separate underlayment. Some forbid extra padding because it makes the locking joints flex and fail. The rule is simple: do what your specific product requires.
- Over concrete: you may need a vapor barrier per product instructions.
- Over wood: underlayment may improve comfort and sound, but only if approved.
- Do not double-pad unless the manufacturer explicitly says you can.
Step 5: Layout and Dry Run (Where You Avoid the “1-Inch Sliver of Shame”)
Snap a reference line
Even if your wall looks straight, it might not be. Snapping a chalk line helps keep the first row true, which helps every row after it behave.
Plan your first and last row width
Dry-lay a few planks (no clicking yet) to see how the last row will land. If the last row would be a skinny strip, shift your starting line so both sides end up a reasonable width. A balanced layout looks more professional.
Stagger end joints
Most manufacturers recommend staggering plank seams by at least several inches (often 6 inches or more) and avoiding a “stair-step” pattern. Mix planks from multiple boxes to blend color variation naturally.
Step 6: Install Click-Lock Vinyl Plank (The Most Common DIY Vinyl Install)
Start with the first row
- Place spacers along the starting wall to maintain the required expansion gap (commonly around 1/4 inchconfirm yours).
- Install the first plank with the tongue/groove orientation specified by your product (many start tongue-side toward the wall).
- Continue along the wall, clicking end joints together. Keep the row straightthis is the row that decides your destiny.
- Cut the last plank in the row to length, leaving the expansion gap at the end wall too.
Continue with the second row and beyond
- Start row two with an offcut from row one (as long as it meets the minimum length requirement) to create the stagger.
- Angle the long side into the previous row and click it in. Then connect the short end joint.
- Use a tapping block gently if needednever hammer directly on the plank. Protect the locking edge.
- Keep checking alignment. Small gaps early become big regrets later.
Cut around obstacles
- Door jambs: Undercut the jamb so the plank slides under for a clean look (an oscillating tool shines here).
- Vents: Trace carefully and cut with a jigsaw. Dry-fit before you click it in.
- Pipes: Drill a hole slightly larger than the pipe for clearance, then use a trim ring/escutcheon to finish.
Install the last row
The last row often needs to be ripped lengthwise. Measure each plank individually (walls aren’t always parallel), subtract the expansion gap, and cut. A pull bar helps lock the final pieces in without smashing your knuckles.
Step 7: Glue-Down Vinyl Plank/Tile (High Commitment, High Reward)
Glue-down installs can look fantastic and feel solid, but the prep work must be excellent. Follow the adhesive and trowel size specified for your product. The general flow looks like this:
- Prep the subfloor until it’s smooth enough to make you slightly proud.
- Snap layout lines and dry-lay a few rows to confirm your plan.
- Spread adhesive in small sections so it doesn’t skin over before planks go down.
- Lay planks/tiles into the adhesive, keeping seams tight and lines straight.
- Roll the floor with a roller (if recommended) to ensure full contact.
- Respect cure times before heavy traffic or wet mopping.
If your adhesive has an “open time” (time you can work after spreading) and a “set time” (when it starts to grab), treat those times like speed limits: ignore them, and you’ll eventually meet a police officer named Consequences.
Step 8: Sheet Vinyl Basics (Big Piece Energy)
Sheet vinyl installation varies by product backing and installation method, but these principles stay consistent:
- Make the subfloor exceptionally smoothsheet vinyl can telegraph imperfections.
- Dry-fit and allow extra material for trimming.
- Plan seams carefully and follow the product’s seam method if multiple pieces are required.
- Use the correct adhesive method (loose lay, perimeter bond, or full spread) for your product.
For many DIYers, sheet vinyl is most manageable in smaller rooms with simpler shapes. If your space has lots of angles, islands, or built-ins, consider professional helpor at least a very patient friend who owes you a favor.
Step 9: Finishing Touches (Where It Finally Looks Like a Real Floor)
Install transitions
Use transition strips where vinyl meets tile, carpet, or a different flooring height. This protects edges and allows movement. In doorways, transitions are often required so floating floors can expand and contract without buckling.
Reinstall baseboards and trim
- Do not nail trim into the floating floorfasten it to the wall so the floor can move underneath.
- Shoe molding or quarter round can cover the expansion gap if baseboards don’t.
Clean and protect
Vacuum, wipe with a damp microfiber cloth, and use a cleaner approved for vinyl. Add felt pads under furniture. If your chair legs sound like tap-dancing on your new floor, that’s your cue.
Common Mistakes (And How to Avoid Them)
- Skipping subfloor prep: The #1 reason vinyl looks “cheap.” Fix dips and bumps first.
- No expansion gap: Floating floors need room to move. Don’t wedge them tight to the wall.
- Too much underlayment: Extra cushion can stress click joints and cause failures.
- Not mixing boxes: Blend planks from multiple cartons for a natural look.
- Bad staggering: Weakens the floor visually and structurally. Vary your seam placement.
- Rushing cuts: Measure twice, cut once, and keep spare blades. Vinyl punishes impatience.
Quick Troubleshooting
Gaps between planks
- Check for debris in the joint.
- Confirm the subfloor is flat enoughdips can prevent full locking.
- Use the tapping block properly (and gently) to close seams.
Peaking or buckling
- Look for pinched areas: heavy cabinets, tight transitions, or trim pressing on the floor.
- Verify you left the required expansion gap.
Clicking or crunching sounds
- Often caused by grit under the planks or uneven subfloor spots.
- In severe cases, you may need to remove planks and fix the underlying issue.
Final Thoughts
Installing vinyl flooring is one of the most satisfying home upgrades because the transformation is fast and the payoff is huge. Do the prep work, follow your product’s instructions, and take your time with layout. The result is a durable, stylish floor that can handle real lifeand still look good doing it.
Real-World Experiences: What People Learn After Installing Vinyl Flooring (The “I Wish Someone Told Me” Edition)
You can read a hundred installation guides and still get surprised by the reality of vinyl flooringbecause houses are wonderfully imperfect, and vinyl is wonderfully honest about it. Here are the most common lessons DIYers and pros share after the fact, plus how to turn those lessons into a smoother install.
1) Subfloor prep takes longer than you thinkplan for it
A lot of people budget two hours for prep and then discover the subfloor has more personality than expected: old staples, adhesive ridges, a mysterious hump near the doorway, and a low spot that collects dust like it’s saving it for retirement. The fix is simple but not glamorous: scrape, sand, patch, and vacuum. If you’re installing rigid core LVP, flattening matters even more because the locking system doesn’t like flexing. The best “experience-based” tip? Spend your energy making the surface right, and the installation itself becomes almost relaxing.
2) Buy extra flooringand then buy a little more
Online calculators are helpful, but real rooms have doorways, weird corners, and that one area where you’ll cut a plank perfectly… upside down. Many installers recommend at least 10% overage for simple rooms and 15% for complicated layouts. In practice, having extra is also how you get a matching repair plank later when someone drops a cast-iron skillet from approximately outer space. Extra planks don’t feel like overspending; they feel like future-you insurance.
3) The first row is the “boss level”
People often say, “Once you get going, it flies.” That’s trueafter the first row is straight and locked in. The first row tends to be slow because you’re establishing alignment, confirming the expansion gap, and learning the feel of the click system. An experienced installer trick is to stop and re-check straightness after a few planks, not after the whole row. If you correct tiny drift early, you avoid a late-game situation where you’re wrestling the floor like it owes you money.
4) Walls are rarely straightmeasure each last-row piece
Many DIYers assume the last row will be one consistent width and cut a whole stack of planks the same. Then they discover the room is slightly wider at one end, so the last row doesn’t fitor it fits but steals the expansion gap. The lived-experience solution is boring but effective: measure each plank position, subtract the required gap, and cut individually. It takes longer, but it prevents weird gaps and weird words.
5) Door jambs are the secret make-or-break detail
Cutting planks around a door frame can look okay… or it can look like a craft project from a haunted dollhouse. People who’ve done this once usually become passionate about undercutting door jambs so planks slide underneath. The finished look is cleaner, and you don’t have to invent new trim pieces to cover an awkward notch. The first time you undercut a jamb and the plank glides under perfectly, you will feel like a home improvement wizard. That feeling is valid.
6) Mixing planks from different boxes helps more than you expect
Vinyl planks often have intentional color variation. If you install box-by-box, you can accidentally create a “stripe” or a cluster of similar tones. People who’ve installed a few rooms get in the habit of opening 3–5 cartons and pulling planks randomly. The result looks more naturallike real woodwithout any extra cost. It’s one of those tiny habits that makes a DIY floor read as “professionally installed.”
7) Comfort upgrades are realbut only if your product allows them
DIYers often want extra softness and sound reduction, especially upstairs or in apartments. The catch: adding underlayment when it’s not approved can cause click-lock failures. People who’ve been burned by that mistake become loyal to one rule: follow the manufacturer’s underlayment guidance exactly. If the product allows an acoustic underlayment, it can noticeably reduce footstep noise. If it doesn’t, the better “experience-based” path is a thick area rug in high-traffic zones and felt pads under furniture, not a forbidden foam layer that voids warranties.
Bottom line from real installs
Installing vinyl flooring is absolutely DIY-friendly, but it rewards patience and prep. The best experiences come from treating the subfloor like a foundation, treating the first row like a blueprint, and treating the manufacturer instructions like they’re written by someone who has seen every possible way this can go wrongbecause they have. Do that, and you’ll end up with a floor that looks sharp, feels solid, and survives daily life without begging for mercy.
