Table of Contents >> Show >> Hide
- Why Cleaning Your Dryer Matters
- Tools and Supplies You’ll Need
- How Often Should You Clean a Clothes Dryer?
- How to Clean a Clothes Dryer: 12 Steps
- Step 1: Turn Off and Unplug the Dryer
- Step 2: Remove and Empty the Lint Screen
- Step 3: Wash the Lint Screen to Remove Residue
- Step 4: Vacuum the Lint Trap Housing
- Step 5: Wipe Down the Dryer Drum
- Step 6: Clean the Dryer Door, Seal, and Exterior
- Step 7: Clean the Moisture Sensor
- Step 8: Pull the Dryer Away From the Wall
- Step 9: Disconnect and Clean the Vent Hose
- Step 10: Clean the Wall Duct and Exterior Vent
- Step 11: Reconnect the Vent and Check the Airflow
- Step 12: Run a Short Test Cycle and Make a Maintenance Schedule
- Common Dryer Cleaning Mistakes to Avoid
- Signs Your Dryer Vent Needs Professional Cleaning
- Extra Tips to Keep Your Dryer Cleaner Longer
- Real-Life Experience: What Cleaning a Dryer Actually Teaches You
- Conclusion
Cleaning a clothes dryer is one of those household jobs that sounds boring until your towels take three cycles to dry, your laundry room smells like toasted fuzz, or your dryer starts huffing like it just ran a marathon. The good news? A clean dryer works faster, treats clothes better, uses energy more efficiently, and helps reduce one of the most overlooked home fire risks: lint buildup.
This guide walks you through how to clean a clothes dryer in 12 practical steps, from the lint screen to the drum, moisture sensors, vent hose, exterior vent, and the mysterious lint-filled underworld behind the machine. You do not need to be an appliance technician. You just need a little patience, a vacuum, a soft brush, mild dish soap, microfiber cloths, and a healthy respect for lint, which is basically sweater confetti with a villain arc.
Before you begin, always check your dryer’s manual. Electric and gas dryers share many cleaning steps, but gas models need extra caution. If you are younger, new to appliance maintenance, or unsure about moving the dryer or handling a gas shutoff valve, ask an adult or a qualified professional for help.
Why Cleaning Your Dryer Matters
A dryer needs strong airflow to remove moisture from clothes. When lint collects in the lint trap, lint trap housing, vent hose, exhaust duct, or outside vent cover, air cannot move properly. That means clothes stay damp longer, heat builds up, and your dryer works harder than it should. Over time, poor airflow may lead to longer drying times, musty laundry, overheating, extra wear on the appliance, and avoidable safety concerns.
Routine dryer maintenance is also a money saver. When your dryer can breathe, it dries more efficiently. A clean lint filter, clear vent, and residue-free moisture sensor can help the machine stop at the right time instead of cooking your favorite hoodie into a tiny emotional-support sweater for a hamster.
Tools and Supplies You’ll Need
- Vacuum with crevice attachment
- Dryer vent brush or flexible lint brush
- Microfiber cloths
- Mild dish soap
- Warm water
- Soft nylon brush or old toothbrush
- Screwdriver, if your vent clamp requires one
- Small bucket or bowl
- Flashlight
- Optional: dryer vent cleaning kit for longer ducts
How Often Should You Clean a Clothes Dryer?
For everyday care, clean the lint screen before or after every load. If you use dryer sheets, wash the lint screen occasionally because softener residue can create an invisible film that blocks airflow. Deep clean the lint trap housing every month or two, especially if you dry towels, fleece, pet bedding, or lint-heavy clothing. Clean the vent hose and exhaust duct at least once a year, or more often if your household runs frequent laundry loads.
Watch for warning signs: clothes taking longer than normal to dry, the dryer feeling unusually hot, lint appearing around the door seal, a burning smell, weak airflow at the outside vent, or the laundry room becoming humid during drying. These are your dryer’s way of saying, “Please send help. Preferably a vacuum.”
How to Clean a Clothes Dryer: 12 Steps
Step 1: Turn Off and Unplug the Dryer
Safety comes first. Turn the dryer off and unplug it from the wall outlet before cleaning inside, behind, or around the appliance. If you have a gas dryer, close the gas shutoff valve before moving the machine or disconnecting anything. If you are not comfortable working around a gas line, stop here and call a professional. There is no prize for being brave with gas appliances, only better life choices.
Give the dryer time to cool if it was recently used. Cleaning a warm lint trap is fine, but working around hot metal parts or a recently heated drum is not ideal.
Step 2: Remove and Empty the Lint Screen
Pull out the lint screen. Depending on your dryer, it may be located on top of the machine, inside the door opening, or near the front rim of the drum. Use your fingers to roll lint off the screen. Avoid rinsing loose lint down the sink because lint can clump and contribute to drain problems. Toss it in the trash instead.
Make lint-screen cleaning a habit before every load. This tiny step improves airflow, helps clothes dry faster, and reduces lint buildup inside the machine. It is the dryer-care equivalent of brushing your teeth: quick, simple, and much better than dealing with the consequences later.
Step 3: Wash the Lint Screen to Remove Residue
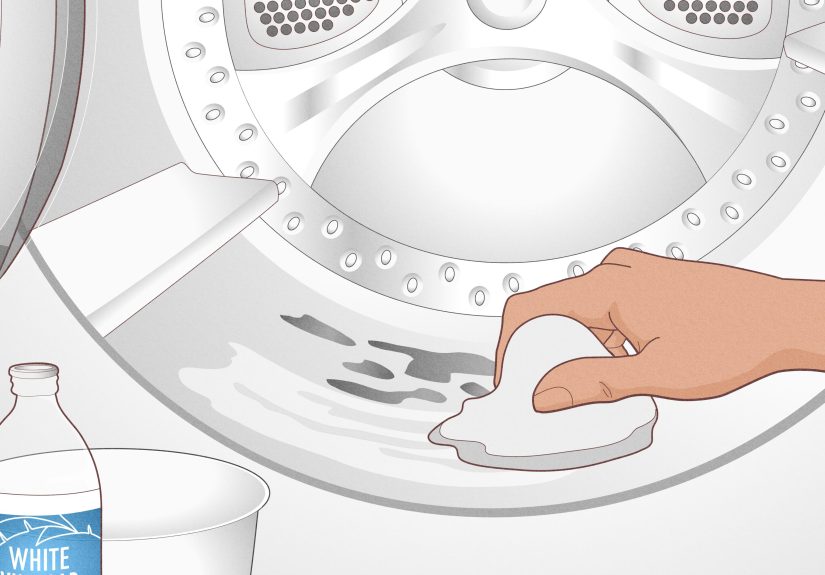
If you use dryer sheets or fabric softener, the lint screen can develop a waxy film that is hard to see. To test it, run a little water over the screen. If water pools instead of passing through easily, it needs a wash.
Fill a bowl or sink with warm water and a few drops of mild dish soap. Gently scrub both sides of the lint screen with a soft nylon brush or old toothbrush. Rinse well, then dry the screen completely with a towel before putting it back. Never reinstall a wet lint screen; moisture plus lint equals a clingy mess nobody invited.
Step 4: Vacuum the Lint Trap Housing
The lint screen catches a lot, but it does not catch everything. Over time, lint slips into the slot where the screen sits. Remove the screen again and use a vacuum crevice tool to clean inside the lint trap housing. A flashlight helps you see hidden clumps.
If your vacuum attachment cannot reach far enough, use a flexible dryer lint brush. Gently insert the brush into the slot, twist it, and pull out lint. Vacuum again afterward. This step is especially useful for households with pets, thick towels, blankets, flannel sheets, or teenagers who somehow own 47 black hoodies.
Step 5: Wipe Down the Dryer Drum
The dryer drum can collect residue from dryer sheets, fabric softener, detergent, ink, crayon, lip balm, gum, or mystery pocket treasures. Mix warm water with a small amount of mild dish soap. Dampen a microfiber cloth, wring it out well, and wipe the entire drum. Do not soak the inside of the dryer.
For sticky spots, hold the damp cloth on the area for a minute, then wipe gently. Avoid harsh cleaners, flammable solvents, and abrasive pads. The goal is to clean the drum, not sand it into a modern art project.
Step 6: Clean the Dryer Door, Seal, and Exterior
Wipe the inside of the dryer door, the rubber or felt seal area, and the door frame. Lint and residue often hide along the edges. Then wipe the control panel, top, sides, and front of the dryer with a damp microfiber cloth. Dry everything with a clean towel.
Pay attention to the area around the dryer. Lint behind or beside the appliance can get pulled into vents and openings. Keep the laundry space free of dust, dryer sheets, cardboard, paper, and clutter. A dryer should not be surrounded by a tiny museum of forgotten socks and empty detergent bottles.
Step 7: Clean the Moisture Sensor
Many modern dryers have moisture sensor bars, usually located inside the drum near the lint screen or along the front interior wall. These sensors detect dampness and help automatic cycles stop when clothes are dry. When coated with fabric softener residue, they may misread laundry and cause the dryer to run too long or stop too early.
Use a soft cloth lightly dampened with mild soap and water to wipe the sensor bars. Dry them thoroughly. Some homeowners use rubbing alcohol on a cotton ball for residue, but always check your manual first. When the sensor is clean, automatic drying cycles usually behave more accurately, which means less overdrying and fewer crispy towels.
Step 8: Pull the Dryer Away From the Wall
With the dryer unplugged, carefully move it away from the wall so you can access the vent hose. Dryers can be heavy, so get help if needed. Move slowly to avoid damaging the flooring, stretching the power cord, or bending the vent hose.
Once you can see behind the dryer, prepare yourself emotionally. This area often contains lint, dust, coins, hair ties, lost receipts, and at least one sock that looks like it has been living a separate life. Vacuum the floor, wall, and back of the dryer before disconnecting the vent hose.
Step 9: Disconnect and Clean the Vent Hose
The vent hose connects the back of the dryer to the wall duct. Loosen the clamp or tape holding the hose in place, then carefully detach it. Remove lint by hand where you can reach, then use a vacuum hose and dryer vent brush to clean inside. If the hose is crushed, torn, clogged, or made of flimsy plastic, consider replacing it with proper metal venting recommended for dryer use.
Do not force a brush through a fragile hose. If the vent hose is damaged, replacement is usually smarter than wrestling with it. Good airflow depends on a clear, properly attached duct, not a sad accordion tube gasping for dignity.
Step 10: Clean the Wall Duct and Exterior Vent
Next, clean the duct opening in the wall. Use a dryer vent brush and vacuum to remove lint from the duct. If the duct is long, has several bends, or runs upward through a roof, a professional cleaning may be safer and more thorough than a basic DIY job.
Go outside and find the exterior dryer vent. Remove lint, leaves, dirt, or nests around the vent cover. Make sure the flap opens freely when the dryer runs. Do not install a screen over the vent opening because it can trap lint and restrict airflow. A dryer vent needs to exhale, not breathe through a sweater.
Step 11: Reconnect the Vent and Check the Airflow
Reconnect the vent hose securely to the dryer and wall duct. Make sure clamps are tight and the hose is not kinked, crushed, or sagging. Push the dryer back carefully, leaving enough room so the duct is not smashed against the wall.
Plug the dryer back in. If it is a gas dryer and you turned off the gas valve, follow the manufacturer’s directions for restoring service or ask a qualified adult or technician to help. Run the dryer on an air-only or low-heat setting for a few minutes and check the outside vent. You should feel a steady flow of air. Weak airflow may mean the vent path is still blocked.
Step 12: Run a Short Test Cycle and Make a Maintenance Schedule
Place a few clean, dry towels in the dryer and run a short cycle. Listen for unusual rattling, check for proper tumbling, and make sure the dryer is not overheating. If everything sounds normal and airflow is strong, congratulations: your dryer has been rescued from the lint kingdom.
To keep it clean, create a simple schedule. Clean the lint screen every load. Vacuum the lint trap housing monthly. Wipe the drum and sensors every few months. Clean the vent hose and exterior vent at least yearly, or sooner if drying times increase. This routine takes far less time than running three extra drying cycles because the vent is stuffed with towel fluff.
Common Dryer Cleaning Mistakes to Avoid
Using the Dryer Without a Lint Screen
Never run the dryer without the lint screen in place. The screen protects internal areas from heavier lint buildup and helps maintain proper airflow. If the screen is missing, cracked, or damaged, replace it before using the dryer again.
Forgetting the Vent Hose
Cleaning the lint screen is important, but it is only part of the job. Lint can travel beyond the screen and collect in the vent hose, wall duct, and exterior vent. If clothes take longer to dry even after you clean the lint screen, the vent system is the next place to check.
Using Too Much Fabric Softener
Dryer sheets and fabric softener can leave residue on lint screens, sensor bars, and fabric. If you notice longer drying times or a coated lint screen, wash the screen and clean the sensors. Wool dryer balls can be a lower-residue alternative for many loads.
Overloading the Dryer
A packed dryer cannot circulate air well. Clothes need room to tumble so hot air can move through the load. Overloading leads to damp pockets, wrinkling, longer cycles, and extra lint. Your dryer is an appliance, not a suitcase before vacation.
Signs Your Dryer Vent Needs Professional Cleaning
Some dryer setups are easy to clean; others are more complicated. Call a professional if the vent run is very long, exits through the roof, has multiple bends, is difficult to access, or remains clogged after basic cleaning. You should also get help if you smell burning, see scorch marks, notice the dryer shutting off unexpectedly, or suspect a gas leak.
Professional dryer vent cleaning can also be a smart choice for multi-story homes, older homes, rental properties, or households that do laundry daily. A technician can inspect airflow, check duct condition, and remove buildup that a basic household vacuum may not reach.
Extra Tips to Keep Your Dryer Cleaner Longer
- Shake out clothes before placing them in the dryer to reduce lint clumps.
- Sort heavy fabrics from lightweight fabrics for more even drying.
- Use the washer’s high-spin setting when appropriate to remove extra water before drying.
- Keep the laundry room floor swept and dust-free.
- Do not dry items with oil, gasoline, or flammable residue.
- Check pockets before drying clothes to avoid ink, gum, crayons, and melted surprises.
- Leave the dryer door open briefly after wiping the drum so moisture can escape.
Real-Life Experience: What Cleaning a Dryer Actually Teaches You
The first time you deep clean a clothes dryer, you may feel slightly betrayed. You clean the lint screen every load, so surely the machine is clean, right? Then you slide a vacuum crevice tool into the lint trap housing and pull out enough fuzz to knit a small decorative squirrel. That is the moment most people realize dryer cleaning is not just a quick swipe; it is a full airflow rescue mission.
One useful experience is learning how drying time tells a story. When a dryer is clean, towels usually dry predictably. When lint builds up in the vent, the machine may still heat, tumble, and sound normal, but clothes come out damp around the seams and waistbands. Many people blame the dryer first, assuming it is old or broken. Sometimes that is true, but often the problem is simpler: the dryer cannot push moist air out fast enough. Cleaning the vent can make the appliance feel surprisingly refreshed.
Another lesson is that lint is sneaky. It does not politely stay on the lint screen like a well-trained houseguest. It drifts under the screen, behind the dryer, into the vent hose, and around the exterior vent flap. Homes with pets tend to collect even more debris because pet hair mixes with fabric lint and forms little gray tumbleweeds. If you dry fleece blankets, towels, robes, or flannel sheets, expect the lint trap housing to need extra attention.
Dryer sheets can also be trickier than they look. They smell fresh and feel harmless, but they may leave a film on the lint screen and moisture sensors. The screen may look clean while quietly blocking airflow. A simple water test can reveal the problem. If water beads up on the screen instead of flowing through, it is time for warm water, dish soap, and a soft brush. This small cleaning habit can improve performance without replacing parts.
People also learn quickly that the space behind the dryer deserves respect. It is often dusty, cramped, and awkward, but it matters. A crushed vent hose can slow airflow even if the hose is clean. When pushing the dryer back, check that the duct is not flattened. That final two-minute inspection can prevent weeks of slow drying.
The best experience-based tip is to turn dryer cleaning into a routine instead of a rescue operation. Keep a flexible lint brush near the laundry area. Vacuum the lint trap slot when you vacuum the laundry room. Put “clean dryer vent” on a yearly home maintenance calendar. Once the habit is built, the job feels less like a dramatic appliance intervention and more like basic home care. Your clothes dry faster, your dryer works less, and your laundry room smells cleaner. Even better, you get the quiet satisfaction of knowing lint has lost another battle.
Conclusion
Learning how to clean a clothes dryer is a practical skill that protects your appliance, your clothes, your energy bill, and your home. Start with the lint screen, then work deeper: lint trap housing, drum, moisture sensors, vent hose, wall duct, exterior vent, and the area around the dryer. The process is not glamorous, but neither is waiting 90 minutes for socks to dry.
Clean airflow is the secret to better dryer performance. Once you make dryer maintenance part of your normal routine, laundry day becomes faster, safer, and a little less annoying. And honestly, any chore that helps towels dry properly deserves a small round of applause.