Table of Contents >> Show >> Hide
- Step 1: Pick the Right Spot (Because Sunlight Isn’t Optional)
- Step 2: Choose a Container That Matches Your Plant’s Ambitions
- Step 3: Use the Right Soil (Spoiler: Not Yard Dirt)
- Step 4: Pick Plants That Play Nice Together
- Step 5: Plant Like a Pro (It’s Mostly About Gentle Handling)
- Step 6: Water and Feed Consistently (Containers Don’t Have Backup Reserves)
- Common Container Garden Problems (and Quick Fixes)
- Real-World Container Gardening Experiences and Lessons (The Extra You’ll Be Glad You Read)
- Conclusion
Want a garden but don’t have a yard? Congratulations: you’re the exact target audience for container gardening.
With a few pots (okay, “planters” if you want to sound fancy), the right soil, and a little know-how, you can grow
herbs on an apartment balcony, flowers by your front door, or tomatoes on a sunny pationo shovel-required
relationship with your lawn.
The best part: container gardens are flexible. You can move them to chase sunlight, protect them from storms,
and “redecorate” by swapping plants like you’re curating a tiny outdoor art gallery. The trick is setting things up
correctly from day onebecause a container garden is basically a small ecosystem that relies on you for the basics:
water, nutrients, and a home that doesn’t turn into a swamp.
Below are six genuinely easy steps (no “Step 17: Achieve inner peace” nonsense) to plant a container garden that looks
good, grows well, and doesn’t make you question your life choices every July.
Step 1: Pick the Right Spot (Because Sunlight Isn’t Optional)
Before you buy anything, stand in your space and figure out what kind of light you actually have. Most “sun-loving”
plants (many vegetables and flowering annuals) want around 6+ hours of direct sun per day. Leafy greens and many herbs
can tolerate less, especially if your afternoons are brutally hot.
Do a quick light check
- Morning sun + afternoon shade: Great for herbs, greens, and flowers that hate scorching heat.
- All-day sun: Perfect for tomatoes, peppers, basil, and many blooming plantsjust plan for more watering.
- Mostly shade: Think shade-tolerant ornamentals, ferns, some leafy greens, and a “cozy woodland vibe.”
Also consider wind. Balconies can be windy, and wind turns containers into plant dehydration machines. If you’ve got a
breezy spot, use heavier pots, tuck containers near a wall, or group them together so they shelter each other.
Step 2: Choose a Container That Matches Your Plant’s Ambitions
Your container is your plant’s entire world. If it’s too small, roots get crowded, soil dries out fast, and your plant
will look like it’s auditioning for a dramatic “before” photo. If it’s big enough, you’ll water less and your plant can
grow to its full potential.
Size guidelines that actually help
- Herbs (basil, parsley, cilantro): 6–10 inches wide for one plant; bigger if mixing multiple herbs.
- Lettuce, arugula, spinach: Wide and shallow works (think bowls or window boxes), as long as there’s drainage.
- Peppers / eggplant: Often happiest in larger, deeper pots.
- Tomatoes: Aim for a large container (a common minimum is around a 5-gallon pot, and bigger can mean less watering and more productivity).
- Flowers (mixed arrangements): Go wider than you thinkyou want root room plus visual balance.
Material matters (mostly because of heat and water)
- Terracotta/clay: Beautiful, breathable, and dries out faster. Great if you tend to overwater.
- Plastic/resin: Lightweight and holds moisture longer. Great if you travel or forget to water.
- Fabric grow bags: Excellent drainage and aeration; can dry quickly in heat.
- Glazed ceramic: Attractive, heavier, and usually moderate on moisturejust confirm drainage holes.
The non-negotiable: drainage holes
If your container doesn’t drain, roots sit in water and struggle to get oxygen. That’s not “extra hydration.” That’s
“plants can’t swim.” If the pot has no holes, either drill them (if safe for the material) or use it as a decorative
outer pot with a draining nursery pot inside.
Step 3: Use the Right Soil (Spoiler: Not Yard Dirt)
Container plants rely on potting mix because it’s built for life in a pot: lighter, better-draining, and designed to
hold moisture without becoming a brick. Garden soil is typically too heavy for containers and can drain poorly, which
can lead to root issues.
What to buy
- Potting mix / soilless mix: Often includes ingredients like peat/coir, bark, perlite, and vermiculite.
- Mix with fertilizer included: Convenient for beginners; you’ll still feed later in the season.
- Specialty mixes: Cactus/succulent mix, seed-starting mix, or raised-bed blends (double-check it’s suitable for pots).
Skip the “rocks in the bottom” trick
Putting gravel or rocks at the bottom of pots is a classic gardening myth. It doesn’t improve drainage the way people
hope; it can actually keep more water sitting in the soil above. Instead, use a well-draining potting mix and drainage
holes. If you’re worried about soil washing out, cover the hole with a small piece of mesh, a coffee filter, or a shard
of broken pottery (not a thick rock layer).
Prepping the container
- Check drainage holes and clear any blockages.
- If reusing a pot, rinse it out and brush off old soil residue.
- Add potting mix until the plant’s crown (where stems meet roots) will sit at the right heightusually leaving about 1 inch of space at the top for watering.
Step 4: Pick Plants That Play Nice Together
Container gardening rewards good matchmaking. Plants sharing a pot should want similar sunlight, water, and growing
conditions. Mix a drought-loving succulent with a thirsty basil plant and you’ll end up disappointing at least one of
them daily.
Two easy ways to choose plants
- Edible container: One “main” crop + supporting herbs (example: a patio tomato with basil and chives).
- Ornamental container: A mixed arrangement for color and texture all season.
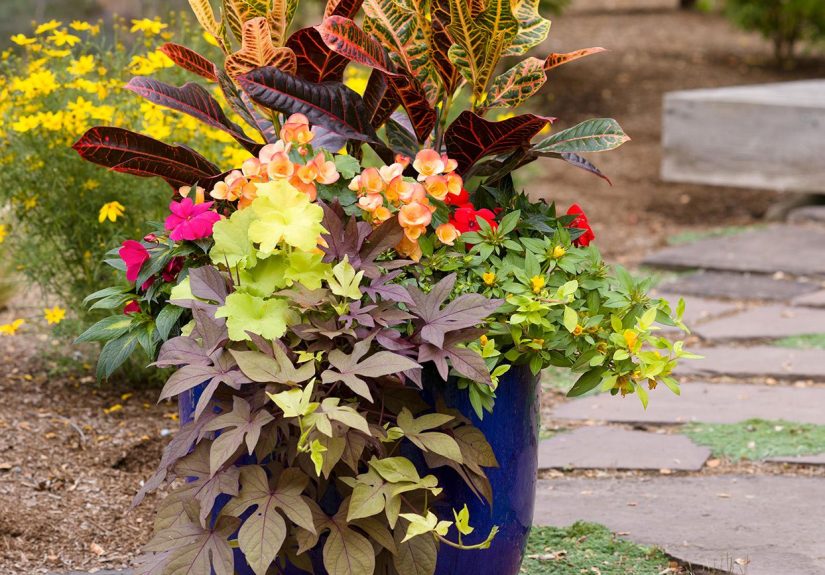
The “Thriller, Filler, Spiller” cheat code (for pretty pots)
If you want a container that looks designed (instead of “I grabbed three plants while on the phone”), try this:
- Thriller: The tall focal plant (e.g., ornamental grass, canna, salvia).
- Filler: Medium-height, mounding plants (e.g., coleus, petunias, calibrachoa).
- Spiller: Trailing plants that cascade over the edge (e.g., sweet potato vine, bacopa, trailing verbena).
Container-friendly plant choices
- Vegetables: Cherry tomatoes, peppers, bush cucumbers, compact zucchini, salad greens.
- Herbs: Basil, thyme, oregano, parsley, mint (mint is happiest when containedotherwise it behaves like it pays rent everywhere).
- Flowers: Marigolds, zinnias, geraniums, begonias, calibrachoa, impatiens (depending on sun/shade).
Step 5: Plant Like a Pro (It’s Mostly About Gentle Handling)
Planting in containers is simple, but small details make a big difference. Your goal is to give roots immediate contact
with fresh mix, eliminate big air pockets, and water thoroughly so the plant settles in without stress.
How to plant in a container
- Moisten the potting mix slightly if it’s bone-dry. Lightly damp soil is easier to work with and hydrates more evenly.
- Remove the plant gently. Squeeze the nursery pot sides to loosen the root ball and slide it out.
- Loosen circling roots. If roots are tightly wrapped, tease them apart with your fingers so they’ll grow outward.
- Set the right depth. Most plants should sit at the same depth they were in their nursery pot.
- Backfill and firm lightly. Add mix around the root ball, pressing gentlyno need to compact like you’re building a sandcastle fortress.
- Leave headspace. Keep about 1 inch at the top so water doesn’t immediately overflow.
- Water thoroughly. You want water to run out of the drainage holesthis helps settle the soil evenly.
If you’re using seedlings: harden them off
If your plants have been living indoors or in a sheltered greenhouse, don’t toss them into full sun and wind all at once.
“Hardening off” means gradually exposing seedlings to outdoor conditions over about a week or two. Start with a shaded,
protected spot, bring them in at night, and increase sun exposure a bit each day. This reduces transplant shock and helps
them adjust to real-world weather.
Step 6: Water and Feed Consistently (Containers Don’t Have Backup Reserves)
In-ground plants can search for water and nutrients beyond the immediate root zone. Container plants can’t. They’re
depending on the small volume of soil you gave them, which means you’re now the “watering schedule” and the “fertility
plan.” No pressure.
Watering rules that save plants
- Water deeply, not just a sip. Water until you see runoff from the drainage holes.
- Check before you water. Stick a finger into the soil. If the top inch feels dry, it’s usually time.
- Expect more watering in heat. Hot, windy days can mean daily watering for small pots.
- Morning is ideal. Plants start the day hydrated and foliage dries faster.
A helpful mental model: wetting a container thoroughly often takes more water than people expect, especially with larger
pots and dry potting mix. Don’t be surprised if your first “real watering” feels like you’re refilling a tiny swimming pool.
The goal is evenly moist soil, not a dry core hiding under a damp surface.
Feeding: why containers get hungry fast
Potting mix doesn’t contain endless nutrients, and frequent watering gradually washes nutrients out. Many gardeners use a
slow-release fertilizer at planting time (often lasting a few months) and then supplement later with a liquid fertilizer.
Edibles like tomatoes and peppers are especially appreciative of consistent feeding once they start growing fast.
- Slow-release fertilizer: Mix into the potting soil at planting, following label rates.
- Liquid fertilizer: Useful mid-season; apply as directed (more is not betterplants don’t “bulk” like gym influencers).
- Compost: Great as a top-dressing, but don’t rely on it alone for heavy-feeding vegetables.
Quick mid-season maintenance checklist
- Pinch and harvest: Herbs get bushier when harvested regularly.
- Deadhead flowers: Many annuals bloom longer when spent flowers are removed.
- Stake tall plants early: Tomatoes and some flowers need support before they flop.
- Scout for pests weekly: Check undersides of leaves for aphids or mites; catch problems early.
- Mulch the top: A thin layer of straw or bark can slow evaporation and reduce splashy soil.
Common Container Garden Problems (and Quick Fixes)
“My plant looks droopy… but the soil is wet.”
Wet soil plus drooping can signal poor drainage or overwateringroots need oxygen. Make sure drainage holes are open, avoid
saucers that hold standing water, and let the top inch or two dry before watering again.
“My leaves are yellowing.”
Yellow leaves can mean several things, but in containers it’s often a nutrient issue or inconsistent watering. Confirm
you’re watering thoroughly (not just wetting the surface), then consider a balanced fertilizer according to label directions.
“Everything dries out instantly.”
Small pots, terracotta, full sun, and wind make drying happen fast. Move containers to a slightly more sheltered spot,
use larger containers, group pots together, or consider self-watering containers if you want a little backup support.
Real-World Container Gardening Experiences and Lessons (The Extra You’ll Be Glad You Read)
A funny thing happens the first time someone grows in containers: the plants don’t just growthey teach. The lessons are
rarely complicated, but they’re memorable because they show up as very visible results. For example, many beginners discover
the “small pot penalty” in mid-summer. Everything looks adorable in May. By July, that same pot can feel like a thimble
holding a full-size plant. The soil dries faster, the plant wilts sooner, and suddenly watering becomes a daily ritual.
The takeaway is simple: going bigger often makes container gardening easier, not harder. Larger containers buffer moisture
swings and give roots more room to behave like roots instead of frustrated commuters stuck in traffic.
Another common experience is learning the difference between “watering” and “wetting.” A quick splash on top can leave the
center of the pot dryespecially with potting mixes that repel water when they’re very dry. Many gardeners have a moment
where they water, walk away feeling responsible, and come back later to a plant that’s still droopy. That’s usually the day
they start watering slowly and deeply until runoff appears. Some even switch to bottom-watering for small pots or use a
watering wand to avoid blasting soil out of the container like a tiny mud geyser.
Plant pairing also becomes a real-life puzzle. It’s tempting to mix everything you love into one potbasil, rosemary,
petunias, and maybe a strawberry plant because why not. But containers reward compatibility. Many gardeners learn that mixing
a thirsty, fast-growing vegetable with a drought-tolerant herb leads to constant compromise. The pot becomes either too wet
for one plant or too dry for another. A good “experience-based” strategy is to group plants by shared needs: one pot for
sun-and-water lovers, another for plants that prefer drying out a bit, and a third for shade-friendly options. It feels
organized, and it saves time because your care routine becomes predictable.
There’s also the “microclimate surprise.” A patio corner near a reflective wall can run hotter than expected, while a spot
under an overhang might stay too dry because rain never reaches it. Balcony railings can funnel wind and turn leaves crispy.
Gardeners often respond by adding simple tweaks: pot feet to improve drainage, a thin mulch layer to slow evaporation, or
rolling caddies so containers can be repositioned when the weather changes. That mobility is one of container gardening’s
hidden superpowersuse it. If a heat wave hits, shifting a pot into afternoon shade can prevent stress without sacrificing
growth.
Fertilizer lessons show up later in the season. Early growth is often great because fresh potting mix is “new and nice.”
Then plants hit a growth spurt or start flowering and fruiting, and suddenly they look tiredpaler leaves, fewer blooms, less
vigor. Many gardeners find that a light, consistent feeding routine works better than occasional heavy doses. Slow-release
fertilizer at planting followed by periodic liquid feeding can keep containers productive. The key “experience lesson” is that
containers run on a limited pantry; you don’t need to overfeed, but you do need to restock.
Finally, container gardening teaches confidence. Once someone successfully grows a pot of basil or a bucket tomato, the fear
drops away. People start experimenting: a salsa container (tomato, pepper, cilantro), a pollinator pot full of flowers, or a
salad bowl planter for quick greens. The best experience-based advice is to start with one or two containers, learn their
rhythms, then scale up. The goal isn’t perfectionit’s a living, growing space that makes you smile when you walk past it.
Conclusion
A thriving container garden isn’t about having a “green thumb.” It’s about getting the fundamentals right: enough light,
a container with drainage, quality potting mix, compatible plants, proper planting depth, and a steady routine for water and
nutrients. Follow these six steps and you’ll have a container garden that looks good, grows better, and makes your space feel
instantly more alivewhether you’re working with a balcony, a porch, or a single sunny step.