Table of Contents >> Show >> Hide
- What Is a Constrictor Knot?
- Why Learn More Than One Way to Tie It?
- Before You Start
- 1. Tie the Constrictor Knot with the Rope-End Method
- 2. Tie the Constrictor Knot with the Twisting Method
- 3. Tie the Constrictor Knot with the Folding Method
- 4. Tie a Slipped Constrictor Knot
- Common Mistakes to Avoid
- Constrictor Knot vs. Clove Hitch vs. Double Constrictor
- Best Everyday Uses for a Constrictor Knot
- Real-World Experience: What Using a Constrictor Knot Actually Feels Like
- Conclusion
- SEO Tags
If knots had personalities, the constrictor knot would be the quiet person in the corner who looks polite, says very little, and then absolutely dominates the room. It is compact, powerful, and surprisingly easy to tie once you understand the structure. And unlike some flashy knots that seem born to be photographed, the constrictor knot is more of a workhorse. It shows up when you need to bind, cinch, clamp, or tame something that is trying very hard not to be tamed.
That is exactly why learning how to tie a constrictor knot is worth your time. This binding knot grips hard, holds its shape well, and can be used for everything from bundling sticks and closing sacks to starting lashings and making a quick temporary whipping on a frayed rope end. The catch? It can tighten so aggressively that untying it later may require a knife and a little emotional recovery.
In this guide, you will learn four practical ways to tie a constrictor knot, when each method makes the most sense, common mistakes to avoid, and how this famous knot compares with close cousins like the clove hitch and the double constrictor. By the end, you will not just know the steps. You will know when to use the knot, when not to use it, and why it has earned such a loyal following among campers, sailors, scouts, and people who just want their bundle of loose stuff to stop behaving like a bag of squirrels.
What Is a Constrictor Knot?
The constrictor knot is a tight binding knot built on a structure that resembles a clove hitch, but with an extra crossing tuck that gives it much more bite. That extra tuck is the secret sauce. It creates pressure that helps the knot grip itself and the object it is tied around. In plain English: once tightened, it usually means business.
This knot works best around curved or rounded objects such as poles, bundles, rope ends, hoses, sacks, sticks, dowels, and similar shapes. It is not a great match for broad, flat surfaces because it relies on a shape it can cinch around. Put it on the wrong surface and it becomes less “precision tool” and more “overconfident paperclip.”
It is commonly used as a binding knot, a temporary whipping knot, a bundle-securing knot, and a useful alternative when a clove hitch feels a little too casual for the job.
Why Learn More Than One Way to Tie It?
Because rope has a sense of humor, and it will always behave differently depending on the task. Sometimes you have access to the end of the object you are tying around. Sometimes you do not. Sometimes you are working with a short piece of twine. Sometimes you need a quick-release version. Sometimes you are wrapping a long cord around a bulky item and do not want to perform interpretive dance just to complete the knot.
That is why different tying methods matter. The finished knot is similar, but the route you take to get there changes based on the situation.
Before You Start
Best materials
Thin rope, cord, or twine usually works best for a constrictor knot. The knot can be tied with larger rope for practice, but in real life it often shines when you need a compact, tight binding.
Best surfaces
Choose rounded, slightly compressible, or cylindrical objects whenever possible. Poles, bundles, bag necks, and rope ends are excellent candidates.
Important caution
The constrictor knot is secure because it jams. That is also its biggest downside. If you think you will need to untie it quickly, go with the slipped version or choose another knot altogether.
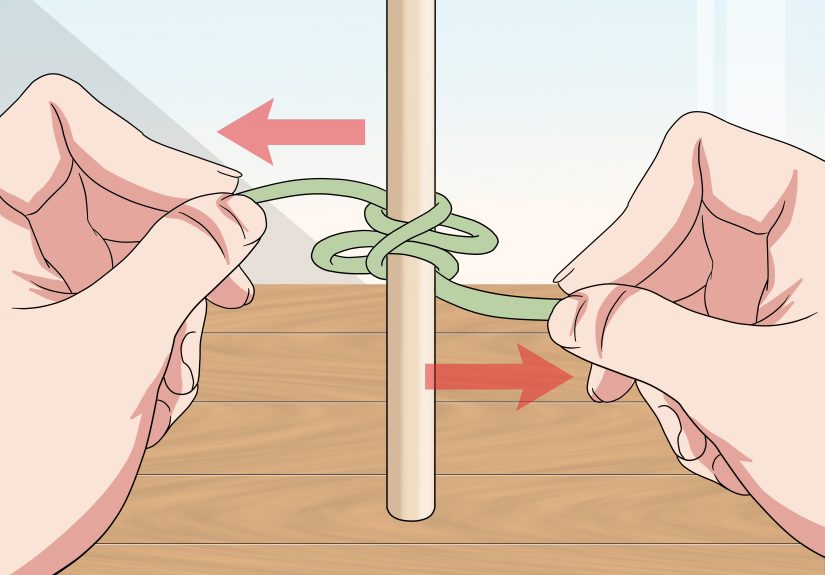
1. Tie the Constrictor Knot with the Rope-End Method
Best for
Using the working end of the rope when you need to wrap around an object directly and cannot slip a pre-formed knot over the end.
How to do it
- Wrap the working end around the object once.
- Cross the working end over the standing part on the front.
- Continue around the object a second time.
- Tuck the working end under itself and under the first wrap so it forms the locking crossing.
- Dress the knot neatly and pull both ends firmly.
Why it works
This is the most direct and dependable method when the rope must first pass around the object. If you are binding firewood, cinching a bag, or tightening cord around a frayed rope end before whipping it properly, this is often the most practical choice.
Pro tip
Take a second to make sure the crossing section is dressed cleanly before tightening. A sloppy constrictor knot can still grip, but a neatly dressed one grips better and looks like you know what you are doing, which is always nice.
2. Tie the Constrictor Knot with the Twisting Method
Best for
Short lengths of cord or situations where you can slip the finished knot over the end of the object.
How to do it
- Hold the cord in both hands.
- Twist it into a loose figure-eight shape, creating two loops.
- Fold the loops together around the center crossing.
- Slip the formed knot over the object.
- Pull both ends to tighten.
Why it works
This method is fast, elegant, and surprisingly satisfying once your hands learn the motion. It is a favorite for temporary whipping on a rope end or quick bindings when you are working with a short piece of twine. In other words, this is the “less talking, more tying” version.
When to skip it
If you cannot access the end of the object, do not fight the rope. Use the rope-end method instead.
3. Tie the Constrictor Knot with the Folding Method
Best for
Longer pieces of cord that would be awkward to twist into shape, especially when preparing a binding to drop over an object.
How to do it
- Lay the cord out and form the needed crossing structure in your hands.
- Fold one loop over the other so the constrictor shape appears.
- Keep the crossing intact while lifting the knot.
- Slip it over the object.
- Pull tight and dress it evenly.
Why it works
The folding method is handy when the twisting method becomes clumsy because the cord is too long or floppy. If the twisting method is the quick magician’s trick, the folding method is the careful engineer. Less flashy, more controlled.
Good use cases
Binding a large glued bundle, organizing poles, or prepping a neat constrictor before placing it over a spar or cylindrical object.
4. Tie a Slipped Constrictor Knot
Best for
Jobs where you want constrictor-knot grip but do not want to enter a long-term relationship with the knot.
How to do it
- Start a normal constrictor knot using the rope-end method.
- Before pulling the final tuck completely through, form a bight in the working end.
- Feed that bight through instead of the whole tail.
- Tighten the knot carefully while leaving the release loop accessible.
- To release, pull the free end or release loop as needed.
Why it works
This version gives you many of the benefits of a standard constrictor knot with a much easier exit strategy. It is ideal for temporary bindings, camp chores, garden jobs, or practice sessions when you would prefer not to cut your rope just because you were being ambitious.
Watch the tradeoff
A slipped constrictor knot is easier to release, but that convenience can slightly reduce the “locked-in” confidence of the regular version. For permanent or semi-permanent bindings, the standard constrictor is still the tougher customer.
Common Mistakes to Avoid
Using it on a flat surface
This knot likes something rounded to hug. On a flat surface, it is less effective and may not bind the way you expect.
Dressing it badly
If the wraps are crossed incorrectly or the locking tuck is messy, the knot may not tighten evenly. A constrictor knot should look compact and orderly before the final pull.
Expecting an easy release
This is not the knot to use when you are likely to say, “I’ll just loosen it later.” That sentence has ended many afternoons badly.
Using it where life safety is involved
The constrictor knot is a binding knot, not a climbing knot. It is excellent for fastening and bundling, but it is not a substitute for knots intended for rescue, rappelling, or load-bearing personal safety systems.
Constrictor Knot vs. Clove Hitch vs. Double Constrictor
Constrictor knot vs. clove hitch
The clove hitch is quicker to adjust and easier to untie, but it is also less secure in many binding situations. The constrictor knot adds that extra locking action, making it the stronger option when security matters more than convenience.
Constrictor knot vs. double constrictor
The double constrictor knot adds an extra riding turn for even more grip, especially useful with slippery twine or when you need a stronger hold. The downside is exactly what you would expect: it is even more likely to jam and can be overkill for simple household tasks.
Best Everyday Uses for a Constrictor Knot
- Binding the neck of a sack or bag
- Making a quick temporary whipping on a frayed rope end
- Holding a bundle of sticks, poles, or cords together
- Starting lashings in campcraft or scouting projects
- Keeping rope strands from unraveling during a splice
- Improvising a temporary clamp around a hose or similar object
- Securing branches or training ties in garden and tree work
Real-World Experience: What Using a Constrictor Knot Actually Feels Like
One of the funniest things about learning the constrictor knot is that it often looks almost too simple to deserve its reputation. The first time many people tie it, they expect something dramatic, maybe a glorious tangle worthy of a maritime opera. Instead, the knot looks compact and humble. Then they tighten it and realize, very quickly, that this little knot is not here to play.
A typical first real-world experience goes like this: someone uses it to bind a loose bundle in the garage, around a bag of yard waste, or on the ragged end of an old rope that has started to fray like a bad haircut. The knot tightens cleanly, the bundle stops shifting, and there is a short moment of triumph. It feels almost unfair. The knot was fast, neat, and stronger than expected. Then comes the second moment, usually later, when that same person decides to untie it. Suddenly the constrictor knot reveals its true personality. It has become one with the object. It has achieved enlightenment. It is no longer interested in your plans.
That experience is exactly why seasoned users respect this knot so much. In camp settings, it is appreciated because it can start a lashing firmly enough that the crossing spar does not wander around while everything else is being wrapped. In rope work, it shines as a quick way to hold fibers together before a proper whipping. In boating and rigging circles, it earns points because it grips even when the setup is awkward and movement is constant. In garden and tree work, it can be useful for securing training ties neatly around supports.
There is also something satisfying about how versatile it feels. The same basic knot can help manage a rope end, tame a bag, secure a bundle, or hold a temporary setup in place while glue dries. It is one of those rare knots that can move from camp gadget to workshop bench to backyard project without looking out of place. That kind of range is part of what makes it memorable. Once people learn it, they tend to start seeing jobs for it everywhere.
But the experience also teaches restraint. A constrictor knot is not a default knot for every task. If you are likely to need frequent adjustment, a clove hitch may be less stubborn. If you need even more grip on slippery cord, a double constrictor may be the better tool. And if quick release matters, the slipped constrictor is the version that saves your sanity. Real experience with the knot usually leads to the same conclusion: it is fantastic when chosen intentionally.
That is probably the best way to describe the feel of working with a constrictor knot. It rewards confidence, clean tying, and good judgment. It is small, strong, and deeply practical. It can make a beginner feel clever and an expert feel efficient. It can also make both of them reach for a knife if they get a little too enthusiastic. In a strange way, that is part of its charm. The constrictor knot is not trying to be friendly. It is trying to hold fast. And honestly, it is very good at its job.
Conclusion
If you only learn one serious binding knot, the constrictor knot deserves a very strong audition. It is compact, secure, and useful in more situations than most people expect. The rope-end method is the practical all-rounder. The twisting method is fast and efficient for short cord. The folding method gives better control with longer material. And the slipped constrictor knot gives you the same general idea without the same level of post-knot regret.
The main lesson is simple: choose the method that matches the job. Use the constrictor knot on rounded objects, dress it neatly, tighten it confidently, and do not expect mercy when it comes time to remove it. Learn it well, and you will start reaching for it whenever something needs to be bound securely and without drama. Well, without too much drama.