Table of Contents >> Show >> Hide
- Why This Chocolate, Hazelnut & Caramel Tart Works
- Recipe Overview
- Ingredients for Chocolate, Hazelnut & Caramel Tart
- How to Make a Chocolate, Hazelnut & Caramel Tart
- Expert Tips for the Best Chocolate Hazelnut Caramel Tart
- Common Mistakes and How to Fix Them
- Serving Ideas
- Storage and Make-Ahead Instructions
- Recipe Variations
- Frequently Asked Questions
- Personal Baking Experience: What This Tart Teaches You
- Conclusion
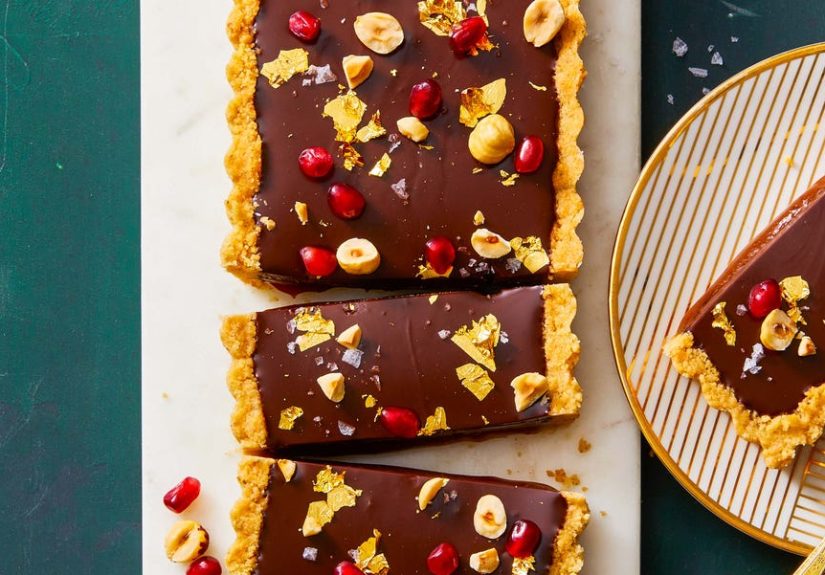
If dessert had a red-carpet moment, this chocolate, hazelnut, and caramel tart would arrive wearing a glossy ganache gown, a buttery hazelnut crust, and just enough flaky sea salt to make everyone whisper, “Who made that?” This is the kind of tart that looks like it came from a boutique bakery, yet it is completely possible to make in a home kitchen without a pastry diploma, a marble counter, or a tiny French chef shouting encouragement from the corner.
This chocolate hazelnut caramel tart recipe is built around three irresistible layers: a crisp hazelnut shortbread-style crust, a soft salted caramel filling, and a smooth chocolate ganache topping. Toasted hazelnuts bring a warm, nutty crunch; caramel adds buttery chew; and chocolate ties the whole thing together like the best friend who remembers everyone’s birthday.
Below, you will learn how to make a chocolate, hazelnut, and caramel tart from scratch, including ingredient tips, step-by-step instructions, storage advice, serving ideas, troubleshooting notes, and real-world baking experience to help you avoid the classic tart tragedies: shrinking crust, scorched caramel, runny ganache, and the deeply personal betrayal of a slice that refuses to cut cleanly.
Why This Chocolate, Hazelnut & Caramel Tart Works
The magic of this tart is contrast. A great dessert does not need to be complicated, but it does need balance. Here, every layer has a job. The crust is sturdy and crisp, so it can hold the rich filling without going soggy. The caramel is sweet, buttery, and slightly salty, so it tastes luxurious instead of flat. The chocolate ganache is silky and deep, giving the tart a truffle-like finish. The hazelnuts provide crunch, aroma, and that familiar chocolate-hazelnut flavor people associate with fancy candies and holiday desserts.
It is also a make-ahead dream. Because the tart needs time to chill and set, it is actually better when prepared several hours before serving. That makes it ideal for dinner parties, Thanksgiving dessert tables, birthdays, date nights, or those “I deserve something spectacular because I folded laundry” evenings.
Recipe Overview
- Recipe name: Chocolate, Hazelnut & Caramel Tart
- Servings: 8 to 10 slices
- Prep time: 35 minutes
- Bake time: 20 to 24 minutes
- Chill time: 2 to 3 hours
- Total time: About 3 hours, mostly hands-off
- Skill level: Intermediate, but friendly
- Best pan: 9-inch tart pan with removable bottom
Ingredients for Chocolate, Hazelnut & Caramel Tart
For the Hazelnut Tart Crust
- 1 cup all-purpose flour
- 1/2 cup finely ground toasted hazelnuts or hazelnut flour
- 1/4 cup powdered sugar
- 1/4 teaspoon fine sea salt
- 8 tablespoons unsalted butter, cold and cubed
- 1 large egg yolk
- 1 to 2 tablespoons ice water, as needed
- 1 teaspoon vanilla extract
For the Salted Caramel Layer
- 3/4 cup granulated sugar
- 3 tablespoons water
- 4 tablespoons unsalted butter, cubed
- 1/2 cup heavy cream, warmed
- 1/2 teaspoon fine sea salt
- 1 teaspoon vanilla extract
- 1/2 cup toasted hazelnuts, roughly chopped
For the Chocolate Ganache
- 8 ounces semisweet or bittersweet chocolate, finely chopped
- 3/4 cup heavy cream
- 1 tablespoon unsalted butter, softened
- 1 tablespoon light corn syrup or honey, optional for shine
- 1/2 teaspoon vanilla extract
For Garnish
- 2 tablespoons toasted hazelnuts, chopped
- Flaky sea salt
- Chocolate shavings, optional
How to Make a Chocolate, Hazelnut & Caramel Tart
Step 1: Toast the Hazelnuts
Preheat the oven to 350°F. Spread the hazelnuts on a baking sheet and toast them for 8 to 10 minutes, stirring once halfway through. They should smell nutty and look lightly golden. If the skins are still on, place the warm nuts in a clean kitchen towel and rub them together. Some skins will cling like they pay rent; that is fine. A little skin adds rustic flavor.
Let the hazelnuts cool completely. Grind enough of them to make 1/2 cup hazelnut flour for the crust, and chop the rest for the caramel layer and garnish.
Step 2: Make the Hazelnut Tart Dough
In a food processor, pulse the flour, ground hazelnuts, powdered sugar, and salt until combined. Add the cold butter and pulse until the mixture resembles coarse crumbs. Add the egg yolk and vanilla, then pulse again. Add ice water, 1 teaspoon at a time, just until the dough begins to clump when pinched.
Turn the dough onto a lightly floured surface and press it into a disk. Do not knead it like bread dough unless you want a crust with the personality of a flip-flop. Wrap the disk and chill it for at least 30 minutes. Chilling helps relax the gluten and firm the butter, which means less shrinking during baking.
Step 3: Shape and Blind Bake the Crust
Roll the chilled dough into an 11-inch circle. Fit it into a 9-inch tart pan with a removable bottom, pressing gently into the corners. Trim the excess dough from the edges. Freeze the shell for 15 minutes while the oven preheats to 375°F.
Line the tart shell with parchment paper and fill it with pie weights, dried beans, or uncooked rice. Bake for 15 minutes, then carefully remove the parchment and weights. Prick the bottom lightly with a fork and bake for another 6 to 9 minutes, or until the crust looks dry and lightly golden. Cool completely before filling.
Step 4: Make the Salted Caramel
In a medium saucepan, combine sugar and water. Cook over medium heat without stirring. Swirl the pan gently if needed, but avoid stirring once the sugar begins to bubble. The syrup will go from clear to pale gold to amber. Watch closely; caramel can go from “beautiful bakery magic” to “campfire regret” in seconds.
When the caramel is deep amber, remove the pan from the heat. Carefully whisk in the butter. The mixture will bubble aggressively, so keep your face and fingers back. Slowly whisk in the warm cream until smooth. Stir in salt and vanilla. Let the caramel cool for 10 to 15 minutes, until thickened but still pourable.
Scatter 1/2 cup chopped toasted hazelnuts over the cooled tart shell. Pour the caramel over the nuts and spread it gently into an even layer. Refrigerate for 30 to 45 minutes, or until the caramel is set enough that it no longer sloshes when moved.
Step 5: Make the Chocolate Ganache
Place the chopped chocolate in a heatproof bowl. Warm the heavy cream in a small saucepan until it is steaming and just beginning to simmer around the edges. Pour the hot cream over the chocolate and let it sit for 3 to 5 minutes. This resting time lets the chocolate melt gently, which helps create a smooth ganache.
Stir slowly from the center outward until the ganache becomes glossy and uniform. Add the softened butter, vanilla, and corn syrup or honey if using. Stir until smooth. If the ganache looks grainy, keep stirring gently; if needed, place the bowl over a pot of barely simmering water for a few seconds at a time.
Step 6: Assemble the Tart
Pour the ganache over the chilled caramel layer. Tilt the pan gently to spread it, or use an offset spatula. Sprinkle the top with chopped hazelnuts and a light pinch of flaky sea salt. Refrigerate the tart for at least 1 1/2 hours, or until fully set.
Before serving, let the tart sit at room temperature for 10 to 15 minutes. This makes the caramel softer, the ganache silkier, and slicing much easier. Use a sharp knife dipped in hot water and wiped dry between cuts for clean bakery-style slices.
Expert Tips for the Best Chocolate Hazelnut Caramel Tart
Use Good Chocolate
Because the ganache is one of the main layers, chocolate quality matters. Choose semisweet or bittersweet chocolate in the 55% to 70% cacao range. Milk chocolate can work, but it makes the tart sweeter. Dark chocolate balances the caramel better and gives the dessert a more sophisticated flavor.
Do Not Rush the Caramel
Caramel rewards patience and punishes multitasking. Keep the heat moderate, stay near the stove, and use a light-colored saucepan if possible so you can see the color change. If the caramel smells burnt, it will taste burnt. There is no frosting thick enough to hide scorched sugar.
Chill Between Layers
The caramel layer needs time to firm before you add the ganache. If you pour warm ganache over warm caramel, the two layers may blend together. It will still taste good, but the clean layered look will disappear. Delicious chaos is still chaos.
Salt Is Not Optional
A small amount of salt makes the chocolate taste deeper, the caramel taste butterier, and the hazelnuts taste nuttier. Without salt, the tart can become overwhelmingly sweet. Use fine sea salt in the caramel and flaky sea salt on top for texture.
Common Mistakes and How to Fix Them
The Crust Shrunk
This usually means the dough was too warm, stretched into the pan, or not rested long enough. Chill the dough before rolling, avoid pulling it into the corners, and freeze the shaped shell briefly before baking. Pie weights also help keep the sides from sliding down.
The Caramel Is Too Hard
If the caramel becomes rock-like after chilling, it likely cooked too long or got too dark. Next time, remove it from the heat when it reaches a medium amber color. Let the tart sit at room temperature before serving to soften the caramel slightly.
The Ganache Is Runny
Runny ganache may need more chocolate or more chill time. Make sure the chocolate is finely chopped and the cream is hot enough to melt it fully. For a firmer tart topping, use a slightly higher chocolate-to-cream ratio.
The Tart Is Hard to Slice
Very cold caramel can cling to the knife. Rest the tart at room temperature for 10 to 15 minutes, then use a hot, dry knife. Wipe between slices. This small move makes you look like someone who casually owns a pastry case.
Serving Ideas
This chocolate, hazelnut, and caramel tart is rich, so slim slices are your friend. Serve it with lightly sweetened whipped cream, vanilla ice cream, espresso, black coffee, or fresh raspberries. The tart also pairs beautifully with a dusting of cocoa powder or a drizzle of warm caramel sauce if you want to lean into the drama.
For a holiday dessert table, garnish the top with whole toasted hazelnuts, gold sprinkles, or chocolate curls. For a more casual dinner, cut it into small bars and serve it finger-food style. It is basically a candy bar that went to finishing school.
Storage and Make-Ahead Instructions
Store the tart covered in the refrigerator for up to 4 days. For the best texture, bring slices to room temperature for 10 minutes before serving. The crust can be baked one day ahead and stored tightly covered at room temperature. The full tart can be assembled the day before serving, making it a smart dessert for parties and holidays.
Freezing is possible, but not ideal. Caramel can change texture after thawing, and ganache may lose some of its glossy finish. If you do freeze it, wrap the tart tightly and freeze for up to 1 month. Thaw overnight in the refrigerator before serving.
Recipe Variations
Chocolate Espresso Hazelnut Tart
Add 1 teaspoon instant espresso powder to the hot cream before making the ganache. Coffee deepens the chocolate flavor without making the tart taste like a latte.
Nutella-Style Tart
Whisk 2 tablespoons chocolate-hazelnut spread into the ganache for an extra creamy, nostalgic flavor. Reduce the garnish slightly so the tart does not become too sweet.
Salted Caramel Pretzel Tart
Add a handful of crushed pretzels to the caramel layer with the hazelnuts. This gives the tart a salty crunch and makes it taste a little like a gourmet candy bar.
Orange Chocolate Hazelnut Tart
Add 1 teaspoon finely grated orange zest to the ganache. Orange brightens the chocolate and makes the tart feel especially festive.
Frequently Asked Questions
Can I use store-bought caramel?
Yes, but choose a thick, high-quality caramel sauce. Thin ice cream topping may not set firmly enough for clean slices. If using store-bought caramel, warm it gently and stir in a pinch of sea salt before spreading it into the tart shell.
Can I make this tart without a food processor?
Absolutely. Whisk the dry crust ingredients together, cut in the cold butter with a pastry cutter or fork, then stir in the egg yolk, vanilla, and ice water. The texture may be slightly more rustic, which is baker code for “still delicious.”
Can I use almonds instead of hazelnuts?
Yes. Almonds, pecans, or walnuts can replace hazelnuts. Hazelnuts give the most classic chocolate-hazelnut flavor, but pecans make the tart warmer and more buttery, while almonds create a cleaner, lighter crunch.
Should this tart be served cold?
It should be stored cold but served slightly softened. Straight from the fridge, the caramel may be too firm and the chocolate less creamy. A short rest at room temperature gives the best texture.
Personal Baking Experience: What This Tart Teaches You
The first time you make a chocolate, hazelnut, and caramel tart, it may feel like three desserts wearing one trench coat. There is the crust, the caramel, and the ganache, and each one seems to have its own tiny rulebook. But once you break the recipe into stages, the process becomes surprisingly calm. Toast the nuts. Make the crust. Let it chill. Bake it. Make the caramel. Let it set. Make the ganache. Let everything relax. Honestly, this tart has better emotional boundaries than most people.
One of the biggest lessons is that temperature matters. Cold butter makes a better crust. Warm cream makes smoother ganache. Slightly cooled caramel pours more neatly. A chilled tart slices better, but a slightly room-temperature tart tastes better. Baking often looks like creativity, and it is, but it is also the gentle management of heat. Once you understand that, the recipe stops feeling intimidating.
The hazelnuts also teach patience. Toasting them may seem like an extra step, but it completely changes the flavor. Raw hazelnuts are mild; toasted hazelnuts are fragrant, bold, and cozy. When they hit the caramel, they add crunch and a roasted flavor that keeps the tart from becoming just “sweet on sweet with more sweet.” It is the difference between a basic chocolate dessert and something people remember.
Caramel is usually the moment that makes home bakers nervous. That is understandable. Hot sugar bubbles like it has something to prove. But the trick is to prepare before you begin. Have the butter cubed, the cream warmed, the whisk nearby, and the salt measured. Once the sugar turns amber, everything moves quickly. The first time you whisk cream into caramel, it may hiss and foam like a dessert dragon. Stay calm. Keep whisking. You are not ruining it; you are making it magnificent.
The ganache layer is the reward. After the drama of caramel, ganache feels soothing. Pour hot cream over chopped chocolate, wait, stir, and suddenly you have a glossy pool of chocolate that looks far more professional than the effort required. It is one of those kitchen techniques that makes you feel instantly more capable. If you can make ganache, you can make truffles, glazes, fillings, and cakes that look like they belong behind glass.
This tart is also a lesson in presentation. A removable-bottom tart pan gives those crisp, elegant edges. A tiny pinch of flaky sea salt makes the top sparkle. A few chopped hazelnuts suggest intention, even if your kitchen currently looks like a powdered sugar snowstorm. When you bring the tart to the table, people notice. They pause. Someone asks if you bought it. That is your moment. Smile mysteriously and say, “Oh, I just made a little tart.” Very casual. Very powerful.
Most importantly, this recipe reminds you that impressive desserts do not have to be perfect. If the caramel layer tilts slightly, nobody cares. If the ganache has one tiny spatula mark, call it artisan. If the crust cracks, patch it with a crumb and keep moving. The final slice still delivers chocolate, caramel, toasted hazelnuts, buttery crust, and a little salt. That combination is almost impossible to argue with.
Conclusion
A chocolate, hazelnut, and caramel tart is the dessert equivalent of a standing ovation. It has crunch, creaminess, sweetness, salt, and deep chocolate flavor in every bite. The recipe takes a little time, but most of that time is chilling and setting, not active work. By using toasted hazelnuts, a fully baked tart shell, a careful salted caramel, and a glossy ganache, you can create a bakery-worthy tart at home with confidence.
Whether you serve it for a holiday, a dinner party, or a quiet weekend treat, this chocolate hazelnut caramel tart recipe delivers the kind of flavor that makes people close their eyes after the first bite. And really, isn’t that the whole point of dessert?