Table of Contents >> Show >> Hide
- Why a Raven Wreath Works So Well for Halloween
- Materials You’ll Need
- How to Make a DIY Scary Ravens Wreath for Halloween
- Design Ideas to Match Your Halloween Style
- Common Mistakes to Avoid
- How to Make It Last Through Halloween
- Real-Life DIY Experiences With a Scary Ravens Wreath for Halloween
- Conclusion
Some Halloween decorations whisper. A scary ravens wreath absolutely caws. It tells the neighborhood that candy is available, the vibes are haunted, and your front door has officially joined the dark side. Better yet, this project looks dramatic without requiring the crafting skills of a sorcerer. If you can use wire cutters, wrangle ribbon, and survive a mild disagreement with a hot glue gun, you can make a wreath that looks expensive, eerie, and gloriously custom.
A DIY scary ravens wreath for Halloween works because it blends three things people love about spooky décor: texture, silhouette, and mood. Ravens and crows instantly create that gothic, slightly theatrical look. A twiggy grapevine base adds a wild, haunted-nest feel. Black florals, feathers, moss, ribbon, and a few strategically placed creepy accents build dimension so the wreath looks rich instead of flat. In other words, you are not just hanging décor on a door. You are curating a tiny haunted statement piece with excellent posture.
This guide will show you how to make a Halloween raven wreath that feels stylish, scary, and very photo-worthy. Whether your style leans classic haunted house, modern gothic, or “I would like Edgar Allan Poe to approve my porch,” this project can be adjusted to fit your look and budget.
Why a Raven Wreath Works So Well for Halloween
Ravens bring immediate atmosphere. They are dramatic without being messy, recognizable without being cheesy, and spooky without turning your entry into a horror movie set. Their dark shape stands out beautifully against orange pumpkins, pale siding, wood doors, and warm porch lights. That contrast is exactly what makes a Halloween front door display pop from the sidewalk.
There is also a design reason this idea works so well. A wreath is circular, soft, and traditional. Ravens are angular, sharp, and a little ominous. When you combine the two, you get visual tension in the best possible way. The wreath feels familiar enough for fall decorating, but the birds, black foliage, and distressed details push it straight into Halloween territory.
Another bonus is flexibility. You can make your scary ravens wreath look elegant, creepy, rustic, glamorous, or just plain mischievous. Add black roses for a gothic floral style. Add moss and twisted twigs for a haunted forest look. Add mini skulls, faux berries, or gauzy ribbon if you want more drama. Ravens are basically the little black dress of Halloween décor: they go with everything and instantly make the room feel more dressed up.
Materials You’ll Need
One reason this DIY Halloween wreath is so satisfying is that most of the materials are easy to find at craft and home stores. You can start simple and build up from there.
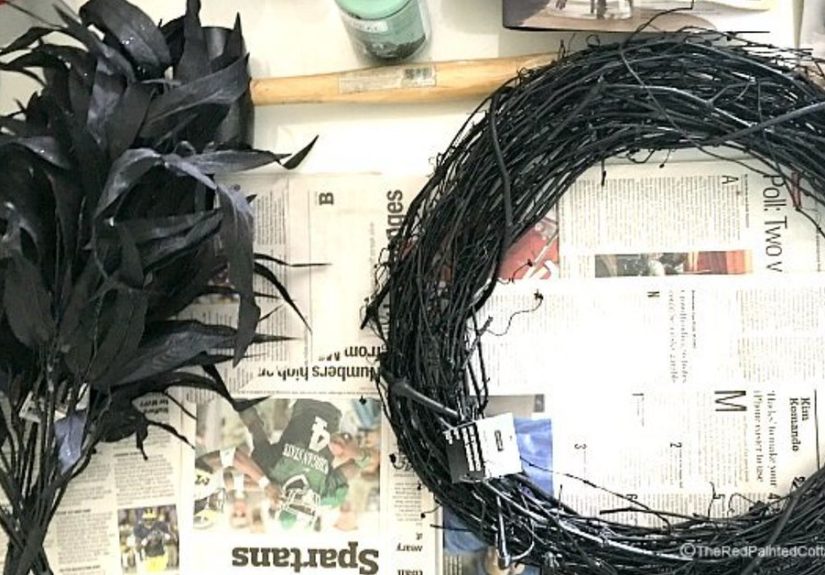
Base Materials
- 14- to 18-inch grapevine wreath, twig wreath, or foam wreath form
- Black spray paint or matte black craft paint
- Floral wire and wire cutters
- Hot glue gun and glue sticks
- Black ribbon, velvet ribbon, or striped Halloween ribbon for hanging
Decorative Elements
- Faux ravens or crows, ideally 2 to 3 for dimension
- Black faux florals such as roses, dahlias, peonies, or leaves
- Feathers, feather boas, or black raffia for texture
- Spanish moss, preserved moss, or dark shredded filler
- Twigs, branches, or curly vine pieces
- Optional accents: mini pumpkins, faux berries, mini skulls, spiders, bells, or battery-operated lights
If you want the quickest version, use a grapevine wreath, black faux stems, one ribbon, and two realistic ravens. If you want a fuller, more theatrical door wreath, add feathers, moss, extra branches, and multiple flower varieties. The secret is not buying everything in the store. The secret is layering enough textures that your eye keeps moving around the wreath.
How to Make a DIY Scary Ravens Wreath for Halloween
1. Choose the Right Wreath Base
A grapevine wreath is the easiest choice if you want an exposed, haunted, natural look. It already has that wild nest-like texture, so it feels especially right for ravens. A foam form works well if you plan to cover nearly the whole surface with ribbon, mesh, feathers, or fabric. For most Halloween raven wreaths, grapevine wins because it looks slightly unruly even before you start, which is honestly the dream.
2. Darken the Base
If your wreath is brown or tan, paint it black. Do not panic if some brown still peeks through. A little variation actually helps the wreath look aged and dramatic instead of looking like it fell into a vat of perfect flat black. Matte paint usually looks moodier than glossy finishes, and mood is the whole assignment here.
3. Build the Main Shape with Branches and Florals
Before gluing anything, lay out the design on a table. Start by tucking in twigs or branches to create direction. Then add your black flowers or leaves in clusters rather than spreading them evenly all the way around. A balanced-but-not-too-balanced arrangement usually looks more designer. Try placing the heaviest florals on one side and letting the ravens visually counterweight the other side.
For larger pieces, use floral wire first and hot glue second. Wire gives support, while glue helps prevent shifting. This is especially important for outdoor use, because wind loves to humble crafters.
4. Add Texture with Feathers, Moss, and Filler
Now comes the magic. Tuck in black feathers around the florals so the wreath starts to look soft, layered, and slightly wild. Add moss in small pockets to fill obvious gaps. If you want a more haunted woodland feel, use twig clusters and moss. If you want a more glamorous gothic look, lean heavier on black petals, velvet ribbon, and feather accents.
Do not cover every inch. Negative space makes the dramatic details stand out. A wreath with a little breathing room looks more intentional than one that appears to be losing a fight with the craft aisle.
5. Position the Ravens
Your faux ravens are the stars, so place them last. Try one perched high and one angled lower, as if they have just landed on the wreath to discuss neighborhood business. Avoid putting them side by side like two polite office coworkers in matching suits. A slightly staggered placement feels more alive and more eerie.
If your birds have clips, test the hold. If they feel loose, reinforce them with floral wire. Heavier birds should always be wired to the base. Glue alone is great for lightweight pieces, but a raven that dives off the door every time someone closes it is less “haunted chic” and more “craft project in crisis.”
6. Add a Finishing Accent
This is where you decide the wreath’s personality. A wide black velvet ribbon makes it look elegant. A striped black-and-white ribbon gives it a vintage Halloween feel. Deep orange berries or tiny pumpkins warm it up and help it tie into fall porch décor. Small skulls or spiders make it more obviously spooky. You can even add a tiny hanging sign that says “Beware,” “Nevermore,” or “Enter If You Dare” if you want a little wink.
7. Hang It Correctly
Use a ribbon loop, over-the-door hanger, or the right adhesive or magnetic method for your door type. The goal is simple: the wreath should look centered, stable, and secure. If it is heavy, make sure the hanging method can actually handle the weight. There is nothing festive about hearing your masterpiece hit the porch at 2 a.m.
Design Ideas to Match Your Halloween Style
Classic Gothic
Use black roses, ravens, matte black twigs, and velvet ribbon. Keep the palette mostly black with just a touch of gray or silver. This version looks dramatic and upscale, like your front door might lead to a candlelit library full of secrets.
Haunted Forest
Mix grapevine, branches, moss, feathers, and a couple of ravens with slightly rumpled wings. Add muted pumpkins or dried-looking foliage. This version feels organic, earthy, and just spooky enough to make people slow down on the walkway.
Glam Halloween
Add glittered black leaves, deep plum flowers, metallic accents, and maybe a tiny hint of gold. This is the wreath for people who want Halloween with a side of drama and excellent lighting.
Farmhouse Spooky
Keep the base rustic, add crows, a burlap or striped ribbon, and a restrained amount of orange berries or mini pumpkins. It is still creepy, but in a “I bake pies and also decorate with ominous birds” kind of way.
Common Mistakes to Avoid
Using only glue for everything: Heavy items need floral wire support. Glue is helpful, but it should not be carrying the whole emotional burden of the project.
Making it too symmetrical: Perfect symmetry can make a spooky wreath look stiff. A little asymmetry adds life and movement.
Ignoring texture: A flat wreath often looks unfinished. Mix smooth petals, rough twigs, soft feathers, and wiry branches.
Overcrowding the design: Too many accents can make the wreath look busy instead of dramatic. Pick a few strong elements and let them shine.
Skipping a test hang: Always hang the wreath before calling it done. Sometimes what looks balanced on a table looks slightly weird on a vertical door, and it is much easier to tweak before the glue fully sets into a lifelong commitment.
How to Make It Last Through Halloween
If the wreath will hang on a covered porch, faux materials should hold up nicely through the season. If it will sit in full weather, choose sturdier faux stems, secure everything tightly, and avoid delicate paper details. Store it in a bin or large wreath box after Halloween so the ravens, ribbon, and branches do not get crushed in the off-season. A little care means you can reuse the same wreath year after year and still feel smug about how good it looks.
You can also update the same base over time. Remove the spiders and tiny pumpkins, keep the black florals and birds, and suddenly you have a moody fall wreath that works into November. That kind of decorating efficiency deserves applause and perhaps a second piece of candy.
Real-Life DIY Experiences With a Scary Ravens Wreath for Halloween
One of the most relatable experiences with a DIY scary ravens wreath for Halloween is realizing the project looks slightly underwhelming for the first twenty minutes. You start with a plain wreath base, a few black stems, and two fake birds staring at you from the table like judgmental managers. At that stage, it is very normal to wonder whether you have made a bold artistic choice or simply purchased several depressing craft supplies. Then you start layering. A branch goes in. A ribbon softens the edge. Moss fills the awkward gap. Suddenly the wreath begins to shift from “garage sale leftovers” to “haunted front-door masterpiece.” Halloween crafts are funny that way. They often look questionable right up until the moment they absolutely work.
Another common experience is discovering that ravens are all about placement. Move one bird half an inch and the whole wreath changes personality. Perch a raven at the top and it looks watchful. Angle one on the side and it feels like movement. Put two birds too close together and it starts to look like they are waiting in line for coffee. This is part of the fun. The project becomes less about following strict rules and more about playing with mood. That is why so many people end up loving this craft even if they do not usually think of themselves as “creative.” The wreath gives immediate visual feedback. Every little adjustment makes a difference, and that makes the process feel rewarding.
There is also the delightful experience of seeing the wreath in its natural habitat for the first time: on the actual front door. On the table, it is a craft. On the door, it becomes a statement. Porch lights hit the feathers differently. The black florals look richer. The birds cast tiny shadows. Suddenly the whole entrance feels styled, and not in an overdone way. It is often the piece that makes people want to add a couple of pumpkins, maybe a lantern, maybe some dark mums, and before long the front porch has turned into a full seasonal display. The wreath has a funny way of starting an innocent little decorating spiral.
Then there is the reaction from other people, which is genuinely part of the experience. Friends notice it. Kids point at the birds. Delivery drivers absolutely clock it. Neighbors suddenly begin upgrading their own porches, which may or may not be a coincidence. A good Halloween wreath becomes conversation décor. It says something about your style before anyone even knocks. And because it is handmade, people tend to ask where you bought it, which is the exact moment you get to casually say, “Oh, I made it,” as if you did not spend forty minutes debating feather placement like it was a national emergency.
Finally, making a scary raven wreath is one of those rare seasonal projects that feels useful beyond the craft table. It is decorative, reusable, adaptable, and personal. You can make it dramatic or playful, elegant or eerie, simple or full-on gothic. The best part is that it does not have to be perfect to look good. In fact, a little wildness often makes it better. Slightly crooked twigs, uneven moss, and moody asymmetry all add character. So the experience is not really about creating something flawless. It is about building something atmospheric, memorable, and fun enough that you will be excited to hang it again next year. That is a pretty good outcome for a project involving fake birds and a glue gun.
Conclusion
A DIY scary ravens wreath for Halloween is one of the smartest ways to make your home look festive without covering every square inch in skeletons and fog machines. It is dramatic, customizable, and surprisingly manageable for a weekend project. With the right base, layered textures, and carefully placed ravens, you can create front door décor that feels polished, spooky, and full of personality. Make it bold, make it eerie, and make it yours. Then hang it up, step back, and enjoy the sweet seasonal satisfaction of having the coolest haunted door on the block.