Table of Contents >> Show >> Hide
- Why This 5-Minute Chocolate Fudge Works
- Recipe Overview
- Ingredients for Easy 5-Minute Chocolate Fudge
- Equipment You Need
- How to Make 5-Minute Chocolate Fudge
- Best Tips for Smooth Microwave Fudge
- Flavor Variations
- How to Store Chocolate Fudge
- Common Mistakes and Easy Fixes
- Serving Ideas
- Why This Recipe Is Great for Beginners
- Experience Notes: What Making Easy 5-Minute Chocolate Fudge Teaches You
- Conclusion
Some desserts ask you to separate eggs, temper chocolate, and whisper encouraging words to a candy thermometer. This Easy 5-Minute Chocolate Fudge Recipe is not one of those desserts. This is the kind of recipe that walks into your kitchen wearing slippers, asks for one bowl, and somehow leaves behind a tray of rich, creamy chocolate squares that taste like you worked much harder than you did.
Classic fudge can be a little dramatic. Traditional versions often involve boiling sugar, watching temperatures, and praying the texture lands somewhere between “velvety candy shop dream” and “edible sidewalk tile.” This quick chocolate fudge skips the drama by using a smart shortcut: sweetened condensed milk. It brings sugar, dairy, and creamy structure in one convenient can, which means your fudge sets beautifully without requiring a culinary degree or a panic button.
This homemade microwave fudge is perfect for holidays, bake sales, movie nights, edible gifts, last-minute guests, or those mysterious evenings when your sweet tooth starts acting like it pays rent. The active work takes about five minutes. You will need chilling time, because fudge needs a nap before it becomes sliceable, but your hands-on effort is wonderfully short.
Why This 5-Minute Chocolate Fudge Works
The magic of this recipe comes from a simple balance of chocolate chips and sweetened condensed milk. When warmed together, the chocolate melts into the thick milk, creating a smooth mixture that firms up as it cools. Vanilla adds warmth, salt sharpens the chocolate flavor, and butter gives the fudge a softer, more luxurious bite.
Unlike old-fashioned fudge, this easy version does not rely on reaching the soft-ball stage or beating the mixture until your arm files a complaint. Instead, it uses dependable pantry ingredients and gentle microwave heat. That makes it a beginner-friendly fudge recipe that still tastes rich enough to earn a spot on a dessert table.
Recipe Overview
- Prep time: 5 minutes
- Chill time: 1 to 2 hours
- Total time: About 1 hour 10 minutes
- Yield: 36 small squares
- Skill level: Easy
- Best for: Holidays, gifts, parties, quick desserts, chocolate emergencies
Ingredients for Easy 5-Minute Chocolate Fudge
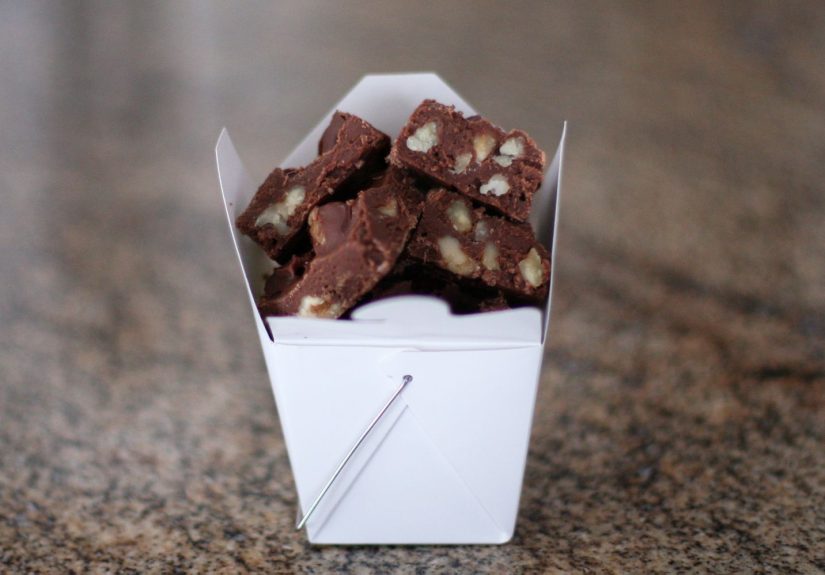
- 3 cups semi-sweet chocolate chips
- 1 can sweetened condensed milk, 14 ounces
- 2 tablespoons unsalted butter
- 1 teaspoon pure vanilla extract
- 1/4 teaspoon fine sea salt
- 1/2 cup chopped walnuts or pecans, optional
- Flaky sea salt, crushed peppermint, mini marshmallows, or sprinkles for topping, optional
Ingredient Notes
Semi-sweet chocolate chips are the easiest choice because they melt well and bring enough sweetness without turning the fudge into a sugar avalanche. Dark chocolate chips work if you like a deeper flavor. Milk chocolate chips make a sweeter, softer fudge, so consider using half milk chocolate and half semi-sweet if you want balance.
Sweetened condensed milk is essential. Do not use evaporated milk. They sit near each other at the store like practical jokers, but they are not interchangeable. Sweetened condensed milk is thick and sugary; evaporated milk is thinner and unsweetened. One makes fudge. The other makes confusion.
Butter adds silkiness and helps the fudge taste more rounded. You can skip it in a pinch, but the final texture will be slightly firmer.
Vanilla and salt are small ingredients with big personalities. Vanilla makes the chocolate taste warmer, while salt keeps the sweetness from becoming too loud.
Equipment You Need
- Microwave-safe mixing bowl
- Rubber spatula or wooden spoon
- 8-inch square baking pan
- Parchment paper or foil
- Sharp knife for slicing
How to Make 5-Minute Chocolate Fudge
Step 1: Prepare the Pan
Line an 8-inch square pan with parchment paper, leaving a little overhang on two sides. This creates handles so you can lift the fudge out later. Lightly grease the parchment if you want extra insurance. Fudge is wonderful, but it can be clingy.
Step 2: Combine the Base Ingredients
Add the chocolate chips, sweetened condensed milk, butter, and salt to a large microwave-safe bowl. Use a bowl with extra room because stirring melted chocolate in a tiny bowl is how kitchen counters become abstract art.
Step 3: Microwave Gently
Microwave the mixture for 60 seconds. Stir well. If the chocolate is not fully melted, microwave in 20- to 30-second intervals, stirring after each round, until smooth. The goal is gentle melting, not chocolate lava. Overheating can make chocolate thick, dull, or grainy.
Step 4: Add Flavor and Mix-Ins
Stir in the vanilla extract. If you are using nuts, mini marshmallows, crushed cookies, dried cherries, or peppermint pieces, fold them in now. Work quickly because the fudge begins thickening as it cools.
Step 5: Spread and Chill
Scrape the fudge mixture into the prepared pan. Smooth the top with a spatula. Add any toppings while the surface is still soft. Refrigerate for 1 to 2 hours, or until firm. Once set, lift the fudge from the pan and cut it into small squares.
Best Tips for Smooth Microwave Fudge
Use Medium or Short Bursts of Heat
Chocolate prefers patience. Even in a 5-minute recipe, rushing the melting process can cause trouble. Microwave in short bursts and stir often. The chocolate may look unmelted at first, but stirring distributes heat and often finishes the job without extra cooking.
Choose the Right Pan Size
An 8-inch square pan gives you thick, gift-worthy fudge. A 9-inch square pan creates thinner pieces that are easier to snack on. Both work, but avoid a very large pan unless you want fudge that resembles chocolate floor tile.
Let It Chill Fully Before Cutting
The hardest part of this easy chocolate fudge recipe is waiting. If you slice too soon, the pieces may smear or bend. For clean cuts, chill until firm, then use a sharp knife. Wiping the knife between cuts makes the squares look tidy and bakery-level fancy.
Do Not Skip the Salt
A tiny amount of salt makes chocolate taste more chocolatey. It does not make the fudge salty unless you add a generous flaky topping. Think of salt as the stage manager: you may not notice it directly, but the whole performance improves.
Flavor Variations
Rocky Road Fudge
Fold in 1 cup mini marshmallows and 1/2 cup chopped walnuts. This version is chewy, crunchy, and dangerously easy to justify as “just one more piece.”
Peppermint Chocolate Fudge
Add 1/2 teaspoon peppermint extract and sprinkle crushed candy canes over the top. This is a holiday classic and looks festive without requiring advanced decorating skills.
Peanut Butter Swirl Fudge
Drop spoonfuls of warm peanut butter over the fudge before chilling, then swirl with a knife. Do not overmix unless you want peanut butter chocolate fudge instead of a pretty swirl. Both taste great, but one wins the beauty contest.
Mocha Fudge
Stir 1 teaspoon instant espresso powder into the chocolate mixture before microwaving. Coffee deepens the chocolate flavor without making the fudge taste like a full cup of coffee.
Cookies and Cream Fudge
Fold in chopped chocolate sandwich cookies and sprinkle more on top. This version is especially popular for parties because it looks playful and disappears quickly.
How to Store Chocolate Fudge
Store homemade fudge in an airtight container. At cool room temperature, it usually keeps well for several days. For longer storage, refrigerate it for up to about two weeks. Place parchment or wax paper between layers so the pieces do not stick together.
You can also freeze fudge. Wrap pieces tightly and place them in a freezer-safe container. Thaw in the refrigerator before serving. Frozen fudge is convenient for holiday prep, but please label the container unless you enjoy family members asking, “Is this soup?”
Common Mistakes and Easy Fixes
My Fudge Is Too Soft
Soft fudge usually means it needs more chilling time, the chocolate ratio was too low, or milk chocolate was used without enough semi-sweet chocolate. Return it to the refrigerator. If it still will not firm up, melt it again with an extra 1/2 cup chocolate chips, then chill.
My Fudge Is Grainy
Grainy fudge often comes from overheating or using chocolate that was not stirred smoothly. Next time, microwave in shorter intervals and stir thoroughly. A splash of patience is the secret ingredient nobody puts on the label.
My Fudge Stuck to the Pan
Parchment paper solves this problem beautifully. If you forgot the parchment, run a thin knife around the edges and gently loosen the fudge. Then promise future-you that parchment is not optional.
Serving Ideas
Chocolate fudge is rich, so small squares are best. Serve it with coffee, hot cocoa, cold milk, or fresh berries. For parties, arrange pieces on a platter with cookies, pretzels, and fruit. For gifting, stack squares in a small tin with parchment between layers. Tie it with ribbon and suddenly you are the person who “just whipped up homemade candy,” which is a delightful reputation to have.
This easy fudge also makes a fun dessert board addition. Pair it with salted nuts, graham crackers, marshmallows, dried cherries, orange slices, and mini cookies. The salty and fruity sides balance the richness and make the whole board feel intentional instead of “I raided the pantry at 10 p.m.”
Why This Recipe Is Great for Beginners
This recipe teaches the basic behavior of chocolate without making you manage complicated candy science. You learn how chocolate melts, how condensed milk creates structure, and how chilling changes texture. It is quick, forgiving, and flexible. Even if the top is not perfectly smooth, you can cover it with sprinkles, nuts, or flaky salt and call it rustic. Rustic is just delicious with confidence.
Because the ingredient list is short, quality matters. Use chocolate chips you enjoy eating on their own. If the chocolate tastes flat before melting, it will not suddenly develop a personality in the bowl. Good chocolate, careful heating, and enough chill time are the three simple rules.
Experience Notes: What Making Easy 5-Minute Chocolate Fudge Teaches You
The first experience most people have with 5-minute chocolate fudge is disbelief. You put chocolate chips and sweetened condensed milk in a bowl, microwave them, stir, and suddenly the mixture turns glossy and thick like something from a candy shop window. It feels suspiciously easy, as if there should be a hidden step involving a copper pot or a grandmother named Mildred. But no. The recipe really is that direct.
One practical lesson is that “five minutes” means five minutes of active work, not five minutes until you are eating perfect squares. The fudge needs time to chill and set. This is not a flaw; it is a feature. While it chills, you can wash the bowl, make coffee, wrap gifts, or stand in front of the refrigerator pretending you are not checking it every seven minutes. The waiting builds character. It also prevents chocolate fingerprints on every knife, plate, and possibly doorknob in the house.
Another lesson is that texture depends on small choices. Semi-sweet chocolate gives the fudge a classic balance. Dark chocolate makes it more grown-up and intense. Milk chocolate makes it sweeter and softer. Nuts add crunch, marshmallows add chew, peppermint adds holiday sparkle, and flaky salt makes each bite taste sharper and more expensive than it actually is. Once you understand the base recipe, you can customize it without fear.
Making this fudge also teaches timing. Stirring matters. Short microwave bursts matter. Scraping the bowl while the mixture is still warm matters. If you wait too long, the fudge thickens quickly and becomes harder to spread. That does not ruin it, but it does make the top look more “mountain range” than “smooth dessert square.” Fortunately, toppings are very forgiving. A sprinkle of chopped nuts can hide almost anything. In the dessert world, nuts are basically edible camouflage.
This recipe is especially useful during busy seasons. Around Thanksgiving, Christmas, Valentine’s Day, birthdays, and school events, people often need a homemade treat that does not require half a day. This fudge fits into tiny pockets of time. You can make it before dinner, chill it while everyone eats, and slice it afterward. You can also make it the night before a party and feel wildly prepared, which is one of adulthood’s rare and beautiful feelings.
The best experience, though, is sharing it. Fudge has a way of making people slow down. Someone takes a square, then another smaller square “just to even out the row,” which is dessert logic at its finest. Homemade chocolate fudge feels nostalgic even when made in a microwave. It tastes like holidays, lunchbox surprises, bake sales, and kitchen counters dusted with cocoa memories. And because this version is so simple, it invites people to make it again instead of filing it under “nice but exhausting.”
In the end, this Easy 5-Minute Chocolate Fudge Recipe proves that a dessert does not need to be complicated to feel special. It needs good chocolate, a reliable method, a little patience, and someone willing to cut the edge pieces for quality control. That someone may be you. The job is difficult, but somebody has to do it.
Conclusion
This Easy 5-Minute Chocolate Fudge Recipe is rich, creamy, flexible, and wonderfully low-stress. With chocolate chips, sweetened condensed milk, butter, vanilla, and salt, you can make homemade fudge that tastes classic without wrestling with a candy thermometer. Keep the base simple, add your favorite mix-ins, chill until firm, and slice into small squares that look gift-ready and taste dangerously good.
Whether you are making holiday treats, a quick chocolate dessert, or a last-minute homemade gift, this recipe deserves a permanent spot in your kitchen notes. It is fast enough for beginners, tasty enough for serious chocolate fans, and forgiving enough for real life. In other words, it is exactly the kind of dessert recipe we all need: easy, impressive, and unlikely to leave flour on the ceiling.