Table of Contents >> Show >> Hide
- What Soldering Electronics Actually Means
- Tools You Need to Solder Electronics
- Leaded vs. Lead-Free Solder
- How to Solder Through-Hole Components
- How to Solder Surface-Mount Components
- Common Soldering Mistakes and How to Fix Them
- How to Tell if a Solder Joint Is Good
- Desoldering and Rework
- Best Practice Tips for Beginners
- Conclusion
- Extra: Real-World Experiences Learning How to Solder Electronics
If you are new to electronics, soldering can look like a mysterious skill handed down by wise engineers in dimly lit workshops. In reality, it is much simpler than that. Soldering is just the process of using a heated tool and a metal alloy to create a solid electrical and mechanical connection between components. That is the serious definition. The less serious definition is this: you are teaching tiny pieces of metal to become permanent roommates.
Learning how to solder electronics is one of the most useful skills in DIY tech. It helps you repair broken wires, build kits, assemble custom circuit boards, and graduate from “I own a breadboard” to “I made this thing and it actually works.” Better yet, once you understand the basics, the process becomes oddly satisfying. A clean solder joint has the same emotional payoff as a perfectly toasted marshmallow. Not too pale, not scorched, just right.
In this guide, you will learn what tools you need, how to solder through-hole and surface-mount components, how to avoid common mistakes, and how to build confidence without turning your first project into a small metallic crime scene.
What Soldering Electronics Actually Means
In electronics, soldering is used to join a component lead or wire to a conductive pad, terminal, or another wire. The solder itself is not supposed to do all the heavy lifting. The real magic happens when the metal surfaces are heated properly and the solder flows smoothly across them. That flow creates a reliable connection that can carry current and survive normal handling.
This is why good soldering is less about dumping metal on a joint and more about heat control, cleanliness, and timing. If you only remember one sentence from this article, make it this one: heat the connection, not the solder blob. A lot of beginners try to melt solder directly onto the iron and smear it onto the joint like frosting. That may create a connection that looks done, but looks can be hilariously deceptive in electronics.
Tools You Need to Solder Electronics
1. A temperature-controlled soldering iron or station
This is the main character. A basic adjustable station is usually better than a bargain-bin iron that gets as hot as the surface of the sun and stays there. A temperature-controlled iron gives you consistency, which means fewer burnt pads, fewer overheated parts, and less frustration.
2. The right soldering tip
Tip size matters more than many beginners realize. A tiny needle tip looks precise, but it often transfers heat poorly. For most electronics work, a small chisel tip or appropriately sized conical tip is more useful because it gives you enough contact area to heat the joint efficiently. For power connectors or larger pads, use a bigger tip. For fine-pitch work, go smaller, but not so small that it struggles to move heat.
3. Solder wire
You will typically choose between leaded solder and lead-free solder. Leaded solder is easier for beginners because it melts and flows more readily. Lead-free solder is more common in modern manufacturing and may be preferred for environmental or regulatory reasons, but it generally requires a little more heat and patience. Pick one type and stick with it for a project rather than mixing and matching like you are creating a metal smoothie.
4. Flux
Flux is your helpful friend. It cleans the metal surfaces, improves solder flow, and helps prevent oxidation while the joint is being made. Even if your solder wire has a flux core, extra flux can still be extremely helpful, especially for rework, older parts, or stubborn joints.
5. Side cutters, tweezers, and helping hands
You will need flush cutters to trim leads, tweezers for small components, and some method of holding the board steady. A vise, helping hands tool, or board holder can save you from trying to grow a third hand out of pure determination.
6. Desoldering braid or a solder sucker
Mistakes happen. That is not a sign you are bad at soldering. That is a sign you are soldering. Desoldering braid helps soak up excess solder, while a solder pump can help clear larger blobs or through-holes.
7. Safety and cleanup items
Use eye protection, wash your hands after handling solder, and work in a well-ventilated area. A fume extractor or local exhaust setup is a smart upgrade, especially if you solder often. Keep brass wool or a proper tip cleaner nearby so your tip stays clean and ready to transfer heat.
Leaded vs. Lead-Free Solder
One of the first decisions you will make when learning how to solder electronics is which solder alloy to use. Leaded solder is often considered easier for hand soldering because it melts at a lower temperature and tends to flow nicely. Many hobbyists like it for practice and repair work. Lead-free solder is widely used in commercial electronics and usually needs a slightly higher iron temperature. It can also be a little less forgiving on dirty or oxidized surfaces.
Neither choice turns you into a wizard overnight. What matters most is understanding the behavior of the solder you are using. If you switch from leaded to lead-free and suddenly feel like your iron forgot how to do its job, that is normal. The solder changed the rules on you.
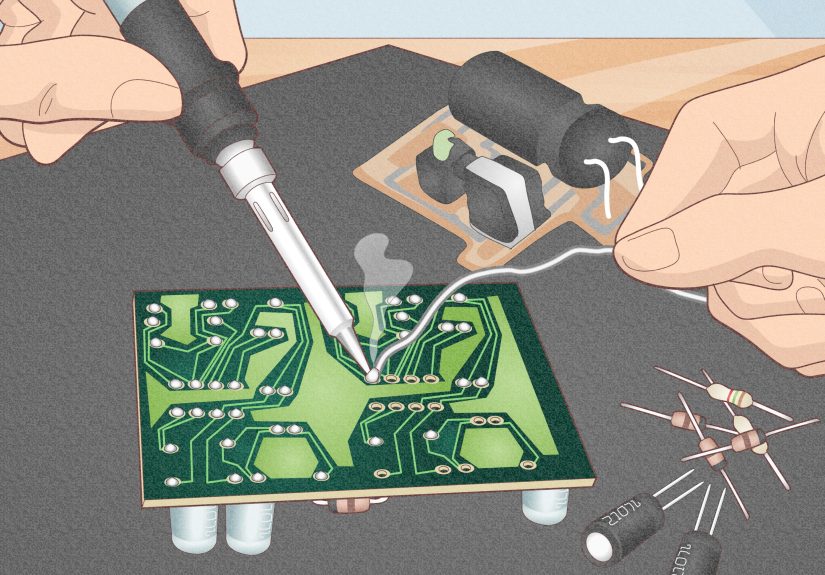
How to Solder Through-Hole Components
Through-hole soldering is the classic starting point because the components are larger and easier to handle. If you are learning how to solder electronics for the first time, start here before wrestling tiny surface-mount parts that resemble glitter with opinions.
Step 1: Prepare the workspace
Turn on your soldering station and let it reach temperature. Secure the board so it does not slide around. Clean and tin the tip by wiping it on your cleaner and adding a small amount of fresh solder. A shiny, wetted tip transfers heat much better than a crusty, oxidized one.
Step 2: Insert the component
Place the component leads through the correct holes in the PCB. Slightly bend the leads on the back side if needed so the part stays in place while you solder.
Step 3: Heat the pad and the lead together
Touch the iron tip so it contacts both the copper pad and the component lead at the same time. This is the moment that matters. You are heating the connection itself, not just warming up the iron for dramatic effect.
Step 4: Feed solder into the joint
After a second or two, feed solder into the heated joint, not directly onto the iron tip. If the joint is hot enough, the solder will flow around the lead and across the pad. You usually need less solder than you think. Beginners often build heroic mountain ranges where a neat little cone would do.
Step 5: Remove solder, then iron
Once the joint is filled, remove the solder wire first, then the iron. Let the joint cool without moving it. If you wiggle the part while the solder is still solidifying, you can create a weak or grainy connection.
Step 6: Inspect and trim
A good through-hole joint usually looks smooth, shiny, and slightly concave, not like a round ball sitting on top of the pad. Trim the excess lead with flush cutters once the joint has cooled.
How to Solder Surface-Mount Components
Surface-mount soldering can feel intimidating, but the basic logic is the same. The parts are smaller, your tools matter more, and your patience gets a full workout.
Method 1: Tack one side first
For small resistors, capacitors, and similar parts, add a little solder to one pad first. Hold the component with tweezers, reheat that pad, and slide the component into place. Once it is aligned, solder the other side. Then go back and touch up the first side if needed.
Method 2: Drag soldering for fine-pitch pins
For chips with many closely spaced leads, use flux generously. Tack the chip in place, then add a small amount of solder to your tip and gently drag it across the pins. The flux helps the solder flow where it belongs. If you create bridges, do not panic. Add more flux and clean up the excess with solder wick.
Method 3: Solder paste and hot air
For more advanced work, solder paste and hot air can make surface-mount assembly easier. Apply a small amount of paste to the pads, place the component, and heat the area until the solder reflows. Surface tension often helps pull the component into alignment. It is one of the rare moments in electronics when the parts actually try to help you.
Common Soldering Mistakes and How to Fix Them
Cold joints
A cold joint usually happens when the pad and lead were not heated enough. It may look dull, rough, cracked, or lumpy. Reheat the joint with a clean, tinned tip and a little fresh solder or flux.
Too much solder
If your joint looks like a metallic gumdrop, use desoldering braid to remove the excess. Then remake the joint cleanly.
Too little solder
If the joint barely wets the pad or does not cover the lead properly, add a little more solder after reheating the joint.
Solder bridges
These happen when solder connects two neighboring pads or pins that should not be connected. Flux and solder wick are usually the cure.
Burned pads or lifted traces
This usually comes from too much heat for too long, or from pushing too hard with the iron. Use the right tip size, work efficiently, and let the heat do the work.
Oxidized tip
If solder stops wetting the tip and starts beading up like it is avoiding eye contact, clean the tip and re-tin it. Leave a small amount of solder on the tip when the iron is resting to help protect it from oxidation.
How to Tell if a Solder Joint Is Good
Inspection matters. In professional electronics work, solder joints are not judged by wishful thinking. They are judged by how they look and how they perform.
A solid joint is usually:
- smooth and properly wetted
- well bonded to both the pad and the lead
- free of cracks, pits, and bridges
- not overloaded with excess solder
- mechanically stable when gently handled
Good lighting and magnification help a lot, especially for surface-mount work. A cheap magnifier can save you from staring at a tiny bridge for twenty minutes and blaming your microcontroller for crimes committed by solder.
Desoldering and Rework
Knowing how to undo bad soldering is part of knowing how to solder electronics well. In fact, many people get better faster once they stop fearing rework. Desoldering braid is excellent for removing small amounts of solder and clearing bridges. Place the braid on the solder, press the iron on top, and let the braid wick the molten solder away. For through-hole parts, a solder sucker can help remove solder from holes before you pull the component.
When reworking a board, take your time. Add flux, use the right tip, and avoid scraping pads aggressively. PCBs are cooperative right up until the moment they are not.
Best Practice Tips for Beginners
- Practice on scrap boards or beginner kits before touching an expensive project.
- Keep the tip clean and tinned.
- Use extra flux more often than your pride says you need to.
- Match the tip size to the joint.
- Work quickly, but do not rush.
- Use ventilation and wash your hands after soldering.
- Inspect every joint before powering anything up.
- Use a multimeter to check continuity when something seems suspicious.
Conclusion
Learning how to solder electronics is one of those skills that looks complicated from across the room and surprisingly manageable once you sit down and practice. The fundamentals are straightforward: use the right tools, keep things clean, apply heat to the joint, use solder sparingly, and inspect your work. Do that consistently, and your solder joints will improve fast.
The first few attempts may look a little rough. That is normal. Nobody starts out making elegant, textbook-perfect joints. Every experienced maker has created ugly blobs, solder bridges, and accidental masterpieces of confusion. The difference is that they kept practicing. With a little patience, good technique, and a willingness to fix mistakes, you will go from “I hope this works” to “I built that” faster than you think.
Extra: Real-World Experiences Learning How to Solder Electronics
The funny thing about learning how to solder electronics is that the first lesson is usually not technical. It is emotional. You sit down with a new iron, a fresh spool of solder, a little kit that promised to be “great for beginners,” and a confidence level that lasts right up until the moment your first solder joint looks like a tiny chrome potato. That is when soldering introduces itself properly.
For many beginners, the first few sessions feel clumsy. Your hands are trying to coordinate the iron, the solder, the board, and a component that seems determined to escape. The iron suddenly feels too hot, then not hot enough, then somehow both. You touch the solder to the tip instead of the joint. You use too much solder because too much feels safer than too little. Then you discover solder bridges and learn that electricity enjoys shortcuts more than you do.
But somewhere around the tenth or twentieth joint, things start to click. You notice that a clean tip behaves better. You notice that flux is not cheating, it is wisdom in liquid form. You notice that when you heat the pad and lead correctly, the solder seems to snap into place with much less drama. That moment is incredibly satisfying because it transforms soldering from guesswork into cause and effect.
A lot of real soldering experience is about troubleshooting habits. You learn to stop and inspect before blaming the parts. You learn that a board that does not power up is often suffering from one simple issue: a missed joint, a reversed part, or one tiny bridge hiding like it pays rent there. You start using a magnifier more often. You begin checking continuity with a multimeter instead of just staring intensely and hoping your determination counts as test equipment.
There is also a practical confidence that comes with repetition. Once you have soldered a few kits, repaired a loose wire, or replaced a broken connector, electronics stop feeling sealed off behind factory magic. You realize many devices are just collections of understandable connections. That shift is huge. It makes future projects feel possible.
And yes, there are still moments that humble you. Surface-mount chips can look like they were designed by someone who hates tweezers. Lead-free solder can feel moody on a bad day. Old oxidized pads can fight back like tiny metal goblins. But those experiences are part of the learning curve, and they teach the lessons that stick best: slow down, add flux, use the right tip, and inspect your work.
In the end, real experience with soldering electronics is not about never making mistakes. It is about becoming calm enough to fix them. That is the point where you know you are no longer just melting metal. You are building skill.