Table of Contents >> Show >> Hide
- What Is a PDF Printer on Mac?
- Do You Need to Add a PDF Printer to Mac?
- How to Print to PDF on Mac Using the Built-In PDF Option
- How to Add a Physical Printer on Mac
- How to Save a Webpage as a PDF on Mac
- How to Save a Word Document as a PDF on Mac
- Can You Add Adobe PDF Printer to Mac?
- How to Customize the PDF Menu on Mac
- Common Problems When Printing to PDF on Mac
- Best Practices for Creating PDFs on Mac
- When Should You Use a Third-Party PDF App?
- Quick Checklist: Add a PDF Printer to Mac
- Experience Notes: What Actually Works Best in Real Life
- Conclusion
Trying to “add a PDF printer” to a Mac can feel like looking for a light switch in a room that is already bright. On Windows, people often install a virtual PDF printer so they can choose “Print to PDF” from the printer list. On a Mac, the good news is simpler: macOS already has a built-in PDF printer feature hiding in plain sight inside the Print dialog. You do not usually need to install a special driver, download a mystery utility, or sacrifice your afternoon to the printer gods.
Still, the phrase “PDF printer on Mac” can mean a few different things. You might want to save a webpage as a PDF, convert a Word document to PDF, add a real printer that also prints PDFs, or replace the old Adobe PDF printer workflow you used years ago. This guide clears up the confusion and walks you through the easiest ways to print to PDF on Mac, add a physical printer, troubleshoot missing PDF options, and build a smoother PDF-saving routine.
What Is a PDF Printer on Mac?
A PDF printer is a virtual printing option that turns a document, webpage, email, spreadsheet, or image into a PDF file instead of sending it to paper. In everyday language, people call this “printing to PDF.” The result looks like a printed copy, but it becomes a digital file you can share, archive, upload, or sign.
On macOS, this feature is built into the system. When you open almost any app and choose File > Print, you will usually see a PDF button or dropdown in the print window. From there, you can choose Save as PDF, name the file, pick a folder, and save it. That is your Mac’s PDF printer. It is not listed as a separate printer because Apple designed it as a system-level print feature rather than a fake printer device.
Do You Need to Add a PDF Printer to Mac?
In most cases, no. If your goal is to create PDFs, your Mac already includes everything you need. You only need to add a printer in System Settings > Printers & Scanners if you want to use an actual physical printer. For PDF creation, the built-in Save as PDF option is usually faster, cleaner, and more reliable.
There are exceptions. Some specialized business workflows may require Adobe Acrobat, PDF editing software, print management tools, or company-approved drivers. But for normal usesaving receipts, turning webpages into PDFs, exporting school assignments, archiving invoices, or sharing documentsthe native macOS PDF printer feature is enough.
How to Print to PDF on Mac Using the Built-In PDF Option
This is the easiest method and works in Safari, Chrome, Mail, Pages, Numbers, Preview, Notes, Word, Excel, and many other Mac apps.
Step 1: Open the File You Want to Convert
Open the webpage, document, email, photo, spreadsheet, or form you want to save as a PDF. For example, you might open a receipt in Safari, a contract in Pages, or a homework file in Microsoft Word.
Step 2: Open the Print Window
Go to the menu bar and choose File > Print. You can also press Command + P. This keyboard shortcut is worth memorizing because it works almost everywhere on a Mac. It is basically the universal “please turn this into something printable” button.
Step 3: Click the PDF Button or Dropdown
In the Print dialog, look for the PDF button, usually near the bottom of the window. On some versions of macOS, it may appear as a dropdown menu. Click it and choose Save as PDF.
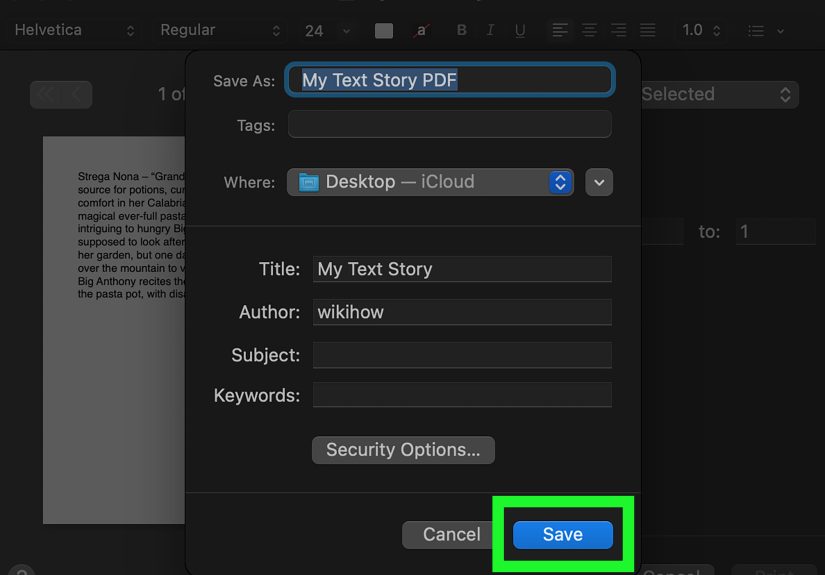
Step 4: Name and Save the PDF
Enter a file name, choose where to save it, and add optional details such as title, author, subject, or keywords if the dialog offers those fields. Then click Save. Your Mac creates a PDF file in the location you selected.
Step 5: Check the Finished File
Open the new PDF in Preview to confirm that the layout, page breaks, images, and text look right. This quick check can save you from sending a PDF with one lonely sentence stranded on page two like it missed the bus.
How to Add a Physical Printer on Mac
If you are not just creating PDFs and actually need to add a real printer to your Mac, follow these steps. This applies to AirPrint printers, USB printers, network printers, and many modern wireless printers.
Step 1: Connect the Printer
For a wireless printer, make sure the printer and your Mac are on the same Wi-Fi network. For a USB printer, connect it directly to your Mac or to a compatible hub. Turn the printer on and give it a moment to wake up. Printers like to think deeply before doing anything.
Step 2: Open Printers & Scanners
Click the Apple menu, open System Settings, and choose Printers & Scanners. On older macOS versions, this may be called System Preferences.
Step 3: Add the Printer
Click Add Printer, Scanner, or Fax. Your Mac will search for nearby printers. Select your printer from the list. If it supports AirPrint, macOS can often use it without extra drivers.
Step 4: Choose the Driver or AirPrint
If your printer appears with AirPrint as an option, that is usually the simplest choice. If your printer needs special features such as advanced color controls, finishing options, or scanning software, you may need the manufacturer’s driver from HP, Canon, Epson, Brother, or another trusted brand.
Step 5: Click Add
Click Add. Once the printer appears in your printer list, you can select it from any Print dialog. You can still use Save as PDF from the same print window whenever you want a digital copy instead of paper.
How to Save a Webpage as a PDF on Mac
Saving webpages as PDFs is one of the most useful Mac PDF printer tricks. It is great for receipts, recipes, travel confirmations, research pages, tickets, and online articles you want to keep before they disappear into the internet fog.
In Safari
Open the page, choose File > Print, click the PDF menu, and select Save as PDF. Safari usually preserves the page layout well, though ads and sidebars may still appear depending on the website.
In Chrome
Open the page, press Command + P, adjust the print settings, then use the system PDF option or Chrome’s own PDF-saving feature. If the page looks messy, try switching layout from portrait to landscape or reducing the scale.
Pro Tip: Use Reader View First
For articles, Safari’s Reader View can create cleaner PDFs. Click the Reader icon when available, then print and save as PDF. This often removes distracting menus and clutter, leaving the actual article instead of a digital yard sale.
How to Save a Word Document as a PDF on Mac
Microsoft Word for Mac gives you two practical ways to create PDFs. The first is Word’s built-in export feature. The second is the macOS Print dialog.
Method 1: Use Save As or Export
Open your Word document, choose File > Save As or File > Export, then select PDF as the file format. This is often best for documents where you want to preserve structure, links, accessibility tags, and formatting.
Method 2: Use Print to PDF
Choose File > Print, click the PDF button, and select Save as PDF. This works well when you want the PDF to look exactly like the printed page.
For polished documents such as resumes, proposals, reports, and client files, check the final PDF carefully. Fonts, spacing, headers, and page breaks can sometimes behave differently after conversion, especially if the original document uses unusual fonts or complex formatting.
Can You Add Adobe PDF Printer to Mac?
Many Mac users search for “Adobe PDF printer Mac” because they remember using an Adobe PDF printer on Windows or older systems. On modern macOS, Adobe PDF does not normally appear as a separate printer in the same way. Instead, Adobe Acrobat focuses on PDF creation, editing, combining, exporting, compressing, signing, and organizing documents inside the Acrobat app.
If you use Adobe Acrobat, you can still create PDFs from many file types, combine multiple files, optimize file size, add security, and edit PDF content. But for basic printing to PDF, the built-in macOS Save as PDF option is usually the cleanest route.
How to Customize the PDF Menu on Mac
The PDF menu in the Print dialog may include useful actions such as Save as PDF, Open in Preview, or options added by apps. Depending on your macOS version and installed software, you may also be able to edit PDF menu actions or use automation workflows.
For most users, the best workflow is simple: print, choose PDF, save the file, then use Preview if you need to review, annotate, rotate, crop, sign, or combine pages. Preview is one of the most underrated Mac apps. It sits quietly in the Dock like a boring office stapler, then suddenly handles half your PDF chores for free.
Common Problems When Printing to PDF on Mac
The PDF Button Is Missing
First, make sure you are using the full Print dialog. Some apps show a simplified print window at first. Look for a button or arrow that expands more settings. If you still do not see the PDF option, try printing from another app to confirm whether the issue is app-specific.
The PDF Looks Different from the Original
Check page size, margins, scale, orientation, and print background settings. Webpages are especially tricky because they are designed for screens, not paper. Try Reader View, landscape orientation, or a lower scale percentage.
The File Size Is Too Large
PDFs with high-resolution images can become huge. If the file is too large to email or upload, open it in Preview and try export options, or use a trusted PDF tool to compress it. Avoid random online compressors for sensitive documents such as tax forms, contracts, medical paperwork, or financial records.
Links Do Not Work in the PDF
Printing to PDF can sometimes flatten interactive elements. If clickable links matter, use the app’s export feature instead of the print feature. For example, Word’s PDF export may preserve document structure better than printing the file to PDF.
The Printer Appears Offline
If your real printer is offline, confirm that it is turned on, connected to the same network, and not stuck with a paper jam or low-ink warning. Remove and re-add the printer in Printers & Scanners if needed. Updating printer software or firmware may also help.
Best Practices for Creating PDFs on Mac
Good PDFs are easy to open, easy to read, and easy to find later. A little organization goes a long way.
Use Clear File Names
Instead of saving a file as document.pdf, use a descriptive name such as 2026-tax-receipt-office-supplies.pdf or client-proposal-final-april-2026.pdf. Future you will be grateful. Future you may even forgive present you for all those screenshots on the desktop.
Choose the Right Folder
Save PDFs into folders such as Receipts, School, Work, Travel, Taxes, or Clients. If you use iCloud Drive, your PDFs can sync across Apple devices.
Use Password Protection When Needed
When saving a PDF from the Mac Print dialog, you may see security options that let you require a password to open, copy, or print the document. Use this for sensitive files, but store the password safely. A password-protected PDF with a forgotten password is basically a locked treasure chest with homework inside.
Preview Before Sharing
Always open the PDF before sending it. Check page order, spelling, image placement, and whether private information is visible. This is especially important for resumes, invoices, forms, and legal documents.
When Should You Use a Third-Party PDF App?
The built-in Mac PDF printer is excellent for creating basic PDFs, but third-party software can be useful for advanced tasks. Consider a dedicated PDF app if you need to edit text inside PDFs, combine large batches of documents, run optical character recognition, redact private information, add advanced form fields, compare PDF versions, or prepare files for professional printing.
For everyday users, Preview plus Save as PDF covers a surprising amount. For business, legal, design, education, and publishing workflows, Acrobat or another professional PDF editor may be worth it.
Quick Checklist: Add a PDF Printer to Mac
- Use Command + P to open the Print dialog.
- Click the PDF button or dropdown.
- Select Save as PDF.
- Name the file clearly.
- Choose the correct folder.
- Use security options for sensitive files.
- Open the finished PDF to check formatting.
- Add a physical printer only if you need paper printing.
Experience Notes: What Actually Works Best in Real Life
After using Macs for everyday PDF tasks, the biggest lesson is this: the simplest method is usually the best method. Many people waste time searching for a downloadable Mac PDF printer because they expect macOS to work like Windows. But once you realize the PDF tool is built into the Print dialog, the whole process becomes almost boringin the best possible way.
For example, saving online receipts is one of the most practical uses. After buying something online, press Command + P, choose Save as PDF, and store the file in a Receipts folder. Add the store name and date to the file name. Later, if you need a return, warranty claim, reimbursement, or tax record, you will not have to dig through email like a raccoon in a filing cabinet.
Another useful habit is creating PDFs from webpages before they change. Event pages, travel confirmations, online instructions, and class materials can disappear or update without warning. Saving a PDF gives you a stable copy. For cleaner results, use Reader View in Safari before printing. This often removes ads, pop-ups, navigation menus, and unrelated clutter, which makes the final PDF easier to read.
For school or work documents, I usually prefer the app’s export feature when formatting matters. In Word, Pages, Keynote, or Excel, exporting directly to PDF may preserve layout, links, and document quality better than printing. But when I need a quick “what you see is what you get” copy, the Print dialog is perfect. It is especially helpful for forms, tickets, shipping labels, and anything that needs to look like a printed page.
Preview is also worth learning. Once the PDF is created, Preview can rotate pages, delete pages, rearrange pages, combine PDFs, add signatures, highlight text, and make simple annotations. Many users install extra software before realizing Preview already handles the basics. It is not a full professional PDF editor, but for everyday fixes, it is surprisingly capable.
The main mistake to avoid is trusting the PDF before opening it. Always inspect the file. Webpages may create awkward page breaks. Spreadsheets may shrink into tiny ant-sized numbers. Images may move. A quick review prevents embarrassing attachments and last-minute panic. If something looks wrong, return to the Print dialog and adjust scale, margins, orientation, or paper size.
For sensitive files, be careful with online PDF tools. They may be convenient, but uploading private documents to random websites is not ideal. If the PDF includes personal information, financial records, contracts, passwords, school records, or medical details, use local tools on your Mac whenever possible. Built-in macOS features, Preview, and trusted desktop apps are safer choices for private files.
Finally, do not overcomplicate printer setup. If you own an AirPrint-compatible printer, macOS usually finds it quickly when both devices are on the same Wi-Fi network. If it does not appear, restart the printer, check Wi-Fi, update firmware, and re-add it in Printers & Scanners. But remember: creating a PDF does not require the physical printer to work at all. Even if your printer is out of ink, out of paper, or emotionally unavailable, your Mac can still save a PDF.
Conclusion
Adding a PDF printer to Mac is easier than it sounds because macOS already includes a built-in print-to-PDF feature. Instead of installing a virtual printer, open your file, press Command + P, click the PDF menu, and choose Save as PDF. If you need a real printer, add it through System Settings > Printers & Scanners. For most users, that combination handles nearly every PDF and printing need without extra software.
The best workflow is simple: create the PDF, name it clearly, store it in the right folder, review it in Preview, and protect it when necessary. Once you get used to the built-in Mac PDF printer, saving documents becomes quick, tidy, and wonderfully paper-free.
Note: This article is based on current, real-world Mac PDF and printer workflows synthesized from official Apple Support, Adobe, Microsoft Support, HP Support, Canon support documentation, and established Mac help resources.