Table of Contents >> Show >> Hide
- Before You Install a Water Heater, Start With the Right Plan
- Tools and Materials You May Need
- How to Install a Standard Tank Water Heater
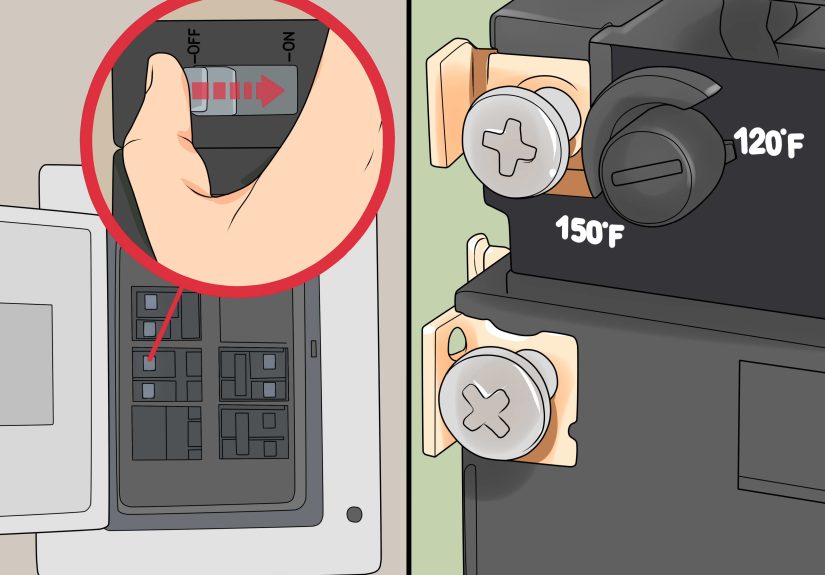
- 1. Shut Off Water, Power, or Gas
- 2. Drain the Old Tank
- 3. Disconnect the Old Unit
- 4. Prepare the Installation Area
- 5. Install the T&P Relief Valve and Discharge Pipe
- 6. Connect the Water Lines
- 7. Handle the Utility Connection Carefully
- 8. Fill the Tank Before Powering Anything On
- 9. Leak-Test and Start Up
- 10. Set the Temperature and Monitor the Install
- Common Water Heater Installation Mistakes
- When You Should Call a Professional
- Installation Experiences: What People Learn the Hard Way
- Conclusion
- SEO Tags
Installing a water heater is one of those home projects that looks simple from across the room. It is a tall cylinder. It has pipes. It heats water. How hard could it be? Then you meet the actual job: heavy equipment, hot water, electricity or gas, pressure relief piping, local code, and a very real chance of turning your utility room into a small indoor lake if you rush it.
The good news is that a standard tank-style water heater replacement can be manageable when you are replacing a similar unit in the same location and the existing plumbing, power, and venting are already appropriate. The less-good news is that this is not a project for guesswork, cowboy confidence, or “I saw half a video, so let’s roll.” If your install involves a new gas line, a vent change, a service panel upgrade, a fuel conversion, or a switch to tankless or heat-pump technology, call a licensed pro and protect both your house and your eyebrows.
This guide walks through how to install a water heater in a clear, practical way, with special attention to safety, common mistakes, and the little details that separate a clean install from a future headache.
Before You Install a Water Heater, Start With the Right Plan
Before you touch a wrench, figure out exactly what you are replacing. The easiest and safest project is swapping in a similar unit: electric for electric, gas for gas, and roughly the same size and capacity. That keeps your plumbing layout, venting, and utility connections closer to what already works.
Also, measure the installation space. Modern water heaters are often physically larger than older models because of improved insulation. That means the new unit might match your old tank’s gallon rating but still refuse to fit through the opening like a stubborn sofa on moving day.
Check these basics before buying:
- The fuel type: electric, natural gas, or propane
- The tank size or first-hour rating your household actually needs
- The physical dimensions of the new unit
- The required voltage and breaker size for electric models
- The venting requirements for gas models
- Whether your local code requires a permit, expansion tank, drain pan, seismic straps, or other upgrades
If you are switching from a tank heater to a tankless or heat-pump model, pause here. That is not a simple one-for-one swap. Tankless gas units often need larger gas lines and direct venting, while heat-pump water heaters need the right room conditions, drainage planning, and installation clearances.
Tools and Materials You May Need
The exact list depends on whether you are installing an electric or gas unit, but most projects involve a similar cast of characters.
- New water heater
- Drain pan, if required or recommended
- Garden hose for draining the old tank
- Pipe wrenches or adjustable wrenches
- Tubing cutter
- Thread sealant or plumber’s tape rated for the application
- Flexible water connectors or new rigid piping and fittings
- New temperature-and-pressure relief valve if not factory installed
- Approved discharge pipe for the T&P valve
- Level and shims, if needed
- Non-contact voltage tester for electric units
- Wire connectors and electrical tools for electric units
- Gas-rated thread sealant and leak-detection solution for gas units
- Expansion tank, if your plumbing system requires one
- Hand truck and a helper, because water heaters are not known for being dainty
How to Install a Standard Tank Water Heater
1. Shut Off Water, Power, or Gas
Start by cutting the utility connections. For an electric heater, switch off the correct breaker and verify the power is off with a non-contact voltage tester. For a gas heater, turn the gas control to off and close the gas shutoff valve. Then shut off the cold-water supply feeding the heater.
Next, open a nearby hot-water faucet and let it run until the water turns cool. This is the project’s version of taking a deep breath before the chaos. It makes draining safer and reduces the chance of getting surprised by very hot water.
2. Drain the Old Tank
Attach a garden hose to the drain valve at the bottom of the tank and route the other end to a floor drain, utility sink, or approved outdoor drainage point. Open the drain valve and let the tank empty fully.
If sediment has built up inside the tank, draining may be slow. That is normal. Old water heaters tend to collect mineral buildup over time, which means the outgoing unit may be heavier than expected. So yes, the tank you are about to move might be part water heater, part geology exhibit.
3. Disconnect the Old Unit
Once the tank is drained, disconnect the plumbing. If you have dielectric unions or flexible connectors, removal may be straightforward. If the pipes are soldered or hard-piped, you may need to cut them back cleanly and prep the ends for reconnection.
For electric units, remove the access cover, confirm the power is still off, disconnect the wiring, and cap things safely as needed. For gas units, disconnect the gas line carefully at the union or appropriate fitting. If you are not completely comfortable with gas piping, stop here and bring in a pro. Gas work is not the place to discover your personal growth mindset.
Then remove the old T&P discharge piping and move the tank out using a dolly and another person. This is not a graceful solo-lift moment.
4. Prepare the Installation Area
With the old tank gone, clean the floor and inspect the area. Check for signs of leaks, corrosion, inadequate drainage, loose venting, or damage to the surrounding walls and floor. If you are installing over a drain pan, make sure the pan is properly sized and routed to an approved drain where required.
Set the new heater in place and confirm that you have enough room to work around it for service and maintenance. It should sit level and stable. If it rocks, shim it properly now instead of pretending the floor “adds character.”
5. Install the T&P Relief Valve and Discharge Pipe
The temperature-and-pressure relief valve is a safety device, not a decorative accessory. If it is not factory installed, install the new valve that came with the heater or the correct new replacement. Do not reuse the old valve.
Then attach the discharge pipe using a code-approved material and route it to an approved termination point near a drain, following the heater instructions and local code. The line should never be capped or blocked. The entire point of this setup is to release dangerous pressure safely if something goes wrong.
6. Connect the Water Lines
Install heat-trap fittings or dielectric fittings if your model requires them. Then reconnect the cold-water inlet and hot-water outlet. Flexible connectors can make replacement easier, especially when alignment is not perfect. If you are hard-piping copper, dry-fit first, clean the pipe ends well, and make neat, solid connections.
If your plumbing system has a check valve, backflow preventer, or pressure-reducing setup that creates a closed system, install a thermal expansion tank if required. It is a small component with a big job: managing the pressure increase that happens when heated water expands.
7. Handle the Utility Connection Carefully
For electric water heaters: match the home’s voltage, breaker, wire size, and grounding setup to the unit’s data plate and manufacturer instructions. Make the wire connections exactly as required, secure the wiring compartment, and keep the breaker off until the tank is completely full.
For gas water heaters: reconnect the gas piping with approved materials and proper fittings, then reconnect the vent system exactly as the heater manual requires. Venting is not a freestyle art project. Every connector, slope, material, and clearance matters. If anything about the vent or gas setup is uncertain, bring in a licensed plumber or gas fitter.
8. Fill the Tank Before Powering Anything On
This step is huge, especially for electric models. Open the cold-water supply valve and open a nearby hot-water faucet. Let the tank fill completely while air escapes through the open hot tap. When water runs steadily from the faucet without sputtering, the tank is full.
Check every connection for leaks. Tighten carefully if needed, but do not go full gorilla on the fittings. If you overtighten something, congratulations: you have created tomorrow’s repair project.
Only after the tank is completely full should you restore power to an electric unit. Powering an empty tank can dry-fire and ruin the heating elements almost instantly.
9. Leak-Test and Start Up
For electric heaters, turn the breaker back on and follow the startup instructions. For gas heaters, open the gas valve, test the fittings with a leak-detection solution, and look for bubbles. No bubbles, good news. Bubbles, bad news. Shut it down and fix the leak before proceeding.
Then light the pilot or follow the manufacturer’s ignition instructions if the unit has electronic ignition. On atmospheric gas heaters, verify that the draft is pulling properly according to the manufacturer’s guidance. If you smell gas, see improper venting, or notice anything odd, stop immediately and call a qualified professional.
10. Set the Temperature and Monitor the Install
Set the thermostat to 120°F for a smart balance of comfort, efficiency, and reduced scald risk. Give the heater time to warm up, then check again for leaks, drips, or unusual noises. Also keep an eye on the T&P discharge line. If water is dripping there after startup, you may have a pressure issue that needs attention.
Common Water Heater Installation Mistakes
Most bad installs do not fail because someone forgot the big dramatic step. They fail because of little details that were skipped while the installer was feeling confident and hungry at the same time.
- Buying a new heater without measuring the space first
- Reusing the old T&P relief valve
- Leaving out a drain pan where one is needed
- Using the wrong discharge piping or capping the line
- Skipping the expansion tank when the plumbing system requires one
- Powering on an electric heater before the tank is full
- Ignoring high incoming water pressure
- Doing gas or vent work without the right experience
- Forgetting earthquake restraints where required
- Setting the water too hot and creating a scald risk
When You Should Call a Professional
DIY is great. So is knowing where the DIY line ends.
Call a licensed plumber, electrician, or gas professional if:
- You are switching fuel types
- You need a new gas line or vent route
- You need an electrical panel upgrade or new circuit
- You are installing a tankless or heat-pump water heater
- Your local code requires permitted work you are not qualified to perform
- You smell gas, cannot verify safe venting, or are unsure about the wiring
There is no trophy for “most determined homeowner.” There is, however, tremendous value in not creating a fire, flood, or carbon monoxide problem.
Installation Experiences: What People Learn the Hard Way
Ask a few homeowners or plumbers about water heater installation, and you will start hearing the same stories over and over. Not because people are unskilled, but because water heaters are sneaky. They look simple. Then the project begins, and the “quick Saturday swap” turns into an all-day lesson in patience, pipe alignment, and humility.
One of the most common experiences is discovering that the new water heater is bigger than the old one. On paper, both units may be 50 gallons, so everything seems fine. In real life, the new tank often has thicker insulation and a slightly different footprint. Suddenly the heater barely clears a door frame, or it no longer fits comfortably under a shelf. That is why seasoned installers measure first and celebrate second.
Another real-world lesson is that old shutoff valves are optimistic, not always functional. Plenty of people turn a valve, assume the water is off, and then get a surprise shower when they loosen a fitting. Veterans of this job learn to verify everything. Is the water truly off? Is the power really dead? Is the gas actually shut down? A tester, a careful check, and a few extra minutes can save a lot of drama.
Then there is the sediment issue. Many old tanks are much heavier than expected because years of mineral buildup settle inside the bottom of the tank. Homeowners who expected to wheel out a manageable appliance instead end up wrestling a metal boulder with plumbing connections. Experienced installers almost always use a dolly, protect the floor, and recruit a second pair of hands before attempting removal.
Leaks after reconnection are another classic chapter in the water-heater story. Even when the big steps are right, tiny drips can appear at threaded fittings, supply connections, or an expansion tank tee. The people who have done this before do not panic. They fill the tank slowly, inspect every joint carefully, tighten only what needs tightening, and recheck once the water has heated. Small patience here prevents big repair bills later.
Electric installs teach one unforgettable lesson: never energize an empty tank. Homeowners who skip the full-fill step can damage the elements almost immediately. After one expensive mistake, they never forget it again. Gas installs carry their own memorable lessons. People quickly learn that gas line work and venting are not areas for casual improvisation. The experienced crowd takes leak testing seriously, follows the manual exactly, and calls a professional when the venting setup gets even slightly weird.
There is also the temperature lesson. Plenty of people crank the water heater hotter than necessary because they think “hotter equals better.” Then they deal with scald risk, wasted energy, and water that comes out like it is trying to boil pasta directly in the sink. Most experienced installers settle around 120°F and move on with their lives.
The biggest takeaway from real installation experiences is simple: the best installs are not the fastest. They are the ones where the installer slows down, verifies every detail, respects the safety devices, and knows when to hand the tough parts to a licensed professional.
Conclusion
If you want to know how to install a water heater successfully, the secret is not superhuman plumbing talent. It is preparation, safety, and refusing to skip the “boring” parts. Choose the right unit, verify the utility requirements, drain and remove the old heater carefully, install the new one level and correctly piped, fill the tank fully before startup, and test everything before you call the job done.
For a straightforward electric or same-type tank replacement, a careful DIYer may be able to handle the work. For gas lines, venting, panel upgrades, fuel conversions, or anything that makes you pause and say, “Hmm, that seems important,” trust that instinct and call a professional. Hot water is wonderful. Hot water installed badly is a different story.