Table of Contents >> Show >> Hide
- Step Zero: Identify Your Hole Type (Because Size Really Does Matter)
- Tools and Materials You’ll Actually Use
- Prep Like a Pro (So the Patch Doesn’t Fail Later)
- How to Patch Tiny Holes and Dings (Nails, Screws, Thumbtacks)
- How to Patch Small Holes (Up to About 1 Inch)
- How to Patch Medium Holes (Door Knob Damage, 1–6 Inches)
- How to Patch Large Holes (Bigger Than About 6 Inches)
- Finishing: The Difference Between “Patched” and “What Hole?”
- Common Mistakes (So You Don’t Have to Learn the Hard Way)
- Realistic Time and Cost (So You Can Plan Like a Sane Person)
- of Real-Life Drywall Patching Experiences (Small and Large)
- Conclusion
Drywall is basically the avocado of home building materials: versatile, everywhere, and somehow always getting bruised. One minute you’re hanging a picture, the next you’ve got a crater where a screw “found its true calling.” The good news? Patching drywall is absolutely a DIY-friendly skill. The better news? Once you learn the handful of repair styles, you can fix almost anythingfrom tiny nail holes to “how did that happen” doorknob punchesso your wall looks like it never met chaos.
This guide walks you through the right repair method for the size of the damage, the tools and materials that actually matter, and the finishing steps that separate a smooth, invisible patch from a lumpy “topographical map” of your living room. We’ll keep it practical, specific, and (mostly) dust-controlled.
Step Zero: Identify Your Hole Type (Because Size Really Does Matter)
Before you grab a tub of mud and start smearing like you’re frosting a cake, figure out what you’re repairing. Drywall fixes work best when you match the method to the damage.
Quick drywall hole cheat sheet
- Tiny holes (pinholes, nail/screw holes, small dents): Usually spackle or lightweight joint compound.
- Small holes (roughly up to about 1 inch): Spackle or joint compound; sometimes tape helps if edges are torn.
- Medium holes (roughly 1–6 inches, like a doorknob or an over-enthusiastic curtain rod): Patch kit (mesh/aluminum screen) or a “California patch.”
- Large holes (bigger than about 6 inches or with broken drywall): Cut out a clean shape, add backing, screw in a drywall patch, tape, mud, finish.
Also note the edge condition. A clean, crisp hole is easier than crumbly drywall paper peeling like a sunburn. Torn paper needs sealing and feathering, or it will bubble under paint.
Tools and Materials You’ll Actually Use
You don’t need a contractor-grade truck full of gear. But you do need the right few things so your patch holds and blends.
Common tools
- Utility knife (fresh blade = cleaner cuts)
- Putty knives: 2–3″ for filling, 6″ for feathering, 10–12″ if you want ultra-smooth blends
- Sanding sponge or sandpaper (120–150 grit for shaping; 180–220 for finishing)
- Drywall saw or jab saw (for larger cutouts)
- Drywall screws + drill/driver (for large patches)
- Dust mask/respirator and safety glasses (drywall dust is clingy and dramatic)
- Tack cloth or damp rag + vacuum (cleanup is half the job)
Common materials
- Spackle: Great for small holes and dents; tends to dry faster.
- Joint compound (“mud”): Better for tape, bigger repairs, feathering wide areas.
- Setting-type joint compound (“hot mud”): Hardens by chemical reaction; useful for first coats and faster builds.
- Paper tape or fiberglass mesh tape
- Self-adhesive patch (mesh/aluminum screen) for medium holes
- Primer (important!)
- Matching wall paint and, if needed, texture spray or texture tools
Prep Like a Pro (So the Patch Doesn’t Fail Later)
1) Check what’s behind the wall
If you’re cutting bigger than a couple inches, assume there could be wires or plumbing. If the damage is near an outlet or switch, shut off power at the breaker before you cut. It’s hard to enjoy your “handy homeowner era” when it includes sparks.
2) Clean up the damage
- Trim away loose paper and crumbly gypsum with a utility knife.
- For dents and tiny holes, lightly sand around the area to remove paint ridges.
- Wipe dust off. Compound sticks better to walls than it does to drywall dust.
3) Square it up when needed
Big tip: large repairs are easier if you cut the damaged area into a neat square or rectangle. Clean edges give you stronger backing, better tape lines, and less frustration.
How to Patch Tiny Holes and Dings (Nails, Screws, Thumbtacks)
These are the “weekday” drywall problems: nail holes from picture frames, tiny dents from furniture, and mysterious pinholes that appear after you rearrange a room at 11 p.m.
Best method: Spackle or lightweight joint compound
- Lightly sand the area to knock down paint sheen and ridges.
- Fill the hole with spackle using a small putty knife. Press firmly so you don’t trap air.
- Scrape flush with the knife. For tiny holes, you want “just enough,” not a blob.
- Let it dry fully (follow the product label). If it shrinks, add a second thin coat.
- Sand smooth (180–220 grit) and wipe dust.
- Prime and paint. Skipping primer can cause “flashing” (a dull patch that shows through paint).
Pro tip: Nail pops
If you’re patching a nail pop (a raised bump where a fastener moved), push the fastener back in or replace it with a drywall screw into framing, then skim with compound. If the wall keeps moving, the bump will return like a sequel nobody asked for.
How to Patch Small Holes (Up to About 1 Inch)
For holes around the size of a pencil eraser up to about an inch (often from anchors or small hardware), you can still use spackle or joint compound. The trick is support and layering so the fill doesn’t crack or sink.
Method A: Spackle/joint compound (for clean holes)
- Bevel the edges slightly with a utility knife (a shallow “V” helps the compound lock in).
- Press compound into the hole, then scrape flush.
- Let dry, then add a second thin coat that feathers 2–3 inches beyond the hole.
- Sand smooth, wipe dust, prime, and paint.
Method B: Tape assist (for torn paper edges)
If the drywall paper is torn or fuzzy around the hole, cover the area with a small piece of paper tape (or mesh tape if you prefer), then skim over it with joint compound. The tape stabilizes weak edges so paint doesn’t highlight the damage.
How to Patch Medium Holes (Door Knob Damage, 1–6 Inches)
Medium holes are where DIY drywall repair graduates from “cosmetic dab” to “actual patch.” If you try to fill a doorknob hole with spackle alone, it will likely sag, crumble, or crack because there’s not enough backing.
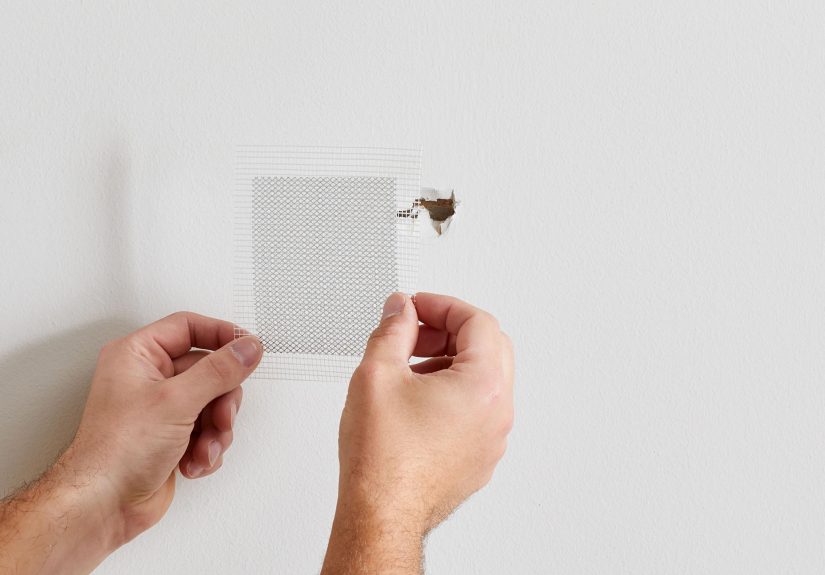
Method A: Self-adhesive patch kit (fast and beginner-friendly)
- Trim and flatten loose edges so the patch sits on a stable surface.
- Stick on the patch centered over the hole. Press firmly around edges.
- First coat: Apply joint compound over the patch, pressing compound through the mesh.
- Feather wide using a 6″ knife. Aim for a thin “plateau,” not a speed bump.
- Dry, then second coat wider than the first (often 8–12 inches across for invisibility).
- Optional third coat for a seamless blend.
- Sand, prime, paint.
Method B: The “California patch” (strong, clean, and oddly satisfying)
A California patch (sometimes called a “butterfly” or “hot” patch) uses drywall itself as the patch, but keeps the face paper extending beyond the gypsum core. That paper becomes a built-in flange that helps the patch bond and blend.
- Cut the damaged hole into a neat square/rectangle with a utility knife or drywall saw.
- Cut a drywall piece 2–3 inches larger than the hole in each direction.
- On the patch piece, score the back paper around the size of the hole, then snap and remove the gypsum core so the front paper remains larger than the core (like a paper “frame”).
- Apply joint compound around the hole edges, then press the patch in so the paper flange lays flat on the wall.
- Skim coat over the paper edges, feathering outward. Add 2–3 thin coats total.
- Sand, prime, and paint.
California patches are especially handy when there’s no stud to screw into and you want a flatter repair than some mesh kits can provide.
How to Patch Large Holes (Bigger Than About 6 Inches)
For big damagethink fist-sized and up, removed wall anchors, or repairs after plumbing/electrical workdo it the durable way: add backing, screw in a patch, tape the seams, then build thin coats until the wall looks normal again.
1) Cut a clean opening
Mark a square or rectangle around the damage and cut it out. Straight edges are easier to patch than jagged shapes. If you can align one side to a stud, even better.
2) Add backing (if you’re not landing on a stud)
- Cut 1–2 wood strips (scrap plywood, lath, or 1x) a few inches longer than the hole’s width/height.
- Slip the wood behind the drywall so it spans the opening.
- Drive drywall screws through the existing wall into the wood to clamp it tight.
3) Cut and attach the drywall patch
- Cut a drywall piece to fit the opening with a small gap (a tight fit is good, forced fit is bad).
- Screw the patch into the backing or studs. Keep screw heads slightly dimpled, not torn through the paper.
4) Tape the seams
Use paper tape or mesh tape over all seams. Paper tape is strong and great for flat joints; mesh is convenient but often benefits from setting-type compound for the first coat to reduce cracking risk. Either can work when applied well.
5) Apply joint compound in thin, widening coats
- First coat: Embed tape and cover seams. Keep it relatively thin.
- Second coat: Wider than the first, feathering edges.
- Third coat: Even wider (often 10–12 inches across) to disguise the repair.
- Let each coat dry fully before sanding lightly and applying the next.
Finishing: The Difference Between “Patched” and “What Hole?”
Sand smart, not angry
Sand lightly between coats, and don’t dig trenches. Use a sanding sponge for control and finish with finer grit (180–220) so you don’t scratch the surrounding paint.
Prime like you mean it
Primer matters because joint compound and spackle are porous. Without primer, your topcoat can look dull or “flash” at different angles. A quick coat of primer helps the paint match the wall’s sheen.
Match wall texture (if your walls aren’t smooth)
Textured walls take a little extra patience. Practice on cardboard first. Light orange-peel sprays, knockdown tools, or even a sponge technique can get you close. The goal is “blends at a glance,” not “museum reproduction.”
Common Mistakes (So You Don’t Have to Learn the Hard Way)
- Using spackle alone for medium/large holes: It can crumble or sink without support.
- Skipping prep: Loose paper edges cause bubbles and peeling later.
- One thick coat: Thick mud shrinks and cracks. Thin coats win.
- Not feathering wide enough: If you can feel a ridge, paint will spotlight it.
- Painting without primer: The patch “ghosts” through, especially under lighting.
Realistic Time and Cost (So You Can Plan Like a Sane Person)
Most patches are inexpensive. Small-hole repairs can cost just a few dollars in spackle and sandpaper. Medium repairs may need a patch kit and compound. Large repairs might require a small drywall piece, screws, tape, compound, and primer. The real cost is dry time: many repairs take multiple coats and at least a day (sometimes two) to fully finish.
If you want speed, consider setting-type compound for early coats (it hardens faster), then switch to premixed compound for smoother finishing. Just remember: faster mud also means faster working timeso mix small batches.
of Real-Life Drywall Patching Experiences (Small and Large)
The first drywall hole I ever patched was a classic: a “temporary” picture hanger that turned into a long-term relationship with gravity. I removed the nail, stared at the tiny crater, and thought, “How hard can this be?” Ten minutes later, I had created a miniature mountain range with spacklebecause apparently my instinct was to overfill, then keep adding “just a little more” like I was icing cupcakes for a competition I didn’t enter. The fix was simple: I sanded it down (a lot), wiped the dust, applied a thin second coat, and feathered it wider. Lesson learned: the knife edge is your best friend, and thin coats are the adult choice.
My next adventure was medium-sized: doorknob damage from a door that swung open like it had somewhere important to be. The hole wasn’t huge, but it was deep enough that spackle alone would have collapsed into it. I used a self-adhesive mesh patch, pressed it firmly, and coated it with joint compound. The first coat looked promisinguntil it dried and I could still see the outline of the patch through the mud. That’s when I learned the “feather wide” rule. I added a second coat that extended much farther than the patch itself, then a third, each thinner than the last. After sanding and priming, the repair disappeared. Under certain lighting, you could still spot it if you already knew where it was… but that’s true for most of us after a haircut, too.
The biggest repair I tackled was after removing a wall-mounted TV bracket. The anchors had chewed up the drywall so badly that the edges were ragged and weak. I could’ve tried to fill it, but the paper was torn and the gypsum was crumblybasically the drywall equivalent of a stale donut. I cut a clean rectangle around the damage and added wood backing behind the opening. Screwing in the patch felt oddly satisfying, like the wall suddenly made sense again. Taping the seams was the part where patience mattered. I rushed the first time, didn’t embed the tape smoothly, and ended up with a bubble that showed under paint. I cut it out, re-taped, and used setting-type compound for the first coat so it locked in firmly. Then I switched to premixed compound for a smoother finish.
The final “aha” moment came with primer. On one repair, I skipped priming because I was feeling bold (and because I was out of primer). The patch looked fineuntil the paint dried and the area flashed under light, slightly duller than the rest of the wall. I went back, primed properly, repainted, and the problem vanished. Now I treat primer like insurance: you don’t appreciate it until you need it, and then you really, really do.
If you’re nervous, start small. Patch a nail hole behind a door. You’ll get the feel for the knife, the drying time, the sanding pressure, and how wide to feather. Then, when you’re ready for bigger holes, you’ll already know the rhythm: prep, support, thin coats, sand lightly, prime, paint. Drywall repair isn’t magicit just looks like it when you do the boring steps well.
Conclusion
Patching drywall is less about brute force and more about smart steps: pick the right method for the hole size, prep the edges, add support when the hole is bigger than “tiny,” and build your finish with thin, widening coats. Sand gently, prime properly, and your wall will go right back to looking like a wallrather than a scrapbook of past hardware decisions.