Table of Contents >> Show >> Hide
- Before You Start: The 5-Minute Reality Check
- Bathroom Sink Plumbing: Quick Tour of What You’re About to Touch
- Steps That Are the Same for Top-Mount and Undermount Sinks
- How to Replace a Top-Mount (Drop-In) Bathroom Sink
- How to Replace an Undermount Bathroom Sink
- Step 1: Support the sink (seriously)
- Step 2: Disconnect plumbing (same as earlier)
- Step 3: Remove mounting clips and cut the silicone
- Step 4: Lower and remove the old sink
- Step 5: Clean the underside and dry-fit the new sink
- Step 6: Install the sink with silicone and hardware
- Step 7: Let it cure
- Step 8: Reconnect plumbing and test
- Sealants, Putty, and Other Sticky Topics
- Common Problems and How to Fix Them
- When to Call a Pro (No Shame, Only Wisdom)
- Time and Cost Expectations
- of Real-World “Sink Swap” Experiences (What People Usually Learn the Hard Way)
- Conclusion
Replacing a bathroom sink is one of those home upgrades that looks like it should require a plumbing license,
three apprentices, and a dramatic “turn off the water!” moment. In reality, most sink swaps are a perfectly
doable weekend projectespecially if you’re replacing a sink with the same style and similar size.
The key is to slow down, measure twice, and accept one universal truth: the old caulk will fight you like it’s
being paid overtime.
This guide walks you through replacing two common sink types:
top-mount (drop-in/self-rimming) sinks that sit in a countertop cutout and are sealed around the rim,
and undermount sinks that attach to the underside of the countertop for that sleek, wipe-crumbs-straight-in look.
You’ll learn what tools you actually need, how to disconnect the plumbing without flooding your vanity,
and how to reinstall everything so it doesn’t leak the first time you wash your hands dramatically.
Before You Start: The 5-Minute Reality Check
1) Confirm what you’re replacing
“Bathroom sink” can mean a lot of things: a sink in a vanity top, a wall-hung sink, a pedestal sink, a vessel sink,
or an integrated one-piece top where the “sink” is basically part of the countertop’s DNA. This article focuses on
vanity-top sinks in two installations: top-mount and undermount.
If your sink is integrated into the vanity top (common with cultured marble), you may be replacing the entire top.
2) Measure like you’re ordering pizza for a crowd (accuracy matters)
- Cutout size: For drop-in sinks, the hole in the counter must match the new sink’s cutout requirements.
- Bowl size & depth: Make sure the new basin clears drawers and doors inside the vanity.
- Faucet compatibility: Count faucet holes (single-hole, 4-inch centerset, widespread, or wall-mount).
- Overflow or no overflow: Your drain assembly must match (many bathroom sinks have an overflow channel).
3) Decide what you’re reusing (and what you shouldn’t)
You can reuse a faucet and drain hardware if they’re in good shape. But flexible supply lines and old,
crusty slip washers are cheap insurance. If your shutoff valves under the sink are corroded, don’t fully close,
or look like they were installed during the Nixon administration, replacing them might be smartunless that turns into
a bigger plumbing project than you planned for today.
4) Tools and materials checklist
- Bucket, towels, and a small tray (for “mystery water” and tiny parts)
- Adjustable wrench and/or channel-lock pliers
- Basin wrench (helpful for faucet nuts in tight spaces)
- Putty knife and utility knife
- Screwdriver set
- Silicone caulk (kitchen & bath / mildew-resistant)
- Plumber’s putty (only if the drain manufacturer recommends it)
- Plumber’s tape (PTFE) for threaded connections if specified
- New supply lines (often 3/8" compression to faucetmatch your setup)
- Optional: new P-trap kit (1-1/4" is common under bathroom sinksverify yours)
- For undermount sinks: clamps/support blocks and new mounting hardware if needed
5) Safety and sanity
Turn off the water at the shutoff valves under the sink. Then open the faucet to relieve pressure. Keep a bucket under
the trap before you loosen anything, because gravity is undefeated. Wear gloves when scraping caulk and gunk, and be gentle
with stone countertopschips are forever.
Bathroom Sink Plumbing: Quick Tour of What You’re About to Touch
Under your sink, you’ll typically see two supply lines (hot and cold) running from shutoff valves to the faucet,
plus a drain setup made of a tailpiece and a P-trap. The P-trap is the U-shaped section that holds water to block sewer gas.
Most bathroom drain connections under the vanity are slip-joint style, meaning they’re designed to be disassembled for maintenance.
Steps That Are the Same for Top-Mount and Undermount Sinks
Step 1: Clear the cabinet and protect the area
Remove everything under the sink. Set towels down and place a bucket under the P-trap. Take a photo of the plumbing before
disassemblyfuture-you will treat past-you like a genius.
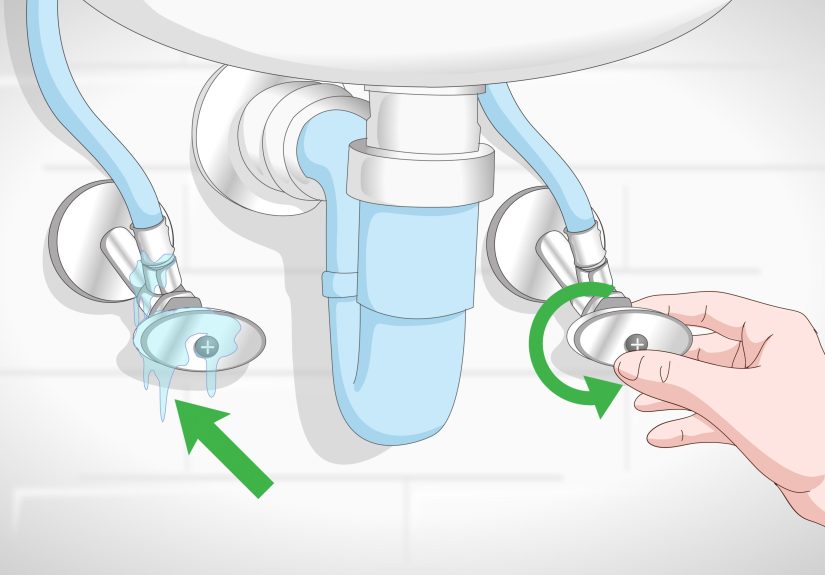
Step 2: Shut off water and disconnect the supply lines
- Close the hot and cold shutoff valves (turn clockwise). If they don’t close fully, shut off the main water supply.
- Open the faucet to relieve pressure and drain remaining water.
- Use a wrench to disconnect the supply lines from the shutoff valves (have the bucket ready).
Step 3: Disconnect the drain (P-trap and tailpiece)
- Loosen the slip nuts on the P-trap (often hand-loosenable; pliers if needed).
- Lower the trap carefully and dump water into the bucket.
- If your stopper uses a pop-up rod, detach the linkage so the stopper can come out when you remove the drain assembly.
Step 4: Remove the faucet (optional, but often easier)
If you’re replacing the faucet (or if it’s easier to handle the sink without it), remove it now. Faucet mounting nuts can be
awkward; a basin wrench helps in cramped vanity cabinets.
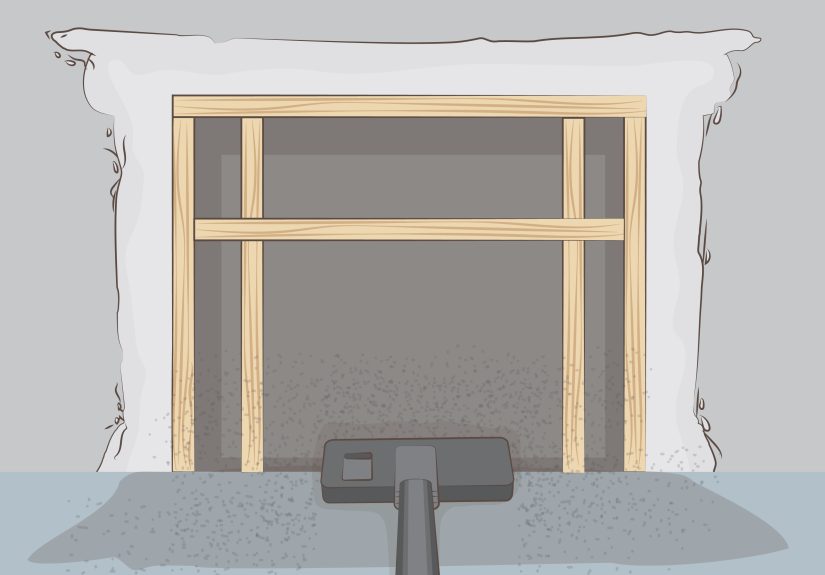
How to Replace a Top-Mount (Drop-In) Bathroom Sink
A top-mount sink sits in a countertop cutout, with a rim resting on top. It’s typically held by caulk/silicone and sometimes
mounting clips underneath. This style is popular because installation is usually straightforward and forgiving.
Step 1: Cut the old seal
Run a utility knife around the sink rim where it meets the countertop. You’re trying to cut through caulk/silicone without
slicing your countertop. Take multiple light passes rather than one heroic, countertop-scratching pass.
Step 2: Release any mounting clips
Some drop-in sinks use clips underneath that pinch the rim to the countertop. Loosen or remove them so the sink can lift out.
If you don’t see clips, the sink may be held primarily by the sealant.
Step 3: Lift out the old sink
Once the seal is cut, gently lift the sink from the cutout. If it won’t budge, slide a putty knife under the rim to break the seal.
Avoid prying directly against stone with a metal tooluse a plastic putty knife or protect the surface.
Step 4: Clean and prep the opening
- Scrape off old caulk/silicone from the countertop.
- Wipe the surface clean and dry (sealants hate dust and soap residue).
- Dry-fit the new sink to confirm it drops in properly and sits flat.
Step 5: Pre-assemble what you can (faucet and drain)
A classic pro move is to install the faucet and drain hardware on the sink before setting it into the countertop.
It’s easier to tighten everything when the sink is on a padded surface rather than inside a cramped vanity cabinet.
For the drain flange seal, follow the drain manufacturer’s instructions. Some drains use a rubber gasket; others specify
plumber’s putty or a suitable sealant. Don’t freestyle this part: the drain is where leaks love to start their careers.
Step 6: Apply sealant and set the sink
- Apply a continuous bead of kitchen-and-bath silicone under the rim (or as directed by the sink manufacturer).
- Lower the sink into the cutout and press evenly to seat it.
- Check level front-to-back and side-to-side. Minor leveling can sometimes be handled by reseating; major issues may mean the countertop itself is out of level.
- If clips are included, tighten them gradually in a crisscross patternsnug, not gorilla-tight.
- Wipe away squeezed-out silicone before it cures.
Step 7: Reconnect plumbing and test
- Reconnect the drain tailpiece and P-trap with clean slip washers.
- Reconnect supply lines (replace old lines if they’re stiff, corroded, or too short).
- Turn water back on slowly and check for leaks at every connection.
- Fill the sink, then drain it while watching the P-trap and drain flange.
How to Replace an Undermount Bathroom Sink
An undermount sink attaches to the underside of the countertop, usually with a combination of silicone adhesive and mounting clips.
It looks great and makes wiping the counter into the sink easy. It can also be trickier to replace because gravity is always waiting
for you to forget Step One: support the sink before removing hardware.
Step 1: Support the sink (seriously)
Before you loosen clips, support the sink from below. Common methods include:
a bar clamp through the drain opening with a padded board on top of the counter, a temporary brace from the cabinet base,
or a support frame/2×4 setup. The goal is to prevent the sink from dropping suddenly when the last clip comes off.
Step 2: Disconnect plumbing (same as earlier)
Shut off water, disconnect supply lines, remove the P-trap, and disconnect pop-up linkage if present. If your sink has an overflow,
make sure the replacement drain assembly is compatible.
Step 3: Remove mounting clips and cut the silicone
- Locate mounting clips around the sink rim under the countertop and remove/loosen them.
- Use a utility knife to cut the silicone bead between the sink rim and the underside of the countertop.
- Work slowly around the perimeter; don’t pry aggressively against stone.
Step 4: Lower and remove the old sink
With support in place and silicone cut, lower the sink carefully. If it still clings, the silicone bead may not be fully cut.
Use a plastic putty knife and patience. Your countertop does not need extra “character marks.”
Step 5: Clean the underside and dry-fit the new sink
- Scrape off old silicone from the countertop underside (carefully).
- Clean and dry the bonding surface (adhesive needs a clean substrate).
- Dry-fit the new sink and confirm alignment with the drain opening.
Step 6: Install the sink with silicone and hardware
- Apply a consistent bead of kitchen-and-bath silicone to the sink rim (or the countertop underside at the rim line).
- Lift the sink into position and align it perfectly with the cutout.
- Clamp/support it so it stays firmly seated while you attach clips.
- Install mounting clips and tighten evenly until snug. Over-tightening can stress the sink or countertop.
- Wipe off excess silicone that squeezes out along the edge.
Step 7: Let it cure
Silicone adhesive needs time to cure. Follow the sealant and sink manufacturer’s cure recommendations before putting stress on the sink.
Many installations call for waiting around a day before heavy use. This is the least glamorous step, but it prevents the dreaded
“sink slowly separating from countertop” situation.
Step 8: Reconnect plumbing and test
Reinstall the faucet and drain (if not already installed), reconnect supply lines and the P-trap, then test carefully:
run water, fill-and-drain cycles, and inspect every connection. A dry paper towel under joints makes tiny leaks easier to spot.
Sealants, Putty, and Other Sticky Topics
The general rule: use what the manufacturer specifies. Many drain assemblies seal with a rubber gasket and do not
require plumber’s putty. Some specify putty; some specify silicone. Plumber’s putty is often used for serviceable seals
(like certain drain flanges) and silicone is typically used where you want an adhesive, flexible, watertight seal (like sink rims).
One important caveat: plumber’s putty can stain or affect certain plastics/finishes, and some manufacturers warn against using it on
acrylic/ABS and other sensitive surfacesso don’t assume it’s universal.
Common Problems and How to Fix Them
Problem: Leak at the drain flange
- Cause: Incorrect sealant choice, uneven compression, misaligned gasket, or not tightened evenly.
- Fix: Disassemble, clean, follow manufacturer directions, and reinstall. Don’t just tighten harder until the universe apologizes.
Problem: Leak at the P-trap slip nuts
- Cause: Slip washer backward, cross-threaded nut, or misalignment.
- Fix: Re-seat washers, hand-tighten first, then snug with pliers. Replace washers if they’re old or deformed.
Problem: Sink doesn’t sit flat (top-mount)
- Cause: Old caulk buildup, warped vanity top, debris, or uneven cutout.
- Fix: Clean thoroughly, dry-fit again, and correct the surface issues before sealing.
Problem: Undermount sink won’t stay tight to the countertop
- Cause: Insufficient support during curing, missing/failed clips, or poor surface prep.
- Fix: Re-support, verify clip anchors/hardware, clean and reapply silicone as needed, and allow full cure time.
When to Call a Pro (No Shame, Only Wisdom)
- You need to modify the countertop cutout (especially stone/quartz).
- Shutoff valves don’t close, leak, or need replacement and you’re not comfortable working on supply plumbing.
- There’s evidence of water damage, mold, or a soft/rotted vanity deck.
- Your drain setup would create an S-trap or requires venting changes.
- The sink is heavy and awkward and you don’t have a second set of hands (undermount installs are safer with help).
Time and Cost Expectations
If you’re doing a like-for-like swap, a top-mount sink replacement can often be completed in a few hours,
while undermount replacements may take longer due to support, adhesive work, and cure time. Costs vary widely based on sink type,
faucet choices, and whether you hire a pro for any portion (countertop modifications and plumbing changes are where budgets grow legs).
of Real-World “Sink Swap” Experiences (What People Usually Learn the Hard Way)
People who replace bathroom sinks tend to share a surprisingly similar set of “I did not see that coming” momentslike a secret handshake
among DIYers. One common experience starts with shutoff valves that look fine but don’t fully shut off. The result isn’t always a dramatic geyser;
sometimes it’s a slow, persistent drip that turns every step into a towel-management exercise. Many homeowners end up learning a valuable lesson:
before you disassemble anything, close the valves and open the faucet for a minute to confirm the water truly stops. If it doesn’t, the project
instantly becomes either a “replace the valves” day or a “turn off the main supply and proceed carefully” day.
Another frequently reported surprise is the condition of the countertop opening. After the old sink comes out, people often find a ridge of hardened caulk,
soap residue, or adhesive that kept the sink “level” through sheer stubbornness. When the new sink goes in, it rocks slightly or sits unevenly,
and suddenly everyone is Googling “why is my sink seesawing.” The fix is usually unglamorous: scrape, clean, dry-fit, scrape again, then finally seal.
It’s a reminder that installation isn’t just about putting in the new pieceit’s about resetting the surface so the new seal can actually do its job.
Undermount sink replacements come with their own greatest hits. A classic experience is realizing (a beat too late) that undermount sinks aren’t held up
by vibesthey’re held up by clips and adhesive, and once those clips are loosened, gravity becomes the project manager. People who do it successfully almost
always mention some kind of support method: a clamp-and-board setup through the drain opening, temporary braces inside the cabinet, or a sturdy platform
that holds the sink in place while clips are removed and reinstalled. It’s also common to discover that old silicone can be tougher than expected;
it may take patient cutting and careful separation to avoid chipping stone edges.
Drain assembly leaks are another shared story. Many folks report that the first leak test goes fineuntil they fill the basin and let it drain quickly,
which creates a stronger flow and pressure shift. That’s when a slightly mis-seated gasket or unevenly tightened nut reveals itself. The most common fix
described is not “tighten it like a weightlifter,” but “disassemble, clean, align, and reassemble.” People also frequently realize their drain assembly needs
to match the sink’s overflow style, because overflow-compatible drains route water differently than non-overflow drains.
Finally, there’s the supply line reality check: old supply tubes can be too short for a taller faucet, too stiff to reseat without stressing connections,
or simply not worth reusing after years of service. DIYers often share that replacing supply lines during a sink swap felt like a small extra step that paid
off in peace of mind. The overall “experience lesson” is consistent: a bathroom sink replacement is easiest when you treat it like a systemsink, faucet,
drain, trap, supply lines, sealantrather than a single object you swap and forget. Do that, and your reward is a sink that looks great, drains cleanly,
and doesn’t turn your vanity cabinet into a surprise indoor pool.
Conclusion
Replacing a bathroom sink (top-mount or undermount) is a high-impact upgrade that mostly rewards careful prep and patient assembly. Measure the cutout,
match faucet holes and drain style, disconnect plumbing thoughtfully, and install the new sink with the right sealant in the right places.
A slow leak test beats a fast regret every time. And if the countertop needs cuttingor the shutoff valves refuse to cooperatecalling a pro can be the most
budget-friendly decision you make that day.