Table of Contents >> Show >> Hide
- What Makes a Traeger Grill Different?
- Before You Start: Quick Safety and Setup Checklist
- How to Start a Traeger Grill: Standard Closed-Lid Startup
- How to Start an Older Traeger Grill with Open-Lid Startup
- Starting a Brand-New Traeger: Seasoning and Burn-In
- When and How to Prime the Auger
- Common Traeger Startup Problems and Fixes
- How to Shut Down a Traeger Grill Correctly
- Best First Foods to Cook After Starting a Traeger
- Useful Traeger Startup Tips for Better Results
- Real-World Experience: What Starting a Traeger Teaches You Over Time
- Conclusion
Starting a Traeger grill is wonderfully simple once you understand what is happening under the hood. Unlike charcoal grills, which require lighter fluid, chimney starters, patience, and possibly a small weather prayer, a Traeger uses electricity, hardwood pellets, an auger, a hot rod, and a fan to create steady wood-fired heat. In plain English: you add pellets, power it up, press or turn the right control, let it ignite, preheat, and then cook.
That said, “simple” does not mean “skip the basics.” A Traeger pellet grill still needs clean airflow, dry pellets, the correct startup method for your model, and a proper shutdown cycle after cooking. Follow those steps and your grill will reward you with ribs, brisket, chicken, burgers, vegetables, pizza, and possibly neighbors who suddenly become much friendlier around dinner time.
Note: Always follow the owner’s manual for your specific Traeger model. Newer WiFIRE and touchscreen grills often use a closed-lid startup, while some older non-connected grills may require an open-lid startup process.
What Makes a Traeger Grill Different?
A Traeger is a wood pellet grill, not a gas grill with a fancy hat. It cooks with food-grade hardwood pellets that are stored in a hopper. When you start the grill, an electric auger moves pellets into the firepot. A hot rod ignites them, and a fan circulates heat and smoke through the cook chamber. This creates an indirect, convection-style cooking environment that is especially good for smoking, roasting, baking, and low-and-slow barbecue.
The big advantage is consistency. You are not constantly adjusting charcoal vents or moving logs around like a backyard firefighter. You set the temperature, the controller manages pellet feeding and airflow, and the grill does most of the babysitting. You still need to pay attention, of course, but Traeger cooking is closer to using an outdoor wood-fired oven than wrestling with a campfire.
Before You Start: Quick Safety and Setup Checklist
Before pressing the ignite button, take one minute to check the basics. This tiny pause can save you from failed ignition, temperature swings, excess smoke, or the deeply annoying realization that your hopper is empty halfway through dinner.
1. Place the Grill Outdoors in a Safe Spot
Use your Traeger outdoors only, in a well-ventilated area. Keep it away from walls, siding, deck railings, low branches, dry leaves, and anything that looks like it would enjoy catching fire. Your grill should sit on a stable surface with enough clearance for heat and smoke to escape safely.
2. Check the Pellet Hopper
Open the hopper and make sure you have enough pellets for the cook. For a short weeknight dinner, a partially filled hopper may be fine. For brisket, pork shoulder, or any long smoke, fill it generously. Running out of pellets can create a gap in the auger, cause the fire to go out, and turn your peaceful cook into a troubleshooting session with sauce on your shirt.
3. Use Dry, Food-Grade Pellets
Use pellets designed for pellet grills, not heating pellets. Cooking pellets are made for food use and flavor. Heating pellets may contain additives or contaminants that do not belong anywhere near your dinner. Also, keep pellets dry. If pellets become damp, they can swell, crumble, jam the auger, or burn poorly.
4. Confirm the Internal Parts Are Installed
Before startup, make sure the heat baffle, drip tray, and grill grates are correctly installed. These parts direct heat, manage grease, and help the grill cook evenly. Starting the grill without them is like driving without a windshield: technically, something may happen, but it is not the experience you want.
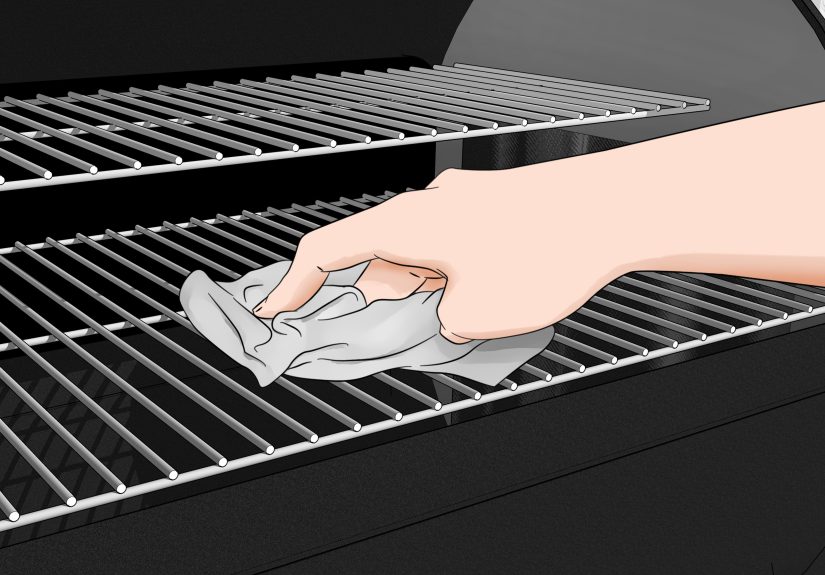
5. Clean Out Excess Ash
Ash buildup in the firepot can slow ignition and affect temperature control. If your Traeger has been used for several cooks, especially long smoking sessions, vacuum the firepot and barrel when the grill is completely cold. A clean firepot gives the hot rod a better chance to ignite pellets quickly and safely.
How to Start a Traeger Grill: Standard Closed-Lid Startup
Many newer Traeger grills use a closed-lid startup procedure. This includes several WiFIRE-enabled models and many newer digital controller grills. If your model’s manual says to use closed-lid startup, follow these steps.
Step 1: Fill the Hopper with Pellets
Add food-grade hardwood pellets to the hopper. Choose the wood flavor based on what you are cooking. Apple and cherry are friendly choices for chicken, pork, seafood, and baked goods. Hickory, oak, and mesquite bring a bolder flavor that works well with beef, wild game, and hearty vegetables.
Step 2: Plug In the Grill and Turn On the Power
Plug the power cord into a properly grounded outlet. Then flip the power switch to the on position. Some models have the switch on the back of the hopper, while others have it near the controller. Wake the controller if your model has a standby button.
Step 3: Set Your Cooking Temperature
Turn the dial or use the controller to choose your desired temperature. For smoking, you may set the grill around 180°F to 225°F. For roasting chicken, vegetables, or weeknight dinners, 325°F to 375°F is common. For burgers or hot-and-fast cooking, many cooks preheat higher, depending on the grill’s maximum temperature.
Step 4: Press and Hold Ignite
Press and hold the ignite button, or confirm the ignition prompt according to your model. You should hear the fan start and may hear pellets dropping into the firepot. The grill will begin its ignition sequence. During this stage, avoid opening the lid repeatedly. Your Traeger is trying to build a stable fire, not perform a magic trick on command.
Step 5: Let the Grill Preheat
Allow the grill to preheat until it reaches the set temperature. Many Traeger grills preheat in about 10 to 15 minutes, though cold weather, high target temperatures, model type, ash buildup, and wind can make it take longer. Some larger or newer series may take closer to 30 minutes in certain conditions.
Step 6: Add Food After Preheating
Once the grill is hot and stable, add your food. Use clean utensils and keep raw meat separate from cooked food, vegetables, and serving platters. A pellet grill may feel relaxed and easygoing, but food safety still matters.
How to Start an Older Traeger Grill with Open-Lid Startup
Some older non-connected Traeger grills use an open-lid startup method. If your owner’s manual tells you to start with the lid open, use this approach.
Step 1: Open the Lid
Keep the grill lid open before turning the dial to the smoke setting. This allows excess startup smoke to escape while the fire establishes.
Step 2: Turn the Dial to Smoke
Set the controller to the smoke setting. You should hear the fan running. Within several minutes, pellets should begin igniting in the firepot.
Step 3: Watch and Listen for Ignition
During startup, you may see thick white or gray smoke. That is normal at first. You may also hear the sound change from fan-only airflow to a more active fire. Once the fire is established, give it a few more minutes.
Step 4: Close the Lid and Set Your Temperature
After the fire has established, close the lid and set the grill to your desired cooking temperature. Let it preheat for about 10 to 15 minutes before placing food on the grates.
Starting a Brand-New Traeger: Seasoning and Burn-In
If your Traeger is brand new, do not toss a brisket on it five minutes after assembly. First, you need to season the grill, also called the initial firing or burn-in. This process burns off manufacturing residues and prepares the internal surfaces for cooking.
The exact seasoning steps vary by model, so check your manual. In general, the process includes adding pellets, priming the auger if necessary, starting the grill, letting the fire establish, then running the grill at a high temperature for a set period. Many Traeger seasoning procedures involve heating the grill for around 30 minutes at a high setting after ignition is established.
During the first burn-in, expect some smoke and unusual smells. That does not mean your grill is haunted. It usually means oils and residues from manufacturing are burning away. Once the seasoning cycle is complete and the grill has properly shut down, your Traeger is ready for its first real cook.
When and How to Prime the Auger
Priming the auger means filling the auger tube with pellets before ignition. You usually need to prime the auger when the grill is new, after it has completely run out of pellets, after clearing an auger jam, or after replacing auger-related parts.
If the auger is empty, the hot rod may heat up but no pellets reach the firepot soon enough to ignite. That can lead to slow ignition or a failed start. Many newer controllers include a prime auger option. Other models require a manual process. Follow the procedure for your exact grill series.
Common Traeger Startup Problems and Fixes
The Grill Is Not Igniting
First, check the obvious things. Is the grill plugged in? Is the power switch on? Are there pellets in the hopper? Are the pellets dry? Is the firepot clean? If the hopper is full but pellets are not reaching the firepot, you may have a pellet bridge, sawdust buildup, or auger jam.
The Grill Produces Too Much Smoke at Startup
Some heavy smoke during ignition is normal, especially on older open-lid startup models. However, excessive smoke can happen if too many pellets are sitting in the firepot, the previous shutdown was interrupted, or the fire was smothered. Turn the grill off safely, let it cool completely, then inspect and clean the firepot before restarting.
The Grill Takes Too Long to Preheat
Cold weather, wind, a dirty firepot, poor-quality pellets, or a very high target temperature can slow preheating. Give the grill enough time, keep the lid closed, and avoid opening it every two minutes to “check.” Every peek releases heat. Your ribs are not going to wave back.
The Temperature Swings More Than Expected
Small temperature swings are normal in pellet grills because the controller feeds pellets in cycles. Larger swings may come from ash buildup, wet pellets, blocked airflow, a dirty temperature sensor, or opening the lid too often. Start with cleaning and pellet quality before assuming something dramatic is wrong.
How to Shut Down a Traeger Grill Correctly
Proper shutdown is just as important as proper startup. Do not simply unplug the grill or flip the power switch off immediately after cooking. Traeger grills use a shutdown cycle to cool the grill, manage remaining pellets, and prepare the firepot for the next cook.
On many models, you press and hold the ignite or shutdown button for about three seconds, select shutdown on the controller, or use the app if supported. The fan may continue running during the shutdown cycle. Depending on the model and previous cooking temperature, shutdown can take roughly 15 to 25 minutes. Let it finish before unplugging or switching off the grill, unless your manual says otherwise.
Best First Foods to Cook After Starting a Traeger
If you are new to Traeger cooking, start with forgiving foods. Chicken thighs, pork tenderloin, sausages, vegetables, and burgers are easier first cooks than a full brisket. They help you learn how your grill preheats, how smoky the flavor is, and how temperature changes affect timing.
For your first smoke, chicken thighs at 350°F are a great confidence builder. They cook faster than ribs, stay juicy, and give you a chance to practice using a meat thermometer. For a low-and-slow test, try pork ribs at 225°F. For a fun surprise, bake a pizza or skillet cornbread. A Traeger is not just a smoker; it is basically a backyard oven with a wood-fired personality.
Useful Traeger Startup Tips for Better Results
Keep Pellets Fresh
Store pellets in an airtight container, not an open bag in a damp garage. Pellets that crumble easily or look swollen may have absorbed moisture. Bad pellets can cause poor ignition, uneven heat, and auger problems.
Preheat Longer for High-Heat Cooking
If you are cooking burgers, steaks, or pizza, give the grill extra time to heat the grates and internal metal parts. The controller may say the grill is ready, but a few more minutes of heat soak can improve browning and consistency.
Use a Meat Thermometer
Do not judge doneness by vibes, grill marks, or your uncle’s confident squint. Use a food thermometer. Cook whole cuts of beef, pork, lamb, and veal to 145°F with a rest; ground meats to 160°F; and poultry to 165°F.
Do Not Overload the Grill
Large pans, crowded racks, or foil that blocks airflow can interfere with heat circulation. A Traeger needs moving air to cook evenly. Leave space around food and avoid covering too much of the drip tray with foil.
Real-World Experience: What Starting a Traeger Teaches You Over Time
The first time you start a Traeger, you may hover like a nervous parent on the first day of school. You listen for the fan. You stare at the smoke. You wonder whether the pellets are dropping correctly. You may even open the lid too often, which is the pellet-grill version of pressing an elevator button 17 times. Eventually, you learn to trust the process.
One of the biggest lessons is that startup success begins before you press ignite. If the firepot is clean, the pellets are dry, the hopper is full, and the internal parts are in place, startup usually feels easy. If the grill is dirty, the hopper is dusty, or the pellets have been sitting in humidity for weeks, startup becomes less predictable. In other words, your Traeger is forgiving, but it is not a miracle worker with Wi-Fi.
Another experience many owners share is learning how weather affects the grill. On a warm, calm day, a Traeger may preheat quickly and hold temperature smoothly. On a windy winter evening, it may take longer to reach temperature and burn more pellets. That does not mean the grill is failing. It means outdoor cooking is still outdoor cooking. Wind, cold air, and frequent lid opening all steal heat.
You also learn that smoke changes during startup. Thick white smoke can appear early as pellets ignite. After the fire stabilizes, the smoke often becomes thinner and cleaner. Beginners sometimes panic when they see less smoke later in the cook, but visible smoke is not the only sign that wood flavor is happening. Thin, steady smoke can produce excellent results without making your food taste like it spent the weekend in a chimney.
The shutdown cycle is another habit that becomes second nature. Many new users want to turn everything off the moment the food comes off. Resist that urge. Let the grill run its shutdown cycle. It cools the system properly and helps prevent leftover pellets from causing trouble at the next startup. Think of shutdown as brushing your teeth before bed: not exciting, but future you will be grateful.
Over time, you will also develop favorite pellet pairings. Apple pellets for pork ribs, cherry for chicken, oak for brisket, hickory for burgers, and pecan for almost anything are common choices. There is no single correct answer. Part of the fun is experimenting until you find the flavor that makes your family suspiciously quiet at the dinner table because everyone is too busy eating.
Finally, starting a Traeger teaches patience. Pellet grills are convenient, but they still reward calm cooking. Let the grill preheat. Let the temperature stabilize. Let meat rest after cooking. Do not chase every tiny temperature fluctuation. Once you learn the rhythm, starting your Traeger becomes less of a procedure and more of a ritual: pellets in, power on, ignite, preheat, cook, eat, accept compliments modestly, repeat.
Conclusion
Learning how to start a Traeger grill is mostly about understanding the sequence: check the grill, add dry food-grade pellets, power it on, choose the correct startup method, let the fire establish, preheat fully, and cook with confidence. Newer Traeger grills often use a closed-lid startup, while some older models require an open-lid smoke setting at ignition. Your owner’s manual is the final authority, so keep it close until the process feels automatic.
The best results come from good habits. Keep the firepot clean, store pellets properly, avoid blocking airflow, use a thermometer, and always complete the shutdown cycle. Do that, and your Traeger will be ready for everything from quick chicken thighs to weekend brisket. The grill may not wash the dishes afterward, but nobody is perfect.