Table of Contents >> Show >> Hide
- First, Know Which “iTunes” Setup You Actually Have
- What an iTunes Library Really Includes
- Before You Transfer Anything, Do These 5 Prep Steps
- The Best Method: Copy the Entire iTunes Folder
- How to Transfer Purchased Music the Easy Way
- When Sync Library Can Save You Time
- What About Moving from Mac to Mac?
- Common Problems and How to Fix Them
- Best Practices After the Move
- Final Thoughts
- Real-World Experiences People Commonly Have During an iTunes Library Transfer
- SEO Tags
Moving an iTunes library to another computer sounds simple until you realize your music collection is not just a pile of songs. It is playlists, play counts, ratings, album artwork, custom metadata, purchased media, and all the tiny digital crumbs you have carefully collected over the years. In other words, it is less “copy some MP3s” and more “please do not break my musical life.”
The good news is that transferring your iTunes library is very doable if you take the right route. The safest method is to consolidate the library, copy the entire iTunes folder, and then point the new computer to that library file. That approach is the closest thing to moving house with labeled boxes instead of tossing everything into the trunk and hoping the coffee mugs survive.
This guide walks you through the cleanest way to transfer your iTunes library to another computer, whether you are moving from one Windows PC to another, from an older Mac, or simply migrating a local media library onto a fresh machine. It also covers what to do if some songs are missing, why purchased content may need authorization, and when Apple Music’s Sync Library can save you a lot of effort.
First, Know Which “iTunes” Setup You Actually Have
Before you start, identify what software is managing your library. On older Macs and many Windows PCs, that is still iTunes. On macOS Catalina and later, Apple replaced iTunes with separate apps such as Music, TV, and Podcasts. On newer Windows setups, Apple also offers dedicated Apple Music, Apple TV, and Apple Devices apps. That matters because the name of the app may change, but the core job remains the same: preserve the library database and the media files together.
If your music is mostly stored locally, copied from CDs, or organized into custom playlists, you should plan on moving the full library folder. If you use Apple Music with Sync Library enabled, a chunk of your library may already reappear automatically once you sign in on the new machine. That said, relying only on the cloud is not always the best move for carefully curated local collections, rare imports, or manually edited tags.
What an iTunes Library Really Includes
Your iTunes library is more than the audio files themselves. The media files are the songs, videos, audiobooks, and other content stored in your iTunes Media folder. But the library also includes a database file that keeps track of playlists, ratings, play history, and organizational details. If you copy only the songs and ignore the library database, your music may show up, but your carefully built playlists can vanish like socks in a dryer.
That is why the smart move is to copy the entire iTunes folder, not just the media subfolder. Think of the media files as the books and the library file as the card catalog. One without the other is technically still a collection, but it is a lot less fun to use.
Before You Transfer Anything, Do These 5 Prep Steps
1. Update the old computer
Open iTunes or the Music app and make sure everything looks normal. If your library is already behaving strangely, with missing tracks or broken artwork, fix that before moving it. A messy library on the old computer usually becomes a mess with luggage on the new one.
2. Consolidate your library
This is the most important step. In iTunes on PC, go to File > Library > Organize Library, then choose Consolidate Files. This copies scattered media into the main iTunes folder so you are not hunting down songs hidden in random folders later. If your music has been imported from all over the place over the years, consolidation turns chaos into one neat moving box.
3. Check your Advanced preferences
Look in Edit > Preferences > Advanced on Windows, or the equivalent settings in Music on Mac, and confirm that your app is set to keep media organized and copy files into the media folder when adding to the library. That is not strictly required for the transfer itself, but it helps make sure the collection behaves like a real library instead of a scavenger hunt.
4. Back up before you move
Yes, copy the library. But also back it up. Those are not the same thing. A transfer is a move. A backup is insurance. Put a copy on an external drive before you start moving files around. Future You would like to shake Present You’s hand for this.
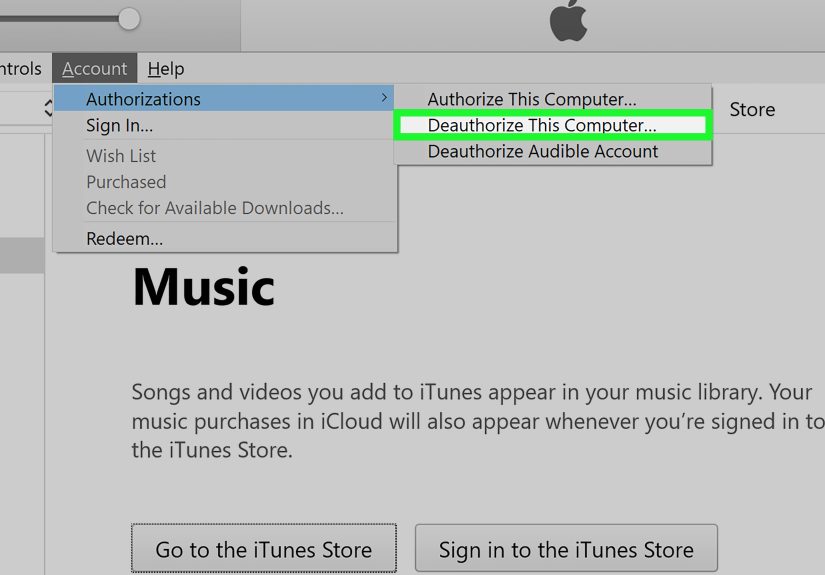
5. Deauthorize only if needed
If you are retiring, selling, or giving away the old computer, deauthorize it before it leaves your hands. Apple limits how many computers can be authorized to play purchases tied to your account, so keeping ghost computers authorized is like paying rent for roommates who moved out years ago.
The Best Method: Copy the Entire iTunes Folder
Step 1: Find your iTunes folder on the old computer
In many setups, the default location is inside your user’s Music folder. On Windows, that is commonly something like C:UsersYourNameMusiciTunes. On Mac, it is typically inside the Music folder for your user account. If you changed the media location in preferences, verify where the active library actually lives before copying anything.
Step 2: Quit iTunes completely
Do not copy the library while iTunes is open. The app may still be updating the library database, which is a lovely way to create file confusion and a terrible way to spend your afternoon.
Step 3: Copy the whole iTunes folder to an external drive
Use an external hard drive, SSD, or large USB drive. Copy the entire iTunes folder, not just the songs. Wait until the copy finishes. Then wait one extra beat because impatience is the unofficial mascot of broken file transfers.
Step 4: Install iTunes or the correct Apple app on the new computer
On the new machine, install iTunes if that is what your setup uses. If you are on a newer Mac, you will use the Music app. On newer Windows installations, Apple may direct you to Apple Music and Apple Devices. Sign in with the same Apple Account if you want access to purchases or cloud-based syncing.
Step 5: Place the copied folder on the new computer
You can put the transferred iTunes folder in the new computer’s Music folder, which is often the easiest choice. Keeping it in a familiar default location reduces the odds of future confusion, especially if you later add more media.
Step 6: Open the transferred library file
Here is the key move many people miss. Hold down the proper key while launching the app:
- Windows: hold Shift while opening iTunes.
- Mac: hold Option while opening Music or iTunes.
You should get a prompt to choose a library. Select Choose Library, browse to the copied iTunes folder, and open the main library file. On Windows, Apple’s guidance points to the iTunes Library.itl file. Once selected, the new computer should load your playlists, ratings, and media organization instead of acting like it just woke up with no idea who The Beatles are.
How to Transfer Purchased Music the Easy Way
If a lot of your collection came from the iTunes Store, you may not need to manually move every purchased track. After authorizing the new computer with your Apple Account, you can often re-download previous purchases. That can be a handy backup option, especially if your old computer is dead, unavailable, or one dramatic fan noise away from retirement.
There is also a transfer-purchases workflow for some content from an iPhone, iPad, or iPod to an authorized computer. Still, this should be treated as a supporting method, not your main migration strategy. It is useful for purchases, but it is not the full answer for custom local files, old CD imports, or lovingly obsessive playlist architecture.
When Sync Library Can Save You Time
If you subscribe to Apple Music and use Sync Library, your music library may appear on the new computer after you sign in and enable it. This is especially helpful for matched and cloud-based content. But do not confuse that with a full local library migration. Cloud syncing is convenient, but it is not always a perfect substitute for a direct file copy, especially if you care about offline files, uncommon imports, or exact local storage control.
The safest mindset is simple: cloud sync is helpful, but a full library copy is reliable. Use both if you can.
What About Moving from Mac to Mac?
If you are moving from one Mac to another, Apple’s Migration Assistant can make the process easier by transferring user data more broadly. That can include your media environment, which is handy when you are replacing an entire machine instead of just moving one app’s library. Even then, it is still wise to make a separate backup of your iTunes or Music folder first. Migration tools are convenient, but convenience is not a substitute for a safety net.
Common Problems and How to Fix Them
Problem: Songs are listed, but they will not play
This usually means the library database moved, but the media files did not, or they landed in a different location. Go back to the old computer, consolidate the library, and copy the full folder again. Missing file paths are a classic sign that the transfer was only half done.
Problem: Playlists disappeared
That often happens when you imported songs into a fresh library instead of opening the transferred library file. Reopen the app while holding Shift or Option, then point it to the copied library.
Problem: Purchased songs ask for authorization
Authorize the new computer using the same Apple Account that bought the content. If you have hit the authorization limit, you may need to deauthorize an old machine or reset authorizations through your account page.
Problem: Everything transferred, but the library feels messy
Turn on the organizational settings for keeping the media folder organized and copying files into it when adding to the library. That helps prevent future song imports from wandering off into desktop folders, old downloads directories, and other digital wilderness.
Best Practices After the Move
- Open several playlists and test random tracks.
- Verify album artwork, ratings, and play counts if those matter to you.
- Keep the old library untouched until you know the new one works perfectly.
- Create a fresh backup of the new computer once the transfer is confirmed.
- Deauthorize the old computer only after you are sure the new setup is solid.
Final Thoughts
Transferring your iTunes library to another computer is not hard, but it does reward patience and punish shortcuts. The safest approach is wonderfully unglamorous: consolidate the files, copy the entire library folder, install the right Apple software on the new machine, and open the transferred library properly. That method protects the things people usually care about most, including playlists, organization, and those oddly sentimental star ratings from 2011.
If you use Apple Music, Sync Library can make life easier. If you bought a lot of music from Apple, re-downloading purchases can help fill gaps. But if you want the most complete and least stressful result, a full library copy remains the gold standard. It is not flashy. It is not futuristic. But it works, and sometimes that is the most beautiful song in the playlist.
Real-World Experiences People Commonly Have During an iTunes Library Transfer
One of the most common experiences people have is realizing they were not really managing “one library” at all. They thought iTunes held everything neatly in one place, but once they started transferring, they discovered songs living in old Downloads folders, random desktop directories, external drives, and mystery folders named things like “New Music Final Final 2.” The transfer process becomes a wake-up call. Suddenly, the consolidation step feels less like a suggestion and more like a rescue mission.
Another common experience is the emotional side of the move. A music library is deeply personal. It is not just audio data. It is college playlists, road trip albums, breakup songs, gym tracks, and those embarrassing but somehow still beloved one-hit wonders that nobody is allowed to judge. People often start the transfer expecting a technical task and end up taking an accidental nostalgia tour through ten or fifteen years of their lives. It is hard to stay annoyed at file management when an old playlist called “Summer Driving 2014” ambushes you with memories.
Many users also run into a funny confidence curve. At first they think, “This will take five minutes.” Then they see how large the library is, how long the copy time looks, and how many little details matter. That is when the mood changes from casual optimism to focused respect. By the time the transfer finishes successfully, people often feel weirdly accomplished, as if they did not just move media files but completed a rite of passage in digital adulthood.
There is also the classic moment of panic when the new computer opens the library and something appears to be missing. Maybe a few tracks show exclamation marks. Maybe a playlist loads but one album is grayed out. In many cases, the problem is fixable, but those first ten seconds can feel dramatic. It is the tech version of opening a moving box labeled “kitchen” and finding only one fork. Fortunately, once users realize the issue usually comes down to unconsolidated files or choosing the wrong library, the stress level drops fast.
People who use Apple Music often describe a split experience. On one hand, Sync Library can feel almost magical because familiar content starts reappearing after sign-in. On the other hand, longtime collectors with ripped CDs, custom edits, live recordings, or rare imports usually trust a manual library copy more than pure cloud convenience. That balance between modern syncing and old-school file control is a real theme in the iTunes world. Many users end up using both, enjoying cloud access while still keeping a local backup like a cautious music-loving squirrel storing acorns for winter.
Finally, one of the best experiences comes after the move is done: opening the new computer, clicking a favorite playlist, and seeing everything work. The artwork is there. The playlists are intact. The library feels familiar. It is still your collection, just on a different machine. That moment is satisfying because it proves the transfer was not only about preserving files. It was about preserving continuity. Your habits, your taste, your history, and your little corner of digital order all made the trip successfully.


![How to Send Money to US from Myanmar [Burma]](https://factxtop.com/wp-content/uploads/2026/04/how-to-send-money-to-us-from-myanmar-burma-dh3TAFu6-thumb.jpg)