Table of Contents >> Show >> Hide
- What Is an Exfoliating Foot Peel?
- Who Should Skip a Foot Peel?
- How to Use an Exfoliating Foot Peel: 10 Steps
- Step 1: Read the Package Like It Is a Tiny Contract
- Step 2: Make Sure Your Feet Are Good Candidates
- Step 3: Pick the Right Time
- Step 4: Wash and Dry Your Feet Thoroughly
- Step 5: Soak First Only If the Instructions Say To
- Step 6: Apply the Foot Peel Evenly
- Step 7: Leave It On for the Recommended Time Only
- Step 8: Rinse Thoroughly and Pat Dry
- Step 9: Wait for the Peel and Do Not Force It
- Step 10: Moisturize and Protect Your Fresh Skin
- What to Expect After a Foot Peel
- Common Mistakes to Avoid
- How Often Should You Use an Exfoliating Foot Peel?
- When to Stop and Get Help
- Conclusion
- Experiences With an Exfoliating Foot Peel: What the Process Usually Feels Like
Note: This article is for general educational purposes and should not replace personal medical advice. If you have diabetes, poor circulation, numbness in your feet, a rash, athlete’s foot, eczema, psoriasis, cuts, or open cracks, talk to a clinician before using an exfoliating foot peel.
If your heels feel like they’ve been auditioning for the role of “tiny desert floor,” an exfoliating foot peel can be a satisfying reset. These peel treatments are designed to loosen dead skin on the soles and heels so rough feet feel smoother over the next several days. The keyword there is days. A foot peel is not a magic trick. It is more like a slow-motion renovation project for your feet.
Done correctly, a chemical foot peel can help soften thick, dull, callused skin. Done carelessly, it can turn into a regrettable episode of “Why did I peel that early?” This guide walks through exactly how to use an exfoliating foot peel safely, what to expect, what mistakes to avoid, and how to care for your feet after the peeling starts.
What Is an Exfoliating Foot Peel?
An exfoliating foot peel is usually a sock-style treatment or liquid mask that contains chemical exfoliants such as lactic acid, glycolic acid, salicylic acid, or other skin-softening ingredients. These ingredients help break down the bonds between dead skin cells so the thick outer layer can gradually shed.
That sounds dramatic, and honestly, it can look dramatic too. But the goal is simple: smoother feet, less roughness, and a fresher-looking sole without aggressive scraping.
Who Should Skip a Foot Peel?
Before we get to the fun part, here is the boring-but-important part. You should not use an exfoliating foot peel on broken, inflamed, infected, or highly sensitive skin. If you have athlete’s foot, eczema, psoriasis, contact dermatitis, sores, or deep heel cracks, this is not the moment. The same goes for people with diabetes, poor circulation, or reduced feeling in the feet unless a healthcare professional says it is safe. In those situations, even minor irritation can become a bigger problem than a dry heel ever was.
How to Use an Exfoliating Foot Peel: 10 Steps
Step 1: Read the Package Like It Is a Tiny Contract
Start with the instructions on the product you bought. Different foot peels use different acid blends and different wear times. Some ask you to soak your feet first. Some do not. Some stay on for under an hour, while others vary by formula. Do not freestyle this. Your feet do not need a surprise chemistry experiment.
Check the ingredient list, usage time, warnings, and age recommendations. If the brand suggests a patch test, do it. If the label says not to use the product on irritated skin, believe it.
Step 2: Make Sure Your Feet Are Good Candidates
Look closely at your soles, heels, toes, and the skin between your toes. A little roughness is fine. Redness, itching, cuts, raw areas, blisters, or peeling from a fungal infection are not. If your feet already look angry, do not hand them a stronger opinion.
This is also a good time to ask yourself why your feet are rough. If your main problem is mild dryness, a rich foot cream with urea, lactic acid, petroleum jelly, or similar moisturizing ingredients may help without the full peel process.
Step 3: Pick the Right Time
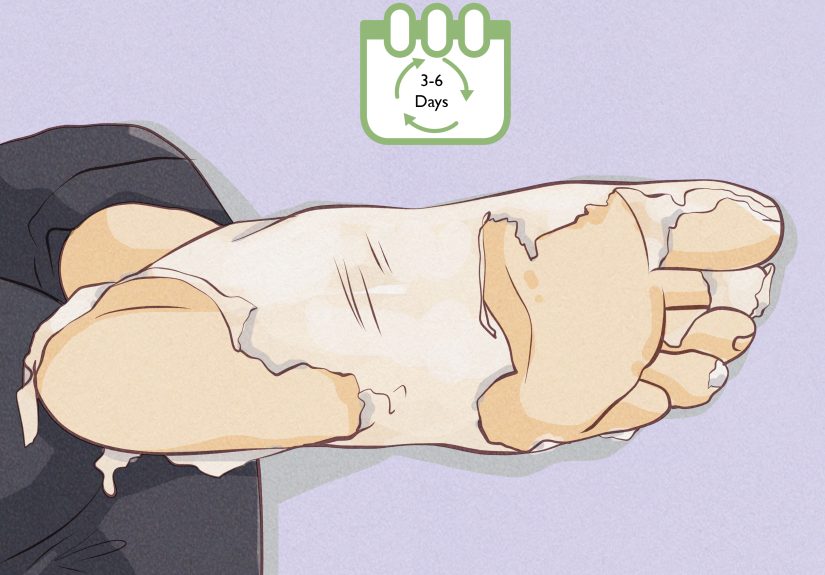
Do not use a foot peel the night before a beach trip, sandal-heavy weekend, school event, or anything else that requires your feet to look camera-ready. The peeling usually starts a few days later, often around day five to day seven, and it can continue for another several days after that.
The best time to do a foot peel is when you can keep things low-key. Think closed shoes, breathable socks, and no pressure to show off your feet like they’re starring in a shoe commercial.
Step 4: Wash and Dry Your Feet Thoroughly
Before applying the peel, wash your feet with lukewarm water and a gentle cleanser. Then dry them well, especially between the toes. Clean skin helps the product make better contact, and dry feet reduce the chance of trapping unwanted moisture where fungus loves to party.
Avoid hot water and harsh scrubbing before the peel. You want clean feet, not freshly irritated ones.
Step 5: Soak First Only If the Instructions Say To
Many exfoliating foot peels recommend a brief soak before application. If yours does, follow the timing exactly. A short soak can soften the outer layer of skin and help the peel spread more evenly. But longer is not automatically better. Over-soaking can weaken the skin barrier and make your feet more sensitive.
If the product does not call for pre-soaking, skip it. There is no bonus prize for improvisation.
Step 6: Apply the Foot Peel Evenly
If your product comes in plastic booties, slide your feet in carefully and seal them as directed. If it is a liquid or gel, apply it evenly over the soles, heels, and other rough areas while avoiding any broken skin.
Many people put regular socks over the booties to keep them snug and make it easier to shuffle around the house without doing that awkward “I am wearing slippery bags on my feet” walk. This step is practical, not glamorous. Beauty is full of sacrifices, and occasionally those sacrifices are dignity and traction.
Step 7: Leave It On for the Recommended Time Only
Set a timer. Then listen to it. This is not a leave-it-on-longer-for-better-results situation. Acid-based products work within a specific window, and extra time can increase irritation without giving you dramatically better peeling.
During the waiting period, avoid pressure, friction, or stomping around like you are training for a hiking expedition. Sit down. Read something. Watch a show. Let science do its quiet little job.
Step 8: Rinse Thoroughly and Pat Dry
Once the timer goes off, remove the peel and rinse your feet well with lukewarm water. Make sure no leftover solution remains between the toes or around the nails. Pat dry gently rather than rubbing with a towel.
After rinsing, your feet may feel normal at first. That is completely typical. The dramatic shedding does not usually begin on the same day. The peel is working behind the scenes, like a very patient stage crew.
Step 9: Wait for the Peel and Do Not Force It
This is the step that trips people up. A few days after treatment, your skin may begin flaking, curling, or peeling in sheets. It can be weirdly satisfying to watch, but resist the urge to pull, pick, shave, scrape, or attack it with a pumice stone too early.
Manual peeling can tear healthy skin underneath, increase irritation, and raise the risk of infection. Let the dead skin come off on its own schedule. Think of yourself as a patient observer, not the demolition crew.
Step 10: Moisturize and Protect Your Fresh Skin
Once peeling starts, use a simple fragrance-free moisturizer to keep your skin comfortable. Thick creams, ointments, or petroleum jelly-based products can help reduce that tight, dry feeling without turning the process into a slippery soap opera.
Wear breathable socks, keep your feet clean, and avoid aggressive foot filing until the peeling phase is over. If your feet will be exposed in sandals, remember that acid-treated skin can be more sensitive to the sun, so a little sunscreen on the tops and sides of the feet is not overkill. It is just smart.
What to Expect After a Foot Peel
Most people expect instant baby-soft feet and get… regular feet for a few days. That is normal. The delayed effect is part of the process. A typical timeline looks like this:
- Day 1 to Day 3: Very little happens. You may wonder whether the product did anything at all.
- Day 4 to Day 7: Peeling often begins around the toes, ball of the foot, or heel.
- Day 7 to Day 14: The main shedding period. This is when your socks may become unexpected witnesses.
- After peeling ends: Skin often feels smoother, softer, and less rough than before.
Some people peel lightly. Others peel like a reptile with a busy schedule. Both can be normal, depending on the condition of your feet, the product formula, and how thick the dead skin was to begin with.
Common Mistakes to Avoid
Using a Foot Peel on the Wrong Problem
If the issue is infection, rash, deep fissures, or severe pain, a peel is not the fix. It may worsen the problem.
Leaving It On Too Long
Longer wear time does not guarantee better results. It may only increase irritation.
Picking at the Peeling Skin
Yes, it is tempting. No, your feet do not appreciate it. Let the loose skin shed naturally.
Over-Scrubbing During the Peel Phase
A gentle wash is fine. Vigorous filing, scraping, or scrubbing while the skin is actively peeling is not.
Skipping Moisturizer Entirely
You do not need to drown your feet in lotion, but a basic fragrance-free moisturizer can make the process far more comfortable.
How Often Should You Use an Exfoliating Foot Peel?
Not every weekend. Foot peels are usually occasional treatments, not a daily or even weekly routine. Most people do best using them sparingly and relying on regular foot care in between. If your feet are constantly rough, focus on the basics too: well-fitting shoes, breathable socks, gentle cleansing, consistent moisturizing, and not pretending your heels can survive winter without help.
For maintenance, many people get better long-term results from simple habits than from repeated peeling sessions. A good foot cream used several times a week can be less dramatic and more sustainable than turning your bathroom into a peeling festival every month.
When to Stop and Get Help
Stop using the product and seek medical advice if you develop strong burning, swelling, severe redness, pain, blisters, drainage, or signs of infection. Also get checked if your feet are peeling but you never used a peel and the problem keeps returning. Persistent peeling can be caused by athlete’s foot, dermatitis, psoriasis, or other conditions that need the right diagnosis instead of another beauty product.
Conclusion
Learning how to use an exfoliating foot peel is really about patience, timing, and restraint. The actual application is easy. The hard part is not interfering while the peel works. Follow the label, protect sensitive skin, moisturize afterward, and resist the urge to overdo it. In exchange, your feet may reward you by looking smoother, feeling softer, and no longer resembling ancient parchment.
In other words, let chemistry handle the rough stuff so you do not have to wage hand-to-hand combat with a foot file.
Experiences With an Exfoliating Foot Peel: What the Process Usually Feels Like
For many people, the first experience with an exfoliating foot peel is less “spa luxury” and more “curious experiment with a surprisingly long sequel.” The application itself is often easy. You wash your feet, put on the booties, wait around for the recommended time, rinse off, and then think, “That was it?” At that point, your feet may still look exactly the same. This is where first-timers often make mistake number one: assuming the product failed. It probably did not. Most of the action happens later.
During the first few days, your feet may feel normal or just slightly dry. Some people notice a little tightness in the soles, especially around the heels. Others feel absolutely nothing and go on with life. Then, somewhere around the middle of the week, the peeling begins. Often it starts around the toes or the ball of the foot. At first it may look like mild flaking, the kind you could ignore if you were not inspecting your feet like a detective. Then suddenly, things escalate. The peeling becomes more obvious, sometimes in strips or soft sheets.
This is the stage people either find deeply satisfying or mildly horrifying. Sometimes both.
A very common experience is wanting to help the skin along. You see a loose edge, your brain says, “Just one tiny pull,” and now you are negotiating with your self-control. The better move is to leave it alone, moisturize lightly, and let the skin release naturally. People who force the process often end up with sore patches, pink tender spots, or skin that feels more irritated than smooth.
Another common experience is becoming strangely aware of your socks. During the peeling phase, soft socks are your best friends. They help contain flakes, reduce friction, and make your feet feel less exposed. Shoes that are too tight can make the process uncomfortable, so many people prefer sneakers, house slippers, or anything roomy enough not to rub.
By the end of the peeling cycle, most people notice that their soles look brighter and feel smoother, especially if roughness was mild to moderate before treatment. Thick calluses may improve but not vanish completely in one round. That is normal. A foot peel is helpful, but it is not a miracle worker with a tiny acid wand. The best experiences usually happen when people treat the peel as one part of a broader foot care routine rather than the entire plan. Consistent moisturizing afterward often makes the biggest difference in how long the results last.
So if your first foot peel feels a little weird, a little messy, and a little fascinating, congratulations. You are having a very standard exfoliating foot peel experience.