Table of Contents >> Show >> Hide
- Why Wood Gets Blotchy in the First Place
- What You Need Before You Start
- How to Stain Wood Evenly: Step-by-Step
- 1. Start With the Right Stain Strategy
- 2. Sand Evenly, Not Randomly
- 3. Remove Dust, Glue, and Other Tiny Enemies
- 4. Use a Pre-Stain Conditioner on Problem Woods
- 5. Test the Exact Finish Schedule on Scrap
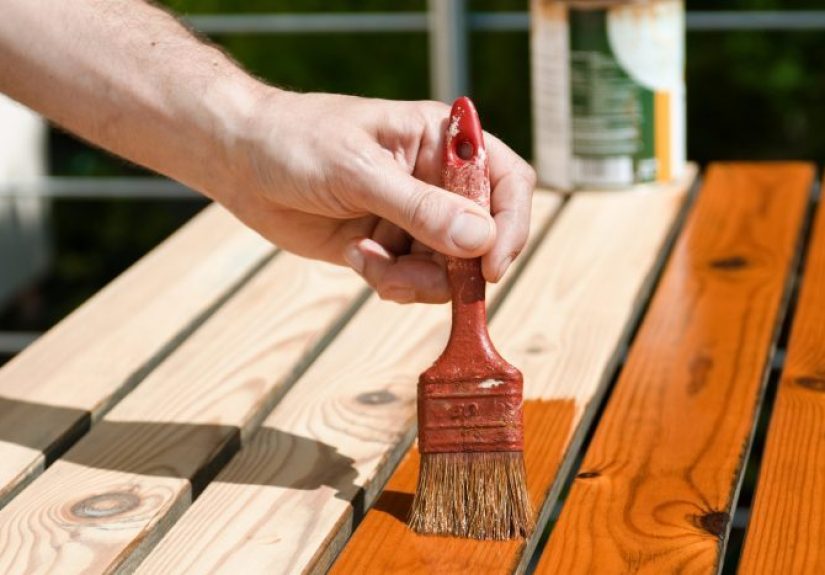
- 6. Apply the Stain in Manageable Sections
- 7. Wipe Off the Excess at a Consistent Time
- 8. Let It Dry Fully Before Judging the Color
- 9. Protect the Finish With a Compatible Topcoat
- Best Approaches for Common Wood Types
- Common Mistakes That Cause Spots and Streaks
- Quick FAQs About Staining Wood Evenly
- Final Thoughts
- Real-World Experience: What This Process Feels Like on an Actual Project
Note: This article is written to pair with a video-style tutorial, but it also works as a standalone step-by-step guide for DIYers, woodworkers, and anyone who has ever looked at a blotchy pine board and quietly whispered, “Well, that escalated quickly.”
Staining wood sounds simple until the stain hits the surface and the wood decides to freestyle. One section goes dark, another stays pale, and suddenly your “warm walnut finish” looks more like a weather map. The good news is that blotches and dark spots are not random acts of woodworking cruelty. They usually happen for predictable reasons: uneven sanding, glue residue, thirsty softwood, inconsistent wipe-off timing, or using the wrong stain strategy for the species.
If you want to stain wood evenly without getting blotches and spots, the secret is less about magic products and more about process. Prep the surface evenly, choose the right stain system, test before committing, and apply the finish with the discipline of someone frosting a cake they actually want to serve. In other words: slow down just enough to avoid spending your weekend sanding off regret.
Why Wood Gets Blotchy in the First Place
Wood is not a perfectly uniform material. Even within one board, density can vary from one area to the next. That matters because stain is absorbed differently by dense grain, open grain, end grain, knots, and softer earlywood. Some species handle stain gracefully. Others behave like they were personally offended by the idea.
The usual troublemakers include pine, birch, maple, alder, poplar, cherry, fir, spruce, and aspen. These woods are more likely to soak up stain unevenly, especially when you use darker penetrating stains. Oak and walnut are typically more forgiving because their grain structure accepts color more consistently.
Blotches also show up when the surface is not prepared evenly. If one area is sanded smoother than another, or if a glue smear blocks stain penetration, the final color will shift. End grain is another classic culprit because it drinks stain faster than face grain. Add rushed application into the mix, and now you have all the ingredients for a finish that looks like it lost an argument.
What You Need Before You Start
You do not need a workshop worthy of a TV host with a flannel sponsorship. You just need the right basics:
- Sandpaper in progressive grits, usually 120, 150, 180, and sometimes 220
- A vacuum, tack cloth, or clean lint-free cloths
- Mineral spirits or the cleaner recommended for your finish system
- Pre-stain wood conditioner for blotch-prone woods
- Oil-based, water-based, or gel stain
- Foam brush, staining pad, or lint-free rag
- Disposable gloves
- Scrap wood from the same project for testing
- A clear topcoat such as polyurethane, lacquer, or another compatible protective finish
If you only remember one line from this whole article, let it be this: test on scrap first. That little practice board is cheaper than therapy and faster than refinishing a whole tabletop.
How to Stain Wood Evenly: Step-by-Step
1. Start With the Right Stain Strategy
If you are working with pine, birch, maple, alder, or another blotch-prone wood, do not blindly grab the first penetrating stain you see. These woods often benefit from either a pre-stain wood conditioner or a gel stain. A conditioner helps regulate how quickly the wood absorbs color. A gel stain sits closer to the surface, which can reduce the dramatic dark-and-light patchiness you get with thinner stains.
That does not mean gel stain is automatically “better” every time. It simply gives you more control on difficult woods. If your goal is deep grain contrast and a more natural penetration look, a traditional stain may still be the right call. But if your last pine project came out looking like a camouflage experiment, gel stain deserves a serious look.
2. Sand Evenly, Not Randomly
Most stain problems begin before the stain can is even open. Uneven sanding creates uneven color, period. Sand the whole surface progressively and consistently. For many interior wood projects, that means starting around 120 grit, moving through 150, and finishing around 180. Some finishers go to 220 on end grain or for final smoothing, but oversanding can sometimes reduce stain absorption, especially on dense woods.
Also, sand with the grain. Random scratches and swirl marks love to show up after stain, when it is far too late to pretend they are “character.” If you use a random-orbit sander, follow up with hand-sanding in the direction of the grain using the same final grit. Do the same routine across the entire piece so one section is not smoother than the next.
3. Remove Dust, Glue, and Other Tiny Enemies
Once sanding is done, remove every bit of dust you can. Vacuum first. Then wipe the surface with a clean cloth. Many finishers also wipe with mineral spirits to reveal hidden scratches, glue spots, and missed areas. Glue residue is especially sneaky because it blocks stain absorption and leaves pale, ugly patches that stand out the second color hits the board.
If you spot shiny glue smears during the wipe-down, sand them out before moving on. Yes, this is annoying. No, the stain will not magically “cover it up.” Wood finish has many talents. Fixing dried glue is not one of them.
4. Use a Pre-Stain Conditioner on Problem Woods
If your wood species is prone to blotching, apply a pre-stain wood conditioner that matches your stain type. In plain English, use a water-based conditioner under a water-based stain and an oil-based conditioner under an oil-based stain unless the manufacturer says otherwise. This step helps seal overly absorbent areas so they do not gulp down stain faster than the surrounding wood.
Follow the product instructions closely because timing matters. Some conditioners require stain application within a certain window. Others call for a short wait before staining. This is not the moment for creative interpretation. You are finishing wood, not auditioning for abstract art.
Conditioner is especially helpful on pine, birch, maple, cherry, alder, and poplar. It can lighten the final color slightly, so keep that in mind if you are aiming for a darker look. In that case, you may need a second stain coat after the first dries.
5. Test the Exact Finish Schedule on Scrap
Do not just test the stain color. Test the entire process. Sand the scrap to the same grit, apply conditioner if you plan to use it, stain it the same way, wipe at the same interval, and topcoat if color shift matters. This tells you what the wood will actually look like, not what the label claims during its best day under showroom lighting.
Testing is also where you figure out whether the stain needs to sit for two minutes, five minutes, or slightly longer before wiping. Different woods and stain types respond differently. A timer is surprisingly helpful here. If you let one side sit for three minutes and the other side for eight, you are basically telling the wood to make two different design decisions.
6. Apply the Stain in Manageable Sections
When it is finally time to stain, work in sections you can control. Flooding an entire tabletop and then wandering off for a philosophical snack break is how lap marks and dark zones happen. Apply the stain generously but evenly with a rag, pad, or applicator recommended by the stain manufacturer. Work it in, keep a wet edge, and avoid letting one zone dry while the next one is still being coated.
Many finishers like to apply stain in circular or overlapping motions first to distribute it, then finish by wiping in the direction of the grain. That final grain-direction wipe helps even out the appearance and avoids streaky, swirly chaos.
7. Wipe Off the Excess at a Consistent Time
This step is where even stain jobs are won or lost. Do not let excess stain dry on the surface unless the product specifically says to. Instead, wipe off the extra stain with a clean cloth in the direction of the grain. Use the same timing across the whole project. If you want a richer tone, do it with consistent timing or additional coats, not with random sections marinating longer than others.
If one area goes darker while the stain is still wet, you can sometimes soften it by lightly wiping with the proper solvent or rewetting that zone with a bit more stain and blending quickly. Once it fully dries, your options get less elegant and more sandpaper-heavy.
8. Let It Dry Fully Before Judging the Color
Fresh stain can look alarmingly dramatic. Relax. Let it dry according to label directions before deciding it is too light, too dark, or the emotional ending of your furniture project. Some stains mellow as they dry, and topcoat can also change the look by adding depth and warmth.
If you need a darker finish, a second coat may help. If you are working on a particularly difficult species, some woodworkers use a washcoat, shellac sealer, dye stain, or toner system to build color in layers rather than relying on one heavy coat of pigment stain. That is more advanced, but it is useful when you want better control on woods like maple, pine, or cherry.
9. Protect the Finish With a Compatible Topcoat
Once the stain is fully dry, apply a protective clear finish. This locks in the color and protects the wood from wear, moisture, and everyday life. Choose a compatible topcoat and apply thin, even coats. Do not shake the can if the instructions tell you to stir. Do not glob it on like cake batter. Thin, calm coats win.
Lightly sand between coats if the finish system calls for it, remove dust, and apply the next coat. The goal is a smooth, durable finish that highlights the stain instead of trapping bubbles, drips, or brush marks forever.
Best Approaches for Common Wood Types
Pine
Pine is beautiful, affordable, and famous for blotching. Use conditioner or gel stain. Keep colors light to medium if you want the most forgiving result. Dark stains can look dramatic, but they also highlight every absorption difference.
Maple
Maple is dense and often stains unevenly. Conditioner, gel stain, dye, or a washcoat can help. Avoid assuming a dark penetrating stain will behave politely. It usually will not.
Birch
Birch can turn patchy quickly, especially with darker colors. Conditioner and testing are essential. If you want a rich color, consider building it more gradually instead of trying to get there in one bold coat.
Cherry
Cherry is gorgeous on its own and darkens naturally over time. It is also prone to blotching. If you stain it, go carefully. Many woodworkers prefer lighter coloring strategies or simply let cherry age into its own beauty.
Oak
Oak is one of the easier woods to stain because its open grain accepts color well. Even so, prep still matters. Sand evenly, remove dust, test your stain, and wipe consistently.
Common Mistakes That Cause Spots and Streaks
- Skipping grits during sanding
- Sanding one area smoother than another
- Leaving glue residue on the surface
- Using dark penetrating stain on blotch-prone wood without a plan
- Applying stain to the whole piece at once and wiping too slowly
- Letting excess stain dry on the surface
- Ignoring scrap tests
- Using mismatched stain and conditioner systems
- Judging color before the stain dries
- Rushing the topcoat
Quick FAQs About Staining Wood Evenly
Can you fix blotchy wood stain after it dries?
Sometimes, but the fix depends on how bad it is. Minor unevenness may improve with a second coat, toner, glaze, or carefully blended topcoat. Severe blotching often means sanding back and starting over. Not fun, but still better than staring at the blotches for the next ten years.
Is gel stain better than regular stain?
For blotch-prone woods, often yes. Gel stain sits closer to the surface and usually gives more controlled color. For highly textured woods or when you want deeper penetration, traditional stain may still be the better fit.
Should you always use wood conditioner?
No, but it is a smart move on woods known for uneven absorption. On oak or walnut, it may not be necessary. On pine, birch, maple, and similar woods, it is often the difference between “nice finish” and “what happened here?”
Does sanding to a finer grit prevent blotching?
Not automatically. Sanding matters, but oversanding can reduce absorption in ways that change color. The key is not sanding to the moon. The key is sanding consistently and using the right stain strategy for the species.
Final Thoughts
If you want to stain wood evenly without getting blotches and spots, think like a finisher, not just a painter with a rag. Prep the wood thoroughly, test the whole system, choose conditioner or gel stain when the species calls for it, and keep your application timing consistent from start to finish. That is how you get a professional-looking wood stain finish that feels intentional instead of accidental.
The biggest lesson is simple: wood stain rewards patience in weirdly dramatic ways. Ten extra minutes of prep can save hours of sanding later. And once you see a clean, even finish glow under the topcoat, you will understand why experienced woodworkers treat surface prep like a religion and glue spots like a personal insult.
Real-World Experience: What This Process Feels Like on an Actual Project
In real life, staining wood evenly is rarely a one-and-done moment where angels sing and the board instantly looks like a showroom sample. It usually starts with optimism, followed by suspicion, then a little panic, and finally relief once you realize the process actually works when you respect it. That emotional roller coaster is part of the experience, especially for beginners.
One of the most common experiences happens right after the first wipe of stain. The surface often looks too dark, too red, too muddy, or wildly uneven for the first minute or two. That is the point where a lot of people assume they have ruined the project. Usually, they have not. They just have not wiped evenly yet, or the stain is still wet and heavy on the surface. As soon as the excess comes off and the color settles, the piece starts looking more intentional.
Another very real experience is discovering that wood species matter more than you expected. Someone can stain oak on a Saturday and feel like a genius, then try the same exact stain on pine on Sunday and wonder whether the board is cursed. That contrast teaches a fast lesson: technique matters, but matching the finish system to the wood matters just as much.
There is also the surprisingly satisfying experience of testing on scrap and seeing the answer before the real project is at risk. A lot of DIYers skip this because it feels like an extra chore. Then they test once, catch a color problem early, and suddenly become lifelong believers. Scrap testing is the woodworking version of checking the water before jumping in. It is not glamorous, but it saves you from shrieking later.
People also notice that the project looks better when they slow down. Not slower in a sleepy way. Slower in a deliberate, consistent way. The best stain jobs usually come from a rhythm: wipe on, spread evenly, watch the clock, wipe off with the grain, move to the next section. Once that rhythm clicks, the finish starts looking smoother and more controlled.
And then there is the topcoat moment. This is where many projects go from “pretty decent” to “oh wow, there it is.” The grain gains depth, the color looks richer, and the whole surface starts to feel finished instead of merely stained. It is one of the most rewarding parts of woodworking because the improvement is immediate and visible.
What most experienced DIYers eventually learn is that blotch-free staining is not about luck or some mystical old-shop secret. It is about stacking small, boring decisions in your favor: even sanding, clean surfaces, the right conditioner, the right stain, and consistent timing. None of those steps are flashy on their own. Together, though, they turn a frustrating job into one you actually want to repeat. That is the kind of experience that builds confidence, and confidence is what makes the next project go smoother from the very first board.