Table of Contents >> Show >> Hide
- Why the Guitar Neck Is the Hard Part
- Can You Actually 3D Print a Guitar Neck?
- Choosing the Best Material for a 3D Printed Guitar Neck
- Design Rules That Matter More Than Brand Loyalty
- Print Orientation and Settings: Where Good Ideas Go to Live or Die
- Fretboard, Frets, Nut, and Hardware
- Setup Turns a Printed Neck into an Actual Instrument
- Common Mistakes When 3D Printing a Guitar Neck
- Is 3D Printing a Guitar Neck Worth It?
- What the Experience of 3D Printing a Guitar Neck Is Really Like
- Conclusion
Note: This is body-only HTML, cleaned for web publication, with no source links or citation artifacts.
Ask a room full of makers if you can 3D print a guitar neck and you will get three kinds of answers. The optimists will say, “Absolutely.” The pessimists will say, “Not if you like tuning stability.” And the smart builders will shrug and say, “Yes, but only if you design it like a guitar neck and not like a cosplay prop.” That last group is the one to listen to.
3D printing a guitar neck is one of those projects that sounds delightfully rebellious. Traditional lutherie says the neck is sacred territory: stable wood, careful shaping, precise fret placement, proper relief, and a setup that feels like butter instead of barbed wire. Add a printer to the conversation, and suddenly you are asking a spool of plastic to survive string tension, climate swings, hand sweat, aggressive bends, and the occasional emotional drop-D riff. That is a big ask.
Still, the idea is not ridiculous. In fact, it is getting more realistic every year. Better filaments, stronger composite materials, more accurate printers, and smarter CAD workflows have made 3D printing a guitar neck less like a science-fair stunt and more like a legitimate experimental build path. The trick is understanding where the neck actually succeeds, where it usually fails, and what design decisions separate a playable instrument from a very expensive wall decoration.
Why the Guitar Neck Is the Hard Part
Many first-time builders obsess over the body because the body is the glamorous part. It is visible, dramatic, and easy to style. The neck, meanwhile, is the quiet tyrant running the entire instrument. If the neck is wrong, the whole guitar is wrong. Period.
A good neck has to do several jobs at once. It has to resist string tension. It has to hold its shape across scale length. It has to keep fret locations accurate enough for acceptable intonation. It has to allow just enough neck relief for the strings to vibrate cleanly without turning the action into a yoga stretch. It also has to feel good in the hand, because nobody has ever fallen in love with a neck profile that feels like gripping a 2×4 in a panic.
That is why 3D printed guitar neck design is really a structural engineering problem wearing a rock-and-roll costume. String gauge, tuning, and scale length all affect tension and feel. A 24.75-inch build behaves differently from a 25.5-inch design, and a baritone neck is a whole different beast. If your CAD model ignores that reality, the printer will not save you. It will simply document your bad decisions in plastic.
Can You Actually 3D Print a Guitar Neck?
Yes, you can. But “can” is doing some heavy lifting here.
A printed guitar neck can absolutely be made playable. Builders have already demonstrated one-piece printed necks with truss rods, frets, and standard hardware. Some work surprisingly well. The catch is that playability is not the same thing as long-term stability. A neck that survives a quick demo, a YouTube riff, and a victorious grin on day one still has to survive day 30, day 100, and that one hot afternoon when it gets left near a sunny window because life got busy.
So the better question is not, “Can you print a guitar neck?” The better question is, “Can you print one that stays straight, feels good, intonates correctly, and survives actual use?” The answer is still yes, but only when the design includes reinforcement, sensible material selection, accurate geometry, and a proper final setup.
Choosing the Best Material for a 3D Printed Guitar Neck
PLA: Great for Prototypes, Risky for Commitment
PLA gets invited to every project because it is easy to print, sharp in detail, and wonderfully cooperative. It is also stiff, which sounds promising for a neck. But PLA has two issues that make it a risky long-term choice for a functional guitar neck: brittleness and heat sensitivity.
In plain English, PLA looks confident until real life shows up. It can crack rather than flex, and warm environments can soften it enough to introduce creep or deformation. That does not make PLA useless. It makes PLA a smart choice for proof-of-concept prints, ergonomic mockups, neck profile tests, and “let’s see if this thing bolts on” experiments. It is less convincing as the forever material for a neck you plan to gig with, leave in a car, or proudly hand to a friend who plays like they are trying to wake the dead.
PETG: The Practical Middle Ground
PETG is often the sensible compromise in 3D printing a guitar neck. It is tougher than PLA, less brittle, easier to print than many engineering filaments, and generally more forgiving during long prints. It also resists moisture well and tends to warp less than fussier materials.
The downside is that PETG is not as stiff as PLA, which means the design has to make up the difference. More walls, smarter reinforcement, and good print orientation matter a lot. PETG is not magic. It is just a good employee: dependable, rarely dramatic, and generally willing to show up on time.
Carbon-Fiber-Filled Nylon: The Maker Favorite for Serious Builds
If you spend enough time around functional-print builders, you will eventually hear the choir begin singing about carbon-fiber-filled nylon. There is a reason. This class of filament offers a compelling mix of stiffness, toughness, and dimensional stability. It also tends to warp less than plain nylon, which is excellent news when you are printing a long part that would otherwise like to behave like a potato chip.
For a 3D printed guitar neck, carbon-fiber nylon is often one of the most appealing FDM choices. It can produce necks that feel more serious, less toy-like, and more structurally convincing than everyday hobby filaments. The tradeoff is that it is more demanding. It wants dry filament, controlled printing conditions, and an abrasion-resistant nozzle because carbon-filled materials chew through soft brass like a beaver with a deadline.
Polycarbonate and Other Advanced Options
Polycarbonate is another strong candidate if your machine can handle it. It is tough, heat-resistant, and structurally impressive. It is also one of those materials that can make you question your life choices during printing if your hardware is not ready. High temperatures, enclosure needs, warping risk, and moisture sensitivity mean polycarbonate is better for advanced users than casual weekend experimentation.
SLS nylon is also attractive in theory because isotropic parts do not suffer from the same directional weakness as ordinary FDM. The catch, naturally, is that most home builders do not have an SLS machine sitting next to the coffee maker.
Design Rules That Matter More Than Brand Loyalty
1. Use a Truss Rod or Other Reinforcement
If you remember only one thing from this article, make it this: do not print a full-scale guitar neck and hope good vibes will do the job of a truss rod.
A truss rod exists because strings pull the neck forward. Even traditional wood necks need that correction. Your printed neck is not above the laws of physics just because it came off a build plate. A metal truss rod, carbon rods, threaded reinforcement, or a hybrid structure with embedded hardware dramatically improves your odds of long-term success.
Some builders use a printed neck with a separate wood fretboard and conventional truss rod. That hybrid approach is not cheating. It is called wisdom.
2. Treat Fret Placement Like Surgery, Not Décor
Frets are not decorative stripes. Their spacing must be accurate. Modern guitars use even temperament, and fret positions follow precise math across the scale length. One tiny error can travel down the board and turn your upper frets into a crime scene. If your CAD process is sloppy, no amount of “vintage vibe” will hide bad intonation.
This is why many smart builders print the neck structure but use a separately machined or slotted fretboard. Printing the neck is already ambitious. Printing the neck and gambling on questionable fret-slot precision is how hobbies become character-building events.
3. Keep the Headstock and Neck Joint Strong
The two most vulnerable areas on many neck designs are the headstock transition and the heel or neck pocket interface. Those zones concentrate stress. They also happen to be the places where people get artistic. Bad combination.
Fillets, generous transitions, proper wall thickness, reinforcement channels, and sane tuner placement all help. If your neck bolts on, pay attention to compression around the bolt holes. If it is a set-neck or neck-through concept, design for load paths, not just looks. A dramatic headstock shape is fun right up until it snaps during tuning and teaches humility.
Print Orientation and Settings: Where Good Ideas Go to Live or Die
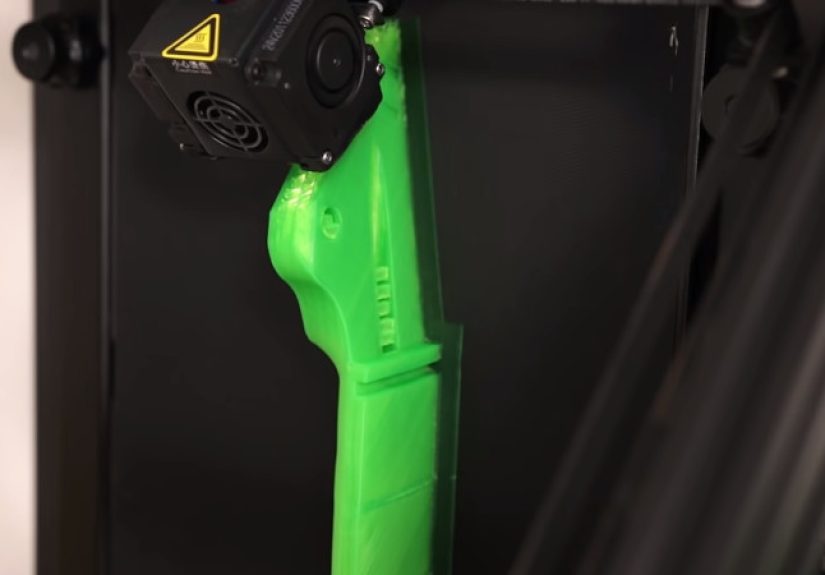
Because FDM parts are weaker between layers, print orientation is not a side note. It is the meeting. For long, stressed parts like a neck, you want the major bending loads to run as much as possible along the filament paths instead of across weak layer bonds. That is why many builders print the neck horizontally, diagonally, or in other orientations that keep the load aligned with the strongest axes of the print.
Printing a neck vertically might look elegant in slicing software, but it can create exactly the kind of layer structure you do not want in a part fighting string tension. In other words, it is the structural equivalent of wearing flip-flops to a roofing job.
Settings matter too. More perimeters usually help. A stronger shell often matters more than blindly maxing infill. Thoughtful infill patterns can add support, but stiffness in a neck often comes more from geometry, wall count, and reinforcement than from bragging rights about a 90% infill print that took half your natural lifespan to finish.
Dry your filament. Slow down enough for consistent layer bonding. Use a hardened nozzle for abrasive composites. Keep temperatures dialed in. On a guitar neck, small print flaws do not stay small. They become setup problems, buzzing problems, or mystery-flex problems later.
Fretboard, Frets, Nut, and Hardware
A printed neck still needs to function like a guitar neck, which means the supporting parts matter just as much as the main structure.
A separate fretboard is often the easiest route to a better result. It lets you use a more traditional surface for fretting, slotting, dressing, and finishing while keeping the printed portion focused on strength and geometry. You can absolutely experiment with printed fretboards, but if your goal is clean playability, traditional fretwire seated in a predictable material still gives you a major advantage.
The nut matters, too. If string slots are wrong, the guitar will fight you before the first chord is even over. And if you plan to use heavier strings for down-tuning, remember that bigger gauges may require nut work, tuner-hole compatibility, and saddle adjustments. Low tuning is fun. Low tuning with the wrong hardware is just a science project that growls.
Setup Turns a Printed Neck into an Actual Instrument
This is where many bold projects either become instruments or return to their natural habitat as workshop conversation pieces.
After assembly, you still need to set neck relief, action, and intonation. Relief is usually checked by using the string as a straightedge, with a capo at the first fret and the string held near the last fret or where the neck meets the body. A little relief is good. Too little can create back-bow and buzzing. Too much raises action and makes the guitar feel clumsy.
Action then needs to be adjusted at the bridge and nut. Intonation should be checked by comparing the open string and the 12th-fret note. If you changed string gauge, scale assumptions, or tuning, intonation will almost certainly need attention. This is not a punishment. This is just how guitars work, whether the neck came from a tree or a spool.
In practical terms, the setup stage is also your truth serum. If the neck keeps moving under tension, if relief drifts badly, or if the geometry refuses to settle, the print may need reinforcement or a redesign. A good setup can refine a good neck. It cannot rescue a bad structure forever.
Common Mistakes When 3D Printing a Guitar Neck
- Choosing PLA for a final build without considering heat and brittleness.
- Skipping a truss rod. This is the printed-neck equivalent of building a boat and forgetting the whole “floating” thing.
- Printing in a weak orientation.
- Assuming infill alone fixes stiffness.
- Ignoring fret accuracy and scale length math.
- Forgetting that heavier strings and lower tunings change tension, feel, and setup needs.
- Rushing post-processing. A neck can print beautifully and still play terribly if the frets, nut, and setup are sloppy.
Is 3D Printing a Guitar Neck Worth It?
If your goal is the easiest path to a flawless professional neck, then no. Buy a good wooden neck and spend your energy playing guitar instead of arguing with extrusion settings at midnight.
But if your goal is innovation, customization, learning, and building something weird in the best possible way, then yes3D printing a guitar neck is absolutely worth exploring. It opens up experimental neck profiles, unusual headstocks, hybrid construction, modular ideas, and rapid prototyping that would be slow or expensive in traditional woodworking.
The sweet spot is honesty. Treat the printed neck like an engineered part, not a novelty. Reinforce it. Choose material with your eyes open. Respect setup. Then you are no longer asking whether a printed neck is “possible.” You are asking how good you can make it.
What the Experience of 3D Printing a Guitar Neck Is Really Like
The real experience of printing a guitar neck is much less like a cinematic breakthrough and much more like a long conversation between excitement, math, and tiny moments of panic. It usually starts with overconfidence. You model the neck, admire the curves, and think, “This is going to be amazing.” Then you remember the neck has to fit a truss rod, line up with the pocket, support fretwork, survive tension, and somehow still feel comfortable. That is usually the point where the coffee gets stronger.
The print itself becomes a test of patience. A neck is long, visible, and unforgiving. You do not get to hide mistakes on a part like this. If the first layers are slightly off, you notice. If the filament is too wet, you notice. If your printer has a tiny wobble, a cooling issue, or a bad seam strategy, you notice. There is a special kind of respect that develops when you are twelve hours into a print and suddenly realize that one little adhesion problem now has the emotional weight of a Shakespearean tragedy.
Then comes the first physical inspection. This is one of the best moments in the whole project. You pull the neck off the printer, hold it in your hands, and immediately understand things the screen never told you. Maybe the profile feels chunkier than expected. Maybe the heel is a little too square. Maybe the headstock looks cool in CAD but in real life resembles a confused boomerang. This stage is humbling, but in a useful way. A printed neck teaches quickly because it becomes real fast.
Assembly is where optimism returns. The truss rod goes in. Hardware starts to fit. The neck bolts to the body. Suddenly the project stops looking like a plastic experiment and starts looking like an instrument with opinions. Then you string it up, and the emotional roller coaster hits its big drop. Will it hold? Will it bow? Will it buzz everywhere? Will the frets behave? Sometimes the answer is glorious. Sometimes the answer is, “Well, that is educational.”
What surprises many builders is how normal a successful printed neck can feel once it is dialed in. If the geometry is right and the setup is careful, the neck stops feeling like a novelty and starts feeling like a guitar neck. Your attention shifts from the print lines to the action, the relief, the fretting hand comfort, and the sound. That is a huge milestone. It means the project has crossed from gimmick into instrument territory.
Of course, the experience also includes revision. Rarely does version one become the forever neck. You tweak wall thickness. You change material. You reinforce the headstock. You revise the truss rod channel. You improve the neck pocket fit by a millimeter here, half a millimeter there. That iterative loop is actually one of the strongest arguments for additive manufacturing. Traditional neck building rewards patience; 3D printing rewards iteration. When used well, that is powerful.
In the end, the experience of 3D printing a guitar neck is not just about saving money or being futuristic. It is about understanding how guitars work at a deeper level. You come away with more respect for luthiers, more respect for setup, and a much sharper eye for structure. Also, you gain the right to casually say, “Oh, that neck? I printed it,” which is extremely hard to beat at a jam session.
Conclusion
3D printing a guitar neck is not a shortcut around traditional instrument design. It is a different route through the same mountain. The same truths still apply: the neck must be stable, accurate, playable, and adjustable. The builders who succeed are the ones who respect those fundamentals while using 3D printing for what it does bestrapid iteration, bold customization, and engineered experimentation.
If you want the best chance of success, start with a realistic scale length, choose a structural material instead of a convenient one, reinforce the neck properly, and treat setup like part of the build rather than an afterthought. Do that, and a 3D printed guitar neck stops being a novelty headline and starts becoming a fascinating, playable piece of modern maker culture.