Table of Contents >> Show >> Hide
- Start With a Tiny Plan (So Your “Quick Project” Doesn’t Become a Lifestyle)
- The DIY Decor Starter Kit (Minimal Tools, Maximum Results)
- 12 High-Impact DIY Home Decor Projects (That Don’t Require a Construction Degree)
- 1) Paint a “micro-feature” for maximum drama
- 2) Peel-and-stick wallpaper (without the bubble-induced breakdown)
- 3) Build a no-fuss gallery wall (with a “template trick”)
- 4) Thrift-store frame makeover (the fastest glow-up)
- 5) Floating shelves or picture ledges for “changeable decor”
- 6) Swap hardware (tiny change, shockingly satisfying)
- 7) Upgrade lighting on a budget (because overhead sadness is real)
- 8) Textiles: the “new room” cheat code
- 9) Create an accent wall with texture (not just color)
- 10) “Shop your house” styling: reframe, regroup, rotate
- 11) Plants, but make it decor
- 12) The classic thrift flip: paint + new legs + confidence
- Room-by-Room DIY Decor Playbook
- Budget-Smart Sourcing: Thrift, Salvage, and “WaitWe Already Own That?”
- Renter-Friendly DIY Decor Rules (Keep the Style, Keep the Deposit)
- Make DIY Decor Look Expensive: 7 Designer-Feeling Tricks
- Safety and Sanity Checks (Because DIY Shouldn’t End in Regret)
- Conclusion: Small Projects, Big Personality
- Real Experiences With DIY Home Decor (The Extra You Actually Need)
DIY home decor is basically the legal way to turn “I’m bored” into “I’m a visionary,” using nothing but a weekend,
a thrift store receipt, and the kind of optimism that makes you believe paint always dries the exact shade on the swatch.
The good news: you don’t need a full renovation (or a reality TV crew) to make a room feel new.
With the right small projects, your space can look more intentional, more personal, andbest of allless like you just moved in yesterday.
This guide is built around real, field-tested methods from well-known U.S. home and DIY publishers:
quick upgrades, renter-friendly tricks, budget sourcing, and the little styling moves that make a $12 project look like a $120 one.
Expect practical steps, honest warnings, and a few jokesbecause if you’ve ever glued something to your fingers,
you deserve to laugh about it.
Start With a Tiny Plan (So Your “Quick Project” Doesn’t Become a Lifestyle)
Before you pick up a brush or click “add to cart,” decide what “better” looks like for the room.
Not Pinterest-perfect. Better for you. Ask three questions:
- What’s the problem? (Bland wall? Bad lighting? Too much clutter? No personality?)
- What’s the vibe? (Warm modern, cozy cottage, minimalist, boho, traditional, “I own a label maker”?)
- What’s the budget? Pick a real number, then reserve 10–15% for “oops.”
One helpful decorating concept is mixing old and new on purposelike a simple “most thrifted, some new” approach (or the reverse).
The goal isn’t a rigid formula; it’s balance. Let durable “anchor” pieces do the heavy lifting, and use DIY accents to bring the fun.
The DIY Decor Starter Kit (Minimal Tools, Maximum Results)
You can do a surprising amount with a short list of basics. If you buy anything, prioritize tools that reduce frustration
(because nothing kills creativity like a crooked frame you can’t unsee).
Must-haves
- Measuring tape, pencil, and a small level
- Painter’s tape (good quality) and a putty knife (for smoothing tape edges)
- Spackle + a small putty knife for patching
- Microfiber cloths and a gentle cleaner for prep
- Basic drill/driver (optional but life-changing)
- Adhesive hooks/strips for renter-friendly hanging
Nice-to-haves
- Stud finder (for shelves and heavier pieces)
- Sanding block or fine-grit sandpaper
- Caulk + caulk tool (for making trim look “installed by someone who owns a yacht”)
Pro tip: most DIY decor fails don’t happen during the “fun part.” They happen during prep.
Clean surfaces, measure twice, and don’t skip drying time. Your future self will send you a thank-you card.
12 High-Impact DIY Home Decor Projects (That Don’t Require a Construction Degree)
1) Paint a “micro-feature” for maximum drama
Painting one small architectural moment can deliver big impact: a door, a fireplace surround, built-in shelves,
or just your trim. Even a bold ceiling or color-drenched corner can make a room feel custom without painting every wall.
Keep the rest of the room calmer and let that one element be the star.
2) Peel-and-stick wallpaper (without the bubble-induced breakdown)
Peel-and-stick wallpaper is a renter-friendly way to add pattern fastaccent wall, powder room, behind shelving,
or even furniture panels. The trick is installation: don’t remove all backing at once.
Work top to bottom, peeling a little and smoothing as you go with a squeegee or plastic card.
If you rush, you’ll trap air and invent new words you can’t say in front of children.
Where to use it: a single wall, the back of a bookcase, stair risers, or as a faux headboard “panel” behind the bed.
Bonus: you can test-drive bold pattern without a long-term commitment.
3) Build a no-fuss gallery wall (with a “template trick”)
Gallery walls look expensive when they’re planned. Lay frames on the floor first.
For easy placement, cut paper to frame size, tape it to the wall, adjust until it feels right, then hang.
Mix sizes, but keep spacing consistent (typically 2–3 inches).
Want ultra-budget and renter-friendly? Try a washi-tape “frame” gallery with prints or photos.
It’s playful, flexible, and easy to redo when your taste changes next Tuesday.
4) Thrift-store frame makeover (the fastest glow-up)
Frames are the gateway DIY. Look for solid wood frames, interesting profiles, or mismatched sets.
Paint them one color for cohesion (matte black, warm white, or a muted tone) or do a two-tone look:
one color on the frame edge, another on the outer profile. Suddenly: curated.
5) Floating shelves or picture ledges for “changeable decor”
Shelves add storage and styling opportunities at the same time. Picture ledges are especially forgiving
because you can swap art, photos, and objects without new holes every time.
Install in a row above a sofa, in a hallway, or in the kitchen for cookbooks and small ceramics.
Style rule: keep a simple rhythmtall item, medium item, small itemthen repeat.
Add one “soft” element (a small plant, a folded textile) to keep it from looking like a store display.
6) Swap hardware (tiny change, shockingly satisfying)
Cabinet pulls, knobs, and even outlet covers are the “jewelry” of the room.
Match finishes within a space (or intentionally mix metals with a plan),
and your kitchen or bathroom can feel upgraded in under an hour.
Keep the old hardware in a labeled bagyour security deposit may thank you later.
7) Upgrade lighting on a budget (because overhead sadness is real)
Lighting is decor. If you can’t replace a fixture, add layered light:
a floor lamp + table lamp + warm bulb can make a room feel instantly more expensive.
If you can replace a fixture, choose something slightly oversizedscale reads “designer.”
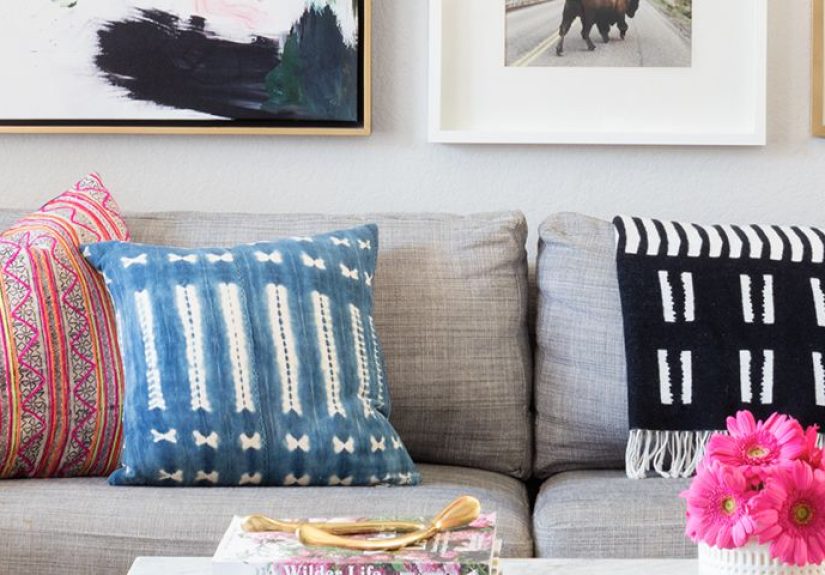
8) Textiles: the “new room” cheat code
If painting feels like a commitment, textiles are your low-risk makeover:
new pillow covers, a patterned throw, updated curtains, or layered rugs.
One classic budget move: drape a colorful quilt or textile over a neutral sofa to add pattern and warmth instantly.
9) Create an accent wall with texture (not just color)
Accent walls can be more than paint. Consider removable molding patterns, vertical battens, faux shiplap panels,
or even a tone-on-tone trim design. When painted the same color as the wall, the texture reads subtle and high-end.
10) “Shop your house” styling: reframe, regroup, rotate
Try this before you buy anything: remove everything from a shelf or tabletop.
Put back only what you love, grouping items in threes (or fives) and varying height.
Rotate seasonal pieces, swap rooms, and move artwork around.
You’d be amazed how “new” your home can feel when your lamp gets a fresh zip code.
11) Plants, but make it decor
Plants add life, color, and textureand they hide a lot of decorating sins.
Use baskets as cachepots, group smaller plants on a tray, or hang one trailing plant near a window.
If you’re not a plant person, choose a hardy option or go fauxbut dust it like it pays rent.
12) The classic thrift flip: paint + new legs + confidence
A basic thrifted side table can become a statement piece with sanding, paint or stain, and upgraded hardware.
For a modern look: clean lines, matte finish, minimal hardware.
For cozy traditional: warm stain, antique brass, and a little character left intact.
The secret is patience between coatsand resisting the urge to “test” tackiness with your thumb.
Room-by-Room DIY Decor Playbook
Living Room
- One big anchor: oversized art, a mirror, or a statement gallery wall.
- Layered lighting: floor lamp + table lamp beats one overhead fixture every time.
- Textile refresh: new pillow covers and a throw can change the entire mood.
- Styling hack: group books + an object + something green (plant) on a tray.
Bedroom
- Faux headboard wall: peel-and-stick wallpaper panel behind the bed.
- Nightstand upgrade: thrift flip or just swap hardware.
- Better rest vibe: warm bulbs, soft curtains, and fewer tiny “visual noise” items.
Kitchen
- Hardware swap: quickest “new kitchen” feeling.
- Open shelving moment: a small picture ledge for cookbooks or framed art.
- Thrifted function: vintage bowls, baskets, or crocks that store tools and look good.
Bathroom
- Small room, big pattern: removable wallpaper on one wall.
- Mirror upgrade: frame a builder-grade mirror or add a nicer one.
- Hotel effect: matching towels + a tray + one plant = instantly more polished.
Entryway
- Landing zone: a hook rail, a small shelf, and a bowl for keys.
- Mirror: makes the space feel larger and brighter.
- Rug: durable, easy-clean, and the first “style cue” when you walk in.
Budget-Smart Sourcing: Thrift, Salvage, and “WaitWe Already Own That?”
Great DIY home decor isn’t about buying more stuff. It’s about buying smarter stuff.
Thrifting and salvage are gold mines for frames, baskets, lamp bases, small tables, and unique decor objects.
Bring a tape measure, check for wobble, inspect for damage, and don’t buy “a project” you secretly hate.
If you’re building a cohesive look, pick two or three “constants” across your home:
a recurring wood tone, a metal finish, and a general color family. That way, even random thrift finds feel related.
What’s usually worth thrifting
- Solid wood furniture (sand/paint/stain = new life)
- Frames (especially wood or vintage profiles)
- Baskets and trays (texture makes rooms feel layered)
- Lamp bases (new shade = transformation)
- Ceramics, bowls, vases (simple shapes style easily)
Renter-Friendly DIY Decor Rules (Keep the Style, Keep the Deposit)
Renting doesn’t mean living in a beige box. It means choosing upgrades that are removable, reversible, or portable.
Adhesive hooks, removable wallpaper, peel-and-stick tiles, tension rods, and picture ledges can do a lot of heavy lifting.
- Test first: try peel-and-stick products on a hidden area to see how your wall reacts.
- Go removable: use Command-style strips for art, mirrors (within weight limits), and lightweight decor.
- Keep originals: store old hardware, bulbs, and anything you swap out.
- Portable upgrades: curtains, rugs, lamps, and art move with youand make every rental feel like yours.
Make DIY Decor Look Expensive: 7 Designer-Feeling Tricks
- Scale up. One larger piece of art often looks better than three tiny ones floating awkwardly.
- Repeat materials. Echo the same metal finish or wood tone in multiple places.
- Use “negative space.” Empty space is part of the design; let things breathe.
- Choose matte for walls. It hides imperfections and looks richer in many rooms.
- Layer textures. Smooth (glass/ceramic) + soft (textiles) + natural (wood/rattan) reads intentional.
- Hide cords. Cord management is unglamorous, but it instantly elevates a space.
- Finish the edges. Caulk, touch-up paint, aligned framesdetails are where “DIY” becomes “custom.”
Safety and Sanity Checks (Because DIY Shouldn’t End in Regret)
- Ventilate when painting and follow product instructions for dry/cure times.
- Be careful with older homes: if you suspect lead paint, use proper precautions and don’t dry-sand.
- Respect electricity: if you’re not confident, stick to lamps and plug-in upgrades, or hire a pro for wiring.
- Anchor heavy items: shelves, mirrors, and tall furniture should be installed safely.
DIY is supposed to make your home feel better, not your stress levels. Choose projects that match your time,
your tools, and your tolerance for minor chaos.
Conclusion: Small Projects, Big Personality
DIY home decor works when it’s strategic: pick one or two high-impact changes, prep properly, and finish cleanly.
Paint can add mood, peel-and-stick can add pattern, thrifting can add character, and styling can pull it all together.
The real magic is that your home ends up looking like younot a catalog.
Start small. One wall, one shelf, one thrift flip. Then enjoy the momentum.
Just remember: every “easy weekend project” has a 30-minute phase where you question every decision you’ve ever made.
Push through. The after photos are worth it.
Real Experiences With DIY Home Decor (The Extra You Actually Need)
The first time I tried a “simple” DIY home decor refresh, I started with confidence and ended with a paint roller stuck to my sock.
That’s not a metaphor. I stepped back to admire my work, stepped forward into the tray like it was a shallow puddle,
and then spent ten minutes doing a one-person interpretive dance called How To Not Track Greige Through The Hallway.
Lesson one: prep your space like you’re about to host a very judgmental museum tour.
Drop cloths, painter’s tape, and a plan for where your tools go when you need two free hands.
Next came peel-and-stick wallpaper, the DIY equivalent of adopting a pet that looks cute online but has strong opinions in real life.
I tried to peel off the entire backing at once because I was feeling brave (and impatient).
The wallpaper immediately folded onto itself with the dedication of a professional wrestler.
After I unpeeled itslowly, dramatically, and with a new respect for anyone who wallpapers for a livingI learned the real move:
peel a small section, stick it, smooth it, then keep going. The process is weirdly calming when you stop trying to speed-run it.
And yes, you can re-stick it when you get slightly offyour wall will not remember your first attempt.
Thrifting taught me a different set of lessons. At first, I bought anything with “potential,” which is just a fancy way of saying
I brought home a pile of future chores. The game-changer was going in with a short list:
frames, baskets, one small table, maybe a lamp base. I started measuring my spaces and taking photos of what I already owned.
Suddenly, I wasn’t collecting random objectsI was building a room. My favorite thrift flip was a beat-up side table that looked
like it had survived three moves and one small tornado. A little sanding, two coats of paint, and new hardware later,
it looked like a boutique find. The only thing that didn’t upgrade was my patience between coats. (Dry time is real. Respect it.)
Styling was the sneaky MVP. I used to think you had to buy new decor to make things feel fresh.
Then I tried “shopping my house”: moving a lamp from the bedroom to the living room, swapping art between rooms,
stacking books under a vase, and grouping objects on a tray. The house looked more put-together,
and I didn’t spend a dime. I also learned that empty space is not “missing decor.”
Empty space is a design choice that makes the decor you do have look more importantlike it has a résumé.
The biggest takeaway from all these projects is that DIY home decor is less about perfection and more about intention.
Most mistakes are fixable: a crooked frame can be rehung, paint can be touched up, wallpaper can be re-smoothed,
and thrift finds can be re-donated with minimal guilt. Start with one project that solves a real problem in your space,
finish it fully (yes, including the edges), and then build from there. Over time, your home becomes a collection of wins,
not a collection of “I’ll get to it someday.” And if a roller gets stuck to your sock, congratulationsyou’re officially doing DIY.