Table of Contents >> Show >> Hide
- Why a DIY Wine Glass Chandelier Works So Well
- What You Need for the Project
- How to Build a DIY Wine Glass Chandelier
- Safety Tips That Matter More Than Style
- Design Ideas for Different Spaces
- Common Mistakes to Avoid
- Is a DIY Wine Glass Chandelier Worth It?
- Final Thoughts
- Extra Experience Section: What It Feels Like to Actually Make One
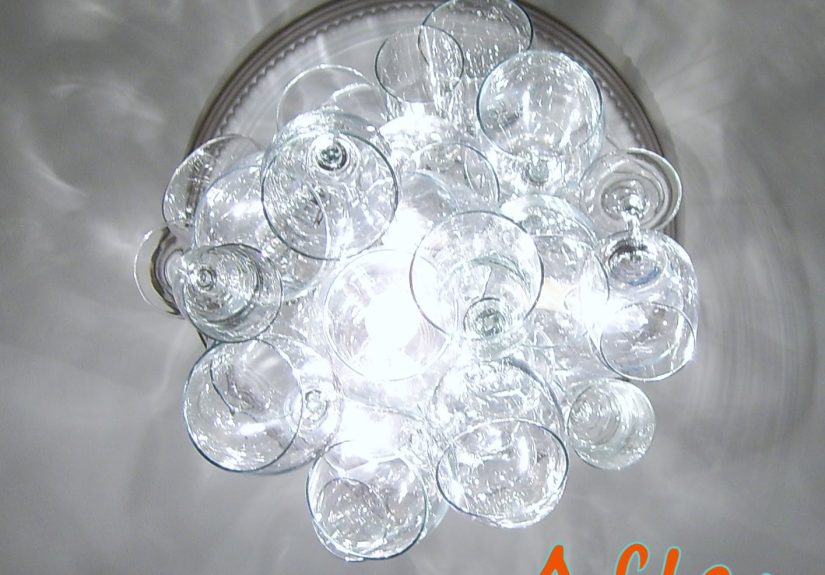
If you have ever looked at a basic dining room light and thought, “That fixture has the personality of plain toast,” this project is for you. A DIY wine glass chandelier turns ordinary stemware into a dramatic light feature that feels equal parts custom design, conversation starter, and slightly mischievous home upgrade. It is the kind of project that makes guests pause mid-sentence, point upward, and ask, “Wait, did you make that?” That, frankly, is one of life’s finer pleasures.
This guest project takes inspiration from classic DIY lighting makeovers where everyday materials are transformed into something that looks far more expensive than it has any right to. The beauty of a wine glass chandelier is that it blends sparkle, structure, and creativity. You get the glow of a chandelier, the charm of collected glassware, and the satisfaction of building something no one else on the block will have. It is not just a light fixture. It is a tiny act of domestic rebellion against boring ceilings.
Better yet, this project can be tailored to your style. Want a vintage look? Use mismatched thrifted goblets and champagne flutes. Prefer modern? Stick with sleek stemless glasses and a clean metal frame. Lean rustic? Pair warm bulbs with an aged finish and a simple medallion. However you spin it, a DIY wine glass chandelier can become the focal point of a dining room, breakfast nook, bar corner, or even a covered entertaining space that needs a little more wow and a lot less shrug.
Why a DIY Wine Glass Chandelier Works So Well
There is a reason chandeliers never really go out of style: they draw the eye upward, help define a room, and create instant mood. A wine glass chandelier does all of that with an added twist. The glass catches and bends light in a way that feels softer and more layered than a bare fixture. The result is a piece that can look glamorous, artsy, or playfully eclectic depending on the glasses you choose and how you arrange them.
Another reason this project works is contrast. Most homes mix hard and soft surfaces: wood tables, painted walls, upholstered chairs, metal hardware. Glass adds movement and reflection to that mix. Even when the chandelier is turned off, it still has visual life. During the day, the glasses catch natural light. At night, they make the bulbs feel more dressed up and less like they just showed up wearing sneakers to a wedding.
And then there is the budget angle. One of the most famous early versions of this guest-project concept used a combination of hardware-store parts, thrifted glasses, and a few new pieces to create a showpiece for a little over one hundred dollars at the time. Prices vary now, of course, because inflation enjoys ruining everyone’s craft-store optimism, but the principle still holds: you can create a custom chandelier look for much less than many retail statement fixtures.
What You Need for the Project
The exact shopping list depends on your design, but most DIY wine glass chandelier builds share the same core ingredients. You need a sturdy mounting plan, a central light source, a way to suspend or secure the glasses, and a clear design for the final shape. In many builds, the glowing center comes from small sockets and candelabra bulbs inside stemless glasses, while the outer body is built with hanging wine glasses, champagne flutes, or goblets arranged at different heights.
Core materials
Start with a fixture-rated mounting setup, a canopy, mounting hardware, lamp wire, sockets, wire connectors, a crossbar, fishing line or another secure hanging medium for decorative glass, crimp beads or similar fasteners, and the glasses themselves. If you plan to drill glass, a diamond core glass bit is the usual choice for clean, controlled holes. A ceiling medallion is optional, but it can hide the working parts and make the whole thing look more finished.
Glass choices
Stemless glasses are especially useful near the light source because they can help conceal the sockets and create a cleaner silhouette. Additional wine glasses, champagne flutes, or martini glasses can be layered around the center for volume and sparkle. A mix of shapes usually looks best because it creates depth. Think of it as styling a salad, but with more danger and better lighting.
How to Build a DIY Wine Glass Chandelier
1. Sketch the shape before you touch a drill
Do not skip the planning stage just because you are excited to make something shiny. Decide whether you want the chandelier to look like a tight globe, a loose cascade, a tiered cluster, or a modern drum. Count your glasses, estimate the finished diameter, and think about where the visual weight should sit. Smaller glasses can fill the top portion, while longer flutes can create a graceful lower edge.
This is also the moment to think about hanging height. In dining rooms, chandeliers are commonly hung about 30 to 36 inches above the table surface, with additional height added for taller ceilings. That standard is useful because it balances function and beauty. Too low, and the fixture feels like it is trying to join dinner. Too high, and it loses some of its impact.
2. Test the ceiling support
This part is not glamorous, but it is the difference between a lovely project and a terrible story. A decorative chandelier may look delicate, yet it can become surprisingly heavy once you combine hardware, wire, sockets, glass, and canopy parts. Make sure the electrical box is rated for the fixture weight. If the setup is questionable, upgrade the box or use a proper brace. In other words, trust the engineering, not your optimism.
3. Drill the glass carefully
If your design calls for drilling stemless glasses, work slowly and use the correct bit. Glass does not reward confidence the way wood does. It rewards patience. Mark your hole locations, keep the bit steady, and avoid rushing. The goal is a clean opening large enough for the needed hardware without stressing the glass. Always wear eye protection, and do a practice run on an inexpensive piece before drilling the glasses you actually love.
4. Build the illuminated center
Once the drilled glasses are ready, assemble the sockets and lamp wire according to the socket instructions. Slide the wire through the glass opening so the socket sits inside. Secure the components with the appropriate hardware, and do not allow the lamp wire to carry the full weight of the glass. In classic versions of this project, extra support is added with line and hardware so the decorative pieces are supported independently. That is a smart move and not just a fussy one.
5. Add the decorative outer layer
Now comes the satisfying part. Tie or secure the surrounding glasses to your ring or support structure at varied heights. This is where the chandelier becomes sculpture. Step back often while you work. A fixture can look balanced up close and weirdly lopsided from ten feet away. Adjust heights until the piece feels full but not crowded. You want sparkle and shape, not a glass traffic jam.
6. Wire and mount the fixture
After shutting off power at the breaker, mount the bracket to the electrical box, connect the wires properly, secure the canopy, and test the fixture. If wiring is outside your comfort zone, bring in a licensed electrician for this stage. There is no shame in outsourcing the part that involves electricity and gravity teaming up against you. In fact, that is called wisdom.
Safety Tips That Matter More Than Style
A good DIY wine glass chandelier should be creative, but it also needs to be safe. First, the ceiling box has to be rated for the load. Current product specs from major manufacturers show that fixture-rated boxes can vary widely in supported weight, which is exactly why guessing is a bad idea. Check the rating, calculate your fixture load, and give yourself margin rather than cutting it close.
Second, consider bulb heat. LED bulbs are the obvious choice for most modern DIY lighting projects because they use much less energy and produce far less heat than incandescent bulbs. That is a big deal when glass, sockets, and decorative elements are clustered together. A cooler fixture is not only more efficient, it is also gentler on materials and more comfortable in a room where people are trying to eat dinner rather than roast beside the centerpiece.
Third, think about bulb compatibility. Some fixtures trap more heat than others, so use bulbs appropriate for the setup and avoid improvising with whatever is rolling around in the junk drawer. Your chandelier deserves better than a mystery bulb with no label and strong “found behind the laundry basket” energy.
Design Ideas for Different Spaces
Modern dining room
Use matching stemless glasses, a matte black canopy, and warm white candelabra LEDs. Keep the silhouette compact and balanced. This version works beautifully over a round dining table and feels sleek without becoming cold.
Vintage-inspired breakfast nook
Mix thrifted goblets, petite wine glasses, and champagne coupes in slightly different shapes. Add a medallion and a soft metallic finish for charm. The irregularity is part of the appeal. It should look collected, not cloned.
Rustic bar corner
Pair clear glasses with aged bronze or weathered iron hardware. A looser arrangement and warmer bulbs help the chandelier feel cozy and relaxed. This approach also works well in a home bar where the project can wink at the room’s purpose without taking itself too seriously.
Eclectic entertaining space
Add subtle color with tinted glass or a few lightly smoked pieces. The trick is restraint. A little color looks intentional; too much can shift the chandelier from sophisticated to “craft fair got rowdy.”
Common Mistakes to Avoid
The first mistake is ignoring scale. A chandelier that is too small gets swallowed by the room. One that is too bulky can feel heavy and crowded. The second mistake is letting every glass hang at the same level. Uniformity may sound neat, but with this kind of project, variation creates life. The third mistake is neglecting maintenance. Glass collects dust, and dust has a remarkable talent for making beautiful things look vaguely haunted.
Another common issue is prioritizing appearance over mechanics. If the internal parts are visible in a distracting way, paint or finish them appropriately, conceal them with glass placement, or redesign the center before installation. It is easier to fix that on the worktable than after the chandelier is already hanging over your table like a judgmental jellyfish.
Is a DIY Wine Glass Chandelier Worth It?
Absolutely, provided you enjoy hands-on projects and are willing to slow down for the tricky parts. This is not the sort of craft you slap together in twenty minutes between laundry loads. It rewards planning, careful drilling, safe installation, and a little artistic instinct. But the payoff is huge. You get a custom light fixture, a memorable talking point, and the rare satisfaction of saying, “Yes, I made that,” without having to immediately follow it with, “Please do not touch it.”
From an SEO perspective and a real-life perspective, what makes this project especially compelling is the mix of practicality and personality. People are always looking for budget-friendly lighting ideas, upcycled chandelier inspiration, and creative dining room décor. A DIY wine glass chandelier checks all three boxes. It is decorative, functional, and wildly more interesting than another forgettable off-the-shelf fixture.
Final Thoughts
A DIY wine glass chandelier is one of those rare projects that feels both imaginative and useful. It gives old or inexpensive glasses a second life, turns lighting into a design moment, and proves that custom décor does not always require designer prices. The smartest version of this project combines beauty with restraint: a thoughtful layout, sound ceiling support, LED lighting, and enough editing to keep the result polished rather than cluttered.
If you are ready to try it, start with a clear plan, respect the safety side of the build, and let the styling reflect your home rather than whatever trend happened to scream the loudest that week. The best DIY wine glass chandelier is not the one with the most sparkle. It is the one that feels intentional, fits the room, and makes people wonder how on earth you pulled it off.
Extra Experience Section: What It Feels Like to Actually Make One
The experience of building a DIY wine glass chandelier is half project, half emotional weather event. At first, it feels charming and cinematic. You line up the glasses, admire your hardware, and imagine the finished piece glowing above your table while your future dinner guests act appropriately impressed. Then reality taps you on the shoulder. Suddenly, you are measuring wire lengths three times, trying to remember which glasses looked elegant versus which ones looked like they belonged at a chaotic wedding buffet, and learning that gravity is the least collaborative member of any DIY team.
Still, that is part of the magic. Projects like this are memorable because they make you pay attention. You begin noticing details you normally ignore, like how different glass shapes catch light, how a few inches of hanging height can change the mood of a fixture, and how much more polished a room looks when the ceiling has personality instead of just existing up there like a blank fifth wall. The hands-on process also teaches restraint. It is tempting to add every pretty glass you own, but somewhere between “striking” and “why is this chandelier wearing too much jewelry?” you learn the value of editing.
There is also something deeply satisfying about mixing old and new. Thrift-store finds, leftover glasses, a couple of fresh hardware-store components, and one smart lighting plan can become a centerpiece that feels collected over time. That combination gives the chandelier character. It does not look mass-produced. It looks like a story. Maybe a few glasses came from a flea market, one came from your aunt’s cabinet, and another survived exactly one holiday season before being promoted from beverage duty to interior design. That personal layer is what makes the project more than a craft.
And yes, there will likely be a moment of doubt. Usually it arrives when the piece is half assembled and looks less like a chandelier and more like an avant-garde science experiment. This is normal. Most worthwhile DIY projects pass through an ugly middle stage where faith does the heavy lifting. Keep going. Once the layers are balanced, the hardware is hidden, and the lights come on, the whole thing starts to make sense in the best possible way.
The final reveal is what people remember. When the chandelier is installed and glowing, the room changes instantly. The table feels more intentional. The space feels warmer. Even a simple dinner starts to feel a little more special. That is the sneaky joy of this project: it is not only about making a light fixture. It is about changing how a room feels to live in. And every time someone looks up and asks about it, you get to relive the story, skip over the frustrating parts if you want, and enjoy the bragging rights you absolutely earned.