Table of Contents >> Show >> Hide
- Why Upgrade Front Door Hardware in the First Place?
- What Counts as Front Door Hardware?
- Measure First, Shop Second
- Choosing the Right Front Door Hardware Style
- Security Features That Actually Matter
- Should You Choose a Knob, Lever, Handleset, or Smart Lock?
- How to Upgrade Front Door Hardware Step by Step
- Common Front Door Hardware Mistakes to Avoid
- When to DIY and When to Call a Pro
- Budget Expectations
- Final Thoughts
- Real-World Experience: What Homeowners Learn After Upgrading Front Door Hardware
Your front door hardware does two jobs at once: it protects your home and introduces your style before anyone even rings the bell. In other words, it is both bodyguard and greeter. That is a lot of pressure for one handleset.
If your current setup is faded, loose, sticky, outdated, or about as stylish as a budget motel from 1997, upgrading your front door hardware can make a dramatic difference. A smart swap can boost curb appeal, improve day-to-day convenience, and add meaningful security at the same time. Better yet, many front door hardware upgrades are very doable for homeowners with a screwdriver, a tape measure, and a little patience.
This guide breaks down everything you need to know before you buy, from measurements and lock grades to finishes, smart-lock options, installation tips, and common mistakes. So before you toss a random shiny lockset into your online cart and hope for the best, let’s make sure your front entry gets an upgrade that actually fits, works, and looks like it belongs there.
Why Upgrade Front Door Hardware in the First Place?
Most homeowners start shopping for new front door hardware for one of three reasons: security, style, or frustration. Sometimes all three show up together like uninvited guests.
Security is the obvious one. A keyed knob alone is not the strongest defense for an exterior entry. A solid deadbolt, a properly installed strike plate, and long screws that anchor into framing can do far more for front door security than a pretty finish ever could. If your current hardware feels flimsy, has visible rust, or sticks every time you lock it, that is your door’s way of asking for help.
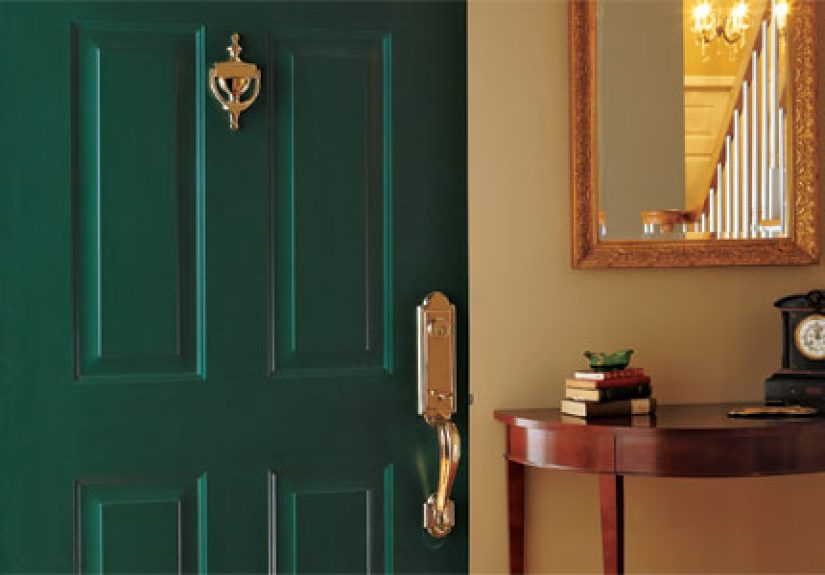
Style is the second big reason. Front door hardware acts like jewelry for the entryway. Swap a tired brass knob for a matte black handleset, or replace a mismatched deadbolt and lever with a coordinated set, and your entry can go from forgettable to polished surprisingly fast.
Then there is convenience. Maybe you are tired of carrying grocery bags while wrestling with an old latch. Maybe you want a keypad deadbolt so family members can stop losing keys like it is an Olympic sport. Maybe your lock works, technically, but only after a tiny shoulder shove and a whisper of encouragement. Those are all valid reasons to upgrade.
What Counts as Front Door Hardware?
When people say “front door hardware,” they often mean the main lockset. But the full package can include several parts:
Handleset, Knob, or Lever
This is the grab-and-go part of the system. A front door may have a full handleset with an exterior grip and thumb latch, or a simpler keyed knob or keyed lever. Handlesets are especially popular because they look substantial and usually include matching trim for a more finished appearance.
Deadbolt
This is the heavy lifter for security. In most cases, the deadbolt is the most important locking component on the front door. It may be traditional, electronic, or smart.
Latch and Faceplate
The spring latch controls the lower part of the door hardware, while the faceplate is the visible metal trim on the door edge. These need to match your door prep and fit correctly.
Strike Plate and Reinforcement
The strike plate mounts on the jamb and receives the latch or bolt. A stronger strike plate with longer screws is one of the most overlooked upgrades in the entire system.
Hinges, Door Viewer, Knocker, and Kick Plate
These are optional from a lock standpoint, but they absolutely affect the overall appearance and function of your entry. If you are doing a visual refresh, matching these details can pull the whole look together.
Measure First, Shop Second
This is the unglamorous part of the project, but it is also the part that saves you from rage-returning a beautiful lockset that does not fit your door.
Backset
The backset is the distance from the edge of the door to the center of the bore hole. Most residential doors use either a 2 3/8-inch or 2 3/4-inch backset. Many modern locksets have adjustable latches that fit both, but you should still verify before buying.
Door Thickness
Exterior doors are commonly around 1 3/4 inches thick, though some specialty or older doors vary. This matters because not every lock is compatible with every door thickness, especially some smart locks and designer handlesets.
Bore Hole and Cross Bore
The large face bore is the main hole drilled through the door. The smaller edge bore is drilled into the side of the door. Standard hardware often fits standard prepped doors, but if your house is older, “standard” may be more of a suggestion than a reality.
Center-to-Center Spread
If you are replacing a handleset, measure the distance from the center of the deadbolt hole to the center of the lower latch hole. This determines whether your new handleset will line up with the existing holes.
Door Handing
Stand outside facing the door. If the hinges are on the left, it is left-handed. If the hinges are on the right, it is right-handed. Some hardware is reversible, but not all of it, especially certain levers and specialty trim.
Lock Type: Tubular vs. Mortise
Most modern homes use tubular locksets. Older homes may have mortise locks, which fit into a rectangular pocket in the door edge. If you have mortise hardware, replacement is less plug-and-play and may require more specialized products or professional help.
Choosing the Right Front Door Hardware Style
The best front door hardware should match your home’s architecture instead of fighting with it. A sleek contemporary pull on a cottage-style entry can look a little confused. So can an ornate traditional handleset on an ultra-modern black slab door.
Good Style Pairings
Traditional homes: Brass, bronze, or classic nickel finishes with curved levers or detailed handlesets.
Modern homes: Matte black, satin nickel, or stainless finishes with clean lines and simple trim.
Farmhouse and transitional homes: Matte black, aged bronze, or mixed metal looks with understated but sturdy shapes.
Historic homes: More decorative escutcheons, richer finishes, and hardware that respects the age of the entry instead of pretending the house was built last Thursday.
Popular Finishes
Matte black: Crisp, modern, and high contrast.
Satin nickel: Versatile, forgiving, and easy to pair with many other finishes.
Oil-rubbed bronze: Warm and traditional with a little drama.
Polished brass: Classic and bright, though it needs the right setting to avoid looking too flashy.
A helpful rule: decide whether you want your hardware to blend in or stand out. If the door color is the star, hardware can play supporting actor. If the door itself is simple, the hardware can do more visual work.
Security Features That Actually Matter
Pretty hardware is nice. Hardware that resists forced entry is nicer.
Look at Lock Grades
For residential hardware, you will often see Grade 1, Grade 2, or Grade 3 references. Grade 1 is the highest performance level, Grade 2 is a strong middle ground for homes, and Grade 3 is more basic. Some residential hardware also references BHMA performance ratings, where AAA indicates top marks across security, durability, and finish categories.
Choose a Real Deadbolt
A quality deadbolt matters far more than relying on a keyed knob alone. For most homeowners, a single-cylinder deadbolt is the practical choice: keyed outside, thumb-turn inside. Double-cylinder deadbolts can add security near glass, but they also raise emergency-exit considerations, so always check local code and life-safety requirements before choosing one.
Upgrade the Strike Plate
This is the part many people skip, and it is a mistake. A reinforced strike plate, ideally installed with long screws that bite into the wall framing rather than just the trim, can significantly strengthen the door system. If you upgrade only the shiny visible parts but leave weak hardware buried in the jamb, you are basically putting designer sunglasses on a problem.
Check Bolt Throw and Alignment
The deadbolt should extend fully into the strike. If the door is sagging, warped, or misaligned, even a premium lock can perform badly. Hardware cannot compensate for a door that closes like it is in a personal feud with the frame.
Consider Smart Lock Features Carefully
Smart locks can be fantastic when chosen wisely. Useful features include keypad entry, app control, remote lock status, temporary guest codes, and auto-lock functions. Just make sure the lock fits your existing deadbolt prep and door thickness, and be realistic about battery maintenance. A smart lock is convenient, but only if you remember it is not powered by magic.
Should You Choose a Knob, Lever, Handleset, or Smart Lock?
Knob
Knobs are compact and familiar, but they are not always the easiest to grip. They work best when the look is simple and the budget is modest.
Lever
Levers are easier to operate and often feel more modern or more accessible. They are a strong everyday choice for homeowners who value ease of use.
Handleset
A handleset gives the front door more presence. It is often the best option when you want maximum curb appeal and a more upscale look.
Smart Deadbolt
Great for households that want keyless entry, guest codes, app control, or integration with a smart home setup. Just remember that convenience should not come at the expense of fit, build quality, or backup access.
How to Upgrade Front Door Hardware Step by Step
1. Remove the Old Hardware
Take off the interior trim, exterior handle or knob, latch, deadbolt, and old strike plates. Keep screws organized in case you need to compare lengths or reuse something temporarily.
2. Inspect the Door and Jamb
Look for stripped holes, cracked wood, sagging hinges, and signs that the latch or bolt has been rubbing. This is the perfect time to fix small problems before the new hardware goes on.
3. Test-Fit the New Components
Dry-fit the latch and deadbolt before fully tightening anything. Confirm that the backset is correct, the latch orientation is right, and the exterior trim sits flush.
4. Install the Latch and Deadbolt
Follow the product instructions carefully. Many modern sets are designed for straightforward replacement on standard doors, but the exact sequence can vary.
5. Install the Exterior and Interior Trim
Make sure all through-bolts line up and that the hardware is centered. Tighten screws evenly. Over-tightening can cause binding, which is a cruel and unnecessary way to ruin a brand-new lock.
6. Replace the Strike Plate
Use the upgraded strike plate if included. If the recess in the jamb is too small, carefully adjust it with a chisel so the plate sits flush.
7. Test Everything Repeatedly
Open and close the door several times. Lock and unlock it with the door open first, then closed. The latch should catch smoothly, and the deadbolt should throw fully without resistance.
Common Front Door Hardware Mistakes to Avoid
Buying for looks only: Great style does not fix poor security or bad fit.
Ignoring measurements: Hardware that almost fits does not fit.
Skipping the strike plate upgrade: This is one of the best value improvements you can make.
Forgetting door handing: Not every lever is universal.
Over-tightening screws: This can cause sticking and misalignment.
Installing a smart lock on a misaligned door: Electronics are not a substitute for proper door operation.
Mixing too many finishes: Cohesive usually beats chaotic.
When to DIY and When to Call a Pro
A standard front door lock replacement on a modern prepped door is usually a manageable DIY project. If you are replacing like-for-like hardware and the holes line up, you can often finish the job in an afternoon.
Call a professional if you have a mortise lock, a severely misaligned door, damaged wood around the lock area, or a custom entry system with multipoint hardware. Also call for help if your “simple upgrade” has somehow turned into a door that no longer opens from either side. That is no longer a project. That is an event.
Budget Expectations
Front door hardware upgrades can range from budget-friendly to “well, that escalated quickly.”
Basic keyed entry plus deadbolt: affordable and practical.
Mid-range handleset with deadbolt: a strong balance of looks and durability.
Premium designer hardware: excellent style, better materials, bigger price tag.
Smart lock systems: added convenience and features, with cost varying based on connectivity and brand.
If your main goal is security, spend less on decorative extras and more on deadbolt quality, strike reinforcement, and overall build quality. If your goal is curb appeal, look for a coordinated set that fits your door correctly and elevates the entire entry.
Final Thoughts
Upgrading front door hardware is one of those rare home projects that can improve both form and function almost immediately. The right hardware can make your entry look cleaner, feel sturdier, operate more smoothly, and secure your home more effectively. That is a lot of payoff for a project that often starts with a screwdriver and a tape measure.
The key is to shop smarter than your impulse. Measure carefully. Choose a style that fits your home. Pay attention to security grades and deadbolt quality. Reinforce the strike plate. And do not assume every shiny lockset is automatically an upgrade just because it photographed well online.
If you get the details right, your front door will not just look better. It will work better every single day. And that is the kind of upgrade worth turning the key for.
Real-World Experience: What Homeowners Learn After Upgrading Front Door Hardware
One of the most common experiences people have after upgrading front door hardware is surprise at how much the old hardware had been annoying them without their realizing it. They had gotten used to the loose knob, the sticky deadbolt, the latch that needed a shoulder bump, or the finish that looked worn no matter how much it was cleaned. Then the new hardware goes on, and suddenly the door closes with a clean click, the lock turns smoothly, and the whole entry feels more solid. It is a small change that often feels bigger in daily life than it did on the shopping list.
Another thing homeowners often notice is that looks matter more than expected. A new handleset can visually “finish” the front of the house. People repaint the door, replace the house numbers, maybe add a new porch light, and then the old lock becomes the one detail that drags everything down. Once the hardware is upgraded, the entry usually feels more intentional. It can make the whole facade look newer, even when the only thing that changed was the metal on the door.
There is also a practical lesson that comes up again and again: the best upgrade is usually not just the visible trim. It is the combination of better hardware plus better installation. Homeowners who take time to align the latch, use stronger screws, and replace a weak strike plate tend to feel the biggest difference. The door feels tighter. The deadbolt engages more confidently. The entry no longer has that slightly flimsy feeling that many builder-grade locksets develop over time.
For families who switch to a keypad or smart lock, the daily experience changes in a different way. No more digging through a bag while holding packages. No more kids forgetting keys. No more hiding a spare key in a place that is not nearly as clever as people think it is. The convenience can be real and immediate. That said, homeowners also learn quickly that smart features do not eliminate the basics. A smart lock still needs a properly aligned door, a good deadbolt, and fresh batteries. Fancy technology is helpful, but it still appreciates solid carpentry.
People replacing hardware on older homes usually learn one more memorable lesson: old doors have opinions. Measurements may be slightly off. Existing holes may not be perfectly centered. Paint buildup can interfere with trim plates. A jamb may need chiseling. A latch recess might be too shallow. These projects are still worthwhile, but they reward patience. Many experienced DIYers say the win comes from slowing down, dry-fitting parts, and solving one detail at a time instead of expecting a five-minute miracle.
In the end, the experience of upgrading front door hardware tends to be satisfying because it touches everyday life so directly. You see it every time you leave. You use it every time you return. Unlike some home improvements that hide behind walls, this one gives immediate feedback. The door feels better in your hand. The house looks sharper from the curb. And every smooth lock and solid close is a little reminder that the upgrade was not just cosmetic. It was practical, visible, and worth doing right.