Table of Contents >> Show >> Hide
- Before You Start: Know What You Are Working On
- Tools and Supplies You Will Need
- Safety First: Lift the Blazer Correctly
- Step-by-Step: How to Change the Brake Pads on a 2000 Blazer
- Step 1: Remove the Wheel
- Step 2: Inspect the Brake Assembly
- Step 3: Check the Brake Fluid Reservoir
- Step 4: Remove the Caliper Bolts
- Step 5: Remove the Old Brake Pads
- Step 6: Clean the Bracket and Hardware Contact Points
- Step 7: Inspect and Service the Slide Pins
- Step 8: Inspect the Rotor
- Step 9: Compress the Caliper Piston
- Step 10: Install the New Brake Pads
- Step 11: Reinstall the Caliper
- Step 12: Repeat on the Other Side
- Step 13: Reinstall the Wheels
- Step 14: Pump the Brake Pedal Before Driving
- Breaking In the New Brake Pads
- Common Mistakes to Avoid
- Troubleshooting After the Brake Pad Replacement
- Real-World Experience: What This Job Usually Feels Like
- Final Thoughts
- SEO Tags
Changing the brake pads on a 2000 Chevrolet Blazer is one of those DIY jobs that looks intimidating until you understand the order of operations. Then it becomes less “mystery box of metal parts” and more “careful weekend project with a torque wrench.” The key word is careful. Brakes are not decorative. They are the difference between stopping smoothly at a red light and giving the car in front of you an unwanted friendship bracelet made of bumper plastic.
This guide explains how to change the brake pads on a 2000 Blazer in a practical, beginner-friendly way while keeping the focus on safety, correct parts, clean installation, and proper inspection. The 2000 Chevy Blazer is part of the S-Series family, and many models use four-wheel disc brakes, but you should always confirm your exact trim, drivetrain, brake option code, and replacement parts before starting. If your Blazer has been modified, repaired with non-original components, or has unusual brake hardware, use a factory service manual or ask a qualified technician to verify the setup.
Important note: This article is for educational DIY guidance. If you are not comfortable safely lifting a vehicle, identifying brake components, or using a torque wrench, have an experienced adult or certified mechanic help. Brake work must be done correctly.
Before You Start: Know What You Are Working On
The main keyword here is simple: change brake pads on a 2000 Blazer. But the real job is more than swapping old pads for shiny new ones. A proper brake pad replacement includes inspecting the rotors, calipers, slide pins, brake hoses, wheel studs, brake fluid level, and hardware. On an older SUV like a 2000 Chevrolet Blazer, rust and stuck parts can turn a “quick pad slap” into a small archaeological dig.
Brake pads should be replaced in axle sets. That means if you replace the front left pads, you replace the front right pads too. Do not replace only one side unless you enjoy strange braking behavior and the suspenseful feeling of your SUV pulling like it has a strong opinion about lane changes.
Tools and Supplies You Will Need
Gather everything before lifting the vehicle. Nothing ruins a brake job faster than realizing your torque wrench is missing while the Blazer is sitting in the driveway with one wheel off, looking disappointed.
Basic Tools
- Floor jack rated for the vehicle weight
- Jack stands rated for the vehicle weight
- Wheel chocks
- Lug wrench or breaker bar
- Socket set and ratchet
- Torque wrench
- C-clamp or disc brake piston compressor
- Wire brush
- Brake cleaner
- High-temperature brake lubricant
- Bungee cord or wire to support the caliper
- Safety glasses and gloves
Replacement Parts
- Correct brake pads for your 2000 Chevrolet Blazer
- New brake hardware clips if included or required
- New rotors if the old rotors are worn, grooved, warped, too thin, or heat damaged
- DOT 3 brake fluid if topping off is necessary after inspection
Choose pads that match your driving style. Ceramic brake pads are popular for low dust and quiet operation. Semi-metallic pads may handle heat well but can produce more noise and dust. For a daily-driven Blazer, quality replacement pads from a trusted brand are usually more important than chasing racing-style marketing. Your 2000 Blazer is an SUV, not a NASCAR entry wearing cargo shorts.
Safety First: Lift the Blazer Correctly
Park on a flat, solid surface. Put the transmission in Park, set the parking brake if you are working on the front brakes, and chock the wheels that will stay on the ground. Slightly loosen the lug nuts before raising the SUV. Do not remove them yet.
Raise the Blazer using the correct lifting points, then place it securely on jack stands. Never rely on a jack alone. A hydraulic jack is a lifting tool, not a life insurance policy. Once the vehicle is supported, gently shake it to confirm it is stable before removing the wheel.
Step-by-Step: How to Change the Brake Pads on a 2000 Blazer
Step 1: Remove the Wheel
Finish removing the lug nuts and pull the wheel off. Set the wheel flat under the side of the vehicle as an extra precaution, but do not treat it as a replacement for jack stands. Look at the brake assembly before touching anything. Notice the caliper, rotor, brake hose, pads, and mounting hardware.
Step 2: Inspect the Brake Assembly
Before removing the caliper, inspect the area. Look for brake fluid leaks, cracked rubber hoses, uneven pad wear, deep rotor grooves, blue heat spots, broken clips, and torn slide pin boots. Uneven wear can mean sticking slide pins, a seized caliper, poor lubrication, or a brake hose problem. If one pad is almost gone and the other looks nearly new, do not simply install new pads and hope the brake fairy handles the rest.
Step 3: Check the Brake Fluid Reservoir
Open the hood and check the brake fluid level. When you compress the caliper piston later, fluid will move back into the reservoir. If the reservoir is overfilled, it may overflow. Brake fluid can damage paint, so protect painted surfaces and wipe spills immediately. Use only the correct brake fluid type for the vehicle, typically DOT 3 for this generation of Blazer.
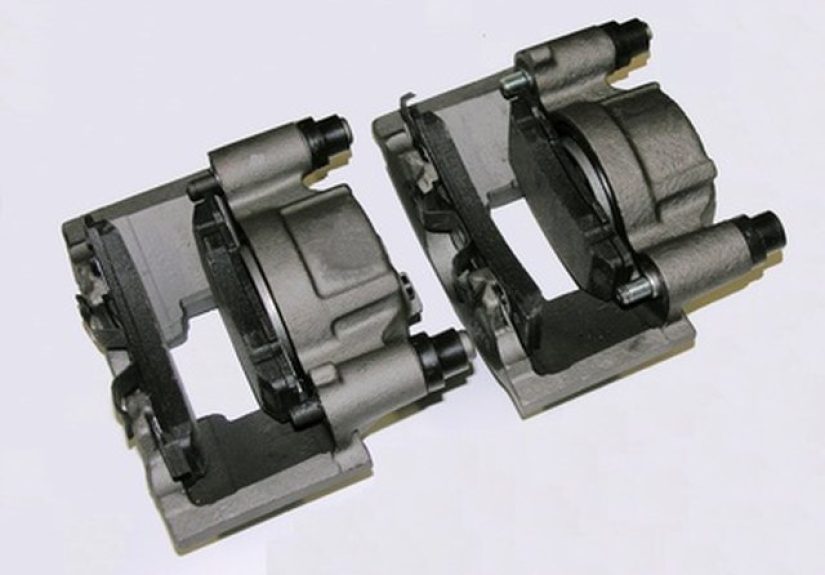
Step 4: Remove the Caliper Bolts
Remove the caliper guide pin bolts or mounting bolts, depending on the brake design on your specific Blazer. Keep track of bolt locations and any sleeves, bushings, or hardware. If the bolts are rusty, work slowly and use the correct socket to avoid rounding them.
Once the bolts are out, slide the caliper away from the rotor. Do not let the caliper hang by the brake hose. Support it with a bungee cord, wire, or hanger from a suspension component. The brake hose is not a hammock. It has responsibilities.
Step 5: Remove the Old Brake Pads
Take out the old pads and hardware clips. Compare the old pads with the new pads to confirm shape, thickness, wear sensor placement, and hardware fit. If the new pads look noticeably different, stop and verify the part number before forcing anything into place.
Pay close attention to how the pads sit in the bracket. Taking a quick photo before removal can save confusion later. Your phone camera is not just for food pictures and blurry concert videos; it is also a surprisingly good mechanic’s assistant.
Step 6: Clean the Bracket and Hardware Contact Points
Use a wire brush and brake cleaner to remove rust and dirt from the pad contact areas. New pads must slide freely in the bracket. If rust builds up under the hardware clips, the pads can bind, drag, overheat, or wear unevenly.
Install new clips if supplied. Apply a thin layer of high-temperature brake lubricant only to the proper metal contact points where the pad ears slide. Do not get grease on the pad friction material or rotor surface. Greasy brake pads are about as useful as sneakers on ice.
Step 7: Inspect and Service the Slide Pins
The caliper slide pins must move smoothly. Pull them out if the design allows, clean them, inspect the rubber boots, and lubricate them with the correct brake-safe lubricant. Do not use petroleum grease where silicone or synthetic brake lubricant is required, because the wrong product can swell rubber parts.
If a slide pin is frozen, badly corroded, or the boot is torn, repair it before continuing. Sticking slide pins are a common cause of uneven brake pad wear and brake pull.
Step 8: Inspect the Rotor
Look at both sides of the rotor. Minor smooth wear is normal. Deep grooves, heavy rust scaling, cracks, heat spotting, pulsation, or thickness below specification means the rotor should be resurfaced or replaced. Many DIYers replace rotors when installing new pads because modern rotors are often affordable and old rotors may already be near their minimum thickness.
If you reuse the rotor, clean it thoroughly with brake cleaner. If you install a new rotor, clean both sides to remove protective oil. Forgetting this step creates smoke, smell, and immediate regret.
Step 9: Compress the Caliper Piston
Place an old brake pad against the piston and use a C-clamp or brake piston tool to compress the piston slowly back into the caliper. Watch the brake fluid reservoir while doing this. If fluid rises too high, remove a small amount with a clean suction tool dedicated to brake fluid.
Compress the piston slowly and evenly. If it refuses to move, the caliper may be seized or there may be another hydraulic issue. Do not force it like you are trying to win a carnival strength game.
Step 10: Install the New Brake Pads
Install the new pads in the correct orientation. Make sure any wear indicator is positioned correctly. The pads should sit securely but still move freely in the bracket. If they must be hammered into place, something is wrong. Remove them and check for rust, incorrect hardware, or wrong parts.
Apply brake lubricant only where specified: usually the pad ears, backing plate contact points, and slide hardware. Keep the friction surface clean.
Step 11: Reinstall the Caliper
Carefully slide the caliper over the new pads and rotor. Reinstall the caliper bolts by hand first to prevent cross-threading. Tighten them to the correct specification for your exact brake configuration. Torque values can vary by caliper type, front or rear axle, and hardware design, so verify the factory specification for your vehicle before final tightening.
After the caliper is secure, spin the rotor by hand. A light pad drag is normal. Heavy binding is not. Recheck pad placement, hardware clips, slide pins, and piston position if the rotor will not rotate reasonably.
Step 12: Repeat on the Other Side
Repeat the same process on the opposite side of the axle. Always complete both sides. Compare wear patterns as you go. If one side is dramatically different from the other, write it down and investigate. Brake parts tell stories; sometimes they are mysteries, sometimes they are horror stories with rust.
Step 13: Reinstall the Wheels
Put the wheels back on and thread the lug nuts by hand. Lower the Blazer until the tires just touch the ground, then tighten the lug nuts in a crisscross or star pattern with a torque wrench. A common factory wheel nut torque specification for this Blazer generation is 100 lb-ft, but always verify the specification for your exact wheel and model setup.
Do not lubricate wheel studs or lug nut seats unless the service information specifically says to do so. Lubricated threads can change clamping force and lead to over-tightening.
Step 14: Pump the Brake Pedal Before Driving
This step is not optional. Before starting the engine or moving the vehicle, pump the brake pedal several times until it feels firm. When you compressed the caliper pistons, you created extra space between the pads and rotors. Pumping the pedal moves the pistons back into position.
If the pedal stays soft, sinks, or feels abnormal, do not drive. Recheck the work, inspect for leaks, and get professional help if needed.
Breaking In the New Brake Pads
New brake pads need a proper break-in, also called bedding or burnishing. Follow the pad manufacturer’s instructions. In general, the process involves a series of moderate stops that gradually heat the pads and rotors, followed by cooling time. Avoid panic stops, towing heavy loads, or holding the brake pedal hard at a stop immediately after heating the brakes.
Good bedding helps transfer an even layer of friction material to the rotor surface. Bad bedding can lead to noise, vibration, glazing, or uneven braking. Basically, your new pads need a polite introduction to the rotors, not a dramatic first date.
Common Mistakes to Avoid
Replacing Pads Without Inspecting Rotors
New pads on bad rotors can cause noise, vibration, and poor stopping. If the rotor is deeply grooved, warped, cracked, or too thin, replace it.
Letting the Caliper Hang by the Hose
This can damage the brake hose. Always support the caliper with a hanger or cord.
Using the Wrong Grease
Use brake-specific lubricant. General-purpose grease may damage rubber components or fail under high heat.
Skipping the Torque Wrench
Guessing torque on brake and wheel hardware is not a badge of honor. Use a torque wrench and correct specifications.
Forgetting to Pump the Pedal
This is one of the most dangerous mistakes. Always pump the brake pedal until firm before driving.
Troubleshooting After the Brake Pad Replacement
If you hear light squeaking during the first few miles, it may be normal bedding noise. If you hear grinding, scraping, clunking, or metallic dragging, stop and inspect the brakes immediately. A burning smell can happen briefly during break-in, but strong smoke, severe pulling, or a soft pedal means something is wrong.
If the Blazer pulls to one side, check for uneven installation, sticking slide pins, a seized caliper, contaminated pads, brake hose problems, or suspension issues. If the pedal pulses, inspect the rotors for runout or thickness variation. If the pedal feels spongy, check for air in the hydraulic system or fluid leaks.
Real-World Experience: What This Job Usually Feels Like
Changing brake pads on a 2000 Blazer is not usually difficult because the basic disc brake layout is straightforward. The challenge is the vehicle’s age. A Blazer from 2000 has had plenty of time to collect rust, road salt, dust, heat cycles, mystery noises, and previous-owner creativity. The actual pad swap may take less than an hour per axle when everything is clean. But if the caliper bolts are crusty or the slide pins are stuck, the job can become a longer afternoon.
One common experience is discovering that the outside pad looks decent while the inside pad is worn down badly. That usually points to a slide pin or caliper movement problem. Many people make the mistake of throwing new pads on and calling it done. Two months later, the new pads are wearing unevenly and the wheel smells hot after driving. The better approach is to stop during the first inspection and ask, “Why did these pads wear this way?” Brake pads are like little report cards. They grade the condition of the caliper, bracket, rotor, and hardware.
Another real-world lesson is that cleaning matters more than beginners expect. A tiny ridge of rust under a stainless hardware clip can squeeze the new pad tightly enough to prevent smooth movement. The pad may fit, but it will not float correctly. That leads to drag, heat, noise, and premature wear. Spending five extra minutes with a wire brush can save you from doing the whole job again while mumbling words not found in the owner’s manual.
Brake lubricant is another area where “more” is not better. A thin film on the correct contact points helps. A sloppy glob that gets near the rotor or friction surface creates problems. The goal is smooth pad movement, not a buttered skillet. Keep the rotor and pad faces spotless.
On older Blazers, the rotor may not want to come off if you decide to replace it. Rust can bond the rotor to the hub. Gentle tapping around the rotor hat, penetrating oil around the hub area, and patience usually help. Avoid smashing parts randomly. The vehicle may be old, but it still deserves manners.
The most satisfying part of the job comes after everything is back together and the brake pedal firms up. That firm pedal is your first sign that the caliper pistons are seated against the new pads. Then comes the cautious test drive. Start slowly in a safe area. Make a few gentle stops. Listen. Feel. Smell. The Blazer should stop evenly without pulling, grinding, or drama. If something feels wrong, return home slowly and inspect the work. Pride is cheaper than a tow truck only when it knows when to be quiet.
Many DIYers also learn that brake jobs are easier the second time. The first time, every bolt looks suspicious. The second time, you understand the rhythm: lift safely, remove, inspect, clean, compress, install, torque, pump, test. Once that rhythm makes sense, the job becomes less stressful and more methodical.
Final Thoughts
Learning how to change the brake pads on a 2000 Blazer can save money and teach valuable maintenance skills, but the job must be treated with respect. Use the correct parts, support the vehicle safely, clean the hardware, inspect the rotors, lubricate only the correct points, torque fasteners properly, and test the brakes carefully before returning to normal driving.
A good brake job is not just quiet. It is smooth, even, predictable, and safe. Take your time, verify your specifications, and do not ignore warning signs. Your Blazer may be old enough to have stories, but with properly installed brake pads, at least stopping does not have to be one of the scary ones.

![Hackaday Reader [David] Wins A Camera From Make And Nikon](https://factxtop.com/wp-content/uploads/2026/05/hackaday-reader-david-wins-a-camera-from-make-and-nikon-jlpGNg0K-thumb.jpg)