Table of Contents >> Show >> Hide
- What Is Liberty Print Bias Binding?
- Why Liberty Prints Work So Well for Bias Binding
- Single-Fold vs. Double-Fold Liberty Bias Binding
- Common Widths and How to Choose One
- Best Projects for Liberty Print Bias Binding
- How to Make Liberty Print Bias Binding
- How to Sew Liberty Print Bias Binding Neatly
- Color and Print Pairing Ideas
- Buying Liberty Print Bias Binding
- Care Tips for Projects with Liberty Bias Binding
- Common Mistakes to Avoid
- Hands-On Experiences with Liberty Print Bias Binding
- Conclusion
- SEO Tags
Liberty Print Bias Binding is the tiny sewing detail that somehow manages to look polite, expensive, artistic, and a little bit smug all at once. It is a narrow strip of fabric, usually cut on the bias, made from Liberty-style printed cotton lawn or other Liberty fabrics, and used to finish raw edges on garments, quilts, accessories, and home sewing projects. In simpler words: it is the beautiful floral ribbon that turns “I made this” into “Yes, I absolutely know what I’m doing.”
If you have ever admired a handmade dress with a dainty floral neckline, a baby quilt with a soft printed edge, or a tote bag whose inside seams look prettier than some people’s living rooms, there is a good chance bias binding was involved. When that binding features Liberty prints, especially the beloved Liberty Tana Lawn-style florals, the result is refined without feeling stiff, classic without feeling dusty, and charming without shouting for attention.
This guide explains what Liberty print bias binding is, why sewists love it, how to choose the right type, how to use it well, and which projects benefit most from its crisp-yet-soft personality. We will also cover practical tips, mistakes to avoid, and real-world sewing experiences so your binding behaves beautifully instead of curling up like a dramatic Victorian fainting couch.
What Is Liberty Print Bias Binding?
Liberty print bias binding is fabric tape made from Liberty-style printed fabric and cut at a 45-degree angle to the grain. This diagonal cut is called the bias. Fabric cut on the bias has more flexibility and stretch than fabric cut straight across the grain, which allows the strip to bend smoothly around curves, corners, necklines, armholes, scallops, and quilt edges.
The “Liberty print” part refers to the distinctive small-scale floral, botanical, paisley, heritage, or artistic prints associated with Liberty Fabrics. These prints are famous for their detail, elegant color palettes, and ability to make even a plain linen dress look like it has a secret trust fund. While many sewists use genuine Liberty Tana Lawn cotton, others use Liberty-inspired lawn or quilting cotton depending on budget and project needs.
Bias Binding vs. Bias Tape: Are They the Same?
In everyday sewing language, bias binding and bias tape are often used interchangeably. Both refer to strips of fabric cut on the bias and pressed into a usable trim. The word “binding” is commonly used when the tape wraps around and encloses a raw edge, while “bias tape” may describe the strip before or during use. Either way, the goal is the same: cover raw edges neatly, add durability, and make the finish look intentional.
Why Liberty Prints Work So Well for Bias Binding
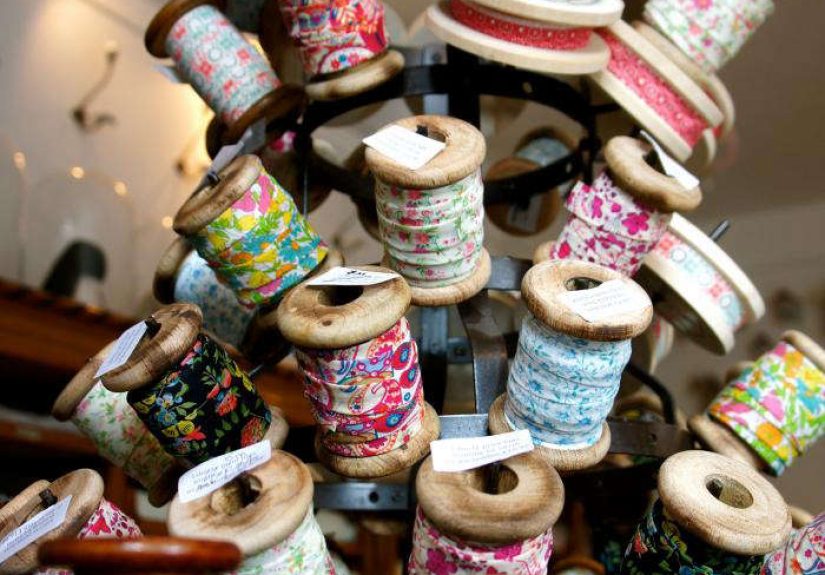
Liberty-style fabrics are popular for bias binding because they usually combine fine detail, smooth texture, and a lightweight hand. The small motifs are especially useful. A large floral print might disappear or look chopped up on a narrow strip, but Liberty’s tiny blossoms, vines, berries, stars, and paisleys still read beautifully even when folded down to a finished width of 1/4 inch, 3/8 inch, or 1/2 inch.
Another advantage is softness. Cotton lawn has a silky feel compared with heavier cotton. That makes it comfortable against the skin, which matters for necklines, sleeve openings, baby clothes, aprons, pajamas, and summer garments. It also reduces bulk, especially where seams overlap. Nobody wants a quilt corner that feels like it is hiding a cracker underneath.
Liberty print bias binding also adds a designer finish without requiring a designer-level sewing room. You can use it as a visible decorative edge or tuck it inside as a secret luxury. That second option is especially satisfying. It is like wearing fancy socks with office shoes: maybe no one else notices, but you know, and that is enough.
Single-Fold vs. Double-Fold Liberty Bias Binding
Before buying or making Liberty print bias binding, it helps to understand the difference between single-fold and double-fold styles.
Single-Fold Bias Binding
Single-fold bias binding has both long raw edges pressed toward the center, but the strip is not folded in half again. It is useful for facing necklines, finishing armholes, binding seams, creating appliqué lines, or adding flat decorative trim. Single-fold binding gives a clean, professional look when you want the binding to turn fully to the inside of a garment.
Double-Fold Bias Binding
Double-fold bias binding starts like single-fold tape, then gets folded in half lengthwise one more time. This creates a narrow strip that can wrap around a raw edge and show on both sides. It is a favorite for quilts, bibs, potholders, bags, aprons, napkins, and curved garment edges. If you are new to sewing binding, double-fold is often the friendlier option because it hugs the edge like it came prepared for the assignment.
Common Widths and How to Choose One
Liberty print bias binding comes in several widths. The right choice depends on the project, fabric thickness, and desired look.
1/4-Inch Finished Width
This narrow size is delicate and elegant. It works well for children’s clothing, fine cotton tops, camisoles, tiny quilted projects, and subtle neckline finishes. It can be trickier to sew because there is less room for error. If your coffee has not kicked in, maybe wait.
3/8-Inch Finished Width
This is a practical middle ground. It is narrow enough to look refined but wide enough to handle curves and layers. Many garment sewists like this size for armholes, necklines, and sleeve edges.
1/2-Inch Finished Width
This width is versatile, beginner-friendly, and strong enough for many craft and quilt projects. It is a great option for baby quilts, tote bags, aprons, placemats, and visible decorative edges.
Best Projects for Liberty Print Bias Binding
Liberty print bias binding is small, but it has range. Think of it as the supporting actor who steals the scene.
Garment Necklines and Armholes
A plain linen tank, cotton blouse, or sleeveless dress can look instantly more polished with Liberty binding around the neckline and armholes. You can choose a print that blends quietly with the main fabric or one that creates contrast. Navy linen with a tiny pink floral binding? Very chic. White cotton with blue Liberty trim? Fresh enough to make your laundry basket feel judged.
Quilt Binding
Liberty print bias binding is excellent for small quilts, baby quilts, wall hangings, and heirloom-style projects. Because Liberty prints often include many colors in one design, they can tie together mixed fabrics beautifully. A floral binding can soften modern geometric blocks, while a darker Liberty print can frame a pastel quilt without looking heavy.
Children’s Clothing
Liberty prints have long been loved for children’s garments because they are sweet without being cartoonish. Bias binding can finish little collars, sleeve openings, bloomers, sun hats, pinafores, and dresses. It adds charm, but it also creates a smooth edge that is comfortable for sensitive skin.
Bags, Pouches, and Accessories
A handmade pouch with Liberty binding along the zipper edge or inner seams feels instantly giftable. Bias binding is also useful for tote bags, drawstring bags, makeup cases, book sleeves, tablet covers, and hair accessories. The print adds personality without requiring complicated construction.
Home Decor Projects
Use Liberty bias binding on napkins, placemats, cushion covers, lampshade trims, bunting, curtains, or table runners. Small amounts go a long way. Even a simple set of cotton napkins looks boutique-worthy with a floral Liberty edge.
How to Make Liberty Print Bias Binding
You can buy pre-made Liberty print bias binding, but making your own gives you total control over print, width, and length. It is also a smart way to use precious fabric scraps. Liberty fabric is beautiful, but nobody wants to waste it. Scraps deserve a second act.
Step 1: Prepare the Fabric
Start with clean, pressed fabric. If the fabric will be used on a washable garment or quilt, prewash it first to reduce shrinkage later. Press with steam if appropriate, and use a light spray starch if the fabric is very soft or slippery.
Step 2: Find the Bias
Lay the fabric flat. The bias runs at a 45-degree angle between the lengthwise grain and crosswise grain. A quilting ruler makes this easy. Cut along that diagonal line to create your first bias edge.
Step 3: Cut Strips
For single-fold binding, cut strips twice the desired finished width. For double-fold binding, cut strips about four times the desired finished width. For example, if you want 1/2-inch double-fold binding, cut strips about 2 inches wide.
Step 4: Join the Strips
Place two strip ends right sides together at a 90-degree angle. Sew diagonally from corner to corner, trim the seam allowance, and press the seam open. Diagonal joins reduce bulk and distribute thickness more smoothly than straight joins.
Step 5: Press the Binding
Feed the strip through a bias tape maker or press by hand. For single-fold binding, press both long edges toward the center. For double-fold binding, fold the strip in half again and press. Take your time here. Bias binding remembers sloppy pressing the way a cat remembers betrayal.
How to Sew Liberty Print Bias Binding Neatly
The secret to beautiful binding is not speed. It is control. Liberty cotton lawn is cooperative, but it still deserves respect.
Use the Right Needle and Thread
For fine cotton lawn, use a sharp universal or microtex needle in a smaller size, such as 70/10 or 80/12. Choose quality cotton or polyester thread that blends with the binding or intentionally contrasts. A slightly finer thread can help reduce bulk on delicate edges.
Do Not Stretch the Binding Too Much
Bias stretches naturally, which is why it handles curves so well. But pulling it while sewing can distort the edge. Let the binding relax into the curve. Guide it gently rather than dragging it like a stubborn suitcase through an airport.
Clip Curves When Needed
For tight inside curves, careful clipping helps the fabric spread and lie flat. For outside curves, ease the binding smoothly and press as you go. Pressing is not optional; it is the quiet hero of good sewing.
Finish Corners with Care
For quilts and napkins, mitered corners give a clean professional finish. Fold the binding at a 45-degree angle at the corner, then fold it back along the next edge. Sew slowly and check both sides before committing. Corners are where binding reveals whether you were patient or merely optimistic.
Color and Print Pairing Ideas
Choosing the right Liberty print bias binding is half technique, half taste, and half emotional decision-making. Yes, that is three halves. Fabric math is different.
Match One Color from the Main Fabric
If your garment or quilt has several colors, choose a Liberty print that picks up one of them. A blue dress with a blue-and-green floral binding feels harmonious. A cream quilt with a binding that includes cream in the print looks intentional.
Use Contrast for a Designer Look
Contrast binding can define an edge beautifully. Try black floral binding on natural linen, red floral binding on denim, or mustard Liberty trim on navy cotton. Contrast works especially well on simple silhouettes.
Think About Scale
Small-scale prints usually work best because bias binding is narrow. Tiny florals, ditsy prints, micro paisleys, and fine geometric designs remain visible after folding. Large motifs may become abstract, which can still be attractive, but the original design may disappear.
Buying Liberty Print Bias Binding
When shopping for Liberty print bias binding, check the fabric content, width, fold type, and length. Some listings sell by the yard, some by the meter, and some in pre-cut bundles. Read carefully so you do not accidentally order enough binding for one potholder when your quilt is the size of a small county.
Look for terms like “Liberty Tana Lawn,” “100% cotton lawn,” “double-fold bias binding,” “single-fold bias tape,” and “continuous length.” If you are finishing a garment, softness matters. If you are binding a quilt or bag, durability and width matter. For heirloom projects, genuine Liberty fabric may be worth the splurge. For craft projects, Liberty-inspired cotton can still give a lovely effect.
Care Tips for Projects with Liberty Bias Binding
Care depends on both the binding and the main fabric. If both are cotton and prewashed, many projects can be machine washed on a gentle cycle. Use mild detergent, avoid harsh bleach, and press after washing to restore crisp edges. For delicate garments, hand washing or a lingerie bag can help preserve the finish. Quilts and baby items should be practical, but a little care keeps the binding looking fresh.
Common Mistakes to Avoid
Choosing Binding That Is Too Narrow
Narrow binding looks elegant, but it can be unforgiving. Beginners may find 1/2-inch double-fold binding easier to control than 1/4-inch binding.
Skipping the Pressing Step
Pressing shapes the binding before stitching. Without it, the fabric may twist, ripple, or refuse to lie flat. The iron is not just a hot paperweight; let it earn counter space.
Using Heavy Binding on Lightweight Fabric
Heavy quilting cotton can overwhelm fine lawn, voile, or silk blends. Liberty cotton lawn is popular because it stays light and flexible.
Forgetting to Check Both Sides
When sewing double-fold binding in one pass, the underside can slip out of the stitch line. Use clips, baste if necessary, and inspect the back before sewing the entire edge.
Hands-On Experiences with Liberty Print Bias Binding
The first time many sewists use Liberty print bias binding, they treat it like treasure. They measure twice, cut once, then stare at the strip for several minutes like it might offer financial advice. That reaction makes sense. Liberty-style fabric has a reputation for being special, and even a narrow strip can feel too pretty to risk. But once it is sewn onto a project, the hesitation usually disappears. The binding does what good trim should do: it improves the project without taking over completely.
On garments, the most satisfying experience is often a neckline finish. A sleeveless linen top can look plain during construction, almost too simple. Then a narrow Liberty floral binding goes around the neckline and armholes, and suddenly the top has personality. The inside looks clean, the outside has a tiny flash of print, and the garment feels more expensive than the pattern envelope ever promised. The key lesson is to avoid stretching the binding while sewing. Let it curve naturally, press after each step, and the neckline will sit flat instead of waving hello from across the room.
On quilts, Liberty print bias binding creates a softer, more romantic frame than solid binding. It is especially useful when the quilt top includes many colors and needs a unifying edge. A floral binding can connect pinks, blues, greens, creams, and golds without forcing one color to dominate. For baby quilts, the softness of cotton lawn feels lovely at the edges. However, because lawn is lighter than standard quilting cotton, some makers prefer a slightly wider binding or careful machine stitching for durability. Beauty is wonderful, but baby quilts live a rugged life involving laundry, snacks, and mysterious sticky substances.
For accessories, Liberty binding is a brilliant scrap-buster. A tiny amount can finish the top edge of a zipper pouch, outline a pocket, decorate a key fob, or bind the raw seams inside a tote. This is where bold print choices can be fun. A bright floral hidden inside a neutral canvas bag feels like a cheerful secret. It is also a good way to practice before moving on to garments, because small projects are less intimidating and easier to redo if a corner goes rogue.
One practical experience stands out: Liberty-style lawn presses beautifully but can shift if handled carelessly. Binding clips are often better than large pins because they hold layers without distorting the strip. If pins are used, fine pins are best. Another helpful trick is to sew the first pass slightly inside the fold line on delicate fabrics, then wrap and topstitch slowly. This gives the second side a better chance of being caught evenly.
Perhaps the biggest joy of Liberty print bias binding is how much impact comes from such a small amount of fabric. You do not need yards and yards to transform a project. A leftover strip can become the detail people notice first. It is economical, creative, and deeply satisfying. In a sewing world where large projects can take weeks, binding offers a quick reward: one neat edge, one pop of print, one tiny victory. And sometimes, one tiny victory is exactly what keeps the sewing machine from being threatened with retirement.
Conclusion
Liberty Print Bias Binding is one of those rare sewing details that is both practical and beautiful. It protects raw edges, helps curves lie smoothly, adds durability, and gives handmade projects a polished finish. Whether you use it on garments, quilts, children’s clothes, bags, or home decor, it brings a refined burst of pattern without overwhelming the design.
The best results come from choosing the right width, matching the fabric weight to the project, pressing carefully, and sewing without stretching the bias out of shape. Genuine Liberty Tana Lawn-style binding is especially loved for its softness, fine weave, and iconic small-scale prints, but the same principles apply to any high-quality floral cotton lawn. Use it visibly for charm or secretly for a private luxury inside your garment. Either way, Liberty print bias binding proves that small details can carry a surprisingly large amount of style.

![Hackaday Reader [David] Wins A Camera From Make And Nikon](https://factxtop.com/wp-content/uploads/2026/05/hackaday-reader-david-wins-a-camera-from-make-and-nikon-jlpGNg0K-thumb.jpg)