Table of Contents >> Show >> Hide
- First: Safety (Because “Unplug It” Is Not Optional)
- What a “Squeak” Usually Means (Sound-to-Suspect Cheat Sheet)
- Quick Fixes You Can Try in 10–20 Minutes (No Surgery Required)
- Diagnosis That Actually Works: Find the Noise Source Before Buying Parts
- The Most Common Real Fixes (Parts That Actually Cause Squeaks)
- Fix #1: Replace a worn drive belt
- Fix #2: Replace the idler pulley (a.k.a. the squeak megaphone)
- Fix #3: Replace drum rollers (and check the shafts)
- Fix #4: Replace drum glides or felt seals
- Fix #5: Address drum bearing wear (rear bearing or support system)
- Fix #6: Check the blower wheel and lint buildup
- A Simple “Do I Need a Kit?” Rule
- When to Stop DIY and Call a Pro
- Keep It Quiet: Preventing Squeaks (and Some Fire Risk) Long-Term
- Real-World Experiences: What People Commonly Run Into (and What Actually Fixes It)
- Experience #1: “It only squeaks at the start… then it calms down.”
- Experience #2: “It squeaks AND thumps like a shoe in a dryer (but there isn’t one).”
- Experience #3: “It squeaks once per drum turnsuper steadyand it got worse after a big comforter load.”
- Experience #4: “It squeaks, dries slower, and the laundry room feels warmer than usual.”
- Experience #5: “I fixed it… and then it made a different noise.”
- Conclusion
Your dryer shouldn’t sound like it’s auditioning for a role as “Haunted Carousel #3.”
The good news: a squeaky dryer is often a simple mechanical complaintnot a sign your laundry room is cursed.
The better news: with a little smart troubleshooting, you can usually pinpoint the source fast and fix it without
taking the whole machine apart like you’re filming a DIY thriller.
This guide walks you through a practical diagnosis (what the noise likely means), quick fixes you can try right away,
and the most common parts that cause squeakinglike the belt, idler pulley, drum rollers, glides, bearings,
and even the blower wheel. Along the way, I’ll call out what’s safe for most DIYers and what’s a “nope, call a pro.”
First: Safety (Because “Unplug It” Is Not Optional)
- Unplug the dryer before opening any panels. If it’s hardwired, switch off the breaker.
- For gas dryers: turn off the gas shutoff valve if you’ll be moving the dryer or opening major panels.
- Let the dryer cool down if it just ranhot metal edges and hot air parts are not fun.
- Pull the dryer forward carefully. Don’t crush the vent duct behind it.
- Wear work gloves (dryer cabinets have sharp edgeslike paper cuts, but angrier).
What a “Squeak” Usually Means (Sound-to-Suspect Cheat Sheet)
A squeak is typically friction: something that should spin smoothly is rubbing, wearing out, or wobbling.
Where the sound is coming from matters just as much as the sound itself.
1) Squeak once per drum revolution
If the squeak happens in a steady rhythmlike “squeak… squeak… squeak…”it often points to the
drive belt or a drum support point (rollers, glides, or a bearing). The belt rotates with the drum,
so a worn, cracked, or stretched belt can “chirp” on each rotation.
2) High-pitched squeal or squeak near the bottom/front
This commonly indicates the idler pulley (the small tension pulley that keeps the belt snug).
When its bearing wears or the wheel wobbles, it can squeal loudlyespecially at startup.
3) Squeak + thump/rumble
That combo often points to drum rollers. Rollers can get flat spots or worn axles, creating a thump
as the drum rolls over the “flat,” and squeaks as the roller bearing grinds.
4) Scraping/squeaking from the front of the drum
Many dryers use drum glides (small plastic or felt-like wear strips) or felt seals at the front.
When they wear down, you can get a squeak or scrape as the drum rides unevenly.
5) Squeak plus poor airflow or odd rattling
Don’t overlook lint buildup or the blower wheel. If lint, a sock, or debris gets where it shouldn’t,
the blower area can squeal, rattle, or make intermittent weird noises.
Quick Fixes You Can Try in 10–20 Minutes (No Surgery Required)
Quick Fix #1: Level the dryer (seriously)
An unlevel dryer can shift slightly as the drum turns, creating squeaks, vibration, and extra wear.
Place a level on top (front-to-back and side-to-side). Adjust the legs until it’s stable and doesn’t rock.
If your dryer “wobbles,” it’s basically doing the problem-solving equivalent of shrugging.
Quick Fix #2: Check for “free” noise makers inside the drum
Empty the drum and check pockets (coins, keys, tiny toys that somehow survive childhood). Also check the drum
for anything caught near the baffles (those raised fins). Run the dryer empty for 30–60 seconds:
if the squeak disappears, your dryer may have been complaining about a load issue or a loose object.
Quick Fix #3: Clean the lint filter and improve airflow
Clean the lint screen. Then check the vent duct behind the dryer: make sure it isn’t kinked, crushed, or clogged.
Poor airflow makes the dryer run hotter and longer, which accelerates wear on moving parts.
Quick Fix #4: Vacuum lint where it hides (and laughs at you)
Pull the dryer forward, unplug it, remove the vent hose, and vacuum lint around the back, the floor area,
and inside the vent connection. If you have a shop vac, this is its moment.
Diagnosis That Actually Works: Find the Noise Source Before Buying Parts
Step 1: Do a “hand spin” test
- Unplug the dryer.
- Open the door and rotate the drum by hand.
- Listen and feel for roughness, scraping, or a squeak in one spot.
If the drum feels rough, the problem is likely in the drum support system (rollers, glides, bearing)
rather than airflow or a random pocket coin.
Step 2: Confirm where the sound comes from (front, back, bottom)
A squeak near the bottom/front often implicates the idler pulley or belt path. Noise from the rear may
implicate the rear drum bearing (on some designs) or rear rollers.
Step 3: If you open it: remove the belt and spin parts individually
On many dryers, once you access the drum and release belt tension, you can spin components by hand:
the idler pulley, each drum roller, and the motor pulley. A good part spins smoothly and quietly.
A bad one feels gritty, wobbly, or squeaks when you turn it.
The Most Common Real Fixes (Parts That Actually Cause Squeaks)
If quick fixes don’t solve it, you’re usually looking at normal wear-and-tear parts. Here’s what to check and how
the repair typically goes.
Fix #1: Replace a worn drive belt
Symptoms: squeak once per rotation, belt looks cracked/glazed/frayed, drum sometimes slips or struggles to start.
Typical repair: Open the cabinet (varies by model), remove the drum or support it, slip the old belt off,
and install the new belt around the drum with the grooved side facing the drum (common design).
Route the belt around the motor pulley and idler pulley to apply tension.
Pro tip: Take a photo of the belt routing before you remove it. Your future self will thank you.
Fix #2: Replace the idler pulley (a.k.a. the squeak megaphone)
Symptoms: high-pitched squeal, noise from the lower/front area, squeak often worst at startup.
Typical repair: With the dryer opened and belt tension released, remove the idler pulley wheel
(often held by a clip/fastener). Replace it if it wobbles, binds, or squeaks when spun by hand.
Lubrication note: Many repair guides recommend replacement rather than oiling, because oil can attract lint.
If your manufacturer explicitly calls for lubrication, use only a high-temperature lubricant sparingly and exactly as directed.
When in doubt, replacing the pulley is usually the cleaner long-term fix.
Fix #3: Replace drum rollers (and check the shafts)
Symptoms: squeak + rumble/thump, drum feels rough when turned by hand, rollers show flat spots or wobble.
Typical repair: Remove the drum, pop off the retaining clip/fastener on each roller, and slide the roller off.
Inspect the roller and the shaft/axle. If the shaft is grooved, rusty, or worn, replacing only the roller may not be enough.
Smart move: If one roller is worn, others may be close behind. Many DIYers replace rollers as a set to avoid reopening the dryer next month.
Fix #4: Replace drum glides or felt seals
Symptoms: scraping/squeaking at the front of the drum, visible wear on glide pads, drum seems to sit unevenly.
Typical repair: Remove the front panel or drum front support (depending on design).
Peel off worn glide pads/felt, clean the surface, and install new glides/seals as directed.
Fix #5: Address drum bearing wear (rear bearing or support system)
Symptoms: squeal from the rear, drum has play/wobble, drum doesn’t spin smoothly by hand.
Typical repair: Bearing replacement can range from “moderate DIY” to “call a technician,” depending on the model.
If the bearing is worn, it’s often best replaced rather than repeatedly lubricated.
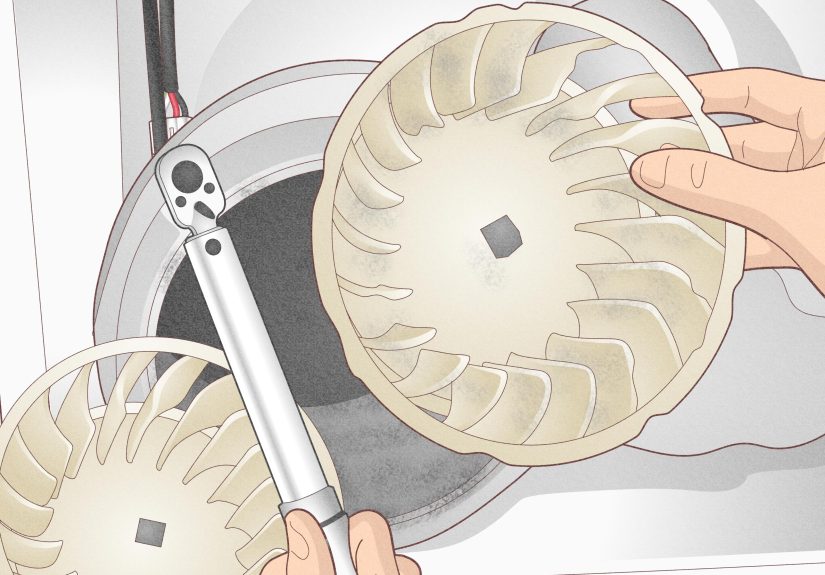
Fix #6: Check the blower wheel and lint buildup
Symptoms: squeak/rattle near the blower housing, odd airflow, intermittent noise, sometimes a vibrating rattle after the cycle ends.
Typical repair: Vacuum lint thoroughly. Inspect the blower wheel for cracks or debris.
A damaged blower wheel may need replacement. Also ensure the vent duct is clear and properly attached.
A Simple “Do I Need a Kit?” Rule
If your dryer is older and you’re already inside the cabinet for a belt, idler pulley, or rollers, a
dryer maintenance kit (belt + pulley + rollers) can be a cost-effective way to refresh the most common wear parts at once.
It’s not mandatorybut it can prevent the “I fixed the squeak… and then it started squeaking again, but in a new key” situation.
When to Stop DIY and Call a Pro
- You smell burning, see smoke, or the dryer is overheating.
- The squeak is paired with electrical issues (tripping breaker, sparking, burning odor).
- You have a gas dryer and you’re not confident working around gas connections.
- The motor seems to be the source (repairs can be pricey and diagnosis can be tricky).
- You’re not comfortable disassembling and reassembling the cabinet safely.
Keep It Quiet: Preventing Squeaks (and Some Fire Risk) Long-Term
Squeaks are annoying, but the maintenance that prevents them also improves efficiency and safety.
Think of it as giving your dryer fewer reasons to complain.
- Clean the lint screen every load. It helps airflow and reduces heat stress.
- Vacuum lint around the dryer and behind it regularly.
- Clean the vent duct at least yearly (more often with pets, heavy use, or long vent runs).
- Use rigid or flexible metal venting when possibleavoid flimsy, crush-prone materials.
- Don’t overload: heavy loads increase strain on belts, rollers, and bearings.
- If the dryer suddenly takes longer to dry, treat it as a clue, not a personality change.
Real-World Experiences: What People Commonly Run Into (and What Actually Fixes It)
Here are some common “dryer squeak” scenarios homeowners describeand the fixes that most often solve them.
Consider this the “been-there-heard-that” section, minus the bruised knuckles.
Experience #1: “It only squeaks at the start… then it calms down.”
This is a classic idler pulley or roller-bearing clue. When a dryer starts, the belt and drum go from zero to full speed quickly.
A dry, worn bearing can squeal loudly during that ramp-up, then quiet down once everything warms slightly and spins steadily.
Homeowners often assume the problem “went away” because the noise fadesbut the underlying wear usually continues.
The best move is to do the hand-spin test and then, if needed, open the cabinet and spin the idler pulley by hand with the belt removed.
If it feels gritty or sounds like a tiny squeaky shopping cart, replacing the pulley is typically the long-term solution.
People sometimes try oil first, but the “oil attracts lint” issue is realso if the squeak returns fast, replacement tends to win.
Experience #2: “It squeaks AND thumps like a shoe in a dryer (but there isn’t one).”
This combo often points to drum rollers that have developed flat spots. The thump happens once per rotation when the flat spot hits the contact point.
The squeak comes from increased friction or worn roller bearings. A common story goes like this:
the dryer starts mildly noisy, then becomes progressively louder over weeks. That’s not your imaginationthat’s wear progressing.
People who replace only the noisiest roller sometimes discover the dryer is still loud because another roller is close to failing,
or because the roller shaft is grooved. A more reliable approach is to inspect all rollers and shafts while you’re inside and replace the set if wear is visible.
It’s the dryer-repair version of changing both windshield wipers instead of just the one that squeaks.
Experience #3: “It squeaks once per drum turnsuper steadyand it got worse after a big comforter load.”
Overloading can accelerate wear, especially on belts, glides, and front drum support points.
A steady “chirp” that matches drum rotation often leads people to the belt first.
When they finally open the cabinet, the belt may look glazed, cracked, or frayed.
The fix is usually straightforward: replace the belt and confirm the idler pulley spins freely (because a failing idler can damage a brand-new belt).
After reassembly, that first quiet cycle feels like magiclike your laundry room suddenly got a noise-canceling upgrade.
Experience #4: “It squeaks, dries slower, and the laundry room feels warmer than usual.”
This scenario frequently involves airflow problems: lint buildup in the venting system, a partially crushed duct,
or lint accumulation inside the cabinet. While lint issues are often discussed as a safety and efficiency problem,
they can also contribute to odd noisesespecially if lint or debris interferes with moving parts or airflow components.
Homeowners are often surprised by how much lint exists outside the lint screen. Cleaning the vent line, vacuuming behind the dryer,
and carefully clearing lint inside accessible areas can reduce strain, shorten drying time, and sometimes quiet the machine.
If airflow improves but the squeak remains, that’s a strong sign you have a true wear-part issue (belt/pulley/rollers/glides).
Experience #5: “I fixed it… and then it made a different noise.”
This happens when one worn part masks another. After you replace the loudest squeaky component, you may suddenly notice a lower rumble,
a soft scrape, or a faint chirp. It doesn’t mean you did the repair wrongit often means you restored smooth movement in one area,
revealing a second aging part.
That’s why many people prefer doing a full inspection while the dryer is open: spin every roller, check the idler pulley,
evaluate the belt condition, and look at glides/seals. The goal is not to replace parts “just because,” but to avoid reopening
the cabinet repeatedly for predictable wear items.
Conclusion
A squeaky dryer is usually your machine’s way of asking for basic attention: stabilize it, clean it, andif neededreplace a few
hardworking parts that wear down over time. Start with the quick checks (leveling, clearing lint, running empty),
then move into targeted diagnosis (hand-spin test, pinpointing the sound location). Most squeaks boil down to the belt,
idler pulley, drum rollers, glides, bearings, or the blower areaand once you identify which one is complaining,
the fix becomes much less mysterious.